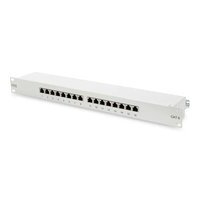
DN-91616S - Équipement électronique Digitus - Notice d'utilisation et mode d'emploi gratuit
Retrouvez gratuitement la notice de l'appareil DN-91616S Digitus au format PDF.


| Type de produit | Commutateur réseau (Switch) 16 ports Gigabit |
| Nombre de ports | 16 ports RJ-45 10/100/1000 Mbps |
| Dimensions (L x P x H) | 440 x 200 x 44 mm |
| Poids | 1,5 kg |
| Alimentation | Adaptateur secteur externe 12V DC, 2A |
| Consommation électrique | Max. 15 W |
| Technologie de commutation | Store-and-forward |
| Capacité de commutation | 32 Gbit/s |
| Support VLAN | Oui, jusqu'à 4094 VLAN |
| QoS | Priorisation par port et par TOS/DSCP |
| Normes réseau | IEEE 802.3, 802.3u, 802.3ab, 802.3x |
| Installation | Montable en rack 19 pouces, kit inclus |
| Ventilation | Ventilateur interne (refroidissement actif) |
| Température de fonctionnement | 0 °C à 40 °C |
| Entretien et nettoyage | Débrancher l'alimentation avant nettoyage ; utiliser un chiffon doux et sec. Ne pas utiliser de solvants. |
| Sécurité | Utiliser dans un endroit sec et bien ventilé. Ne pas obstruer les ouvertures d'aération. |
| Pièces détachées | Adaptateur secteur, câble d'alimentation, kit de montage, patins antidérapants |
| Réparabilité | Pas de pièces réparables par l'utilisateur. Contacter le SAV Digitus en cas de panne. |
| Accessoires inclus | Câble RJ45, guide d'installation rapide |
| Garantie | 2 ans (selon conditions Digitus) |
FOIRE AUX QUESTIONS - DN-91616S Digitus
Questions des utilisateurs sur DN-91616S Digitus
0 question sur cet appareil. Repondez a celles que vous connaissez ou posez la votre.
Poser une nouvelle question sur cet appareil
Téléchargez la notice de votre Équipement électronique au format PDF gratuitement ! Retrouvez votre notice DN-91616S - Digitus et reprennez votre appareil électronique en main. Sur cette page sont publiés tous les documents nécessaires à l'utilisation de votre appareil DN-91616S de la marque Digitus.
MODE D'EMPLOI DN-91616S Digitus
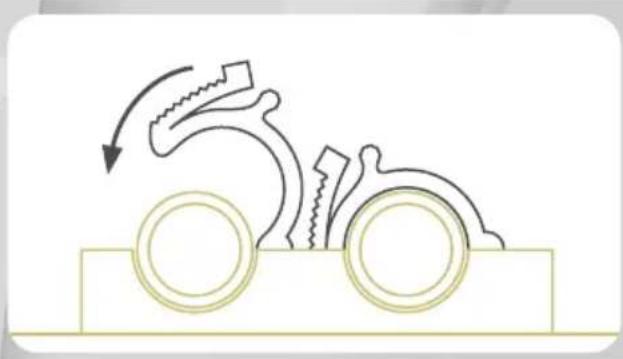
Schritt 5: ZUGENTLASTUNG
Rastschelle - Fixieren Sie das Datenkabel zur Zugentlastung mittels (hinterer) Rastschelle.
Kabelbinder - Fixieren Sie das Datenkabel mittels Kabelbinder.
![graph TD A["Step 1: Rectangle with internal components"] --> B["Step 2: Square component"] B --> C["Step 3: Horizontal bar with curved arrow indicating rotation or movement"]](/content/2026/07/1486482/images/f5698e849bf1199f6e9b47241a8a12c68760d125680b93a770be6a8d04217d1a.jpg)
Step 5: STRAIN RELIEF
Locking clamp - Fix the data cable to the strain relief by means of (rear) locking clamp.
Cable tie - Fix the data cable with a cable tie.

Schritt 6: ABDECKUNG INSTALLIEREN
Setzen Sie den Gehäusedeckel auf die Verteilertafel und drücken Sie ihn leicht an, um ihn zu verriegeln.
Step 6: INSTALL THE COVER
Place the housing cover on the distribution panel, and gently press to lock the panel cover.
INSTALLATIONSANLEITUNG
VERTEILERFELD (GESCHIRMT)
INSTALLATION GUIDE
PATCH PANEL (SHIELDED)
Type Category Item code
| High Density | CAT 6A | DN-91624S-SL-EA / DN-91624S-SL-EA-G |
| CAT 6 | DN-91624S-SL-SH / DN-91624S-SL-SH-G | |
| 19" | CAT 6A | DN-91624S-EA / DN-91624S-EA-B |
| CAT 6 | DN-91624S / DN-91624S-B / DN-91616S / DN-91616S-B | |
| CAT 5e | DN-91524S / DN-91516S | |
| 10" | CAT 6A | DN-91612S-EA / DN-91612S-EA-G |
| CAT 6 | DN-91612S / DN-91612S-G / DN-91608S / DN-91608S-G | |
| CAT 5e | DN-91512S / DN-91512S-G / DN-91508S / DN-91508S-G | |
| Desktop | CAT 6A | DN-91612SD-EA / DN-91612SD-EA-G |
| CAT 6 | DN-91608SD / DN-91608SD-G | |
| CAT 5e | DN-10001 |


Schritt 1: ABNEHMEN DER ABDECKUNG
Ziehen Sie die Abdeckung zurück oder drücken Sie die Abdeckung mit einem Werkzeug nach oben, um sie zu öffnen.
Step 1: REMOVE THE COVER
Pull back the shell or use a tool to push up the shell to open.

Schritt 2: KABELMANTEL ENTFERNEN
Schneiden und entfernen Sie mithilfe eines Kabelabmantlers ca. 6 cm des Kabelmantels.
S/FTP: Führen Sie den Geflechtschirm verdrillt entlang des Kabels nach hinten ab.
F/UTP: Wickeln Sie den Beidraht um dem Kabelmantel.
U/FTP: Wickeln Sie den Beidraht um dem Kabelmantel.
Step 2: REMOVE THE CABLE SHEATH
Cut and remove approx. 6 cm of the cable sheath using a cable stripper.
S/FTP: Route the braid shield twisted along the cable to the back.
F/UTP: Wrap the drain wire around the cable sheath.
U/FTP: Wrap the drain wire around the cable sheath.


Schritt 3 KABELFIXIERUNGEN
Rastschelle - Fixieren Sie das Datenkabel mittels Rastschelle. Zur Erdung muss der Geflechtschirm (S/FTP); Beidraht (F/UTP, U/FTP) mit der vorderen Rastschelle (metallisiert) kontaktieren.
Kabelschelle - Fixieren Sie das Datenkabel mittels Kabelschelle und ziehen Sie die Schraube an. Es werden gleichzeitig zwei Datenkabel fixiert. Zur Erdung muss der Geflechtschirm (S/FTP); Beidraht (F/UTP, U/FTP) mit der Kabelschelle kontaktieren.
Step 3: CABLE FIXINGS
Locking clamp - Fix the data cable with a locking clip. For grounding, the braid shield (S/FTP); drain wire (F/UTP, U/FTP) with the front locking clamp (metallized).
Cable clamp - Fix the data cable with a cable clamp and tighten the screw. Two data cables are fixed at the same time. For grounding, the braid shield (S/FTP); drain wire (F/UTP, U/FTP) with the cable clamp.
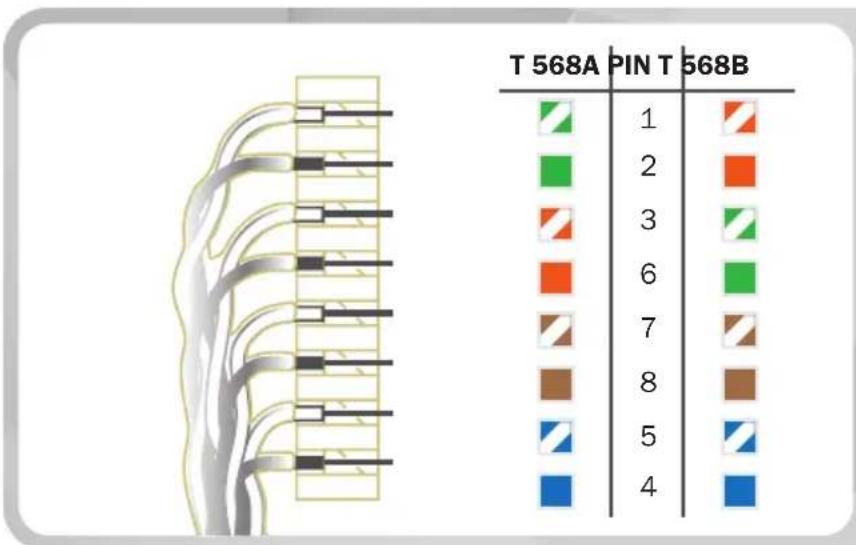

Schritt 4: ANSCHLUSS (T568A / T568B)
Legen Sie die Adern gemäß vorgegebener Kodierung in der Schneidklemme. Die Aderverdrillung und der Folienschirm (S/FTP, U/FTP) muss bis zur Schneidklemme aufrechterhalten bleiben!
Pressen Sie die Adern mithilfe eines Anlegewerkzeugs (DN-LSA-PT) in die Schneidklemme und schneiden Sie die überschüssigen Kabelenden ab.
Step 4: CONNECTION (T568A / T568B)
Lay the wires in the insulation displacement clamp according to the specified coding, the twisting and the foil shield (S/FTP, U/FTP) must be maintained up to the insulation displacement terminal!
Press the wires into the insulation displacement clamp with the help of a punch-down tool (DN-LSA-PT) and cut off the excess wire ends.

- SCHRITT 5: ZUGENTLASTUNG
- STEP 5: STRAIN RELIEF
- SCHRITT 6: ABDECKUNG INSTALLIEREN
- STEP 6: INSTALL THE COVER
- INSTALLATIONSANLEITUNG
- VERTEILERFELD (GESCHIRMT)
- INSTALLATION GUIDE
- PATCH PANEL (SHIELDED)
- SCHRITT 1: ABNEHMEN DER ABDECKUNG
- STEP 1: REMOVE THE COVER
- SCHRITT 2: KABELMANTEL ENTFERNEN
- STEP 2: REMOVE THE CABLE SHEATH
- SCHRITT 3 KABELFIXIERUNGEN
- STEP 3: CABLE FIXINGS
- SCHRITT 4: ANSCHLUSS (T568A / T568B)
- STEP 4: CONNECTION (T568A / T568B)
Marque : Digitus
Modèle : DN-91616S
Catégorie : Équipement électronique