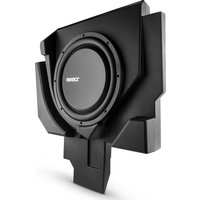
CA-X3BASS-P - Caisson de basse DS18 - Notice d'utilisation et mode d'emploi gratuit
Retrouvez gratuitement la notice de l'appareil CA-X3BASS-P DS18 au format PDF.


| Type de produit | Subwoofer |
| Marque | DS18 |
| Modèle | CA-X3BASS-P |
| Puissance RMS | 300 Watts |
| Puissance maximale | 600 Watts |
| Impédance | 2 Ohms |
| Sensibilité | 88 dB (1W/1m) |
| Réponse en fréquence | 30 Hz - 250 Hz |
| Diamètre | 30 cm (12 pouces) |
| Profondeur de montage | 15 cm |
| Bobine mobile | Double bobine 2+2 Ohms |
| Aimant | Ferrite |
| Poids | 6,5 kg |
| Matériau du cône | Polypropylène traité |
| Suspension | Caoutchouc |
| Grille de protection | Incluse |
| Alimentation recommandée | Amplificateur externe (non inclus) |
| Entretien et nettoyage | Nettoyer avec un chiffon doux et sec |
| Sécurité | Respecter les consignes de câblage et de puissance |
| Réparabilité | Pièces détachées disponibles via service après-vente |
FOIRE AUX QUESTIONS - CA-X3BASS-P DS18
Questions des utilisateurs sur CA-X3BASS-P DS18
0 question sur cet appareil. Repondez a celles que vous connaissez ou posez la votre.
Poser une nouvelle question sur cet appareil
Téléchargez la notice de votre Caisson de basse au format PDF gratuitement ! Retrouvez votre notice CA-X3BASS-P - DS18 et reprennez votre appareil électronique en main. Sur cette page sont publiés tous les documents nécessaires à l'utilisation de votre appareil CA-X3BASS-P de la marque DS18.
MODE D'EMPLOI CA-X3BASS-P DS18
DS18®
HYDRO
OWNER'S MANUAL
MANUAL DEL USUARIO
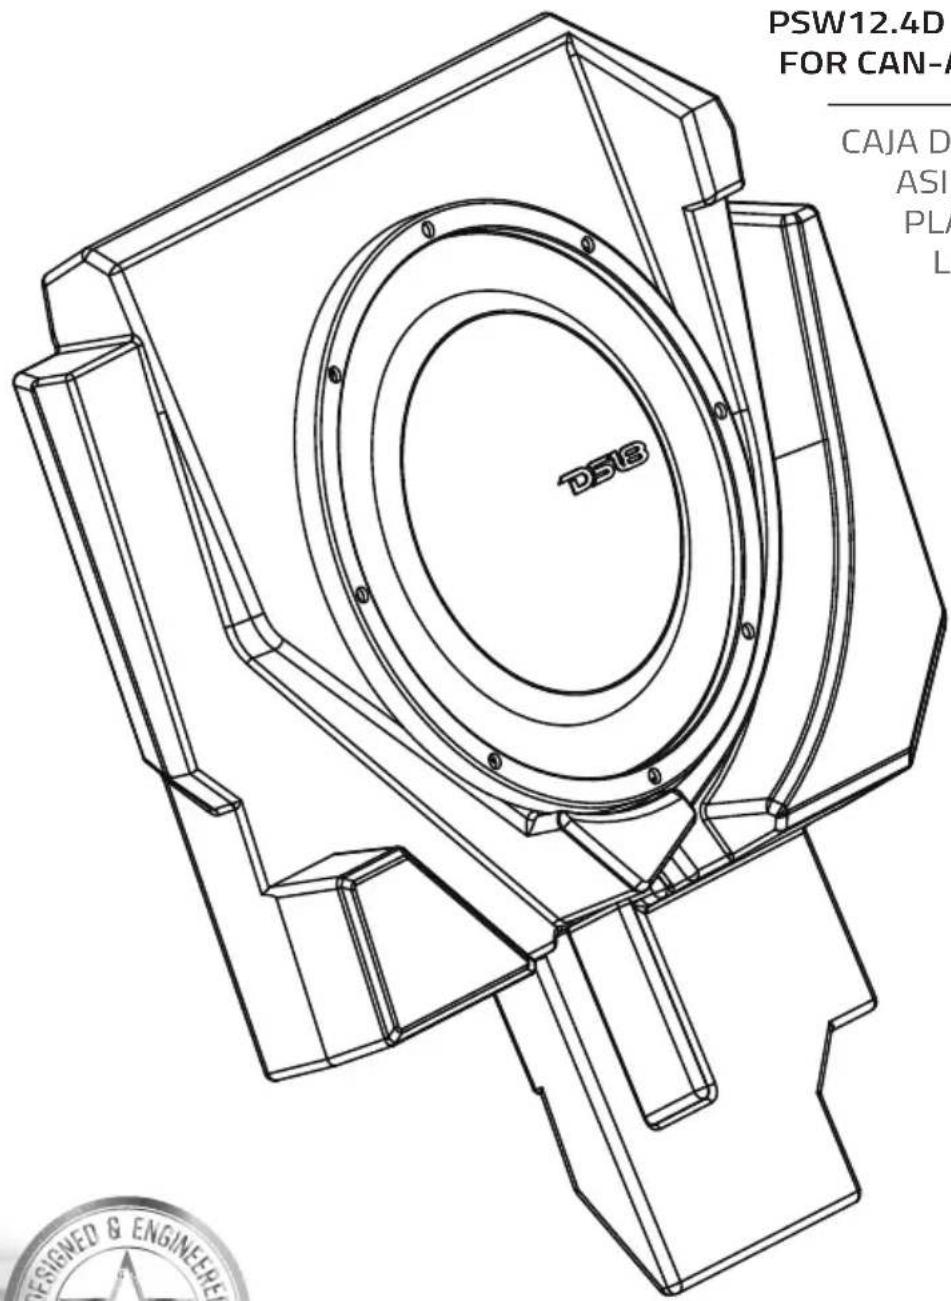
CA-X3BASS-P
12" UNDER SEAT ENCLOSURE WITH PSW12.4D SHALLOW SUBWOOFER FOR CAN-AM X3 PASSENGER SIDE
CAJA DE 12" PARA DEBAJO DEL
ASIENTO CON SUBWOOFER
PLANO PSW12.4D PARA EL
LADO DEL PASAJERO DEL
CAN-AM X3
2Ω

SPECIALLY
DESIGNED FOR
CAN-AM X3
12" UNDER SEAT ENCLOSURE WITH PSW12.4D SHALLOW SUBWOOFER FOR CAN-AM X3 PASSENGER SIDE
CAJA DE 12" PARA DEBAJO DEL ASIENTO CON SUBWOOFER PLANO PSW12.4D PARA EL LADO DEL PASAJERO DEL CAN-AM X3
FEATURES
■ Especially designed for the Passenger side under seat location
- High Output Down-firing 12" Shallow Subwoofer
- Sealed Waterproof under seat enclosure design
- Easy to install design using factory bolt locations
- Integrated Sound Damping to mitigate vibration and potential rattle
- Plug and play Wiring design for easier installation and maintenance
- Does not interfere with seat position or height
- Subwoofer DS18 PSW12.4D Included.
- Aftermarket Subwoofer amplifier required (NXL-X1000.1D Recommended) not included.
CARACTERÍSTICAS
- Especialmente diseñado para la ubicación debajo del asiento del lado del pasajero
- Subwoofer poco profundo de 12" de alto rendimiento y disparo hacia abajo
- Diseño de carcasa sellada a prueba de agua debajo del asiento
- Diseño fácil de instalar utilizando ubicaciones de pernos de fábrica
- Amortiguación de sonido integrada para mitigar la vibración y el posible traqueteo
- Diseño de cableado Plug and Play para facilitar la instalación y el mantenimiento.
- No interfiere con la posición o la altura del asiento.
■ Subwoofer DS18 PSW12.4D Incluido. - Requiere amplificador de subwoofer del mercado de accesorios (se recomienda NXL-X1000.1D) no incluido.
INSTALLATION / INSTALACIÓN:
Step 1: Release the lower seat belt strap from the harness by feeding it back through the tension assembly. This will allow you to feed the shoulder straps through the hole at the top of the seat.
Paso 1: Suelte la correa del cinturón de seguridad inferior del arnés pasándola hacia atrás a través del conjunto de tensión. Esto le permitirá pasar las correas de los hombros a través del orificio en la parte superior del asiento.
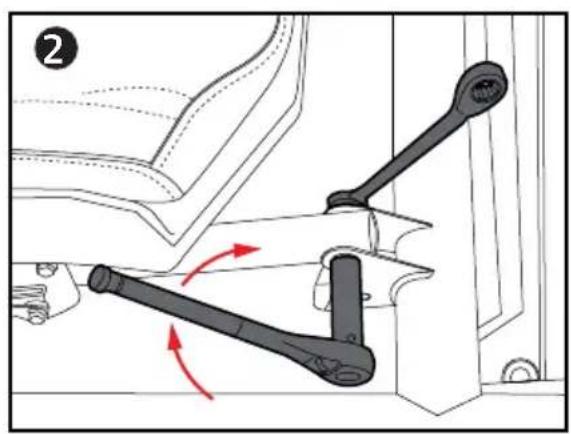
Step 2: Remove two (2) 13mm bolts and nuts at the front of the seat frame.
Paso 2: Retire dos (2) pernos y tuercas de 13 mm en la parte delantera del armazón del asiento.
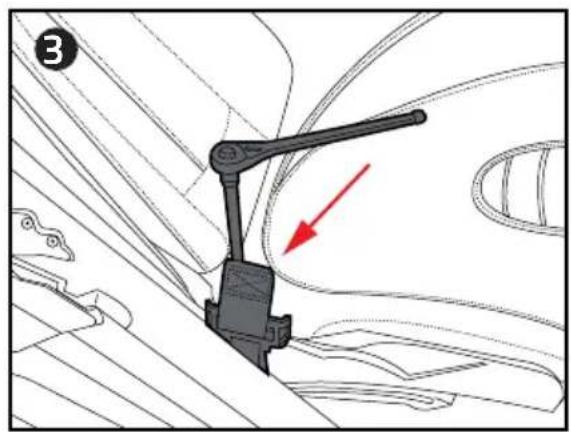
Step 3: Access the rear 18mm nuts using a socket with extension either by aligning the holes in the seat base over the nuts or by sliding the seat fully forward and reaching behind.
Paso 3: acceda a las tuercas traseras de 18 mm utilizando un casquillo con extensión, ya sea alineando los agujeros en la base del asiento sobre las tuercas o deslizando el asiento completamente hacia adelante y estirando la mano hacia atrás.
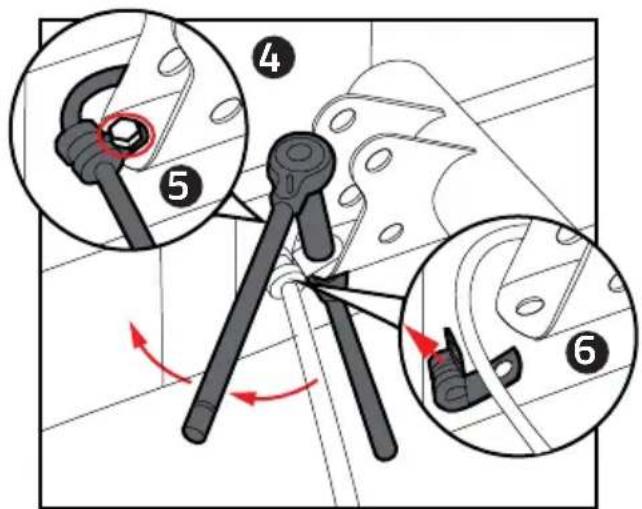
Step 4: With the seat free, disconnect the seat belt sensor and speed sensor cables from the seat assembly. Step 5: Once disconnected, lift the seat out of the vehicle and set aside. Remove the 10mm M6 bolt holding the brake line clamp in place on the seat frame. Step 6: Remove the cable clamp from the brake line.
Paso 4: Con el asiento libre, desconecte el sensor del cinturón de seguridad y los cables del sensor de velocidad del conjunto del asiento. Paso 5: Una vez desconectado, levante el asiento del vehículo y déjelo a un lado. Retire el perno M6 de 10 mm que sujeta la abrazadera de la línea de freno en su lugar en el marco del asiento. Paso 6: Retire la abrazadera del cable de la línea de freno.

INSTALLATION / INSTALACIÓN:
Step 7: Wrap the brake line with the strip of adhesive backed foam tape included in the box. Note: This step is to prevent the brake line from rattling against the enclosure under high bass output and any chaffing due to movement of the brake line while the vehicle is in motion.
Paso 7: envuelva la línea de freno con la tira de cinta de espuma con reverso adhesivo que se incluye en la caja. Nota: Este paso es para evitar que la línea de frenos golpee contra el gabinete bajo una salida de graves alta y cualquier rozamiento debido al movimiento de la línea de frenos mientras el vehículo está en movimiento.
Step 8: Tilt the front of the enclosure down and slide it under the forward crossbar as you set it in place onto the floor of the vehicle tucking the brake line into the pre-molded slot in the bottom of the enclosure.
Paso 8: Incline la parte delantera de la caja hacia abajo y deslícela debajo de la barra transversal delantera mientras la coloca en el piso del vehículo metiendo la línea de freno en la ranura premoldeada en la parte inferior de la caja.
Step 9: Taking the long bar bracket included, align the slotted holes with the threaded insets on the top rear of the enclosure. The two large holes at either end should slide over the threaded seat mounting posts. Loosely install three (3) T-40 Torx screws into the bracket.
Paso 9: tomando el soporte de barra larga incluido, alinee los orificios ranurados con las inserciones roscadas en la parte superior trasera del gabinete. Los dos orificios grandes en cada extremo deben deslizarse sobre los postes de montaje roscados del asiento. Instale sin apretar tres (3) tornillos Torx T-40 en el soporte.
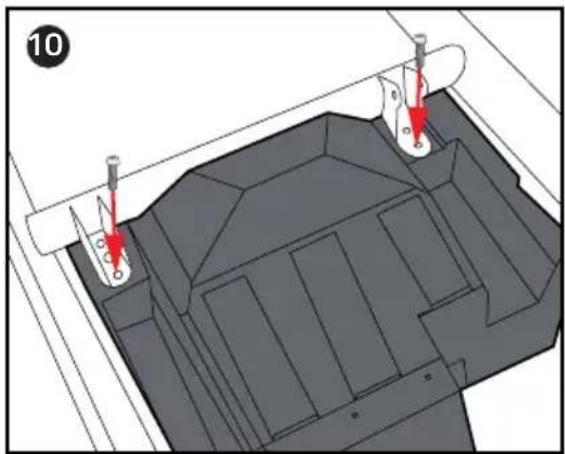
Step 10: Align the threaded inserts at the front corners of the enclosure with the holes in the bottom of the seat brackets and insert two (2). Once all fasteners are in place, tighten to secure the enclosure. T-40 Torx screws.
Paso 10: Alinee los insertos roscados en las esquinas delanteras del gabinete con los orificios en la parte inferior de los soportes del asiento e inserte dos (2). Una vez que todos los sujetadores estén en su lugar, apriete para asegurar el gabinete. Tornillos Torx T-40.


INSTALLATION / INSTALACIÓN:
Route the subwoofer cable to the desired connection point. Note: If installing as part of a kit, the subwoofer plug will connect to the main harness supplied. If not installing as part of a kit, the plug will need to be removed and additional speaker wire added. With your wire routed and system tested, reinstall the seat in the reverse order as removed. Note: In the event of floor pan rattle, included in the subwoofer kit are a self-tapping drill bit and bolts to allow you to bolt the floor pan directly to the frame of the vehicle.
Dirija el cable del subwoofer hasta el punto de conexión deseado. Nota: Si se instala como parte de un kit, el enchufe del subwoofer se conectará al arnés principal suministrado. Si no se instala como parte de un kit, será necesario quitar el enchufe y agregar un cable de altavoz adicional. Con el cableado enrutado y el sistema probado, vuelva a instalar el asiento en el orden inverso al que se quitó. Nota: En caso de que la bandeja del piso suene, en el juego de subwoofer se incluye una broca autorroscante y pernos que le permiten atornillar la bandeja del piso directamente al bastidor del vehículo.
SPECIFICATIONS / ESPECIFICACIONES:
Speaker Type / Size / Tipo de altavoz/Tamaño....12" / 304.8mm
Total Impedance / Impedancia Total 2 Ohm
Total RMS Power Handling / Manejo de potencia RMS total 600W
Total MAX Power Handling / Manejo total de potencia MAX 1200W
Sensitivity (1w/1m) / Sensibilidad (1w/1m) 88 dB
Frequency Response / Respuesta de Frecuencia 20Hz-600Hz
Recommended Lo Pass Crossover / Crossover de paso bajo recomendado....80Hz
SPEAKER SPECIFICATIONS / ESPECIFICACIONES DE LOS ALTAVOCES:
Voice Coil Diameter / Diámetro de la Bobina de Voz 3"/76.2mm
Voice Coil Former Material / Material Interior de Bobina Móvil ....Aluminum
Winding Material / Material de Bobinado....Cooper
Cone Material / Material del Cono......Water Resistant PPI / IBP resistente al agua
Surround Material / Material de la Suspension...... Rubber / Caucho
Basket Material / Material de la Canasta....Steel / Acero
Magnet Material / Material del Imán....Ferrite / Ferrito
Magnet Weight / Tamaño del imán....68 Oz
BOX SPECIFICATIONS / ESPECIFICACIONES DE LA CAJA:
Box Type / Tipo de caja......Sealed / Sellado
Box Material / Material de la caja....Polyethylene (PE) / Polietileno (PE)
Finish Material / Material de acabado....Black / Negro


WARRANTY
Please visit our website DS18.com for more information on our warranty policy.
We reserve the right to change products and specifications at any time without notice.
Images may or may not included optional equipment.

WARNING:
Cancer and Reproductive Harm.
www.P65Warning.ca.gov
GARANTÍA
Visita nuestra página web DS18.com para obtener más información sobre nuestra garantía.
Nos reservamos el derecho de cambiar productos y especificaciones en cualquier momento sin previo aviso. Las imágenes pueden incluir o no equipo opcional.

ADVERTENCIA:
Cáncer y Daño Reproductivo.
www.P65Warning.ca.gov

FOR MORE INFORMATION
PLEASE VISIT
DS18.COM
WELIKEITLOUD
Instagram f YouTube Twitter in
- DS18®
- OWNER'S MANUAL
- CA-X3BASS-P
- 12" UNDER SEAT ENCLOSURE WITH PSW12.4D SHALLOW SUBWOOFER FOR CAN-AM X3 PASSENGER SIDE
- FEATURES
- CARACTERÍSTICAS
- INSTALLATION / INSTALACIÓN
- SPECIFICATIONS / ESPECIFICACIONES
- SPEAKER SPECIFICATIONS / ESPECIFICACIONES DE LOS ALTAVOCES
- BOX SPECIFICATIONS / ESPECIFICACIONES DE LA CAJA
- WARRANTY
- WARNING
- GARANTÍA
- ADVERTENCIA
- FOR MORE INFORMATION
- PLEASE VISIT
- DS18.COM
- WELIKEITLOUD
Marque : DS18
Modèle : CA-X3BASS-P
Catégorie : Caisson de basse