VT-TFLBTH - Caméra de surveillance Vitek - Notice d'utilisation et mode d'emploi gratuit
Retrouvez gratuitement la notice de l'appareil VT-TFLBTH Vitek au format PDF.


| Marque | Vitek |
| Modèle | VT-TFLBTH |
| Type de produit | Appareil électronique |
| Dimensions (L x l x H) | 100 x 60 x 25 mm |
| Poids | 120 g |
| Alimentation | Pile bouton CR2032 (incluse) |
| Autonomie | Environ 100 heures |
| Connectivité | Bluetooth 5.0 |
| Portée Bluetooth | Jusqu'à 10 mètres |
| Fonctions principales | Transmission audio sans fil, compatibilité avec smartphones et tablettes |
| Matériau | Plastique ABS |
| Couleur | Noir |
| Température de fonctionnement | 0 °C à 40 °C |
| Entretien et nettoyage | Essuyer avec un chiffon doux légèrement humide. Ne pas utiliser de produits abrasifs. |
| Sécurité | Tenir hors de portée des enfants. Ne pas exposer à l'humidité ou à la chaleur excessive. |
| Pièces détachées et réparabilité | Pile remplaçable. Contactez le service après-vente Vitek pour toute réparation. |
| Informations générales | Chargeur non fourni. Fonctionne avec une pile CR2032. |
FOIRE AUX QUESTIONS - VT-TFLBTH Vitek
Questions des utilisateurs sur VT-TFLBTH Vitek
0 question sur cet appareil. Repondez a celles que vous connaissez ou posez la votre.
Poser une nouvelle question sur cet appareil
Téléchargez la notice de votre Caméra de surveillance au format PDF gratuitement ! Retrouvez votre notice VT-TFLBTH - Vitek et reprennez votre appareil électronique en main. Sur cette page sont publiés tous les documents nécessaires à l'utilisation de votre appareil VT-TFLBTH de la marque Vitek.
MODE D'EMPLOI VT-TFLBTH Vitek
Included Flat / Wall Bracket Weight: 6.61lbs (105.83oz.) / 3kg


1) Place drill template onto wall, then drill holes accordingly.
2) Install gang box on the wall, use two screws to secure the bracket to the gang box, then use four screws to finish securing bracket to the wall.
3) Route and connect cables, then install cable cover.
4) Hang device on bracket hook, then tighten screws to secure.
VT-TDBTH - Optional Desktop Bracket
Gross Weight: 1.10lbs (17.64oz.) / .5kg // Net Weight: .88lbs (14.11oz.) / .4kg


28492 Constellation Road Valencia, CA 91355
VT-TDBTH - Optional Desktop Bracket - Continued

- After connecting all cables, attach the panel onto the bracket with 4 screws.

- Loosen the screw as indicated above to adjust the angle of the bracket.

- Put the bracket onto the desktop or attach the bracket onto the desktop with screws.
VT-TPBTH - Optional Post / Pole Mount for Use with Turnstiles
Gross Weight: 1.28lbs (20.46oz.) /.58kg //
Net Weight: 1.15lbs (18.34oz.) / .52kg

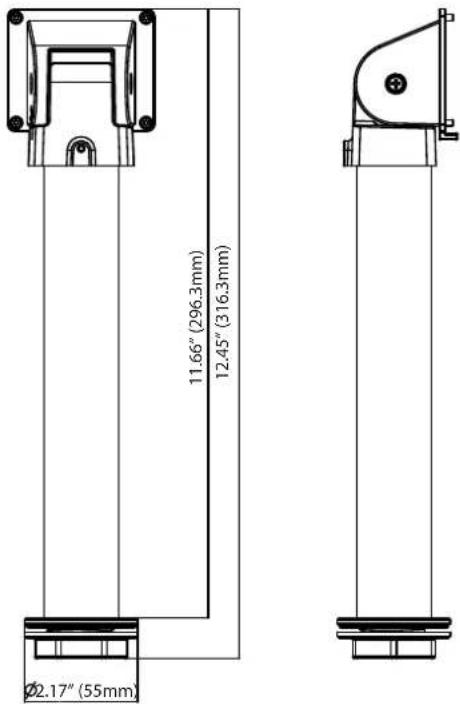
Post / Pole Mounting Instructions
![graph TD A["Cut the installation surface according to the drill template."] --> B["1.32"<br>Ø33.5"] B --> C["2. Install the pole and then tighten the nut."] C --> D["3. Route the cables."] D --> E["4. Tighten the screw with L-shaped screwdriver."] E --> F["5. Connect the cables."] F --> G["6. R…](/content/2026/07/1473432/images/abee73201d6004af291c75b46ee1aba65aa426e3c5059a5c75f9c89514f7533e.jpg)
Height Requirement

- The recommended installation height (H) is from 51.18" to 57.09" which can cover human height of 4'7" 6'2" in the detection area. It can be adjusted according to the actual scene.
- The ideal temperature measuring distance ranges from 0.3m to 0.4m.
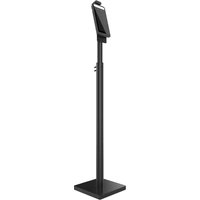
VT-TFLBTH - Optional Stand-on-Ground Mount
Gross Weight: 10.36lbs (165.79oz.) / 4.7kg // Net Weight: 10.14lbs (162.26oz.) / 4.6kg

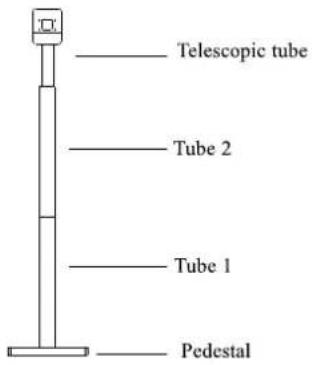
- Put the flange into the hole of the pedestal.

- Use the tool to attach the flange and Tube 1 (You can also directly install Tube 2 if you don't want to install Tube 1)

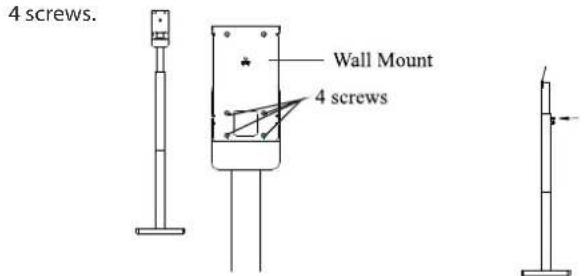
- Adjust the height of the bracket, then tighten the screws.

Marque : Vitek
Modèle : VT-TFLBTH
Catégorie : Caméra de surveillance