110UXNQTUK - Téléviseur HISENSE - Notice d'utilisation et mode d'emploi gratuit
Retrouvez gratuitement la notice de l'appareil 110UXNQTUK HISENSE au format PDF.


| Type de produit | Téléviseur |
| Marque | Hisense |
| Modèle | 110UXNQTUK |
| Taille de l'écran | 110 pouces (diagonale) |
| Résolution | 4K Ultra HD (3840 x 2160) |
| Technologie d'affichage | ULED (ou QLED) avec rétroéclairage LED |
| Système d'exploitation | Vidaa (Smart TV) |
| Connectivité | 4 ports HDMI, 2 ports USB, Ethernet, Wi-Fi, Bluetooth |
| Audio | 2 x 10 W haut-parleurs stéréo |
| Alimentation | 100-240 V ~ 50/60 Hz |
| Consommation énergétique | Environ 200 W (veille <0.5 W) |
| Poids | Environ 35 kg (sans support) |
| Dimensions (sans support) | 2840 x 1630 x 85 mm (L x H x P) |
| Fonctions principales | Smart TV, HDR10+, Dolby Vision, compatibilité HDMI 2.1, télécommande vocale |
| Entretien et nettoyage | Nettoyer l'écran avec un chiffon doux et sec ; éviter les produits abrasifs |
| Sécurité | Arrêt automatique en cas de surchauffe ; fixation murale recommandée |
| Pièces détachées et réparabilité | Disponibles via service client Hisense ; indice de réparabilité 8/10 |
| Garantie | 2 ans (selon législation en vigueur) |
| Accessoires fournis | Télécommande, piles, câble d'alimentation, support mural (optionnel) |
| Classe énergétique | A+ (selon norme UE) |
FOIRE AUX QUESTIONS - 110UXNQTUK HISENSE
Note : Consultez la notice pour les spécifications exactes VESA.
Questions des utilisateurs sur 110UXNQTUK HISENSE
0 question sur cet appareil. Repondez a celles que vous connaissez ou posez la votre.
Poser une nouvelle question sur cet appareil
Téléchargez la notice de votre Téléviseur au format PDF gratuitement ! Retrouvez votre notice 110UXNQTUK - HISENSE et reprennez votre appareil électronique en main. Sur cette page sont publiés tous les documents nécessaires à l'utilisation de votre appareil 110UXNQTUK de la marque HISENSE.
MODE D'EMPLOI 110UXNQTUK HISENSE
USER MANUAL
Read the manual carefully and ensure you have fully understood its contents before operating this device for the first time.


Apparatus with CLASS I construction shall be connected to a MAINS socket outlet with a protective earthing connection.
Figures and illustrations in this manual are provided for reference only and may differ from actual product appearance.
Parts of the software function changes with the system upgrade.
Find what you want
This TV is equipped with a user manual and embedded E-Manual (Settings > Support > E-Manual).
| E-Manual support functions | ||
| [yk6w] | Search | Find the help you are looking for. |
| [K5cc] | Try Now | Go directly to the function page and try it. |
| [w264] | QR Code | Scan to open the E-Manual on your mobile device. |
Contents
Installation .... 1
TV Front and Rear....5
Connection 6
Remote Control 8
Specifications 12
Other Information....13
Accessories List
The following accessories are included with TV:
User Manual × 1
Remote Control × 1
Power Cord × 1
Base Stand × 2
Screw × 4 (85")
Screw × 6 (110")
AAA Battery × 2 (For Solar Powered Remote, the battery is built in)
Warranty Card × 1
NOTE
- The accessories may be different from the list above due to different models, countries / regions. Please refer to the actual accessory bag.
Important Notice
Paragraphs beginning with the symbol conditions for the following settings.

indicate important instructions, tips or (No text)

For your own safety and the optimal performance of your TV, ensure to read the safety instructions before performing any installation.
Compatibility with 3rd party products, software and services are not guaranteed. We cannot be held liable for any damage or loss suffered whilst operating, using or connecting to incompatible devices or apps.
The recording and playback of content on this or any other device may require permission from the owner of the copyright or other such rights in that content. It is your responsibility to ensure that your use of this or any other device complies with applicable copyright legislation in your country. Please refer to that legislation for more information on the relevant laws and regulations involved or contact the owner of the rights of the content you wish to record or playback.
Read these instructions
Follow all instructions
Heed all warnings
Keep these instructions
All rights reserved.

Hereby, Hisense Visual Technology Co., Ltd. declares that the radio equipment type is in compliance with Directive 2014/53/EU and Radio Equipment Regulations 2017 of UK. Please enter the model name at the following internet address to read the full text of the declaration of conformity: https://global.hisense.com/support/certificate-download/.
Please refer to the rating label for TV model name and find Bluetooth remote control model name on the remote control or inside the remote control cover.
Safety Instructions
To ensure safe and correct use of this product, always comply with the following precautions to avoid dangerous situations and damage to your unit:

CAUTION
RISK OF ELECTRIC SHOCK DO NOT OPEN

CAUTION: TO REDUCE THE RISK OF ELECTRIC SHOCK, DO NOT REMOVE COVER (OR BACK). NO USER-SERVICEABLE PARTS INSIDE. REFER SERVICING TO QUALIFIED SERVICE PERSONNEL.

The lightning flash with arrowhead symbol, within an equilateral triangle is intended to alert the user to the presence of uninsulated dangerous voltage within the product's enclosure that may be of sufficient magnitude to constitute a risk of electric shock.

The exclamation point within an equilateral triangle is intended to alert the user to the presence of important operating and maintenance (servicing) instructions in the literature accompanying the appliance.

AC voltage: This symbol indicates that the rated voltage marked with the symbol is AC voltage.

Class I product: This symbol indicates that it requires a safety connection of protective earthing (ground).
The intended use and ambient conditions for this TV
This TV is intended for the rendering of video and audio signals, on a table-top or wall-mounted, in a home or office environment. It must not be used in rooms with a high level of humidity or dust concentration. The warranty is only valid if used as intended by the manufacturer.
WARNING
High humidity and dust concentration may lead to current leaks in the device. To reduce the risk of fire or electrical shock:
- Do not expose this unit to rain, moisture, dripping or splashing water, and do not place objects filled with liquids, such as vases, cups, etc. on or over the unit.
- Do not touch the TV with wet hands.
- Do not expose to direct air-conditioning and keep candles or other naked flames away from the TV at all times.
If the TV is moved from a cold environment to a hot environment, leave it switched off for at least an hour to avoid condensation. If used outside, make sure it is protected from moisture.
If you notice anything unusual, immediately remove the power plug.
In case of fire, use preferably a CO2 gas or powder fire extinguisher. If such extinguishers are not accessible, try to isolate the electrical supply before using a water fire extinguisher.
WARNING
Stability Hazard
A television set may fall, causing serious personal injury or death. Many injuries, particularly to children, can be avoided by taking simple precautions such as:
- ALWAYS use cabinets or stands or mounting methods recommended by the manufacturer of the television set.
- ALWAYS use furniture that can safely support the television set.
- ALWAYS ensure the television set is not overhanging the edge of the supporting furniture.
- ALWAYS educate children about the dangers of climbing on furniture to reach the television set or its controls.
- ALWAYS route cords and cables connected to your television so they cannot be tripped over, pulled or grabbed.
- NEVER place a television set in an unstable location.
- NEVER place the television set on tall furniture (for example, cupboards or bookcases) without anchoring both the furniture and television set to a suitable support.
- NEVER place the television set on cloth or other materials that may be located between the television set and supporting furniture.
- NEVER place items that might tempt children to climb, such as toys and remote controls, on the top of the television or furniture on which the television is placed.
If your existing television set is being retained and relocated, the same considerations as above should be applied.
■ Moving/Transportation
Before moving this TV, disconnect all cables and move in the vertical position only. Grasp the device on the upper and lower edges of the frame.
- Do not press or put stress on the front panel of the TV. It may take two or more people to carry larger TVs.
If you have to briefly lay down the TV, place the unit with its entire front surface lying flat on soft material.
The LED screen is made of glass and can break if is not handled properly. Always wear rubber gloves to carry the unit. If the LED screen is damaged, liquid crystal might leak out. In case of skin contact, immediately rinse thoroughly with water.
■ Power Supply
Incorrect voltages can damage the TV. Only connect this unit to a power supply with the correct voltage and frequency noted on the type plate, using the supplied power cable.
The power plug must be easily accessible so that the device can be disconnected at all time. The unit is live, even if in standby mode, as long as the unit is connected to a power outlet.
It is recommended that this unit is placed on a dedicated circuit.
- Do not overload the power outlets by connect too many appliances to the same outlet. Overloaded wall outlets, extension cords, etc. are dangerous and can result in electric shock and fire.
After power off, don't turn it on again in 5 seconds. Frequent switching power supply in a short period of time can cause abnormal TV.
■ Power plug and power cable
- Do not touch the power plug with wet hands.
- Do not place heavy objects on the power cable. Route the cable so that it is not kinked or laid over sharp edges, walked on or exposed to chemicals. A power cable with damaged insulation can cause electric shock and fire.
- Pull the power plug, NOT on the cable
when disconnecting. The cable can become damaged and cause a short circuit if pulled on.
- Do not place the power cable near a high temperature object.
- Do not move the TV with the power cable plugged into a socket.
- Do not use a damaged or loose power cable, or a damaged socket outlet.
- Do not use any power cords other than the one supplied with this unit.
- MAIN plug on the power cord is used as the disconnect device, the disconnect device and socket-outlet shall be easily accessible.
■ Set-up
Check that the location is suitable to bear the load of the TV. Place on a level, sturdy and horizontal base. Ensure that the unit does not hang over the edge of the base when placed in or on furniture. If placed on a cart, use caution when moving to avoid the unit from tipping over.
- Place the unit in a normal upright horizontal position. It must never be operated vertically, lying flat or hanging overhead from the ceiling.
- Place the unit where it is not exposed to direct sunlight or other sources of heat.
When mounting the TV on a wall, follow the instructions supplied with the wall-mount, make sure not to install the TV by hanging the power and signal cables on the back of the TV.
■ Air ventilation and high temperatures
Install your TV only where there is proper ventilation, and ensure that there is at least 10 cm free space on the sides and 20 cm above the unit for air circulation. Excessive heat and obstruction of ventilation could lead to fire or early failure of some electric components.
- Do not block any ventilation openings with newspapers, tablecloths, curtains, etc.
- Do not dry clothing etc. on top of the unit.
- Take care not to touch the ventilation openings since they may become hot.
- Do not insert foreign objects into the TV through the vents.

■ The Stand
- Do not use any stand other than the one supplied with this unit.
- Do not modify or use the stand if it becomes warped of physically damaged.
- During setup, make sure that all the screws are securely tightened.
- Ensure that the TV does not suffer any impact during the attachment of the stand.
- Ensure that children do not climb onto the stand.
- Attach or remove the stand with at least two people.
Prevent small items from getting into the interior of the device through the ventilation slots. Such objects may cause short circuits, which may cause fire.
If something should get inside the unit, immediately unplug the power plug of the device and contact service support.
■ The LED screen
Despite thorough care when manufacturing this display, it cannot be 100% guaranteed that no sub-pixel defects will occur due to technical reasons. These cannot be considered as a device defect in terms of the guarantee. They will not affect the performance and reliability of the TV.
To prevent "image burn", avoid displaying still images for long periods of time, there is a possibility that a copy of the image may remain. If the aspect ratio is set to 4:3 for a long period of time, image burn may occur on the black areas. Image burn is not covered by the warranty.
- Do not apply strong force or impact on the display panel.
Avoid touching the LED screen or touching it for long periods of time. Doing so may produce some temporary distortion effects on the screen.
■ Radio waves
- Do not use the TV in any medical institutions or locations with medical equipment. Radio waves may interfere with medical equipment and cause malfunction.
- Do not use the TV near any automatic control equipment such as automatic doors or fire alarms. Radio waves may interfere with automatic control equipment and cause malfunction.
If you have a cardiac pacemaker, keep a distance of at least 22 cm from the TV. Radio waves may interfere with the operation of a pacemaker.
■ Built-in wireless LAN
- Do not connect to wireless networks that you do not have the usage rights for. Data transmitted and received over radio waves may be intercepted and monitored.
The built-in wireless LAN uses 2.4 GHz, 5 GHz and 6 GHz frequency band. To avoid malfunctions or slow response caused by radio wave interference, keep the TV away from devices such as other wireless LAN devices, microwaves, mobile phones, and other devices that use 2.4 GHz, 5 GHz and 6 GHz signal.
■ Warning about off-gassing
New furniture, carpet, paint, building materials and electronics can release chemicals into the air through evaporation. After you set your TV up and turn it on for the first time, you may notice a slight smell within a couple of hours. This is because some components of TV are heating up for the first time. The materials that we use fully meet the environmental requirements and
regulations. Your TV is working just fine and the fumes from the off-gassing will diminish eventually.
■ Supervision
- Do not let children play unsupervised close to the TV. It could tip over, be pushed off or pulled down from the stand surface and injure someone.
- Do not allow a switched-on TV to run unattended.
Volume
Loud music and noises can lead to irreversible damage to your ears. Avoid extreme volume, especially over long periods and when using headphones.
If you hear a drumming noise in your ears, turn down the volume or temporarily stop using headphones.
■ Thunder Storms
Pull out the power plug and all connected antenna cables from the TV during a thunderstorm. Overvoltage caused by lightning strikes can damage the TV via the antenna system, as well as the wall socket.
■ Long periods of absence
As long as the power plug is connected to a live socket outlet, the TV will consume power even in standby mode. The power plug and all connected antenna cables should be disconnected out during long periods of absence.
■ Cleaning and care
CAUTION:
Unplug the power cord prior to cleaning the TV.
Clean the TV, the screen, and the remote control with a soft, moist, clean and colour-natural cloth only. Do not use any chemicals.
- Do not subject the surfaces to insect repellent, solvent, thinner or other volatile substances. This may degrade the surface quality.
- Do not spray water or other liquids directly on the TV. Liquid inside the TV
could lead to product failure.
- The surface of the display panel is treated and may be easily damaged. Take care not to scratch it with fingernails or other hard objects.
- Also wipe the power plug with a dry cloth at regular intervals.
■ Service/Repair
Never remove the cover/back of the TV; there are no user serviceable parts inside. Refer all service to qualified service personnel.
Packaging
Keep the anti-moisture materials and plastic bags out of reach of children.
Plastic bags can cause suffocation and the anti-moisture material is harmful if swallowed. If swallowed by mistake, force the patient to vomit and visit the nearest hospital.
■ Modification
Do not attempt to modify this product in any way. Unauthorised modification could void the warranty of this unit, cause electric shock and fires.
■ Remote Control battery
For replaceable battery:
- Incorrect installation may cause battery leakage, corrosion and explosion.
- Replace only with the same or equivalent type.
- Do not mix old and new batteries.
- Do not mix different battery types.
- Do not use rechargeable batteries.
- Do not burn or break up batteries.
- Be sure to dispose of batteries correctly.
- Do not expose batteries to excessive heat such as sunshine, fire or the like.
For built-in battery:
- Do not disassemble the product or attempt to remove the battery by yourself.
- Do not dispose it into fire.
- Do not crush or puncture the battery.
- Prevent it from falling down.
-
Use the correct charging device.
-
Be sure to dispose of battery correctly.
- Do not expose battery to excessive heat such as sunshine, fire or the like.
■ Outdoor Antenna Grounding
If an outdoor antenna used, be sure the antenna system is protected against voltage surges and built-up static charges.
■ Disposal
Refer to the recycling section of this manual.

CAUTION
- Be sure to disconnect the AC power cord before installing a stand or wall mount brackets.
- The display on your TV is fragile. Make sure the TV screen is not scratched or damaged by hard objects or from pressure.
- After the installation is completed, make sure the TV is steady on a table or firmly attached to a wall mount, before removing all protective film, if any.

Installing the stand
Follow the illustrations and textual instructions below to complete the installation steps:
85"
- Take out stands, screws and upper cushions. Place upper cushions on the ground and the distance between the two cushions should be 750-850 mm.
- Two people stand on each side of the TV. Hold the side of the TV with one hand and hold it under with another hand. Lift and move the TV vertically to the left and right upper cushions. Do not pinch the screen when hold the TV.
- One person holds the TV from the front side, the other person attaches the TV base stands to the slots on TV back cover. Use the screws provided to secure each base stand tightly.
Note:
- Make sure there is one person holds the TV during the whole installation process.
- If your table is long enough to place the TV on top of, then insert the stands into the screw holes 'A' that are shown in the illustration. If your table is NOT long enough, then insert the stands into the screw holes 'B' that are shown in the illustration. Note that these two installation methods types cannot be mixed.


110"

CAUTION
-
Four or more people are needed to lift and move the TV. The weight of TV with base stands is 239.2 lbs (108.5 kg). The furniture where the TV is placed should be tough enough to support. Make sure that the width of the furniture is above 19.2 inches (487 mm).
• One person holds the TV to prevent it from tipping during the whole installation process. -
One person holds the side of the TV, and others remove the side cushions. Do not pinch the screen while holding the TV.

Side Cushions
- Remove the Base Covers from the grooves. The places where the Base Covers located are used for fixing the base stands.
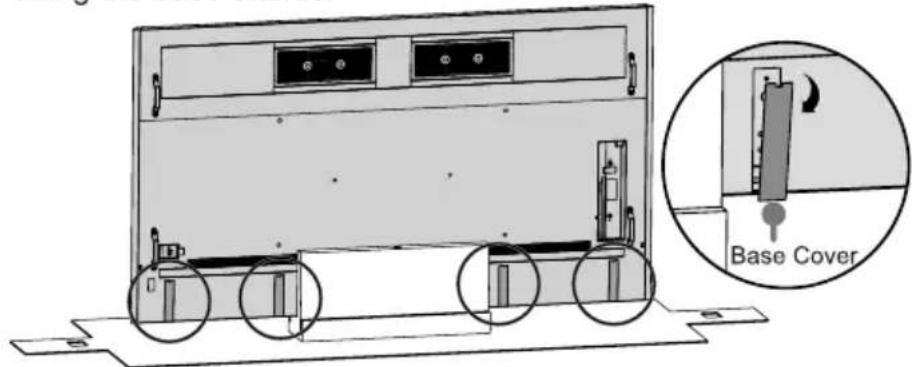
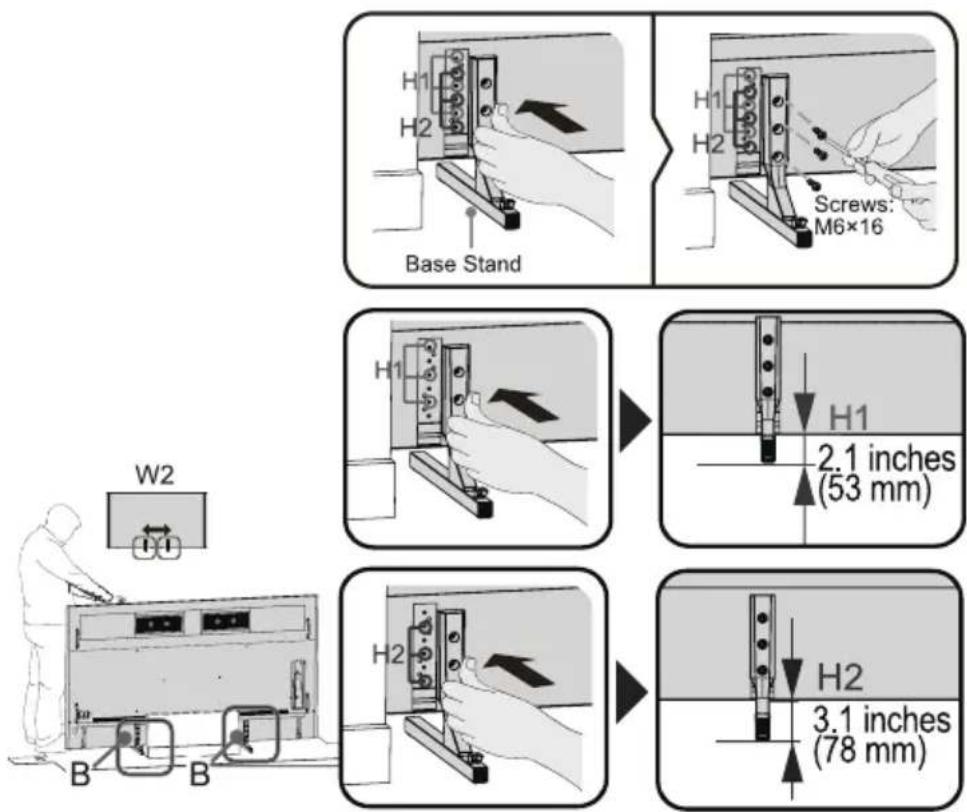
- Attach the TV base stands to the slots where the Base Covers are removed. Use the screws provided to secure each base stand tightly. There are two options for the base mounting height. If you want the TV to be higher, select H2. If you want the TV to be lower, select H1.
Note: If your table is long enough to place the TV, then insert the base stands into the screw holes 'A' that are shown in the illustration. If your table is NOT long enough, then insert the base stands into the screw holes 'B' that are shown in the illustration. Note that these two installation types cannot be mixed.

Installing the wall mount bracket
Before mounting the TV, remove the TV stand if you have already attached it, and make sure the wall mount bracket supports the weight of your TV.

CAUTION
- When mounting the TV on a wall, follow instructions provided with the wall mount bracket. If it is not correctly mounted, the TV may fall and cause property damage or personal injury.
- Four or more people are needed to lift and move the TV. The weight of 110" TV without base stands is 224.9 lbs (102.0 kg), make sure the wall and the wall mount bracket are tough enough before hanging the TV. (only for 110")
- Place spacers between the TV and bracket.
• Standard dimensions are shown below.
| Wall mount hole pattern (mm) | 600 × 400 (85")1100 × 600 (110") |
| Wall mount screw size | M8 |
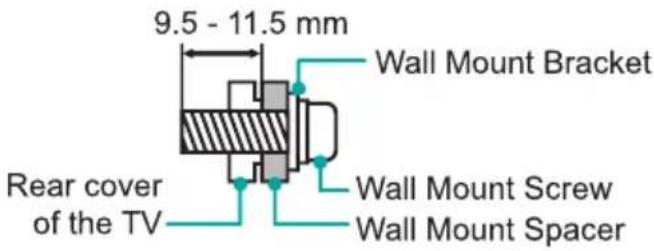
• We do not recommend hanging the TV on a slanted wall, and when wall mounting make sure your television remains parallel to the wall and does not lean forward.

NOTE
• The diameter and length of the screws differ depending on the wall mount bracket model.
- Wall mount bracket is optional. Your TV may not have wall mount bracket. Please refer to the actual accessories.

| Item | Description |
| Power indicator | The light is white in standby mode. |
| Power button(Standby/Source) | Press the button to turn the TV on. Press it again to bring up the control menu and move the focus between different inputs. Long press the button to make a selection. |
| Built-in micro-phone control button | Switch the built-in microphone control button to on to use the built-in microphone.After the Alexa or VIDAA Voice setup has been completed and Hands-Free mode is turned on, you can use Hands-Free Wake-up, just say "Alexa" or "Hey VIDAA" to call up the voice assistant. |
NOTE
- ANT2 Jack supports power supply for satellite antenna (13/18V, 0.5A max.)
- Check the jacks for position and type before making any connections. Loose connections can result in image or colour problems. Make sure that all connections are tight and secure.
Not all A/V devices have the ability to connect to a TV, please refer to the user's manual of your A/V device for compatibility and connections procedure. - Before connecting external equipment, remove the mains plug from the wall socket. Otherwise, it may cause electric shock.
- Powering on the TV requires several seconds to load programmes. Do not rapidly turn the TV off as it may cause the TV work abnormally.
• The Picture is Only for Reference. - Before using Hands-Free Wake-up, connect your TV to the network. The Hands-Free Wake-up and some of its features are available on limited country/region/language.
Terminals
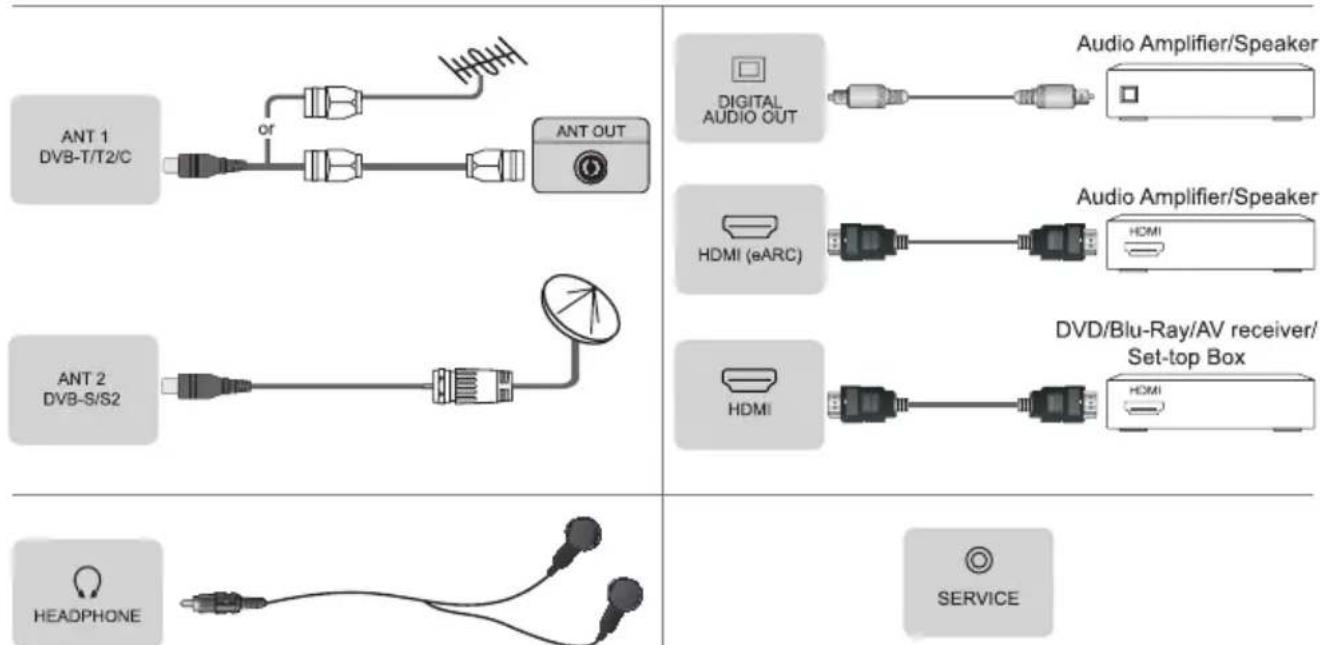
NOTE
- Excessive sound pressure from earphones and headphones can cause hearing loss.
NOTE
- Service jack is not available for you to connect an external device. It can only be used by our factory for testing purposes.
![graph TD A["AV IN"] --> B["Red(R)"] A --> C["White(L)"] A --> D["Yellow(Video)"] B --> E["VCR/DVD Player/Recorder/Set-top box/Satellite Receiver/Video Camera"] C --> E D --> E style A fill:#f9f,stroke:#333 style E fill:#ccf,stroke:#333](/content/2026/07/1464505/images/6a0171ca3eca5534a07fce4eda3f0d1b90d85cba40e6d2eda462a0c9f7a2a95c.jpg)
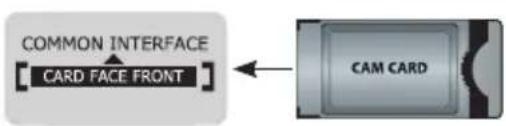
NOTE
- Do not repeatedly insert or remove the Common Access Module as this may damage the interface and cause a malfunction.
- You must obtain a Cl+ module and card from the service provider of the channels you want to watch.
- CI+ is not supported in some countries and regions.

NOTE
- Exceeding a total current consumption may result in damage. The USB 1.1 and USB 2.0 devices maximum current consumption are 500mA . The USB 3.0 device maximum current consumption is 1A (only for some models).
- For individual non-standard high-capacity mobile hard disk, if its impulse current is greater than or equal 1A, it may cause TV-rebooting or self-locking. So the TV does not support it.
▶ LAN (Wired setup)
Connect your TV to your network by connecting the LAN port on the back of your TV to an external modem or router using a LAN (Ethernet/Cat 5) cable. See the illustration below.
It is recommended to use a modem or router that supports Dynamic Host Configuration Protocol (DHCP). Modems and routers that support DHCP automatically provide the IP address, subnet mask, gateway, and DNS, so you don't have to enter them manually. Most home networks already have DHCP.
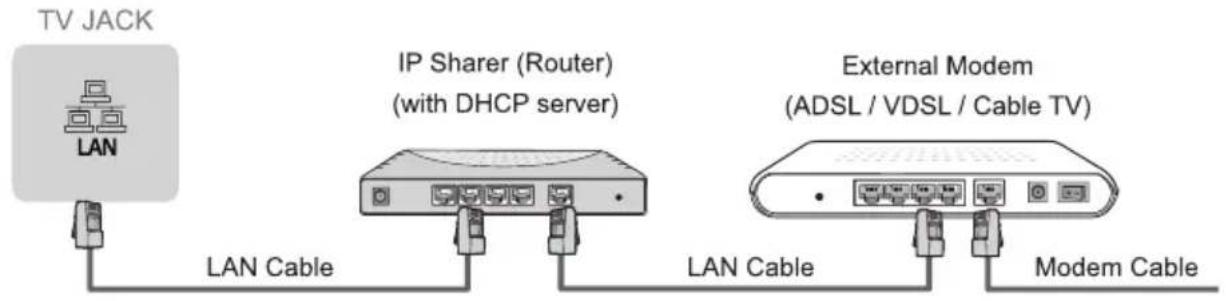
▶ Wireless setup
To connect your TV to your network wirelessly, you need a wireless router or modem. See the illustration below.
The built-in Wireless LAN Adapter supports the IEEE 802.11a/b/g/n/ac/ax communication protocols. It is recommended to use IEEE 802.11ax router. Low transfer rates for b/g may have the influence on the quality of streamed videos and other media.
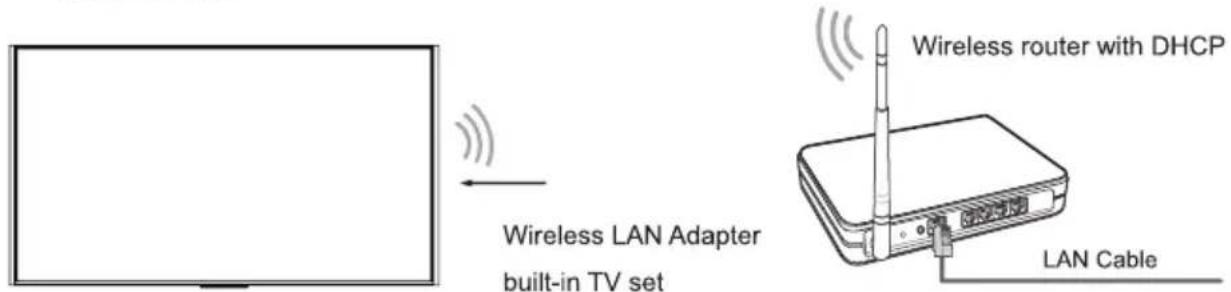
NOTES
- You must use the built-in Wireless LAN Adapter to use a wireless network because the set doesn't support external USB network adapters.
- If the wireless router supports DHCP, your TV can connect more easily to the wireless network.
- If you apply a security system other than the systems listed below, it will not work with the TV. Security system: WPA, WEP, WPA2.
- In order to guarantee smooth network, the distance between router and TV should be less than 10 metres.

NOTE
- The included remote control will vary depending on model, country/region. Check information according to the actual remote control in the accessory bag.
▶ Buttons of remote control
| BUTTON | DESCRIPTION |
| Named | Power on/Standby |
| head | Select input sources |
| Number button | Select a channel or input numbers |
| Four colour buttons | Special function buttons |
| GUIDE | Display the Electronic Program Guide (DTV mode) |
| CH.LIST | Display the Channel List on the screenFor some models, long press "GUIDE" button to be used as CH.LIST |
| ▶II | Playpad keys |
| ≡ | Press to enter Menu |
 (^ / v / < / >) (^ / v / < / >) | D-pad (up/down/left/right navigation buttons) |
| OK | Confirmation button |
| ⇐ | Under the Menu or App, return to the previous place |
| [Speed] | Display the Home screen |
| VOL | Volume (up/down) |
| CH | Channel (up/down) |
| [Speed] | Mute and restore sound |
| EXIT | Exit the menu or exit the application |
| ψ | Activate the microphone |
| INFO | Display the current program information |
| SUBTITLE | Activate or deactivate the subtitle modeFor some models, long press "◀×" button to be used as SUBTITLE |
| boxed | Custom button to launch input or apps quickly |
| TEXT | Turn on/off the teletext function |
| APP | Quick access buttons to APP |
| APPS | Fast access to app store |
| 123 | Select a channel or input numbers and special function buttons |
NOTE
• For models with TEXT button, long press to be used as INFO.
• For models with INFO / INFO button, long press to be used as TEXT.
- Buttons listed here are for reference only. Actual remote control may vary depending on model, country/region.
Installing Batteries in the Remote Control (for battery-replaceable remote)

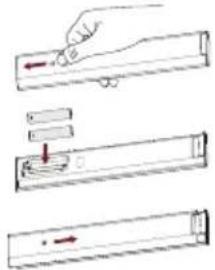
- Slide the back cover to open the battery compartment of the remote control.
- Insert two AAA size batteries. Make sure to match the (+) and (-) ends of the batteries with the (+) and (-) ends indicated in the battery compartment.
- Close the battery compartment with the cover.
NOTE
• Product image is only for reference, actual product may vary in appearance.
- Dispose of your batteries in a designated disposal area.
- Do not mix battery types or combine used batteries with new ones.
- Remove depleted batteries immediately to prevent battery acid from leaking into the battery compartment.
• If you do not intend to use the remote control for a long time, remove the batteries.
• Leaving a battery in an extremely high temperature surrounding environment that can result in an explosion or the leakage of flammable liquid or gas.
- Battery chemicals can cause a rash. If the batteries leak, clean the battery compartment with a cloth. If chemicals touch your skin, wash immediately.
Risk of fire or explosion if the battery is replaced by an incorrect type.
Disposal of a battery into fire or a hot oven, or mechanically crushing or cutting of a
battery, that can result in an explosion.
- A battery subjected to extremely low air pressure that may result in an explosion or the leakage of flammable liquid or gas.
▶ Charging the Remote Control (for solar powered remote)

You can charge the remote by exposing the solar cell to light or using a USB type-C cable(not provided).
When charging by type-C port, the red indicator will blink. When fully charged, the indicator will stop blinking first and then turn off.
NOTE
• Product image is only for reference, actual product may vary in appearance.
- The battery is not user replaceable. Do not try to remove or change the internal battery by yourself, cause it may cause damage to the battery/device, personal injury, fire or explosion.
- When you do not use the remote control, place it face up to make the solar cell expose to light.
• Leaving a battery in an extremely high temperature surrounding environment that can result in an explosion or the leakage of flammable liquid or gas.
- Battery chemicals can cause a rash. If chemicals touch your skin, wash immediately.
- Disposal of a battery into fire or a hot oven, or mechanically crushing or cutting of a battery, that can result in an explosion.
- Place the remote control correctly to prevent it from falling down.
- A battery subjected to extremely low air pressure that may result in an explosion or the leakage of flammable liquid or gas.
▶ Pairing the Remote Control
Pair the remote to the TV after you power it on. Keep the remote control within 3 metres from the TV. Press any button (except power and mic button) to pair.
NOTE
• In special cases, press and hold [≡] button to pair.
- If an unknown error occurred with the remote, then it could have been caused by interference. Try to remove what's causing the interference and pair it again.
- If an unknown error occurred in the remote control while the battery power is normal, you can take out the batteries, press any key for 1\~2 seconds, and insert them back. Then the remote control will work normally. (only for battery-replaceable remote)
- If an unknown error occurred in the remote control, please recharge and activate the remote control. (only for solar powered remote)
• The remote cannot be paired to the TV while the TV is in standby mode.
▶ Remote Control Operation Range
- The remote control can work at a distance of up to 8 metres in front of the TV set.
- The remote control angle: taking the remote sensor as an apex, 6 metres away, its controlled horizontal angle is within ±30° , while the vertical angle is within ±15° .
- The operating distance may vary depending on the brightness of the room.

Disposal of this unit
Product should not be damaged, dismantled or thrown in municipal waste. It should be packed and handed over to authorised re-cycler.
Features, appearance and specifications are subject to change without notice.
| Item | 85" | |
| Dimension(W × H × D) | Without Stand | 76.2 × 43.1 × 1.9 inches(1936 × 1096 × 47 mm) |
| With Stand | 76.2 × 44.4 × 17.6 inches(1936 × 1128 × 447 mm) | |
| Weight | Without Stand | 117.9 lbs (53.5 kg) |
| With Stand | 120.2 lbs (54.5 kg) | |
| Active Screen Size (Diagonal) | 215 cm | |
| Screen resolution | 3840 × 2160 | |
| Audio power | 2×15W + 20W + 2×6W + 2×6W | |
| Operating mode power density | 0.023 Watts/cm2 | |
| Network standby power consumption | ≤ 2.0 W | |
| Power consumption in standby mode | 0.5 W | |
| Item | 110" | |
| Dimension(W × H × D) | Without Stand | 99.6 × 56.1 × 3.7 inches(2530 × 1425 × 93 mm) |
| With Stand | 99.6 × 58.9 × 19.2 inches / 99.6 × 57.9 × 19.2 inches(2530 × 1495 × 487 mm) / (2530 × 1470 × 487 mm) | |
| Weight | Without Stand | 224.9 lbs (102.0 kg) |
| With Stand | 239.2 lbs (108.5 kg) | |
| Active Screen Size (Diagonal) | 280 cm | |
| Screen resolution | 3840 × 2160 | |
| Audio power | 2×15W + 2×20W + 2×6W + 2×6W | |
| Operating mode power density | 0.024 Watts/cm2 | |
| Network standby power consumption | ≤ 2.0 W | |
| Power consumption in standby mode | 0.5 W | |
| Power consumption | Please refer to the rating label. | |
| Power supply | Please refer to the rating label. | |
| Receiving systems | Analog | PAL-D/K, B/G, I, SECAM-D/K, B/G |
| Digital | DVB-T/T2, DVB-C, DVB-S/S2 | |
| Wireless LAN Module specifications | Frequency Range | 2.4-2.4835GHz5.15-5.85GHz5.9-6.425GHz |
| Output Power (Max.) | 2.4-2.4835GHz 17dBm5.15-5.25GHz 14dBm5.25-5.35GHz(DFS Band) 14dBm5.49-5.71GHz(DFS/TPC Band) 14dBm5.725-5.85GHz(for Non EU) 14dBm5.9-6.425GHz 14dBm | |
| Bluetooth Module specifications | Frequency Range | 2.4-2.4835GHz |
| Output Power (Max.) | 2.4-2.4835GHz,Class1,6dBm | |
| Environmental conditions | Temperature: 41°F - 95°F (5°C - 35°C) Humidity: 20% - 80% RH Atmospheric pressure: 86 kPa - 106 kPa | |
| HDMI Input | RGB / 60Hz (640×480, 800×600, 1024×768)YUV / 60Hz (480i, 480p, 720p, 1080i, 1080p)YUV / 50Hz (576i, 576p, 720p, 1080i, 1080p)3840×2160 / 24Hz, 3840×2160 / 25Hz,3840×2160 / 30Hz, 3840×2160 / 50Hz,3840×2160 / 60HzFor HDMI 3, 4:3840×2160 / 120Hz, 2560×1440 / 120Hz1920×1080 / 120Hz, 3840×2160 / 144Hz2560×1440 / 144Hz, 1920×1080 / 144Hz | |
Other Information
Recycling/Licenses
WEEE (Waste Electronic Electric Equipment)
European Directive 2012/19/EU

This symbol on the product or on its packaging indicates that this product must not be disposed of with your household waste. Instead, it is your responsibility to dispose of your waste equipment by handing it over to a designated collection point for the recycling of waste electrical and electronic equipment. The separate collection and recycling of your waste equipment at the time of disposal will help to conserve natural resources and ensure that it is recycled in a manner that protects human health and the environment. For more information about where you can drop off your waste equipment for recycling, please contact your local city office, your household waste disposal service or the shop where you purchased the product.
Battery

For replaceable battery:
In accordance with the Battery Directive, used batteries should not be disposed of in the domestic waste. Dispose your batteries in the collection containers specific for this purpose in retail stores.
For built-in battery:
In accordance with the Battery Directive, the battery in this product should not be disposed of in the domestic waste. The built-in battery in this product is not user replaceable, please contact your service provider for more information. Dispose the product to waste disposal service and they will take appropriate measures for the recycling and treatment.
ROHS (Restriction of Hazardous Substance)
European Directive 2011/65/EU

This European directive limits the use of dangerous and hazardous substances which are difficult to recycle.
This allows recycling easily the EEE and contributes to the safeguard of the environment.
Substances included in this product match to the RoHS directive.

HIGH-DEFINITION MULTIMEDIA INTERFACE
The terms HDMI, HDMI High-Definition Multimedia Interface, HDMI Trade dress and the HDMI Logos are trademarks or registered trademarks of HDMI Licensing Administrator, Inc.

VISION IQ

ATMOS
Dolby, Dolby Vision, Dolby Atmos, and the double-D symbol are registered trademarks of Dolby Laboratories Licensing Corporation. Dolby Vision IQ is a trademark of Dolby Laboratories Licensing Corporation. Manufactured under license from Dolby Laboratories. Confidential unpublished works. Copyright © 2012-2024 Dolby Laboratories. All rights reserved.

Manufactured under license from IMAX Corporation. IMAX ® is a registered trademark of IMAX Corporation in the United States and/or other countries. For DTS patents, see http://patents.dts.com. Manufactured under license from DTS Licensing Limited. DTS and the DTS logo are registered trademarks or trademarks of DTS, Inc. in the United States and other countries. © 2020 DTS, Inc. ALL RIGHTS RESERVED.

FOR DTS PATENTS, SEE http://xperi.com/dts-patents/. MANUFACTURED UNDER LICENSE FROM DTS, INC. AND ITS AFFILIATES. DTS, THE SYMBOL, DTS AND THE SYMBOL TOGETHER, DTS:X, DTS-HD, DTS-HD MASTER AUDIO, NEURAL:X, AND VIRTUAL:X, ARE REGISTERED TRADEMARKS OR TRADEMARKS OF DTS, INC. IN THE UNITED STATES AND/OR OTHER COUNTRIES. © DTS, INC. AND ITS AFFILIATES. ALL RIGHTS RESERVED.
EPREL Registration Information
85UXNQ (1953579)
85UXNQTUK (1953605)
110UXNQ (2060990)
110UXNQTUK (2060998)
- USER MANUAL
- FIND WHAT YOU WANT
- CONTENTS
- ACCESSORIES LIST
- NOTE
- IMPORTANT NOTICE
- FOR YOUR OWN SAFETY AND THE OPTIMAL PERFORMANCE OF YOUR TV, ENSURE TO READ THE SAFETY INSTRUCTIONS BEFORE PERFORMING ANY INSTALLATION
- READ THESE INSTRUCTIONS
- FOLLOW ALL INSTRUCTIONS
- HEED ALL WARNINGS
- KEEP THESE INSTRUCTIONS
- SAFETY INSTRUCTIONS
- CAUTION
- THE INTENDED USE AND AMBIENT CONDITIONS FOR THIS TV
- WARNING
- STABILITY HAZARD
- MOVING/TRANSPORTATION
- POWER SUPPLY
- POWER PLUG AND POWER CABLE
- SET-UP
- AIR VENTILATION AND HIGH TEMPERATURES
- THE STAND
- THE LED SCREEN
- RADIO WAVES
- BUILT-IN WIRELESS LAN
- WARNING ABOUT OFF-GASSING
- SUPERVISION
- VOLUME
- THUNDER STORMS
- LONG PERIODS OF ABSENCE
- CLEANING AND CARE
- SERVICE/REPAIR
- PACKAGING
- MODIFICATION
- REMOTE CONTROL BATTERY
- FOR REPLACEABLE BATTERY
- FOR BUILT-IN BATTERY
- OUTDOOR ANTENNA GROUNDING
- DISPOSAL
- INSTALLING THE STAND
- 85
- 110
- INSTALLING THE WALL MOUNT BRACKET
- TERMINALS
- LAN (WIRED SETUP)
- WIRELESS SETUP
- NOTES
- INSTALLING BATTERIES IN THE REMOTE CONTROL (FOR BATTERY-REPLACEABLE REMOTE)
- CHARGING THE REMOTE CONTROL (FOR SOLAR POWERED REMOTE)
- PAIRING THE REMOTE CONTROL
- REMOTE CONTROL OPERATION RANGE
- DISPOSAL OF THIS UNIT
- OTHER INFORMATION
- RECYCLING/LICENSES
- BATTERY
- ROHS (RESTRICTION OF HAZARDOUS SUBSTANCE)
- EUROPEAN DIRECTIVE 2011/65/EU
- EPREL REGISTRATION INFORMATION
Marque : HISENSE
Modèle : 110UXNQTUK
Catégorie : Téléviseur