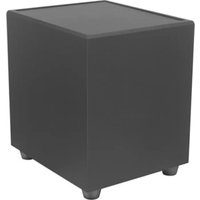
CT8 - Haut-parleur Rockville - Notice d'utilisation et mode d'emploi gratuit
Retrouvez gratuitement la notice de l'appareil CT8 Rockville au format PDF.


| Type de produit | Haut-parleur passif |
| Marque | Rockville |
| Modèle | CT8 |
| Dimensions (L x H x P) | 250 x 350 x 200 mm |
| Poids | 3,2 kg |
| Puissance nominale | 100 W RMS |
| Impédance | 8 Ω |
| Réponse en fréquence | 50 Hz – 20 kHz |
| Sensibilité | 90 dB (1 W/1 m) |
| Type de haut-parleur | 2 voies : woofer 8" + tweeter |
| Alimentation | Amplification externe requise |
| Connectivité | Borniers à vis |
| Matériau du boîtier | MDF avec finition vinyle |
| Grille de protection | Grille métallique amovible |
| Entretien et nettoyage | Essuyer avec un chiffon doux et sec. Ne pas utiliser de produits abrasifs. |
| Sécurité | Ne pas exposer à l'humidité ou aux températures extrêmes. Tenir hors de portée des enfants. |
| Pièces détachées et réparabilité | Contacter le service après-vente pour les pièces de rechange. |
| Usage recommandé | Enceinte bibliothèque ou surround |
FOIRE AUX QUESTIONS - CT8 Rockville
Questions des utilisateurs sur CT8 Rockville
0 question sur cet appareil. Repondez a celles que vous connaissez ou posez la votre.
Poser une nouvelle question sur cet appareil
Téléchargez la notice de votre Haut-parleur au format PDF gratuitement ! Retrouvez votre notice CT8 - Rockville et reprennez votre appareil électronique en main. Sur cette page sont publiés tous les documents nécessaires à l'utilisation de votre appareil CT8 de la marque Rockville.
MODE D'EMPLOI CT8 Rockville
Bracket Adjustments
Vertical Adjustment
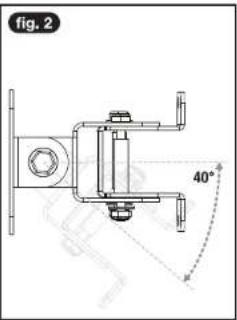
The CT80-SUB has a vertical adjustment radius of 80 degrees. To adjust the vertical angle of the cabinet, loosen the bolts (a) and adjust the bracket (fig. 1) up or down (fig. 2). Once you have attained the proper angle, tighten the bolts.


Horizontal Adjustment
The CT80-SUB has a horizontal adjustment radius of 80 degrees. To adjust the horizontal angle of the cabinet, move it left (fig. 1) or right (fig. 2) to the desired position.


Features/Specifications
- Can be placed on the floor or mounted to a wall with included wall-mount bracket
• Built-in 70V/100V transformer
• 20oz magnet - Banana binding post terminals accept banana cables or regular speaker wire
• 40W, 20W, 10W selectable with 70V input - 55W, 25W, 15W selectable with 100V input
- Bypass option to run sub at 4 ohm: 80W RMS @ 4 ohm
• Frequency response: 40Hz – 800Hz
• Sensitivity: 90dB (1W @ 1m)
- Includes high quality mounting bracket
• Unit dimension: 12.4" x 9.65" x 12.4"
- Unit weight: 12.9LBS
RockvilleAudio.com
© 2022 ROCKVILLE // Features and specifications are subject to change and/or improvement without notice.
ROCKVILLE
CT80-SUB
8"70V/100V COMMERCIAL/RESTAURANT SUBWOOFER
OWNER'S MANUAL
ATTENTION:
WATCH THIS VIDEO BEFORE FIRST USE!
Who reads manuals?
Scan the QR code or go to rockvillesupport.com/ct80-sub to access how-to video(s), the owner's manual, and other important information you may need to get the most out of your item.
If you prefer written instructions, please read ahead!
With Rockville you get many options.

Missing items? If you ordered a bundle that includes more than one product and you are missing part of your bundle, then it just means your order shipped from two different warehouses. You will receive the remaining items very soon. If you have any concerns or inquiries, feel free to call our customer support center at 1-646-758-0144, 24 hours a day/7 days a week.
The Rockville CT80-SUB subwoofer is a great choice for any restaurant, office, retail store, or other commercial application. This subwoofer will make a great addition to any 70V speaker setup. Please read this guide carefully for proper use of your CT80-SUB. Should you need assistance, please call our technical help line at 1-646-758-0144, 24 hours a day/7 days a week
Functions
- Mounting bracket
- 70V/100V/4-ohm tap switch
- Binding post terminals
- Port

Choosing the Appropriate Tap
70-volt systems are the number one choice for any application for which you want to install multiple speakers. With 70 volt there are a lot of advantages over 4-ohm systems. One of the main advantages is the simplicity of the wiring, as well as how easy it is to match up the speakers with an amplifier. You always want your 70-volt amp to have at least 15% or 20% more power than the combined watts your speakers are tapped at. For example, if you have a 200-watt/70-volt amplifier, you can install five 70-volt speakers that are tapped at 20 watts each or fifteen 70-volt speakers that are tapped at 10 watts each as long as they total close to 175 watts. When we say the word "tap", what we are referring to is the selector knob on the back of the CT80-SUB. It allows you to set how many watts the built-in transformer will allow the sub to get from the amplifier. The taps set at 10, 20, and 40 watts for 70-volt input, 15, 25, and 55 watts for 100-volt input. This range of taps allows for full customization of the sound for the space where the speakers are installed. In a restaurant, for example, you can tap your dining room speakers at 20 watts, the speakers in the outside seating area at 40 watts, and the ones in the hallway and bathrooms at 10 watts. Another great feature of 70-volt speakers is that you can mix and match any type, whether they are wall-mounted speakers (such as these), ceiling speakers, subwoofers, etc.
Another benefit of 70-volt speaker setups is the ability to run very long lines of speaker wire without signal loss. And, the wiring is very simple. You just connect all the positive terminals of the speakers to the positive 70-volt terminal(s) of the amplifier. The negative terminals on the speaker get connected to the negative (COM) terminal(s) of the amp. You do not have to worry about impedance as the power is constant.
Please be sure to check out Rockville's complete selection of high-quality 70-volt speakers, amplifiers, and accessories.
Setup
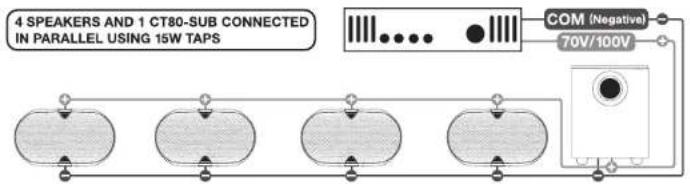
70V/100V Speaker Configuration
The total number of speakers multiplied by the tap value cannot exceed the output power (in watts) of your 70V amplifier. The example on the facing page shows four total speakers and the CT80-SUB. Using the 20W taps, you will need an amplifier with at least 100 watts (5 x 20 = 100W). A good rule of thumb is to select an amplifier with 15% to 20% greater power; in this case, an amplifier that delivers about 120W.
Installation
The CT80-SUB can be wall-mounted on a variety of surfaces. Make sure to place the mounting bracket at a height that will provide enough clearance for the enclosure and will allow the subwoofer to be tilted as needed.
Flat Surface
Make sure the CT80-SUB is on a flat, stable surface. Bass frequencies are omnidirectional, so the subwoofer can be placed anywhere. Try placing it near a wall or a corner for increased bass.
Drywall/Masonry
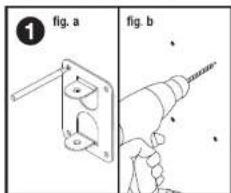
- Using the swivel bracket mounting plate as a template, mark the mounting screw locations (fig. a). When mounting to drywall, we recommend you use a stud finder to locate the wall studs and mark their location. Drill pilot holes for the screws (fig. b). If you are installing on masonry or between studs, we recommend using anchors (included). Be sure to use the proper drill bit size for the anchors. Use no less than two anchors to secure the mounting bracket.
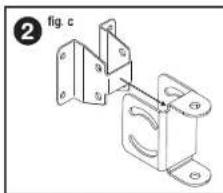
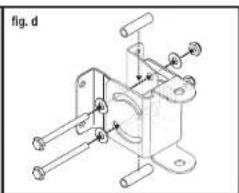
- Assemble the swivel bracket by sliding the swivel bracket base into the swivel bracket (fig. c). Next, use the included bolt assembly to secure the base to the bracket as indicated in figure d. Please note, there is a special material applied to the threads of the bolts to help keep them tight when you are screwing on the nut and to keep the nut from coming loose due to vibrations from audio playback. You may feel a bit of resistance and that is normal. To facilitate the process, use a pair of pliers (not included) to hold the nut in place while you tighten the screw with the included wrench.
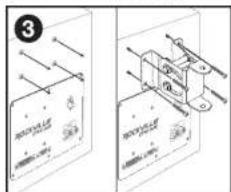
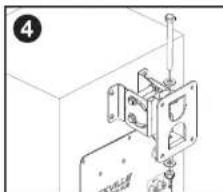
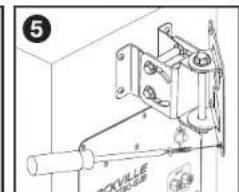
- Now attach the swivel bracket assembly to the subwoofer cabinet. Unscrew the premounted screws and align the holes on the bracket to the predrilled holes on the back panel of the cabinet. Use the screws to attach the bracket. Make sure that the screws are properly seated and that the bracket is securely mounted.
- Attach the swivel bracket mounting plate to the swivel bracket assembly.
- Finally, attach the unit to the wall where you drilled the mounting screw holes. Make sure to use all four screws to secure the unit to the wall.
Wiring

Marque : Rockville
Modèle : CT8
Catégorie : Haut-parleur