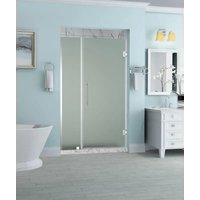
Belmore SDR965F - Système de douche ASTON - Notice d'utilisation et mode d'emploi gratuit
Retrouvez gratuitement la notice de l'appareil Belmore SDR965F ASTON au format PDF.


| Type de produit | Système de douche |
| Marque | Aston |
| Modèle | Belmore SDR965F |
| Dimensions (environ) | 200 x 200 x 150 mm |
| Poids (environ) | 1,5 kg |
| Alimentation | Réseau d'eau (pression standard) |
| Matériau principal | Laiton chromé |
| Fonctions principales | Douche avec pommeau, flexible, support mural réglable |
| Nombre de modes de jet | 3 (pluie, massage, brume) |
| Flexible | Longueur 1,5 m, inox tressé |
| Raccordement | Filetage standard 1/2 pouce |
| Pression d'eau recommandée | 1 à 5 bars |
| Température d'eau maximale | 80 °C |
| Entretien et nettoyage | Nettoyer avec un chiffon doux et de l'eau savonneuse ; détartrer régulièrement avec un produit non abrasif |
| Sécurité | Utiliser de l'eau à température modérée ; éviter les chocs et les nettoyants agressifs |
| Pièces détachées et réparabilité | Flexible, pommeau, joints disponibles ; réparation possible par un professionnel |
| Informations générales | Notice d'utilisation disponible en téléchargement gratuit au format PDF |
FOIRE AUX QUESTIONS - Belmore SDR965F ASTON
Questions des utilisateurs sur Belmore SDR965F ASTON
0 question sur cet appareil. Repondez a celles que vous connaissez ou posez la votre.
Poser une nouvelle question sur cet appareil
Téléchargez la notice de votre Système de douche au format PDF gratuitement ! Retrouvez votre notice Belmore SDR965F - ASTON et reprennez votre appareil électronique en main. Sur cette page sont publiés tous les documents nécessaires à l'utilisation de votre appareil Belmore SDR965F de la marque ASTON.
MODE D'EMPLOI Belmore SDR965F ASTON
ASTON
ESCAPE THE EVERYDAY
INSTALLATION AND OWNER'S MANUAL
Please select your shower door model, or shower door style from the selection below for easy installation.
ATTENTION: This door is extremely heavy and the hinges on this door must be attached to the studs or to preinstalled 2 X 6 wood reinforcement behind the wall.
Before you start
Thank you for purchasing your Aston shower door. We hope it will provide you with years of satisfying use and enjoyment.
Please read this manual carefully because it contains information and instructions about the proper installation of the unit. If you do not follow certain conditions of installation and maintenance, your warranty may be affected.
- Inspect boxes for shipping damage. If the product has been damaged, is missing parts, or has a finishing defect, please contact our customer support department within 5 business days of delivery date.
- NOTE: You should consult your local building codes with questions on installation compliance standards. Plumbing and building codes vary by location.
- Before installation, inspect installation surfaces or level and have to the strength to support the heavy weight of this shower door assembly. This Shower door should only be installed using the connection point to the studs or to pre-installed 2x6 wood reinforcements behind the wall.
Installation Guide
Please read and follow the installation instructions and guidelines in this section. Failure to follow the recommended instructions and installation techniques may lead to possible damage to the unit or the surrounding area. This can affect warranty claims.
ATTENTION: This unit requires assembly. A minimum of two people are required for assembly, as several of the sections can be large and unstable until assembled.
You will need the following tools:
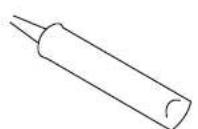
Caulk
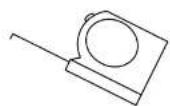
Tape Measure
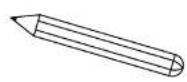
Pencil

Phillips Screwdriver
Detailed Diagrams of Shower Door Components
Diagram A
(Shower Door)
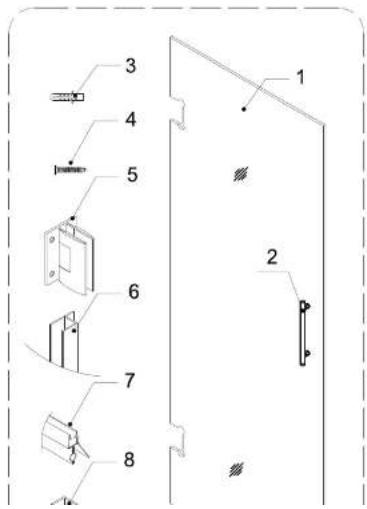
Diagram B
(Stationary Glass Panel with Top Brace)
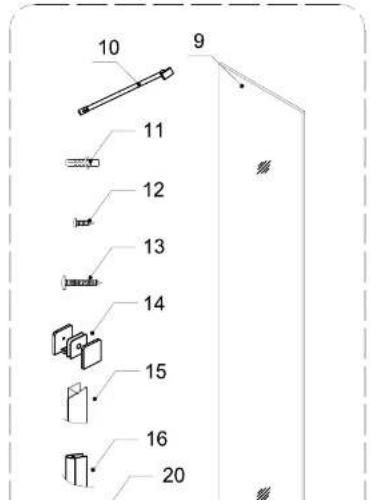
Diagram C
(Stationary Glass Panel with Glass Shelves)

PLEASE NOTE: During unpacking carefully inspect all parts and identify all parts using detailed diagram in your manual as a reference. Before discarding the packaging check for any parts or small hardware bags that may have been overlooked.
STYLE A
Single shower door 22"-38"
Diagram A must be used for assembly
Pages: 5-8
STYLE B
Shower door with the 6" or 10" small or 14"-38" large stationary glass support bar, Diagram A and Diagram B must be used for assembly.
Pages: 5-8, 9-15
Single Shower Door Assembly and Installation (Style A)
NOTE: Please use parts from Diagram "A" for the Single Shower door assembly and installation.
ATTENTION: A minimum of two people are required for the next assembly steps.
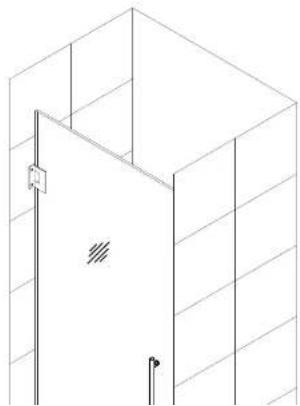
This model is treated with Antonia
- Place a board ( 1/2 " thick) on the threshold or the shower base. Remove the corner pads from the Glass door (01). Place the Glass door (01) on 1/2" thick board. Carefully position the hinged side of shower door against the wall and check with level for plumb.
NOTE:
Please check with a level and be sure that the door is absolutely plumb.
See Figure 2 for details.
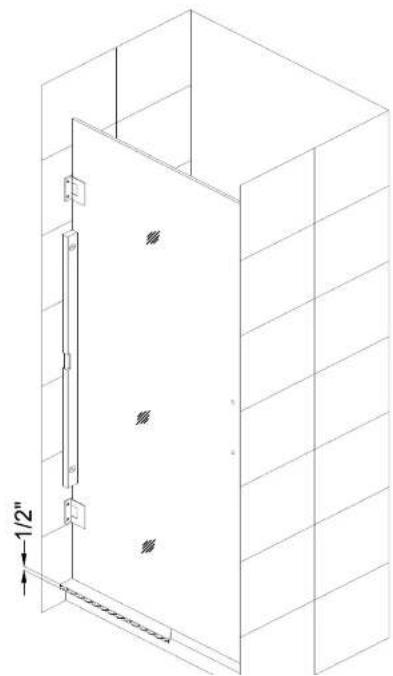
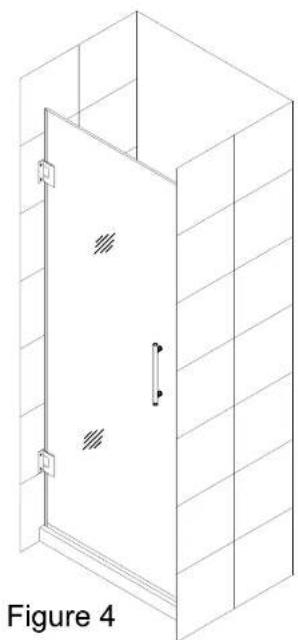
- Install the Handle (05) to the Glass Door (01) using the hardware provided.
See Figure 4.

NOTE: DO NOT attach the handle to the door glass until instructed to install. DO NOT use the handle to lift the glass during installation. This may result in damage to the glass and/or serious injury.
- Measure the bottom of the Glass door (01) from the Side strip (06) to the vertical edge of glass door(01). (Handle side of Glass Door)
Cut the Bottom anti-water strip (07) to the size of your measurement and notch 3/8 " of the inner side of the Bottom anti-water strip.
See Figure 6 for details.
ATTENTION:
Prior to next step, please be sure that the section of the wall for installation of the L-shaped strip (07) is clean, dry and free from soap, oil and any construction debris.

Figure 6
Stationary Glass Panel Assembly and Installation (Style B and C)
NOTE: Please use parts from Diagram "B" or "C", depending on your model style, for the Stationary glass panel (9) assembly and installation.
ATTENTION: A minimum of two people are required for the next assembly steps.


- Align the Glass Clamps (14) with notches in the Stationary glass (9) and install Glass clamps (14) to Stationary glass (9).
Noted: Smooth flat surface of Glass clamp (14) should be installed on outside of glass door.


See Figure 9 for details.
Figure 9
- Install the Anti-water strip seal onto the vertical edge of the Stationary glass nearest glass clamp.
See Figure 10 for details.
Insert the Stationary glass panel into the Wall channel.

- Adjust the Stationary glass panel (9) position so the gap between Glass door (01) and Stationary glass panel (09) is between, (1/16"-1/2").
Optional: If the gap is larger than 1/2" add the U-shaped strip to vertical edge of glass door (01).

Figure 14

Optional
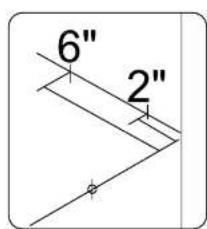
- Mark the position of the Glass clamp (14) on shower base. Mark the position of Wall channel (20) on shower wall.
See Figure 15 for details.


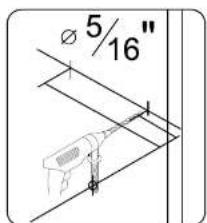
- Using the appropriate drill bit for your wall surface drill each hole location with a 5/16" diameter drill bit.
Using the appropriate drill bit for your floor surface drill hole location with a 5/16" diameter drill bit.
See Figure 17 for details.
NOTE: If your surface is prone to cracking or chipping then it is recommended that you pilot drill first using a smaller drill bit, and then step up to the final size.

Figure 17
- Install the Glass clamp (14) to shower base using M4x60 screws.
See Figure 20 for details.

Figure 20
- Place the Stationary glass (9) into position in shower area and install glass clamp (14) to Stationary glass (9).
See Figure 21 for details.
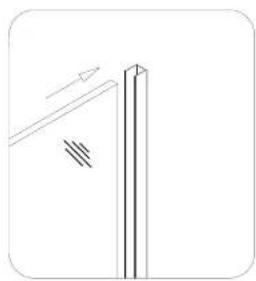
Figure 21
If the Stationary glass panel (9) is 14" wide or larger, please continue your installation:
• Style B for Support bar installation.
• Style C for Glass shelves installation.


Glass Shelve installation mounting holes
Support Bar Assembly and Installation (Style B)
NOTE: Please use parts from Diagram "B" for the Support Bar assembly and installation.
- Position the Support bar (10) on the Stationary glass (9). Using a level, check support bar is level and mark the bracket's location on the shower wall.
Remove the Support bar (10) from the Stationary glass (9) and detach the wall bracket. Position the wall bracket to the marked area on shower wall and mark the drilling location on shower wall.
Drill the Wall anchor (11) hole using 5/16" drill bit.
Insert the Wall anchor (11) and fasten the bracket

Glass Shelves Assembly and Installation (Style C)
NOTE: Please use parts from Diagram "C" for the Glass Shelves assembly and installation.
- Mark the hole locations on shower wall for attaching glass shelve brackets.
Drill the holes using 5/16" drill bit.
Insert the Wall anchors (11).
Attach the Shelf brackets (without nut) (19) to the wall using the M4x60 screws (13).
Attach the Shelf brackets (with nut) (18) to the Stationary glass panel.

Care and Maintenance
As with any other luxury item, maintenance and care are critical to the long lasting quality and enjoyment of your shower door and tray. The proper care and maintenance outlined in this section are necessary to ensure the longevity of the unit. Damage caused by not following the care and maintenance guidelines in this section is not covered under the manufacturer's warranty.
StarCast by EnduroShield makes your cleaning easier and less frequent; however it recommended that your continue to clean the surfaces regularly. Please see the Enduro Shield Care and Maintenance section for detailed maintenance requirements.
ASTON GLOBAL INC. – Limited Warranty
This warranty applies to products purchased from Aston Global Inc. after May 1, 2017.
Aston Global Inc., a Texas Corporation ("Aston"), provides the following warranty coverage for shower doors and enclosures, bathtubs, shower panels and related components (The Products). Aston warrants that The Products shall be free from defects in material and workmanship from the date of the original sale of the product by Aston (the "limited warranty period"), subject to the following conditions. This warranty extends to the original owner/end-user only, in its original place of installation and is not transferable to subsequent owners. Aston reserves the right to modify this warranty at any time; however, modifications will not change the warranty provisions in effect at the time of sale of the products in question. This warranty applies only to products sold by Aston and purchased from an Aston-authorized dealer. Proof of purchase / original sales receipt from the original consumer purchase must be provided with all warranty claims.
This limited warranty does not cover glass provided by others or outside fabrication provided by others, nor does it cover defects in material or workmanship caused by improper installation of the product; use of improper cleaning products or materials; or caused by accidents, owner or installer negligence, alterations, abuse or misuse. This
PARTS ONLY WARRANTY
This warranty is extensive in that it covers replacement of all defects. LABOR CHARGES AND/OR DAMAGE INCURRED DURING INSTALLATION, REPAIR, OR REPLACEMENT, AS WELL AS ANY OTHER KIND OF ANCILLARY COST, LOSS OR DAMAGE ARE EXCLUDED.
COMMERCIAL USE AND OTHER EXCLUSIONS
This warranty excludes all industrial, commercial and business usage. The warranty period for products installed for commercial applications or used in commercial ventures, including but not limited to motels, hotels, casinos, student housing, condos, apartments, and fitness centers, is a one (1) year limited warranty from the date of purchase for shower doors, bathtub doors, shower enclosures, shower bases, and backwalls, with all other terms of this warranty applying except the duration of the warranty. Aston hereby disclaims all warranties for products sold as dealer or store displays.
WARRANTY TERMS
Aston will, at its election, repair or replace the product found by Aston in its sole
Aston product installations and repairs must be performed by either an Aston authorized agent or a licensed, insured and experienced professional contractor - installation or repairs performed by any other party shall void the warranty. This warranty shall not apply to breakage or damages caused by normal wear and tear, fault, carelessness, abuse, misuse, misapplication, improper maintenance, alteration or modification of the unit, as well as chemical or natural corrosion, accident, fire, flood, act of God or any other casualty. Improper care and cleaning will void the warranty. Use of cleaners containing abrasive cleansers, ammonia, bleach, acids, waxes, alcohol, solvents or other products not recommended for hardware finishes, glass or acrylic as they may damage the metal or glass finish of your shower door or shower enclosure and will void the warranty. For additional product maintenance instructions please refer to the product installation manual. Aston is not responsible for any issues arising in connection with errors or omissions in information provided on Aston or dealers' websites. This warranty does not extend to any non-Aston plumbing or components installed by installers, end users or by any party other than Aston.
THE FOREGOING WARRANTIES ARE IN LIEU OF ALL OTHER WARRANTIES, EXPRESSED OR IMPLIED, INCLUDING BUT NOT LIMITED TO THE IMPLIED WARRANTIES OF MERCHANTABILITY AND FITNESS FOR A PARTICULAR
RESIDENTIAL INSTALLATIONS
SHOWER DOORS and ENCLOSURES
GLASS: Limited Lifetime
Aston warrants the glass of shower doors, tub doors and shower enclosures to be free from defects in workmanship and materials under normal residential use for the life of the product.
StarCast Protective Coating by EnduroShield: Ten (10) Years, provided by PCT Global LLC.
For shower doors treated with StarCast protective coating, warranty coverage is provided by its maker, PCT Global LLC. Please register directly with EnduroShield online at
HARDWARE: Limited Lifetime
DRAIN, OVERFLOW AND ACCESSORIES: Limited Lifetime
Aston warrants the freestanding tub Drain, Overflow and Accessories in Polished Chrome and Brushed Stainless Steel finishes to be free from defects in workmanship and materials under normal residential use for two (2) years. The warranty for any part in Oil-rubbed Bronze finish shall be limited to one (1) year.
WALK IN TUBS
TUB SHELL: Three (3) Years
Aston warrants the Walk In Tub Shell to be free from defects in workmanship and materials under normal residential use for three (3) years.
This warranty does NOT cover damage or failure caused by improper handling, modification of any type, improper installation, misuse, lack of proper routine maintenance, the use of improper cleaners or abrasives, accidents or acts of God, nor does it apply to the effects of normal wear and tear. Alteration, customization or modification of the tub, any accessory or any other part voids this warranty.
HARDWARE: One (1) Year
Aston warrants shower door, tub door and shower enclosure hardware (i.e. handles, rollers, hinges, profiles, clips, guides, brackets, towel and support bars) to be free from defects in workmanship and materials under normal commercial use for one (1) year.
SHOWER BASES: One (1) Year
Aston warrants shower bases to be free from defects in workmanship and materials under normal commercial use for one (1) year.
SEALS, SWEEPS, VINYL COMPONENTS: One (1) Year
Warranty for plastic seal strips, sweeps or any other vinyl components shall be limited to one (1) year.
* Aston does not warrant glass for scratches, chips, water spots, breaking or any other damage after installation.
FREESTANDING TUBS
SHOWER PANELS: One (1) Year
Aston warrants shower panels to be free from defects in workmanship and materials under normal commercial use for a period of one (1) year from the initial date of purchase.
STEAM SHOWERS: One (1) Year
Aston warrants steam showers panels to be free from defects in workmanship and materials under normal commercial use for a period of one (1) year from the initial date of purchase.
STATE LAWS AND THIS WARRANTY
Laws and regulations governing the installation, design and installation the products in construction applications vary widely. Aston does not have any control over and disclaims all responsibility and liability for selection, configuration, installation and operation of the products. The obligation of Aston to provide coverage under this limited warranty is expressly subject to the condition that the original user activates the warranty within 30 days of purchase by registering on-line or calling 1 (877) 424-9699.
- ASTON
- INSTALLATION AND OWNER'S MANUAL
- BEFORE YOU START
- INSTALLATION GUIDE
- DETAILED DIAGRAMS OF SHOWER DOOR COMPONENTS
- STYLE A
- STYLE B
- SINGLE SHOWER DOOR ASSEMBLY AND INSTALLATION (STYLE A)
- NOTE
- ATTENTION
- STATIONARY GLASS PANEL ASSEMBLY AND INSTALLATION (STYLE B AND C)
- SUPPORT BAR ASSEMBLY AND INSTALLATION (STYLE B)
- GLASS SHELVES ASSEMBLY AND INSTALLATION (STYLE C)
- CARE AND MAINTENANCE
- ASTON GLOBAL INC. – LIMITED WARRANTY
- PARTS ONLY WARRANTY
- COMMERCIAL USE AND OTHER EXCLUSIONS
- WARRANTY TERMS
- RESIDENTIAL INSTALLATIONS
- SHOWER DOORS AND ENCLOSURES
- GLASS: LIMITED LIFETIME
- STARCAST PROTECTIVE COATING BY ENDUROSHIELD: TEN (10) YEARS, PROVIDED BY PCT GLOBAL LLC
- HARDWARE: LIMITED LIFETIME
- DRAIN, OVERFLOW AND ACCESSORIES: LIMITED LIFETIME
- WALK IN TUBS
- TUB SHELL: THREE (3) YEARS
- HARDWARE: ONE (1) YEAR
- SHOWER BASES: ONE (1) YEAR
- SEALS, SWEEPS, VINYL COMPONENTS: ONE (1) YEAR
- FREESTANDING TUBS
- SHOWER PANELS: ONE (1) YEAR
- STEAM SHOWERS: ONE (1) YEAR
- STATE LAWS AND THIS WARRANTY
Marque : ASTON
Modèle : Belmore SDR965F
Catégorie : Système de douche