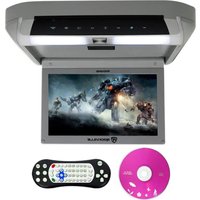
RVD10HD - Écran LCD avec lecteur DVD intégré Rockville - Notice d'utilisation et mode d'emploi gratuit
Retrouvez gratuitement la notice de l'appareil RVD10HD Rockville au format PDF.


| Type de produit | Haut-parleur amplifié |
| Dimensions (L x H x P) | 30 x 25 x 20 cm |
| Poids | 4,5 kg |
| Alimentation | Secteur 220-240 V, 50 Hz |
| Puissance de sortie RMS | 100 W |
| Connectivité | Bluetooth 5.0, entrée auxiliaire 3,5 mm |
| Fonctions principales | Lecture audio sans fil, égaliseur intégré, prise casque |
| Entretien et nettoyage | Nettoyer avec un chiffon doux et sec. Ne pas utiliser de produits abrasifs. |
| Sécurité | Débrancher avant nettoyage. Ne pas exposer à l'humidité ou à des températures extrêmes. |
| Pièces détachées et réparabilité | Contacter le service client Rockville pour les pièces détachées et la réparation. |
| Garantie | 1 an |
FOIRE AUX QUESTIONS - RVD10HD Rockville
Questions des utilisateurs sur RVD10HD Rockville
0 question sur cet appareil. Repondez a celles que vous connaissez ou posez la votre.
Poser une nouvelle question sur cet appareil
Téléchargez la notice de votre Écran LCD avec lecteur DVD intégré au format PDF gratuitement ! Retrouvez votre notice RVD10HD - Rockville et reprennez votre appareil électronique en main. Sur cette page sont publiés tous les documents nécessaires à l'utilisation de votre appareil RVD10HD de la marque Rockville.
MODE D'EMPLOI RVD10HD Rockville
ROCKVILLE

Thank you for purchasing this Rockville Flip Down Roof Mounted High Resolution TFT LCD Monitor with DVD Player and Multimedia input.
We are very proud to bring you what we consider to be the absolute best value in mobile audio products. The Rockville RVD10HD is called a true all in one because the DVD player and a load of entertainment options are all included in one chassis. This all in one monitor is easy to install since you do not have to wire a separate DVD player. The built in DVD player will play all your favorite files including DVD/VCD/MP3/WMA/MP3/MP4/CD.
We have spared no expense in manufacturing RVD-HD series Flip Down Monitors to meet the highest quality standards. With proper care and installation this unit will provide you with the highest levels of sound quality. We hope that this unit will bring you years of performance and reliability.
Please read this installation guide carefully for proper use of your Rockville Flip Down Roof Mounted High Resolution TFT LCD Monitor with DVD player and multi media input. Should you need technical assistance during or after your installation please call our technical help line at 1-646-758-0144, Monday through Friday, 9am to 5pm EST.
Contents
Resetting Unit 3
Powering Unit 4
User Interface 4
Control Panel 5
Remote Control Functions 6-7
DVD/USB/SD/HDMI 7-8
Advanced Functions 8-9
Installation 9-10
Wiring 10-11
Troubleshooting 11
Precautions
- To minimize the risk of improper installation Rockville recommends that the installation of this product be performed by an MECP-Certified professional installer.
- Improper installation may cause damage to the vehicle or injury to the driver and occupants.
- Installation must be performed in accordance with this product installation manual. Rockville is not responsible for damage or injuries resulting from installation not performed strictly in accordance with the procedures described in this manual.
- Proper installation of this product may require the use of mounting hardware not included.
- Use only new, unused and properly-sized fasteners to install this product. Do not use previously installed or worn fasteners.
- No modifications to the product or mounting hardware are permitted.
- This product is designed to be used and viewed by rear seat passengers only. The monitor screen must not be visible to the driver. Viewing by the driver while operating the vehicle is not recommended.
- Rockville does not recommend connecting wires or cables to auxiliary connectors while the vehicle is in motion.
- This product must not obstruct the driver's rear view when installed or used.
- Rockville bears no liability for any property damage or personal injury that may result from improper or unintended installation or use of this product.
Resetting the Unit
- Turn the engine key to the "OFF" position
- Unplug the wire harness for five seconds. This will engage a full reset.
• Re-plug the harness. - Turn the engine key to the "ACC" or "ON" position
- Press and hold the power button for 3 seconds
• The unit will turn on. - If this procedure does not resolve your issue, please contact customer service for further assistance.
Powering the Unit
- Turn the engine key to the "ACC" or "ON" position
- Press and hold the power button for 3 seconds
• The unit will turn on.
- When the engine key is turned to the "OFF" position, the unit will turn off.
Tip: If the unit does not turn on, check to ensure all wires are connected properly. It is strongly suggested you seek out the help of a professional when installing.
Tip: Most functions can be accessed from the control panel, but more in-depth functions can only be performed with the remote.
User Interface
Unit Settings
- Adjust the unit settings for optimal playback.
- Selected items are highlighted by blue box.
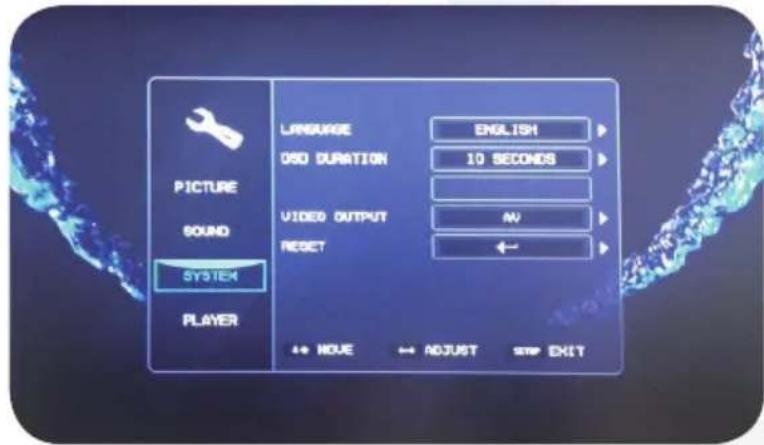
Tip: To display content from an external device, use the AV/IN option found on the control panel and remote.
Switch Media Devices
- Press the "USB/SD" button to switch between Disc, SD, and USB devices.

Tip: Refer to DVD and USB/SD sections for a list of playable media formats.
Media Files
- Browse the files stored in connected SD or USB device.


| 1 | Previous | Skip to previous chapter, song, picture, page, or video. |
| 2 | Menu | Acces and adjust unit settings. When in settings menu, press to return to main menu. |
| 3 | Next | Skip to next chapter, song, picture, page, or video. |
| 4 | Brightnes | Adjust brightness. |
| 5 | Power ON/OFF | Press to turn on the unit. |
| 6 | Door Trigger Operation | Turns unit lights on when door is opened. |
| 7 | LED Brightness | Turns LED mood light on or off. |
| 8 | Eject/Play/Pause | Press once to Play media. Press again to pause. Press and hold to eject disc. |
| 9 | LED Light | Blue LED mood light. |
| 10 | Overhead Light | Super bright overhead lights. |
| 11 | Monitor Release Button | Press to release the screen. |
| 12 | Speakers | Built-In high quality speakers. |
| 13 | Disc Drive | Insert DVD or CD to access media content. |
| 14 | USB Input | Connect MP3 player or thumb drive. |
| 15 | HDMI Input | Use to connect any media device with HDMI capability. |
| 16 | SD Input | Playback audio or video files from SD card. |
| 17 | 3.5mm Mini Jack | Use to connect external sound source. |

Remote Control Functions
| 1 | Game | Use letter keys to operate game functions. |
| 2 | Start | Start game. |
| 3 | Title | Displays DVD title. |
| 4 | Select | Select game menu items. |
| 5 | Eject | Press to eject disc. |
| 6 | PBC Menu | Show playback controls. |
| 7 | Display | Displays disc information. |
| 8 | Power | Turn unit on and off. |
| 9 | Enter | Press to confirm settings. |
| 10 | Angle | Switch picture angle. |
| 11 | Cursors | Move cursor up, down, left, and right. |
| 12 | Subtitle | Switch subtitle languages. |
| 13 | Zoom | Zoom in or zoom out of picture on screen. |
| 14 | Program | Use this button to program unit. |
| 15 | Volume + | Press to increase volume. |
| 16 | Setup | Press to enter and exit setup menu. |
| 17 | FWD | Scan forward through pictures or audio. |
| 18 | TFT Menu | Press button to display the DVD menu screen. |
| 19 | Volume - | Press to decrease volume. |
| 20 | Play/Pause | Press once to play and pause content. |
| 21 | Next | Skip to next chapter, song, picture, page, or video. |
| 22 | RWD | Scan backwards through pictures or audio. |
| 23 | L/R | Toggle between left and right audio channels.. |
| 24 | Stop | Press once to stop content. |
| 25 | USB/SD | Press to switch between USB and SD mode. |
| 26 | Previous | Skip to previous chapter, song, picture, page, or video. |
| 27 | Mute | Press to mute volume. |
| 28 | Number Pad | Use to input numbers. |
| 29 | Direction Pad | Use to control game and navigate game menus. |
| 30 | Mode | Switch between DVD/AV/HDMI mode. |
| 31 | TFT-SW | DVD: Repeat entire chapter or title. CD: Repeat track or entire disc. |
| 32 | Return | Return to previous menu. |
DVD
Getting Started
- Insert the DVD, label side up, into the disc drive.
- Wait for the DVD to load.
- Navigate the DVD menu for options.
Control
- Play/pause and navigate through the DVD menu options using the designated buttons found on both the control panel and the remote.
playable Discs
• DVD
- DVD-RW
- CD-R
• VCD
• MP4
- DVD-R
- DVD-9
- CD-RW
• MP3
USB/SD
Unit Settings
- Insert USB device or SD card into the designated slots (seev pages 5 for slot locations).
- Wait for the unit to load content.
- Browse files using the designated commands on the unit remote.
playable Media Formats
• AUDIO: MP3, MP4, WMA, WAV
• VIDEO: MPEG4, AVI, WMV, VOB, DiVix, MPG
• PHOTOS: JPG
- BOOKS: TXT
Tip: Video from a USB/SD is controlled the same way as DVD.
Player Password: 0000
HDMI Input
Connect HDMI output to the HDMI input of the unit via an HDMI cable (not included). Unit supports 1080P video mode.
Advanced Functions
Picture Contol via Unit
- Press the MENU button on the unit to bring up the on-screen picture control menu.
- Select the desired sub-menu (COLOR, OSD, FUNCTION, and SOUND) by pressing the MENU button again.
- Press Previous/Next buttons to enter and adjust sub-menus.
- Press the MENU button to return to the previous menu.
Advanced Functions
Picture Contol via Remote Control
- Press the MENU button on the remote to bring up the on-screen picture control menu.
- Select the desired sub-menu (COLOR, OSD, FUNCTION, and SOUND) by pressing the ▲ / ▼ buttons.
- Press ◀/▶ buttons to enter and adjust sub-menus.
- Press OK to confirm selection.
- Press the MENU button to return to the previous menu.
FM Transmitter Setup via Unit
- Press MENU button.
- Press POWER button.
- Press +/- buttons to select SOUND CONTROL from the menu.
- Press POWER button again, then press +/- buttons to select the FM menu.
- Press POWER button and use +/- to select the FM frequency.
- Use MENU key to return to previous menu.
FM Transmitter Setup via Remote
- Press MENU button.
- Press ▲/▼ buttons to scroll to SOUND CONTROL menu.
- Press ◀/▶ buttons to select SOUND CONTROL.
- Press ▲/▼ buttons to scroll to FM menu.
- Press ◀/▶ buttons to select FM.
- Press ▲/▼ buttons to scroll to FM frequency menu.
- Press ◀/▶ buttons to select the desired FM frequency.
- Press the MENU button to return to the previous menu.
Game Mode
- Insert the game disc into the disc drive and wait for it to load.
- Once main menu is displayed, use the ▲/▼/◄/► keys on the remote control to navigate through games. Press ENTER on the remote.
- If using remote control to play game, use the ▲/▼/◄/► on the remote to control game play. Use the ENTER key to confirm function of item in game.
- Use the RETURN key to exit game.
Installation Guide
Install Instructions (all units)
- To prevent short circuits, remove key from the ignition and disconnect the RED (+12V) cable from battery terminal.
- Disconnect the original dome light.
- Detach metal mounting plate from Rockville unit (see fig.1).
- Attach the metal mounting plate to the roof (see fig.2) using self tapping screws (not provided). Make sure screws attach to interior roof liner.
-
Connect ground wire harness in the following order:
Ground wire (black), ACC wire (red). -
Attach the unit to the metal mounting plate using the screws removed in step 2.
- Connection may vary depending on vehicle make and model. Rockville recommends that the installation of this product be performed by an MECP-Certified professional installer.
Fig.1

Fig.2

Fig.3


WARNING:
- Be careful not to screw and puncture the exterior roof.
- Use only the screws supplied.
Install Precautions
- This unit should be install by a qualified technician or service personnel.
• This product is designed to operate with a 12V DC, grounded battery system. - Use proper insulation and fastening materials to prevent electrical short-circuiting.
- Do not connect the red wire of this product directly to the battery terminal. Remember to connect the red wire of this product to the ACC of the ignition key switch. Failure to do so may result in draining of the battery charge prematurely.
- Do not install this product at a position that may cause injuries to the passenger(s) during an accident.
- Due to different car specifications, please ensure that the display monitor is suitably located.
- Do not install this product at a declining angle exceeding 30° .
Wiring

Tip: AV In - Use these to connect an external media deice such as a camera, game console, etc.
AV Out

- Left audio output
- Right audio output
- Video output
Tip: Use these to project the display onto external screens such as the head-rest monitor.

- Black = ground
- Red = ACC +12V
- Black = FM antenna
- Blue = door trigger +
- Green = door trigger -
-
Yellow = battery +
-
Connect the black lead to any bare metal surface on the car chassis or the dome light ground wire.
- Connect the red lead to 12 volt ACC wire.
Troubleshooting
| No display | Check for loose or disconnected cables. Check input mode settings on the on-screen menu. Check ground cable. Make sure the area it is attached to has no rust or corrosion and is clean. Make sure ground connection is very tight and secure. |
| No sound/distorted sound | Check for loose or disconnected cables. Try using different FCA cables. Check audio output menu settings. |
| No power | Check for loose or disconnected cables (power and ground). Check for blown fuses. Make sure to replace fuse with one of the same type. |
| Poor quality playback | Check the disc for scratches. Clean the disc if needed. |
| Disc Error is dis-played on screen | Turn the unit off and then back on. Check that the disc has been inserted properly: label side up. Check that the disc is in the proper format. Check region settings (PAL/NTSC). |
| Remote control does not work | Check for any obstructions between the remote and the remote sensor on the unit. Check the remote battery. Bring the remote closer to the unit. Make sure you've removed the plastic tab from the battery compartment. |
Visit us at:
RockvilleAudio.com
Due to constant improvements, these specifications are subject to change without notice.
Copyright 2017
- ROCKVILLE
- CONTENTS
- PRECAUTIONS
- RESETTING THE UNIT
- POWERING THE UNIT
- USER INTERFACE
- UNIT SETTINGS
- SWITCH MEDIA DEVICES
- MEDIA FILES
- DVD
- GETTING STARTED
- CONTROL
- PLAYABLE DISCS
- USB/SD
- PLAYABLE MEDIA FORMATS
- HDMI INPUT
- ADVANCED FUNCTIONS
- PICTURE CONTOL VIA UNIT
- PICTURE CONTOL VIA REMOTE CONTROL
- FM TRANSMITTER SETUP VIA UNIT
- FM TRANSMITTER SETUP VIA REMOTE
- GAME MODE
- INSTALLATION GUIDE
- INSTALL INSTRUCTIONS (ALL UNITS)
- WARNING
- INSTALL PRECAUTIONS
- WIRING
- AV OUT
- ROCKVILLEAUDIO.COM
Marque : Rockville
Modèle : RVD10HD
Catégorie : Écran LCD avec lecteur DVD intégré