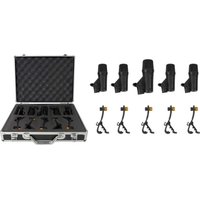
PRO-D5 KIT - Microphone Rockville - Notice d'utilisation et mode d'emploi gratuit
Retrouvez gratuitement la notice de l'appareil PRO-D5 KIT Rockville au format PDF.


| Type de produit | Microphone dynamique |
| Marque | Rockville |
| Modèle | PRO-D5 KIT |
| Directivité | Cardioïde |
| Réponse en fréquence | 50 Hz - 15 kHz |
| Impédance | 600 Ω |
| Sensibilité | -54 dBV/Pa |
| Connectique | XLR 3 broches |
| Alimentation | Passive (sans pile) |
| Matériau du boîtier | Métal |
| Dimensions (L x Ø) | 185 x 50 mm |
| Poids | 320 g |
| Accessoires inclus | Clip micro, adaptateur de pied, câble XLR |
| Utilisation recommandée | Chant, parole, sonorisation |
| Entretien | Nettoyer avec un chiffon doux et sec |
| Sécurité | Éviter les chocs et l'humidité |
| Réparabilité | Composants standards, soudure possible |
| Garantie | 2 ans |
| Couleur | Noir |
FOIRE AUX QUESTIONS - PRO-D5 KIT Rockville
Questions des utilisateurs sur PRO-D5 KIT Rockville
0 question sur cet appareil. Repondez a celles que vous connaissez ou posez la votre.
Poser une nouvelle question sur cet appareil
Téléchargez la notice de votre Microphone au format PDF gratuitement ! Retrouvez votre notice PRO-D5 KIT - Rockville et reprennez votre appareil électronique en main. Sur cette page sont publiés tous les documents nécessaires à l'utilisation de votre appareil PRO-D5 KIT de la marque Rockville.
MODE D'EMPLOI PRO-D5 KIT Rockville
ROCKVILLE
PRO-D5 KIT
5 PIECE DRUM MIC KIT w/METAL BASS and
SNARE MICROPHONES + CLIPS
OWNER'S MANUAL
ATTENTION:
WATCH THIS VIDEO BEFORE FIRST USE!
Who reads manuals?
Scan the QR code or go to rockvillesupport.com/pro-d5-kit to access how-to video(s), the owner's manual, and other important information you may need to get the most out of your item.
If you prefer written instructions, please read ahead!
With Rockville you get many options.

Missing items? If you ordered a bundle that includes more than one product and you are missing part of your bundle then it just means your order shipped from two different warehouses. You will receive the remaining items very soon. If you have any concerns or inquiries, feel free to call our customer support center at 1-646-758-0144, 24 hours a day/7 days a week.
Thank you for purchasing this Rockville PRO-D5 5 Piece Drum Mic Kit. Please read this owner's manual carefully for proper use of your PRO-D5 5 Piece Drum Kit. Should you need technical assistance please call our technical help line at 1-646-758-0144, 24 hours a day/7 days a week.
Includes
• (1) Bass drum mic
• (4) Snare/Tom drum mics
• (5) Mic clamps
• (1) Aluminum travel/protective case with foam
- Manual
- Warranty card
IMPORTANT SAFETY INSTRUCTIONS
- Never drop the microphones or subject them to extreme shock.
• Always store the mics in their padded case to protect them during transport. - Avoid exposing the microphones to extremely high temperatures and humidity.
- Avoid leaving the microphones in direct sunlight for long periods of time.
- Avoid getting the microphones wet.
- If the microphones are used in a high-moisture application, such as an outdoor performance, wipe off the microphones with a dry cloth and permit them to air dry. Do not store the mics until all moisture has evaporated.
Set-Up
Clamp Description:

Attaching the Clamps and Microphones:
- Use the microphone clips (included) to attach the mics to the drums. Place the lower portion of the clamp under the rim of the drum (fig. a). After securing the lower portion of the clamp under the rim, lift the clamp until the groove in the upper portion clicks onto the top edge of the rim (fig. b).


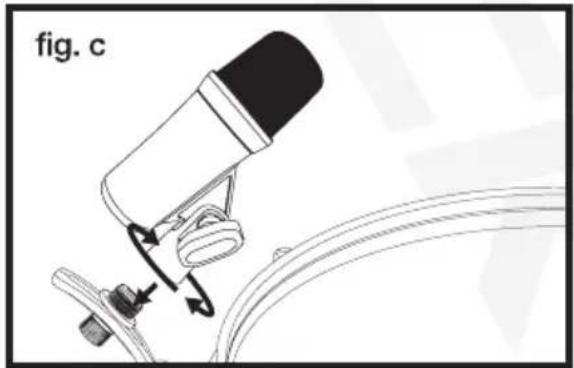
- Attach the mic to the clamp by screwing the adjustable base onto the adapter (fig. c).

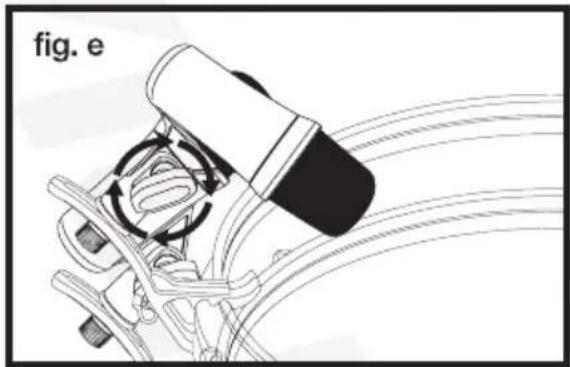
- To adjust the angle of the mic, loosen the knob and tilt the mic to the desired position (fig. d). To secure the mic in the current position, turn the knob clockwise to tighten it (fig. e).

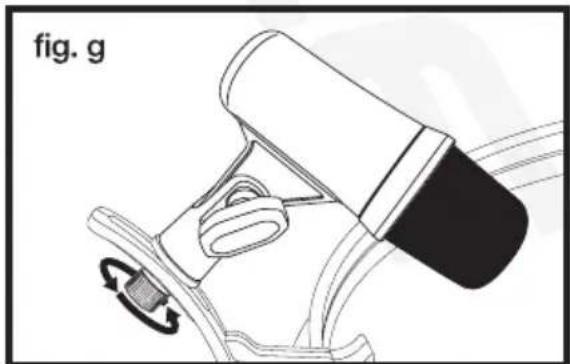
- To adjust the position of the mic, loosen the thumbscrew and slide the mic to the desired position (fig. f). Once the mic is in position, tighten the thumbscrew (fig. g). Do not over-tighten.

Set-Up (continued)
Positioning the Mics:
The microphones included in the PRO-D5 kit have cardioid pick up patterns so that they pick up sound directly in front of the microphones and reject the sound behind them. This means that in order to avoid picking up ambient sound, the microphones should be set so that they are facing away from cymbals or other drums.
Microphones, but especially uni-directional or cardioid microphones, exhibit the “proximity effect.” It is defined as a change in the microphone’s frequency response based on it’s position relative to the sound source. Any adjustments of the microphone’s position or angle can make a difference in the sound quality. When you point a cardioid mic directly at the sound source (also known as “on axis”) you will get the best frequency response. Pointing the microphone slightly away or off axis, will cause the low frequency response to drop off and it will sound thinner. Please note that directional microphones progressively boost bass frequencies as the microphone is placed in closer proximity to the source. This can result in a warmer and more “boomy” sound.

1. Tom Drums:
- Place microphones near the rim, approximately 1 to 4 inches above the drums.
- For a deeper sound, the mic should be pointed towards the middle of the head. Aim the mics closer to the edge of the head to capture more overtones.
2. Snare Drums:
- Place the microphone near the rim, approximately 1 to 4 inches above the drum.
- To capture more "stick attack", aim the microphones towards the middle of the head. Aim the mics closer to the edge of the head to capture more overtones.
- Pointing the rear side of the microphone towards the hi-hat will help to reduce cymbal noise in the snare drum signal.
3. Kick Drums:
• The microphone should be placed in front of the kick drum.
- If there is a hole in the resonant head, place the microphone inside the hole for better isolation.
- For increased attack, remove the resonant head and place the microphone closer to the beater head.
- Placing a pillow inside the kick drum will reduce the sustain and overtones for a more focused attack.
Wiring the Mics:
These microphones feature a 3-pin XLR connector to connect to any mixer, audio-interface, or mic pre-amp. Using a standard XLR cable (not included), connect the female end to the microphone's connector and the male end to appropriate port on the sound processing device. Some devices use 1/4 inputs, in this instance you will require a female XLR to 1/4 cable.
Room Acoustics:
An appropriate recording space is the key to achieving great results when recording drums. These mics will pick up the sound of the recording space to a degree, so its a good idea to ensure you have acoustic room treatment on the walls and ceiling above the drums to avoid room reflections and minimize phasing issues.
Features and Specifications
Bass Drum Microphone:
- Steel grill
- Aluminum body
• Zinc alloy hardware
• Fits any mic stands
• Anti-wind filter inside the grill - Element: Dynamic
• Polar Pattern: Cardioid
• Frequency response is engineered to be perfect for kick drums - Studio quality performance make these perfect for recording or live shows
• Sounds great even at high SPL levels - Rejection of unwanted noises
- XLR Output
- Integrated flexible mounting hardware
• Large diaphragm delivers accurate low frequencies
• Frequency Response: 30Hz – 12KHz - Sensitivity: -58dB ±5dB (0dB = 1V/Pa at 1KHz)
Features and Specifications (continued)
• Output Impedance: 600Ω ±30% (at 1kHz)
• Microphone Length: 4.72 inches
- Microphone Max. Diameter: 2.01 inches
• Microphone Weight: 0.77 lbs
Tom/Snare Drum Microphone:
- Steel grill
- Aluminum body
• Zinc alloy hardware - Fits any mic stands
• Anti-wind filter inside the grill - Element: Dynamic
• Polar Pattern: Cardioid
• Large diaphragm delivers accurate frequency response
• Frequency response is engineered to be perfect for tom-toms and snare drums - Studio quality performance make these perfect for recording or live shows
• Sounds great even at high SPL levels - Rejection of unwanted noises
- XLR Output
- Integrated flexible mounting hardware
• Frequency Response: 60Hz – 13kHz - Sensitivity: -54dB ±3dB (0dB = 1V/Pa at 1kHz)
• Output Impedance: 600Ω ±30% (at 1kHz)
• Microphone Length: 4.53 inches
• Microphone Max. Diameter: 1.61 inches
• Microphone Weight: 0.44 Lbs
Troubleshooting
| PROBLEM | SOLUTION |
| No sound or faint sound | 1. Verify all sound system connections.2. Check the volume levels of your sound processing device.3. Make sure the mics are not positioned too far from the sound source. |
| Rattling or cracking sounds | This may be caused by moisture in the microphone. If moisture is found inside the microphone, allow it to dry at room temperature. Avoid using the mic in hot, humid environments and avoid contact with liquids. |
| Feedback | 1. Move the microphones away from nearby speakers.2. Place the microphones behind speakers.3. Change the microphones' orientation so that they are not pointed directly at any speaker. |
| Inconsistent mic signal | 1. Make sure the mics are properly connected.2. Make sure the cables are not damaged.3. Check the requirements of the sound processing device and make sure you are using the appropriate cable. |
| Distortion or noise | 1. Make sure you are using windscreens (included).2. Point the mic away from cymbals, other drums, and nearby speakers. |
RockvilleAudio.com
©2023 ROCKVILLE // The information presented is subject to change and/or improvement without notice.
- ROCKVILLE
- PRO-D5 KIT
- OWNER'S MANUAL
- ATTENTION
- WATCH THIS VIDEO BEFORE FIRST USE
- WHO READS MANUALS
- INCLUDES
- IMPORTANT SAFETY INSTRUCTIONS
- SET-UP
- CLAMP DESCRIPTION
- ATTACHING THE CLAMPS AND MICROPHONES
- SET-UP (CONTINUED)
- POSITIONING THE MICS
- TOM DRUMS
- SNARE DRUMS
- KICK DRUMS
- WIRING THE MICS
- ROOM ACOUSTICS
- FEATURES AND SPECIFICATIONS
- BASS DRUM MICROPHONE
- FEATURES AND SPECIFICATIONS (CONTINUED)
- TOM/SNARE DRUM MICROPHONE
- ROCKVILLEAUDIO.COM
Marque : Rockville
Modèle : PRO-D5 KIT
Catégorie : Microphone