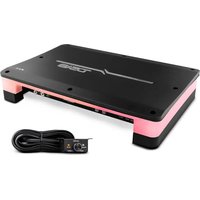
FX1 - Recepteur DS18 - Notice d'utilisation et mode d'emploi gratuit
Retrouvez gratuitement la notice de l'appareil FX1 DS18 au format PDF.


| Type de produit | Récepteur audio marin |
| Marque | DS18 |
| Modèle | FX1 |
| Dimensions (L x H x P) | 188 x 58 x 168 mm (norme DIN simple) |
| Poids | 0,85 kg |
| Alimentation | 12 V DC (borne de batterie) |
| Puissance de sortie | 4 x 50 W max (crête) |
| Types de radio | AM/FM avec RDS |
| Connectivité sans fil | Bluetooth 5.0 (mains libres et streaming) |
| Entrées audio | 1 x USB, 1 x AUX 3,5 mm, 1 x entrée antenne |
| Sorties audio | 4 x haut-parleurs, 2 x RCA pré-out |
| Fonctions principales | Radio, Bluetooth, USB, AUX, télécommande, horloge |
| Indice de protection | IPX6 (résistant aux éclaboussures) |
| Matériau du châssis | Châssis métallique avec face avant en plastique ABS |
| Entretien et nettoyage | Nettoyer avec un chiffon doux sec ; éviter les produits abrasifs |
| Sécurité | Fusible intégré, protection contre les inversions de polarité, protection thermique |
| Pièces détachées et réparabilité | Face avant amovible, câbles d'alimentation fournis, télécommande incluse |
| Accessoires inclus | Kit de montage, câble d'alimentation, télécommande, piles CR2025 |
| Garantie | 1 an |
| Température de fonctionnement | -20 °C à +60 °C |
| Consommation électrique | 15 A max (avec musique) |
FOIRE AUX QUESTIONS - FX1 DS18
Questions des utilisateurs sur FX1 DS18
0 question sur cet appareil. Repondez a celles que vous connaissez ou posez la votre.
Poser une nouvelle question sur cet appareil
Téléchargez la notice de votre Recepteur au format PDF gratuitement ! Retrouvez votre notice FX1 - DS18 et reprennez votre appareil électronique en main. Sur cette page sont publiés tous les documents nécessaires à l'utilisation de votre appareil FX1 de la marque DS18.
MODE D'EMPLOI FX1 DS18
DS18®

FOR MORE INFORMATION
PLEASE VISIT
DS18.COM
WE LIKE IT LOUD
OWNER'S MANUAL
MANUAL DEL USUARIO
FX1 / FX4 / FX6
FLUSH OR SURFACE MOUNT CLASS-D AMPLIFIER
AMPLIFICADOR CLASE D PARA MONTAJE EMPOTRADO O EN SUPERFICIE
1 CH / 4 CH / 6 CH
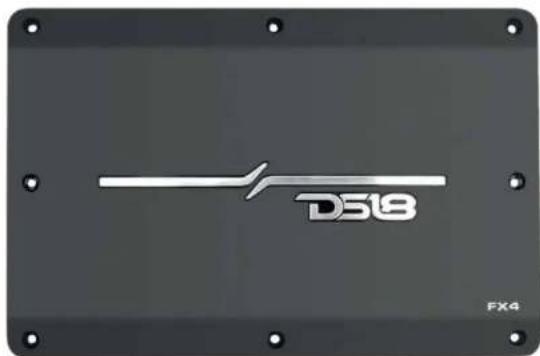
DS18®

RGB
ENGLISH | ESPAÑOL


FX1 / FX4 / FX6
FLUSH OR SURFACE MOUNT CLASS-D AMPLIFIER
AMPLIFICADOR CLASE D PARA MONTAJE EMPOTRADO O EN SUPERFICIE
1 CH / 4 CH / 6 CH
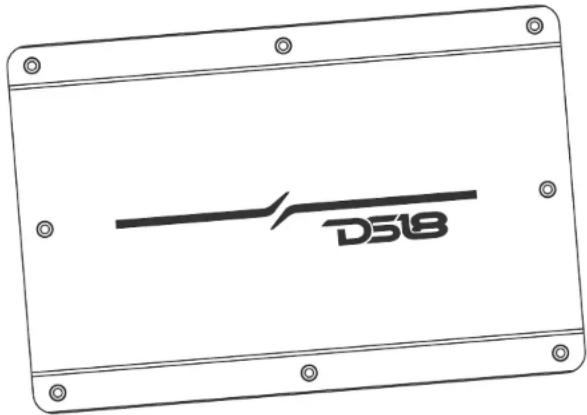
CONTENT / CONTENIDO
FEATURES / CARACTERÍSTICAS....2
ELEMENTS DESCRIPTION / DESCRIPCIÓN DE LOS ELEMENTOS....3
AMPLIFIER INSTALLATION / INSTALACIÓN DE AMPLIFICADOR 6
WIRING / CABLEADO....8
SPECIFICATIONS / ESPECIFICACIONES....11
DIMENSIONS / DIMENSIONES....14
TROUBLESHOOTING / SOLUCIÓN DE PROBLEMAS....16
DS18®
INTRODUCTION
Congratulations on the purchase of your FX Series Amplifier from DS18. Designed and manufactured for professional car audio applications that require a high-quality, powerful amplifier with small footprint for easy installation.
Unlike standard amplifiers with one method of installation, DS18's FX Series Amplifiers come equipped with a surface mode adapter allowing it to be installed in flat and flush applications. This addition offers flexibility in positioning the amplifier, making it perfect for custom car audio builds and guarantees optimal performance without compromising on space or aesthetics. This innovative adapter is also integrated with mesmerizing LED lights. These built-in LED lights add a touch of style and flair to your car audio setup, creating an eye-catching focal point that complements the amplifier's exceptional performance.
Compared to other digital class amplifiers, DS18's FX Series Amplifiers provide the best performance at a very low operating temperature, making it perfect for car audio applications. Get ready to experience powerful and crystal-clear sound like never before as the FX Series Amplifier takes your car audio system to places unthought of.
Thank you for choosing DS18! We're confident you'll be satisfied with your purchase for years to come.
FEATURES
- IPX5 Water Resistant with Coated 4 layers PCB for Prevent Corrosion.
- Flush or Surface Installation Mode Designed for Easy and Clean Install on ATV/RV Roofs, Boat Walls, Car Audio Panels or Racks.
- Stable and Reliable Class D Circuit Design.
- LED Clipping Indicator for Easier Adjustment.
- Selectable/Variable Crossovers.
- Surface Mode Adapter with LED Digital Chasing Lights.
- Direct Insert Power and Speaker Terminals.
- Easy Installation.
INTRODUCCIÓN
Felicitaciones por la compra de su amplificador de la serie FX de DS18. Diseñado y fabricado para aplicaciones profesionales de audio para automóviles que requieren un amplificador potente y de alta calidad con un tamaño reducido para una fácil instalación.
A diferencia de los amplificadores estándar con un método de instalación, los amplificadores de la serie FX de DS18 vienen equipados con un adaptador de modo de superficie que permite su instalación en aplicaciones planas y empotradas. Esta adición ofrece flexibilidad en el posicionamiento del amplificador, lo que lo hace perfecta para construcciones personalizadas de audio para automóviles y garantiza un rendimiento óptimo sin comprometer el espacio o la estética. Este innovador adaptador también está integrado con fascinantes luces LED. Estas luces LED incorporadas agregan un toque de estilo y estilo a la configuración de audio de su automóvil, creando un punto focal llamativo que complementa el rendimiento excepcional del amplificador.
En comparación con otros amplificadores de clase digital, los amplificadores de la serie FX de D518 brindan el mejor rendimiento a una temperatura de funcionamiento muy baja, lo que los hace perfectos para aplicaciones de audio para automóviles. Prepárese para experimentar un sonido potente y nildo como nunca antes, ya que el amplificador de la serie FX lleva el sistema de audio de su automóvil a lugares insospechados.
¡Gracias por elegir DS 18! Estamos seguros de que estará satisfecho con su compra en los años venideros.
CARACTERÍSTICAS
- IPX5 resistente al agua con PCB recubierto de 4 capas para evitar la corrosión.
- Modo de instalación al ras o en superficie diseñado para una instalación fácil y limpia en techos de vehículos todo terreno/caravanas, paredes de embarcaciones, paneles de audio para automóviles o estantes.
- Diseño de circuito de clase D estable y confiable.
- Indicador de recorte LED para un ajuste más fácil.
- Crossovers seleccionables/variables.
- Adaptador de modo de superficie con luces de movimiento digitales LED.
- Terminales de altavoz y alimentación de inserción directa.
- Pequeño tamaño para una fácil instalación.
FX AMPS
ELEMENTS DESCRIPTION / DESCRIPCIÓN DE LOS ELEMENTOS
FX1
FX4

FX6

DS18®
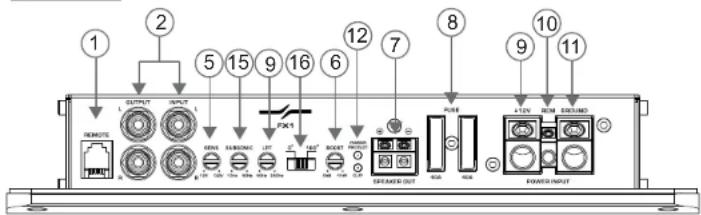
- REMOTE - Connect the remote level control to this terminal. The remote level controls allows adjustment of the subwoofer level from a remote location in the vehicle.
- RCA Inputs: These RCA inputs are designed to work seamlessly with source units featuring RCA or Line level outputs. To ensure optimal amplifier performance, it's important that your source unit provides a minimum output level of 100mV. We highly recommend the use of high-quality twisted marine cables (Tinned OFC) with these inputs. This choice not only enhances signal integrity but also helps reduce the risk of corrosion, a frequent issue in marine installations that can lead to failures over time. Invest in the best cables for a long-lasting, top-notch audio experience on the water.
- FILTER - Mode and FREQ Control - These controls allow control over the frequencies played for the channels. There is an option for Low Pass, Full Range, or High Pass. In LPF or HPF mode, the crossover frequency can be tuned from 40Hz to 2KHz.
- X-OVER - X-OVER selector for HPF (high pass) / LPF (low pass) / FLAT (full range) in front or rear channel.
- SENS - Knob for input gain adjustment, this ranges from 0.25V to 6V input signal.
- BASS BOOST - The variable bass boost control on the amplifier is designed to give you increased output, 0–12dB, at 45Hz. The setting for this control is subjective.
- Speaker Terminals (+/-) - Connect your speakers to these terminals. Make sure to keep an eye on the speaker polarity throughout your system. Ignoring this can lead to a loss of bass response and a drop in the overall audio quality.
- FUSE: standard automatic fuse, you must use the same power fuse if you need to change it.
-
Power Terminal (+12V) - This is the main power input for the amplifier and must be connected directly to the positive terminal of the watercraft's battery for proper operation. Use caution when installing (+12) power cable in the Boat. Avoid running this cable parallel with RCA cables, antennas, or other sensitive equipment due to
-
REMOTE - Conecte el control de nivel remoto a este terminal. Los controles de nivel remotos permiten el ajuste del nivel del subwoofer desde una ubicación remota en el vehículo.
- Entradas RCA - Estas entradas RCA se utilizan con unidades fuente que tienen salidas de nivel de línea o RCA. (Las unidades fuente necesitan un nivel mínimo de salida de 100mV para el correcto funcionamiento del amplificador). Recomendamos solo cables marinos trenzados de alta calidad (OFC estañado) para disminuir la posibilidad de corrosión, que es una falla común en las instalaciones marinas.
- FILTRO - Control de modo y FREQ - Estos controles permiten el control sobre las frecuencias reproducidas para los canales. Hay una opción para paso bajo, rango completo o paso alto. En el modo LPF o HPF, la frecuencia de cruce se puede ajustar de 40 Hz a 2 KHz.
- X-OVER - Selector X-OVER para HPF (paso alto) / LPF (paso bajo) / FLAT (rango completo) en canal delantero o trasero.
- SENS - Perilla para ajuste de ganancia de entrada, esta va desde 0.25V hasta 6V de señal de entrada.
- BASS BOOST - El control de refuerzo de graves variable en el amplificador está diseñado para brindarle una mayor salida, 0–12dB, a 45Hz. La configuración de este control es subjetiva.
- Terminales de altavoces (+/-) - Conecte los altavoces a estos terminales. Observe la polaridad de los altavoces en todo el sistema. Una fase incorrecta puede provocar la pérdida de la respuesta de graves y/o una mala calidad general del sonido.
- FUSIBLE: fusible automático estándar, debe usar el mismo fusible de potencia si necesita cambiarlo.
- Terminal de alimentación (+12 V) - Esta es la entrada de alimentación principal del amplificador y debe conectarse directamente al terminal positivo de la batería de la embarcación para que funcione correctamente. Tenga cuidado al instalar el cable de alimentación (+12) en la embarcación. Evite tender este cable en paralelo con cables RCA, antenas u otros equipos sensibles debido a las corrientes masivas que pueden inducir ruido en el sistema de audio. También es muy importante tener una conexión firme y segura para obtener el máximo rendimiento. Recomendamos usar cable OFC estañado 4AWG con el amplificador de 4 canales.
FX AMPS
massive currents that can induce noise into the audio system. It is also very important to have a tight, secure connection for maximum performance. We recommends using 4AWG Tinned OFC wire with the 4 ch amplifier.
-
Remote Terminal - The Amplifier can be turned on by applying 12 volts to this terminal Typically this voltage is supplied by a wire from the source unit marked "remote" or "power antenna".
-
Ground Terminal - This is the main negative (-) input for the amplifier and must be connected directly to the negative terminal of the watercraft's battery for proper operation. Avoid running this cable parallel with RCA cables, antennas, or other sensitive equipment due to massive currents that can induce noise into the audio system. It is also very important to have a tight, secure connection for maximum performance. We recommends using 4AWG Tinned OFC wire with the 4 ch amplifier.
-
POWER/PROTECT / CLIP LED Indicator: The POWER LED lights up in green when the amp is turned on, indicating it's ready for action. If the amp encounters a short circuit or activates thermal protection, the PROTECT LED will illuminate, signaling a safety precaution. In such cases, it's essential to inspect the amplifier or allow it to cool down before restarting. The CLIP LED comes into play when the amplifier encounters clipping, a situation where it struggles to produce the required voltage for the input signal. Continuous or prolonged clipping can potentially harm your amplifier and speakers. If you observe clipping, we recommend adjusting the gain settings and your head unit's volume levels. For detailed instructions on setting your amplifier's gain levels correctly, please refer to section "1. Gain Control" on this page.
-
INPUT MODE - In 2-channel position the amplifier can use one input signal on the 1&2 channels to drive both 1&2 and 3&4 outputs simultaneously. In 4-channel position, the 1&2 and 3&4 inputs are separated and only output to their respective channels.
-
PHASE - The phase setting synchronizes the phase of your Subwoofer output to that of the other speakers in the car. Set your amp to 0 and listen to a track with some bass. Afterward, set the Phase setting to 180 degrees, and see if the bass output improves or becomes worse with the same track. Leave the switch set to whichever setting yields the best results.
-
Terminal Remoto - El amplificador se puede encender aplicando 12 voltos a este terminal. Por lo general, este voltaje lo suministra un cable de la unidad fuente marcado como "remoto" o "antena eléctrica".
-
Terminal de Tierra - Esta es la entrada principal negativa (-) del amplificador y debe conectarse directamente a la terminal negativa de la batería de la embarcación para que funcione correctamente. Evite tender este cable en paralelo con cables RCA, antenas u otros equipos sensibles debido a las corrientes masivas que pueden inducir ruido en el sistema de audio. También es muy importante tener una conexión firme y segura para obtener el máximo rendimiento. Recomendamos usar cable OFC estañado 4AWG con el amplificador de 4 canales.
-
LED POWER / PROTECT/CLIP - EI LED POWER se iliuma en verde cuando el amplificador está encendido. Cuando el amplificador está en cortocircuito o protección térmica, el LED PROTECT está encendido. Debe verificar el amplificador o esperar a que la temperatura del amplificador se entríe antes de reiniciar. Cuando el amplificador encuentra recorte, el LED CLIP se encenderá. El recorte ocurre cuando un amplificador no puede generar suficiente voltaje para reproducir la señal de entrada. El recorte continuo o a largo plazo puede causar daños graves a su amplificador y altavoces. Si experimenta saturación, se recomienda que ajuste la configuración de ganancia y los niveles de volumen de la unidad principal. Consulte "1. Control de ganancia" en esta página para obtener instrucciones detalladas sobre cómo configurar correctamente los niveles de ganancia de su amplificador.
-
MODO DE ENTRADA - En la posición de 2 canales, el amplificador puede usar una señal de entrada en los canales 1 y 2 para controlar las salidas 1 y 2 y 3 y 4 simultáneamente. En la posición de 4 canales, las entradas 1 y 2 y 3 y 4 están separadas y solo eríten a sus respectivos canales.
-
FASE: la configuración de fase sincroniza la fase de la salida de su subwoofer con la de los otros altavoces del automóvil. Pon tu amplificador a 0 y escucha una pista con algo de bajo. Luego, establezca la configuración de fase en 180 grados y vea si la salida de graves mejora o empleora con la misma pista. Deje el interruptor configurado en la configuración que produzca los mejores resultados.
DS18®
-
SUBSONIC FILTER - Adjust the frequency setting of the subsonic crossover. The frequency range is 10Hz-50 Hz. Frequencies lower than the setting will be filtered out of the audio signal.
-
LPF: Low pass frequency adjusting knob, the frequency ranges from 50Hz to 250Hz.
-
FILTRO SUBSONICO - Ajuste la configuración de frecuencia del cruce subsónico. El rango de frecuencia es de 10 Hz a 50 Hz, Las frecuencias inferiores a la configuración se filtrarán de la señal de audio.
-
LPF: perilla de ajuste de frecuencia de paso bajo, la frecuencia varia de 50 Hz a 250 Hz.
FLUSH MOUNT INSTALLATION /
INSTALACIÓN EMPOTRADA

SURFACE MOUNT INSTALLATION / INSTALACIÓN DE MONTAJE EN SUPERFICIE
Hole Cut for Mounting / Corte del Orificio para el montaje FX1/FX4: 9.2"x5.8" / 233.7x147mm FX6: 14.5"x5.8" / 370x147mm

This frame has digital LEDs that work only with a digital light module (included) this module is connected directly to a 12 volt 2 amp capacity circuit with an on/off switch (do not use remote power from radio as which is not enough current for the lights and may damage the radio).
A. In case you want to use an existing module in your system or to manage the same sequence in several frames in your installation you can cut this included module and use the 3 wires directly from the lights that are (Red +), (Black -), (White Digital Input) and connect it to your existing digital lighting module.
Este marco tiene LED digitales que funcionan unicamente con un modulo de luces digital (incluido) este modulo va conectado directamente a un circuito de 12 voltos y 2 amperios de capacidad con un switch para apagarlo y prenderlo (no use la corriente remota del radio ya que no es suficiente corriente para las luces y puede dañar el radio).
A. En caso de querer usar un modulo existente en tu sistema o para manejar la misma secuencia en varos marco en su instalación puede cortar este modulo incluido y usar los 3 cables directamente de las luces que son (Rojo +), (Negro -) y (Blanco Entrada Digital) y conectarlo a su modulo de luces digital existente
FX AMPS
AMPLIFIER INSTALLATION
Amplifiers are generally mounted in closed compartments of the vehicle or watercrafts. Select a location that will provide adequate ventilation for the amplifier. Avoid mounting the amplifier in exposed areas.
Secure the amplifier with the screws provided. Before securing the amplifier, inspect the mounting location carefully to ensure that you do not drill into or damage any electrical, hydraulic, fluid, or fuel lines.
- Before you start, disconnect the negative cable from the battery, tape up the end so it is isolated from the battery.
- Run an appropriate gauge wire from the battery to the amplifier. Plan this part of the installation carefully. This cable will carry very high current. If it should short to the body and it is not properly fused, it could catch fire.
- Connect the power (+) wire to the positive post of the battery using a marine grade fuse holder capable of the total current load of all amplifiers connected and locate it as close as possible to the battery.
- Connect the Ground (-) wire to the negative post of the battery.
- Run the speaker wire to the speakers. It is advised that you leave some extra wire at this point. You can fix it later. This amplifier is a multi-channel amplifier design, meaning it has more than one channel of speaker outputs. Connect this carefully and neatly; strip your wire back and twist the exposed leads. If the wires ever contact each other the amplifier will go into protection mode.
- Connect the speaker wires to the amplifier and speakers (make sure the amp is off first). Make sure the polarity (+) and (-) is correct.
- Connect the remote wire and the RCA audio signal from the Head Unit to the amplifier.
- If you haven't done so already, mount the amplifier now. Only after this step - you should connect back the negative cable at the battery.
- Now is a good time to turn on the amp for the first time. Your FX Series amplifier offers a
INSTALACIÓN DE AMPLIFICADOR
Los amplificadores generalmente se montan en compartimentos cerrados del vehículo o embarcaciones. Seleccione una ubicación que proporcione una ventilación adecuada para el amplificador. Evite montar el amplificador en áreas expuestas.
Asegure el amplificador con los tomillos proporcionados. Antes de asegurar el amplificador, inspeccione cuidadosamente la ubicación de montaje para asegurarse de no perforar ni dañar ninguna línea eléctrica, hidráulica, de fluido o de combustible.
- Antes de comenzar, desconecte el cable negativo de la batería, pegue el extremo con cinta adhesiva para que quede aislado de la batería.
- Tienda un cable de calibre adecuado desde la batería hasta el amplificador. Planifique esta parte de la instalación con cuidado, este cable transportará una corriente muy alta. Si tiene un cortocircuito en algun lugar y no está correctamente protejido con fusible, podría incendiarse.
- Conecte el cable de alimentación (+) al borne positivo de la batería con un portafusibles de grado marino capaz de soportar la carga de corriente total de todos los amplificadores conectados y ubiquelo lo más cerca posible de la batería.
- Conecte el cable de tierra (-) al poste negativo de la batería.
- Tienda el cable del altavoz hasta los altavoces. Se aconseja que deje algo extra alambre en este punto. Puedes arreglarlo más tarde. Este amplificador tiene un diseño de amplificador multicanal, lo que significa que tiene más de un canal de salidas de altavoz. Conecte esto con cuidado y prolijamente; Pele el cable hacia atrás y retuerza, los cables expuesto. Si los cables alguna vez entran en contacto, el amplificador entrará en modo de protección.
- Conecte los cables de los altavoces al amplificador y los altavoces (asegúrese de que el amplificador esté apagado primero). Asegúrese de que la polaridad (+) y (-) sea correcta.
- Conecte el cable remoto y la señal de audio RCA la unidad principal al amplificador.
- Si aún no lo ha hecho, monte el amplificador ahora. Solo después de este paso, conecte de nuevo el cable negativo en la batería.
- Ahora es un buen momento para encender el amplificador por primera vez. Este amplificador de la Serie
comprehensive set of controls, including crossover and gain adjustments, to fine-tune your speaker system. Now, it's time to harness the full potential of these controls to achieve exceptional sound quality.
WARNING
Professional installation by an authorized DS18 amps dealer is highly recommended! Otherwise, the performance of your new gear may not be satisfactory. In the event that you decide to do your own installation, please read and follow this manual very carefully. Failure to do so may compromise the integrity of this product, your vehicle, and possibly void the product warranty.
DS18®
FX tiene todos los controles necesarios para ajustar a tu sistema de altavoces como crossover y el ajuste de ganancia, es momento de ajustarlos correspondientemente para que tengas un buen resultado en calidad de sonido.
PRECAUCIÓN
¡Se recomienda encarecidamente la instalación profesional por parte de un distribuidor autorizado de amplificadores DS18! De lo contrario, el rendimiento de su nuevo equipo puede no ser satisfactorio. En caso de que decida realizar su propia instalación, lea y siga este manual con mucha atención. El no hacerlo puede comprometer la integridad de este producto, su vehículo y posiblemente anular la garantía del producto.
WIRING / CABLEADO
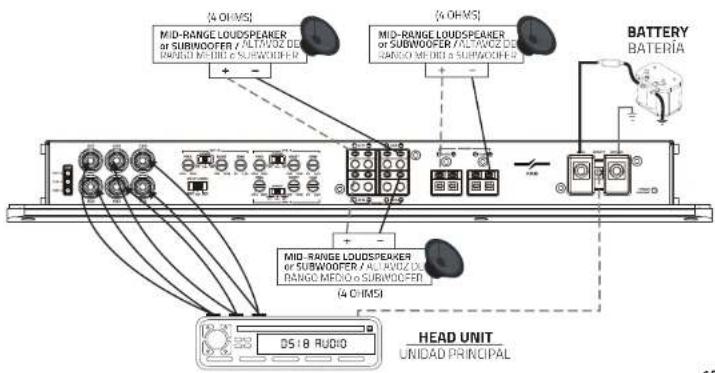
MONO LOW LEVEL (RCA) / NIVEL BAJO MONO (RCA)

- CLIP LED Indicator for Output Clipping: Keep an eye on the CLIP LED indicator located on the remote Level knob. To prevent distortion and ensure your audio remains clear and undistorted, promptly turn down the Gain control.
- GAIN: adjust the output level.
-
POWER: Blue Light = Amplifier is ON.
-
Indicador LED para el monitor de recorte de salida en la perilla de nivel remota, si ve que la luz parpadea, baje la ganancia.
- Ajusta el nivel de salida.
- Luz azul = Amplificador está encendido.
FX AMPS
WIRING / CABLEADO
STEREO LOW LEVEL (RCA)
NIVEL BAJO ESTÉREO (RCA)
FX4
OUTPUT AUDIO SIGNAL TO FEED AN EXTRA AMPLIFIER (FOR EXAMPLE A SUBWOOFER AMPLIFIER).
SALIDA DE SEÑAL DE AUDIO PARA ALIMENTAR UN AMPLIFICADOR EXTRA (POR EJEMPLO UN AMPLIFICADOR PARA SUBWOOFER).
BATTERY BATERÍA
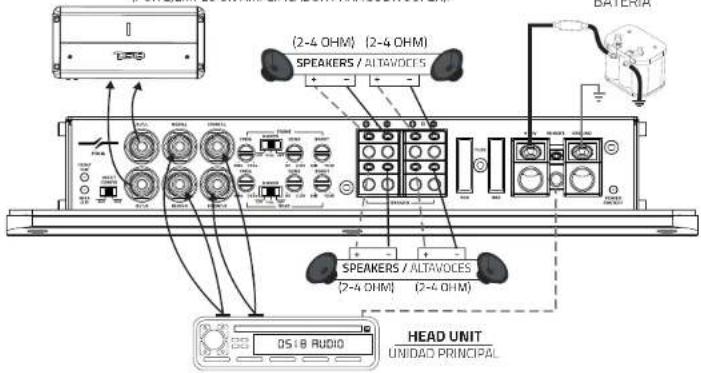
STEREO LOW LEVEL (RCA)
NIVEL BAJO ESTÉREO (RCA)
FX6
(2-4 OHM) (2-4 OHM)
SPEAKERS / ALTAVOCES

9
WIRING / CABLEADO
BRIDGE LOW LEVEL INPUT (RCA)
ENTRADA DE BAJO NIVEL DE PUENTE (RCA)
FX4
OUTPUT AUDIO SIGNAL TO FEED AN EXTRA AMPLIFIER (FOR EXAMPLE A SUBWOOFER AMPLIFIER).
SALIDA DE SEÑAL DE AUDIO PARA ALIMENTAR UN AMPLICADOR EXTRA (POR EJEMPLO UN AMPLICADOR PARA SUBWOOFER).
DS18®
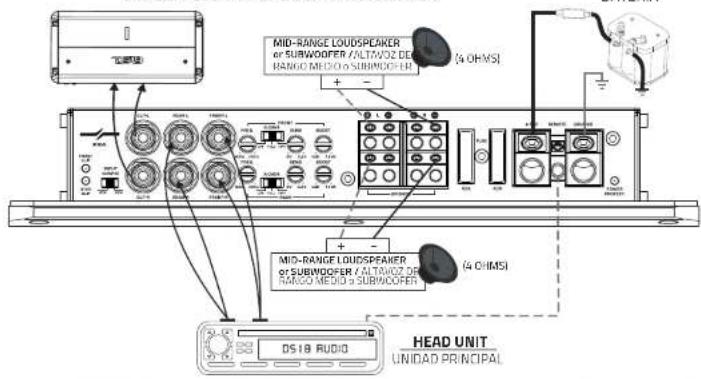
BRIDGE LOW LEVEL INPUT (RCA)
ENTRADA DE BAJO NIVEL DE PUENTE (RCA)
FX6
10
FX AMPS
FX1
SPECIFICATIONS / ESPECIFICACIONES
POWER / POTENCIA
| Total Watts (Peak) / (Pico) Vatios Totales | 2700W |
| RMS Power @ 4 ohm / Poder Continuo @ 4 OHM | 400W |
| RMS Power @ 2 ohm / Poder Continuo @ 2 OHM | 650W |
| RMS Power @ 1 ohm / Poder Continuo @ 1 OHM | 900W |
AUDIO / AUDIO
| Frequency Response / Respuesta de Frecuencia | 15-250Hz |
| Signal to Noise Ratio / Relación Señal / Ruido | 92dB |
| Efficiency @ 4 ohm / Eficiencia @ 4 OHM | 82% |
| Damping Factor / Factor de Amortiguamiento | 75 |
| Input Impedance / Impedancia de Entrada | 30Kohms |
| Total Harmonic Distortion (THD) / Distorsión Armónica Total (THD) | 0.08% |
| Low Level Input Range / Rango de Entrada de Bajo Nivel | 0.2V-12V |
| Selectable X-Over / Cruze Seleccionable | Fixed LPF |
| X-Over Filter Range / Rango de Filtro de cruce | 50-250Hz |
| Bass Boost Range / Rango de Refuerzo de Graves | 0~12dB |
| Bass Boost Frequency / Frecuencia del Refuerzo de Graves | 50Hz |
| Infrasonic Filter / Filtro Infrasónico | 10-50Hz |
| Phase Selector / Selector de Fase | 0/180° |
FEATURES / CARACTERÍSTICAS
| Amplifier Class / Clase de Amplificadores | Digital (D) |
| Amplifier Type / Tipo de Amplificador | Monoblock / Subwoofer / Monobloque / Subwoofer |
| Number of Channels / Número de Canales | 1 Channel / 1 Canal |
| Minimum Impedance / Impedancia Mínima | 1 ohm |
| Led Indicator / Indicador Led | Power | Protect | Clip / Encendido | Protección | Recorte |
| Power Input Terminal Size / Tamaño de Entrada de Alimentación | 4 Ga |
| Fuse Size / Tamaño de Fusible | 80A (2x40A) |
| Remote Level Control / Control de Nivel Remoto | Yes / Si |
| Thermal Protection / Protección Térmica | Yes / Si |
| Over-Load Protection / Protección Contra la Sobrecarga | Yes / Si |
| DC Output Protection / Protección de Salicia de DC | Yes / Si |
| Short Circuit Output Protection / Protección de Salida de Cortocircuito | Yes / Si |
| Voltage Input Protection / Protección de Entrada de Voltaje | Yes / Si (8.8-15.9V) |
| Clipping Protection / Protección de Recorte | Yes / Si |
| Remote Level Control with Clip Indicator and Metal Case | Yes (Included) / Si (Incluido) |
| Control Remoto de Nivel con Indicador de Clip y Caja Metálica |
| RCA Low Level Output / Salida RCA de bajo nivel. | Yes / Si |
| Tiffany RCA Connector / Conector RCA Tiffany. | Yes / Si |
| Very High Efficiency Digital Circuit Design / Diseño de circuito digital de muy alta eficiencia. | Yes / Si |
| PCB with Anti-Corrosion Protection Coating / PCB con revestimiento de protección anticorrosión. | Yes / Si |
| Surface Mount Component Technology / Tecnología de componentes de montaje en superficie. | Yes / Si |
| Quality Control Verification using Audio Precision Instruments. | Yes / Si |
| Verificación de control de calidad utilizando instrumentos de precisión de audio | |
| Surface Mounting with Digital Chasing LED Adapter. | Yes / Si |
| Montaje en superficie con adaptador LED digital | |
| Waterproof Rating / Clasificación impermeable. | IPX5 (Flush Mounting / Montaje Empotrado) |
| Body Color | Finish / Color del Cuerpo | Acabado. | Black Aluminum / Aluminio Negro |
MEASUREMENTS / MEDIDAS
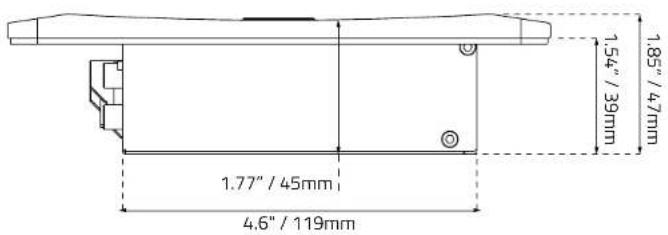
| Body Length / Longitud del Cuerpo | 9" / 228mm |
| Body Width / Ancho del Cuerpo | 4.7" / 120mm |
| Overall Height / Altura Total | 1.85" / 47mm |
| Heatsink Length / Longitud de Disipador de Calor | 10.8" / 275mm |
| Heatsink Width / Ancho de Disipador de Calor | 7.2" / 182mm |
| Mounting Hole / Orificio de Montaje | 9.2"x5.8" / 233.7x147mm |
| Mounting Depth / Profundidad de Montaje | 1.5" / 39mm |
| Gross Single Unit Weight / Peso unitario bruto individual | 2.8Kg |
FX4
DS18®
POWER / POTENCIA
| Total Watts (Peak) / (Pico) Vatios Totales | 3000W |
| RMS Power @ 4 ohm / Poder Continuo @ 4 OHM | 4 x 180W |
| RMS Power @ 2 ohm / Poder Continuo @ 2 OHM | 4 x 250W |
| RMS Power @ 4 ohm Bridge / Poder Continuo @ 4 OHM Puente | 2 x 500W |
AUDIO / AUDIO
| Frequency Response / Respuesta de Frecuencia | 20Hz-20KHz |
| Signal to Noise Ratio / Relación Señal / Ruido | 87dB |
| Efficiency @ 4 ohm / Eficiencia @ 4 OHM | 79% |
| Damping Factor / Factor de Amortiguamiento | 80 |
| Input Impedance / Impedancia de Entrada | 28Kohms |
| Channel Separation / Separación de Canales | 60dB |
| Total Harmonic Distortion (THD) / Distorsión Armónica Total (THD) | 0.15% |
| Low Level Input Range / Rango de Entrada de Bajo Nivel | 0.3-5V |
| Selectable X-Over / Cruze Seleccionable | LPF/HPF/FULL |
| X-Over Filter Range / Rango de Filtro de cruce | 40Hz-2KHz |
| Bass Boost Range / Rango de Refuerzo de Graves | 0-12dB |
| Bass Boost Frequency / Frecuencia del Refuerzo de Graves | 50Hz |
FEATURES / CARACTERÍSTICAS
Amplifier Class / Clase de Amplificadores Digital (D)
Amplifier Type / Tipo de Amplificador....Stereo Full Range / Rango Completo Estereo
Number of Channels / Numero de Canales .... 4 Channels / 4 Canales
Minimum Impedance / Impedancia Minima....2 ohm (Stereo) / 4 ohm (Bridge) Led Indicator / Indicador Led....Power | Protect | Clip / Encendido | Protección | Recorte
Power Input Terminal Size / Tamaño de Entrada de Alimentación ....4 Ga
Fuse Size / Tamaño de Fusible 80A (2x40A)
Remote Level Control / Control de Nivel Remoto....No / No
Thermal Protection / Protección Térmica....Yes / Si
Over-Load Protection / Protección Contra la Sobrecarga ....Yes / Si
DC Output Protection / Protección de Salida de DC....Yes / Si
Short Circuit Output Protection / Protección de Salida de Cortocircuito....Yes / Si
Voltage Input Protection / Protección de Entrada de Voltaje ....Yes / Si (8.8-15.9V)
Clipping Protection / Protección de Recorte .... Yes / Si
Input Channel Selectable / Canal de Entrada Seleccionable....Yes (2/4 Channels) / Si (2/4 Canales)
RCA Low Level Output / Salida RCA de bajo nivel.... Yes / Si
Tiffany RCA Connector / Conector RCA Tiffany....Yes / Si
Very High Efficiency Digital Circuit Design / Diseño de circuito digital de muy alta eficiencia.... Yes / Si
PCB with Anti-Corrosion Protection Coating / PCB con revestimiento de protección anticorrosion..... Yes / Si Surface Mount Component Technology / Terminal de componentos de materia en superficie..... Yes / Si
Surface Mount Component Technology / Tecnologia de componentes de montaje en superficie .... Yes / Si Quality Control Verification using Audio Precision Instruments.
Quality Control Verification using Audio Precision Instruments. Yes 7 Si
Verification de control de calidad utilizando instrumentos de precision de audio Surface Mounting with Digital Chasing LED Adapter Yes / Si
Surface Mounting with Digital Chasing LED Adapter .... Yes / 51 Montaje on superficie con adaptador LED digital
Montaje en superficie con adaptador LED digital Waterproof Rating / Clarificación impermeable IRY5 (Flush Mounting / Montaje Empotrade)
Waterproof Rating / Classification Impermeable....IPX3 (Flush Mounting / Montaje Empotrado) Body Color | Finish / Color del Cuervo | Acabado Black Aluminum / Aluminio Negro
MEASUREMENTS / MEDIDAS
| Body Length / Longitud del Cuerpo | 9" / 228mm |
| Body Width / Ancho del Cuerpo | 4.7" / 120mm |
| Overall Height / Altura Total | 1.85" / 47mm |
| Heatsink Length / Longitud de Disipador de Calor | 10.8" / 275mm |
| Heatsink Width / Ancho de Disipador de Calor | 7.2" / 182mm |
| Mounting Hole / Orificio de Montaje | 9.2"x5.8" / 233.7x147mm |
| Mounting Depth / Profundidad de Montaje | 1.5" / 39mm |
| Gross Single Unit Weight / Peso unitario bruto individual | 2.75kg |
FX AMPS
FX6
SPECIFICATIONS / ESPECIFICACIONES
POWER / POTENCIA
Total Watts (Peak) / (Pico) Vatios Totales 4500W
RMS Power @ 4 ohm / Poder Continuo @ 4 OHM 6 x 180W
RMS Power @ 2 ohm / Pader Continuo @ 2 OHM 6 x 250W
RMS Power @ 4 ohm Bridge / Poder Continuo @ 4 OHM Puente ....3 x 500W
AUDIO / AUDIO
Frequency Response / Respuesta de Frecuencia....20Hz-20KHz
Signal to Noise Ratio / Relación Señal / Ruido 80dB
Efficiency @ 4 ohm / Eficiencia @ 4 OHM ....79%
Damping Factor / Factor de Amortiguamiento 80
Input Impedance / Impedancia de Entrada.... 28Kohms
Channel Separation / Separación de Canales....60dB
Total Harmonic Distortion (THD) / Distorsión Armónica Total (THD) 0.19%
Low Level Input Range / Rango de Entrada de Bajo Nivel 0.3-6V
Selectable X-Over / Cruze Seleccionable ....LPF/HPF/FULL
X-Over Filter Range / Rango de Filtro de cruce 40Hz-2KHz
Bass Boost Range / Rango de Refuerzo de Graves 0\~12dB
Bass Boost Frequency / Frecuencia del Refuerzo de Graves....50Hz
FEATURES / CARACTERÍSTICAS
Amplifier Class / Clase de Amplificadores Digital (D)
Amplifier Type / Tipo de Amplificador ....Stereo Full Range / Rango Completo Estéreo
Number of Channels / Número de Canales 6 Channels / 6 Canales
Minimum Impedance / Impedancia Minima.... 2 ohm (Stereo) / 4 ohm (Bridge)
Led Indicator / Indicador Led....Power | Protect | Clip / Encendido | Protección | Recorte
Power Input Terminal Size / Tamaño de Entrada de Alimentación 4 Ga
Fuse Size / Tamaño de Fusible....120A (2x40A)
Remote Level Control / Control de Nivel Remoto....No / No
Thermal Protection / Protección Térmica....Yes / Si
Over-Load Protection / Protección Contra la Sobrecarga Yes / Si
DC Output Protection / Protección de Salida de DC .... Yes / Si
Short Circuit Output Protection / Protección de Salida de Cortocircuito.... Yes / Si
Voltage Input Protection / Protección de Entrada de Voltaje ....Yes / Si (8.8-15.9V)
Clipping Protection / Protección de Recorte .... Yes / Si
Input Channel Selectable / Canal de Entrada Seleccionable ....Yes (2/4/8 Channels) / Si (2/4/8 Canales)
Tiffany RCA Connector / Conector RCA Tiffany.... Yes / Si
Very High Efficiency Digital Circuit Design / Diseño de circuito digital de muy alta eficiencia.... Yes / Si
PCB with Anti-Corrosion Protection Coating / PCB con revestimiento de protección anticorrosión..... Yes / Si
Surface Mount Component Technology / Tecnologia de componentes de montaje en superficie .... Yes / Si
Quality Control Verification using Audio Precision Instruments .... Yes / Si
Verificación de control de calidad utilizando instrumentos de precisión de audio
Surface Mounting with Digital Chasing LED Adapter Yes / Si
Montaje en superficie con adaptador LED digital
Waterproof Rating / Clasificación impermeable....IPX5 (Flush Mounting / Montaje Empotrado)
Body Color | Finish / Color del Cuerpo | Acabado .... Black Aluminum / Aluminio Negro
MEASUREMENTS / MEDIDAS
Body Length / Longitud del Cuerpo 14.25" / 362mm
Body Width / Ancho del Cuerpo 4.7" / 120mm
Overall Height / Altura Total 1.85" / 47mm
Heatsink Length / Longitud de Disinador de Calor 16" / 406mm
Heatsink Width / Ancho de Disinador de Calor 7.2" / 182mm
Mounting Hole / Orificio de Montaje 14,5"x5.8" / 370x14.7mm
Mounting Hole / Unificio de Montaje 14.5 x 3.6 / 370x 147mm Mounting Depth / Profundidad de Montaje 15" / 29mm
Mounting Depth / Profusional de Montaje 1.5 / 35mm Gross Single Unit Weight / Pass unitarial units individual 2.2%
Gross Single Unit Weight / Peso Unitario Bruto Individual 3.2Kg
13 14
FX1 FX4
DS18®
DIMENSIONS / DIMENSIONES

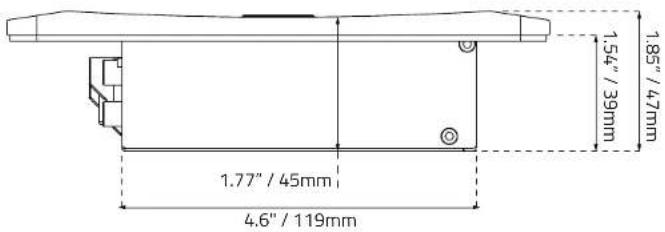
FX AMPS
FX6
DIMENSIONS / DIMENSIONES

DS18®
TROUBLESHOOTING
Before removing your amplifier refer to the list below and follow the suggested procedures. Always test the speakers and their wires first.
AMPLIFIER WON'T POWER UP
- Check for good ground connection.
- Check that remote DC terminal has at least 10V DC.
- Check that there is battery power on the + terminal.
- Check all FUSES.
- Check that Protection LED is not lit. IF it is lit, shut off amplifier briefly and then re-power it.
HIGH HISS OR ENGINE NOISE (ALTERNATOR WHINE) IN SPEAKERS
Disconnect all RCA inputs to the amplifier, if hiss noise disappears, then plug in the component driving the amplifier and unplug its inputs. If hiss noise disappears, go on until the faulty/noisy component is found. Its best to set the amplifier input level as insensitive as possible. "The best subjective S/N ratio is obtainable this way. Try to drive as high a signal level from the head unit as possible.
PROTECTION LED COMES ON WHEN THE AMPLIFIER IS POWERED UP
Check for shorts on speaker leads. Check that volume control on the head unit is turned down low. Remove speaker leads, and reset the amplifier f the Protection LED still comes on, then the amplifier is faulty. The amplifier will shut down automatically when the units: temperature goes up to 85°C This will protect the units from damage.
AMPLIFIER GETS VERY HOT
Check that the minimum speaker impedance for that model is correct. Check for speaker shorts. Check that there is good airflow around the amplifier. In some applications, an external cooling fan may be required.
DISTORTED SOUND
Check that the Level controls is set to match the signal. level of the head unit. Check that all crossover frequencies have been properly set. Check for shorts on the speaker leads.
HIGH SQUEAL NOISE FROM SPEAKERS
This is always caused by a poorly grounded RCA wire.
FX AMPS
SOLUCIÓN DE PROBLEMAS
Antes de retirar su amplificador, consulte la lista a continuación y siga los procedimientos sugeridos. Siempre pruebe primero los altavoces y sus cables:
EL AMPLIFICADOR NO SE ENCIENDE
- Verifique que haya una buena conexión a tierra.
- Compruebe que el terminal de CC remoto tenga al menos 10 V CC.
- Verificar que haya energía de batería en el terminal +
- Revisar todos los FUSIBLES.
- Compruebe que el LED de protección no esté encendido. Si está encendido, apáguelo brevemente y luego vuelva a encenderlo.
RUIDO ALTO DEL SILBATO O DEL MOTOR (RUIDO DEL ALTERNADOR) EN LOS ALTAVOCES
Desconecte todas las entradas RCA del amplificador, si desaparece el silbido o el ruido, conecte el componente que alimenta el amplificador y desconecte sus entradas. Si el silbido/ruido desaparece, continúe hasta encontrar el componente defectuoso ruidoso. Lo mejor es establecer el nivel de entrada del amplificador lo más insensible posible. "La mejor relación S/N subjetiva se puede obtener de esta manera. Trate de conducir un nivel de señal tan alto como sea posible desde la unidad principal.
EL LED DE PROTECCIÓN SE ENCIENDE CUANDO SE ENCIENDE EL AMPLIFICADOR
Compruebe si hay cortocircuitos en los cables de los altavoces. Verifique que el control de volumen en la unidad principal esté bajo. Retire los cables de los altavoces y reinicie el amplificador. Si el LED de protección aún se enciende, entonces el amplificador está defectuoso. El amplificador se apagará automáticamente cuando las unidades: La temperatura suba a 85°C Esto protegerá las unidades de daños.
EL AMPLIFICADOR SE CALIENTA MUCHO
Compruebe que la impedancia mínima de los altavoces para ese modelo sea la correcta. Compruebe si hay cortocircuitos en los altavoces. Compruebe que haya un buen flujo de aire alrededor del amplificador. En algunas aplicaciones, puede ser necesario un ventilador de refrigeración externo.
SONIDO DISTORSIONADO
Verifique que los controles de nivel estén configurados para coincidir con la señal, nivel de la unidad principal. Verifique que todas las frecuencias de crossover se hayan configurado correctamente. Compruebe si hay cortocircuitos en los cables de los altavoces.
ALTO RUIDO DE CHILLIDO DE LOS ALTAVOCES
Esto siempre es causado por un cable RCA mal conectado a tierra.
17 18

FX AMPS
WARRANTY
Please visit our website DS18.com for more information on our warranty policy
We reserve the right to change products and specifications at any time without notice. Images may or may not include optional equi

WARNING:
Cancer and Reproductive Harm. www.P65Warning.ca.gov
GARANTÍA
Visita nuestra página web DS18.com para obtener más información sobre nuestra garantía
Nos reservamos el derecho de cambiar productos y especificaciones en cualquier momento sin previo aviso. Las imágenes pueden incluir o no equipo opcional.

ADVERTENCIA:
Cáncer y Daño Reproductivo. www.P65Warning.ca.gov
- DS18®
- FX1 / FX4 / FX6
- FLUSH OR SURFACE MOUNT CLASS-D AMPLIFIER
- CONTENT / CONTENIDO
- INTRODUCTION
- FEATURES
- INTRODUCCIÓN
- CARACTERÍSTICAS
- FX AMPS
- ELEMENTS DESCRIPTION / DESCRIPCIÓN DE LOS ELEMENTOS
- AMPLIFIER INSTALLATION
- INSTALACIÓN DE AMPLIFICADOR
- WARNING
- PRECAUCIÓN
- WIRING / CABLEADO
- STEREO LOW LEVEL (RCA)
- BRIDGE LOW LEVEL INPUT (RCA)
- FX1
- SPECIFICATIONS / ESPECIFICACIONES
- POWER / POTENCIA
- AUDIO / AUDIO
- FEATURES / CARACTERÍSTICAS
- MEASUREMENTS / MEDIDAS
- FX4
- FX6
- FX1 FX4
- DIMENSIONS / DIMENSIONES
- TROUBLESHOOTING
- AMPLIFIER WON'T POWER UP
- HIGH HISS OR ENGINE NOISE (ALTERNATOR WHINE) IN SPEAKERS
- PROTECTION LED COMES ON WHEN THE AMPLIFIER IS POWERED UP
- AMPLIFIER GETS VERY HOT
- DISTORTED SOUND
- HIGH SQUEAL NOISE FROM SPEAKERS
- SOLUCIÓN DE PROBLEMAS
- WARRANTY
- GARANTÍA
- ADVERTENCIA
Marque : DS18
Modèle : FX1
Catégorie : Recepteur