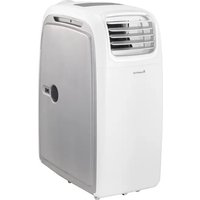
AN-PAC14D1 - Climatisation Aconatic - Notice d'utilisation et mode d'emploi gratuit
Retrouvez gratuitement la notice de l'appareil AN-PAC14D1 Aconatic au format PDF.


| Marque | Aconatic |
| Modèle | AN-PAC14D1 |
| Type de produit | Climatisation mobile monobloc |
| Dimensions (L x l x H) | Environ 45 x 38 x 70 cm |
| Poids net | Environ 28 kg |
| Alimentation électrique | 220-240 V ~ 50 Hz |
| Puissance de refroidissement | 14000 BTU/h (environ 4,1 kW) |
| Consommation électrique (refroidissement) | Environ 1300 W |
| Classe énergétique (refroidissement) | A |
| Débit d'air | Jusqu'à 420 m³/h |
| Niveau sonore | Environ 65 dB(A) |
| Réfrigérant | R32 |
| Fonctions principales | Refroidissement, ventilation, déshumidification, mode nuit, minuterie 24h |
| Type de filtre | Filtre à air lavable |
| Installation | Nécessite une évacuation d'air vers l'extérieur (kit fourni) |
| Entretien et nettoyage | Nettoyer le filtre toutes les 2 semaines ; nettoyer le bac de récupération d'eau régulièrement |
| Sécurité | Dispositif d'arrêt automatique en cas de surchauffe ; protection du compresseur |
| Pièces détachées et réparabilité | Indice de réparabilité : 8.5/10 ; pièces disponibles sur demande |
| Accessoires fournis | Télécommande, tuyau d'évacuation, adaptateur de fenêtre |
FOIRE AUX QUESTIONS - AN-PAC14D1 Aconatic
Questions des utilisateurs sur AN-PAC14D1 Aconatic
0 question sur cet appareil. Repondez a celles que vous connaissez ou posez la votre.
Poser une nouvelle question sur cet appareil
Téléchargez la notice de votre Climatisation au format PDF gratuitement ! Retrouvez votre notice AN-PAC14D1 - Aconatic et reprennez votre appareil électronique en main. Sur cette page sont publiés tous les documents nécessaires à l'utilisation de votre appareil AN-PAC14D1 de la marque Aconatic.
MODE D'EMPLOI AN-PAC14D1 Aconatic
คู่มีอาการใช้งาน
เครื่องปรับอากาศเคลื่อนที่
รุ่น AN-PAC12D1
AN-PAC14D1
คำแนะนำ
กรุณาศึกษาคู่มืออย่างละเอียด ก่อนทำการติดตั้งและใช้งานเครื่องปรับอากาศ
เก็บคู่มือนี้ไว้ใช้อ้างอิง
สารบัญ
คำแนะนำต้านความปลอดภัย 3
รายละเอียดสินค้าและรายการชั้นส่วน 5
การติดตั้ง 6
แผงควบคุมและการตั้งค่า 9
โหมดการทำงาน 13
การระบายน้ำ 15
การช่อมบำรุงรักษา 16
การแก้ไขบัญหาเบื้องต้น 17
ภาคผนวก 18
คำแนะนำต้านความปลอดภัย
ข้อสำคัญ!
- จำนวนแนะนําอย่างละเอียดก่อนใช้งาน
- เครื่องปรับอากาศรุ่นนี้มีระดับ IPX0 ออกแบบมาเพื่อใช้งานภายในอาคารโดยเฉพาะแต่สามารถใช้งานภายนอกอาคารได้ โดยป้องกันฝนและน้ำกระเช็นได้
- ฉลาก: เครื่องนี้ต้องเชื่อมต่อกับแรงดันไฟฟ้า 220-240 V / 50 Hz เต้าเสียบแบบมีสายดิน เท่านั้น
- การติดตั้งต้องเป็นไปตามข้อกำหนดของประเทศไทย
- หากคุณมีข้อสงสัยเกี่ยวกับความเหมาะสมของแหล่งจ่ายไฟฟ้า ควรให้ช่างไฟฟ้าที่มีคุณสมบัติตรวจสอบและแก้ไข
- เครื่องปรับอากาศนี้ได้รับการทดสอบแล้ว่าปลอดภัยต่อการใช้งาน อย่างไรก็ตามโปรดใช้ผลิตภัณฑ์ด้วยความระมัดระวัง
- ถอดปลักก่อนทำการถอดประกอบหรือทำความสะอาด
- หลักเลี่ยงการสัมผัสชิ้นส่วนที่มีการเคลื่อนไหวของเครื่องใช้ไฟฟ้า
- ห้ามสอดนั่ว ดินสอ หรือวัตถุอื่นใดผ่านตัวป้องกัน
อุปกรณ์นี้ไม่ได้มีไว้สำหรับบุคคล (รวมถึงเด็ก) ที่มีความสามารถทางร่างกาย ประสาทสมผัส หรือจิตใจที่บกพร่อง และไม่ได้มีไว้สำหรับ ผู้ที่ขาดประสบการณ์และความรู้ เว้นแต่จะมีผู้ดูแลหรือให้คําแนะนําเกี่ยวกับการใช้อุปกรณ์นี้โดยบุคคลที่รับผิดชอบต้านความปลอดภัย
- ห้ามปล่อยให้เด็กใช้งานเครื่องใช้ไฟฟ้านี้โดยไม่มีผู้ดูแล
- ห้ามทำความสะอาดเครื่องด้วยการฉีดน้ำหรือแข่ในน้ำ
- หลักเสี่ยงการต่อปลักไฟเข้ากับเต้ารับไฟฟ้า หากไม่มีเต้ารับไฟฟ้า ควรให้ช่างไฟฟ้าที่มีคุณสมบัติดตั้งให้
- ห้ามใช้งานอุปกรณ์นี้หากสายไฟหรือปลักชํารุดเสียหาย ตรวจสอบให้แน่ใจว่าสายไฟไม่ได้ถูกดึง หรือสัมผัสกับวัตถุหรือที่แหลมคม
- ห้ามจุ่มสายไฟลงในน้ำ เพาะอาจทำให้เกิดไฟฟ้าช็อด
- ควรเปลี่ยนสายไฟที่ชํารุดโดยผู้ผลิตหรือช่างไฟฟ้าที่มีคุณสมบัติเพื่อหลักเลี่ยงอันตราย
- บริการอื่นๆ นอกเหนือจากการทำความสะอาดตามปกติหรือการเปลี่ยนแผ่นกรอง ควรดำเนินการโดยตัวแทนศูนย์บริการ ที่ได้รับอนุญาต การไม่ปฏิบัติตามอาจส่งผลให้การรับประกันเป็นโมมะ
- ห้ามใช้อุปกรณ์เพื่อวัตถุประสงค์อื่นใด นอกเหนือจากที่ระบุไว้ในคู่มือ
- เครื่องปรับอากาศจะต้องถูกจัดเก็บและขนย้ายในแนวตั้งเสมอ มิจะนั้น คอมเพราะเซอร์อาจได้รับความเสียหาย หากมีข้อสงสัย เราแนะนําให้รอย่างน้อย 24 ชั่วโมงก่อนที่จะเปิดใช้งานเครื่อง
- หลังจากการปิดเครื่อง ควรหลักเสี่ยงการเปิดเครื่องโดยทันที่ การทำเช่นนี้จะป้องกันไม่ให้คอมเพราะเซอร์เสี่ยหาย
- ห้ามใช้ปลักไฟที่มีตัวตั้งเวลาเป็นสวิตช์ในการเปิดและปิดเครื่อง ให้ชัสวิตช์เปิด/ปิดที่ให้มาซึ่งอยู่บนแพงควบคุม
- วางเครื่องไว้บนพื้นผิวแห้งและมั่นคงเสมอ
- ไม่ควรติดตั้งเครื่องใช้ไฟฟ้าในห้องซักรีดหรือห้องที่เปียกซื้น
- ก็ซสารทำความเย็น R290 เป็นไปตามข้อกำหนดต้านสิ่งแวดล้อมของยุโรป
• R290 มีค่า GWP (ศักยภาพในการทำให้โลกร้อน) ต่ําเป็นอันดับที่ 3
- เครื่องปรับอากาศมีสารทำความเย็น R290 ประมาณ 160กรัม(รุ่น AN-PAC12D1), 180 กรัม(รุ่น AN-PAC14D1)

- ห้ามใช้หรือจัดเก็บในพื้นที่ที่ไม่มีการระบายอากาศ โดยมีพื้นที่ต่อยูนิตน้อยกว่า 11.3 ตร.ม. ห้องจะต้องมีลักษณะที่สามารถป้องกัน การรั่วซึมของกําซสารทำความเย็นได้ เนื่องจากอาจเกิดอันตรายจากไฟไหมัหรือการระเบิดได้ หากสารทำความเย็นสัมผัสกับ เครื่องทำความร้อนไฟฟ้า เตา หรือแหล่งกำเนิดประกายไฟอื่นๆ
- หากมีการติดตั้ง ใช้ หรือเก็บเครื่องใช้ไฟฟ้าในห้องที่ไม่มีการระบายอากาศ ห้องนั้นจะต้องมีลักษณะที่สามารถป้องกันไม่ให้มีการรั่วไหลของก๊าซสารทำความเย็น เนื่องจากอาจมีความเสี่ยงต่อการเกิดไฟไหมมัหรือการระเบิดได้ หากสารทำความเย็นสมผัสกับเครื่องทำความร้อนไฟฟ้า เดา หรือแหล่งกำเนิดประกายไฟอื่นๆ
- ห้ามใช้ผลิตภัณฑ์และติดต่อตัวแทนจำหน่ายเพื่อขอคําแนะนํา หากได้รับความเสียหายต่ออุปกรณ์ซึ่งอาจทำให้ระบบสารทำความแย็นได้รับผลกระทบ
- การซ่อมแซมหรือบํารุงรักษาเครื่องจะต้องた่าเนินการโตผู้ที่มีคุณสมบัติเหมาะสมเท่านั้น ก่อนเปิดเครื่องและซ่อมบํารุงเครื่องผู้ที่ได้รับอนุญาจะต้องมีคู่มือการใช้งานของผู้ผลิต และต้องปฏิบัติตามข้อมูลด้านความปลอดภัยที่มีอยู่ในคู่มือตังกล่าวเพื่อให้แน่ใจว่าอันตรายหั้งหมดจะลดน้อยลง
- ระบบสารทำความเย็นไม่ควรมีร หรือรอยเจาะ
- ห้ามใช้ผลิตภัณฑ์หรือวิธีการใดฯ เพื่อเร่งกระบวนการละลายน้ำแข็งหรือทำความสะอาด นอกเหนือจากที่ผัผลิตแนะนํา
- ควรจัดเก็บเครื่องใช้ไฟฟ้าในห้องที่ไม่มีแหล่งกำหนดประกายไฟ (ตัวอย่างเช่น เปลวไฟที่เปิดอยู่ เครื่องใช้แก้สที่ทำงานอยู่ หรือเครื่องทำความร้อนไฟฟ้าที่ทำงานอยู่)
- ห้ามเจาะหรือผา
- โปรดทราบว่าสารทำความเย็นอาจไม่มีกลิ่น
เคล็ดลับการประหยัดพลังงานและการป้องกันความปลอดภัย
- ห้ามบิดหรือก็จขวางการไหลของอากาศจากช่องระบายอากาศ
- เพื่อประสิทธิภาพสูงสุด ควรเว้นระยะห่างจากผนังหรือวัตถุอย่างน้อย 50 ชม. เครื่องนี้ติดตั้งเซ็นเซอร์ตัดความร้อนเพื่อบ้องกันความร้อนสงเกินไป
- รักษาแผ่นกรองให้สะอาด ภายใต้การทำงานปกติ แผ่นกรองควรทำความสะอาดเพียง 1 ครั้งต่อ 3 สัปดาห์ (โดยประมาณ) ชั้นอยู่กับคุณภาพอากาศเนื่องจากตัวกรองสามารถทำจัดอนุภาคในอากาศได้ จึงอาจจำเป็นต้องทำความสะอาดบ่อยๆ สำหรับการเปิดเครื่องครั้งแรก ให้ตั้งความเร็วพัตลมไว้ที่สูงสุดและปรับอุณหภูมิให้た่ํากว่าอุณหภูมิสภาพแวดล้อม 4-5 องศา
- จากนั้นตั้งความเร็วพัดลมไว้ที่ระดับต่ำและปรับอนหภมิเป็นค่าที่คุณต้องการ
- เพื่อบกป้องตัวเครื่อง เราชขอแนะนําให้ไม่ใช้งานฟังก์ชั้นทำความเย็นเมื่ออนหภูมิแวดล้อมสงกว่า 35°C
รายละเอียดสินค้าและรายการชิ้นส่วน
รายละเอียดสินค้า
- โหมดทำความเย็น และลดความชั้น สามารถใช้งานได้ตลอดทั้งปี
- ทรงพลังและยืดหยุ่นสำหรับใช้ทั้งในบ้าน
- กำหนดทิศทางการต่อท่อลม โดยการสลับหน้ากาก ทำให้สามารถติดตั้งเครื่องไว้ภายนอกห้องได้ จึงเหมาะสมอย่างยิ่งสำหรับใช้ในห้องเซิร์ฟเวอร์ สํานักงาน เด็นท์ทหารหรือค่ายทหาร
- ปรับปรุงความสะดวกสบายและคุณภาพอากาศภายในอาคาร
- ระบทะเหยน้ําอัดโนมัติ -ไม่จำเป็นต้องติดตั้งภาดเก็บน้ํา ยกเว้นการใช้งานสภาพแวดล้อที่มีความชื่นสูง
- การออกแบบที่ Gestัดรับและทานทาน
- แผงควบคุมแบบดิจิตอลพร้อมการป้องกันน้ำกระเช็นระดับ IP 24
- หน้าจอ LED แสดงอุณหภูมิที่ต้องการและรหัสข้อผิดพลาด
- รีโมทคอนโทรลและตั้งเวลาเปิด-ปิด 24 ชม. ใช้งานได้ทั้งในระบบทำความเย็น หรือ โหมดลดความซึ้น
- ฟังก์ชันตั้งเวลา – ช่วยให้คุณแลือกได้ว่าจะให้เครื่องทำงานในหมดปรับอากาศหรือใหมดลดความชิ้น
- เทคโนโลยีการปกป้องคอมเพราะเซอร์ขั้นสูง
- มีล้อเลื่อนเพื่อการพกพาที่ดิข้น
รายการชิ้นส่วน
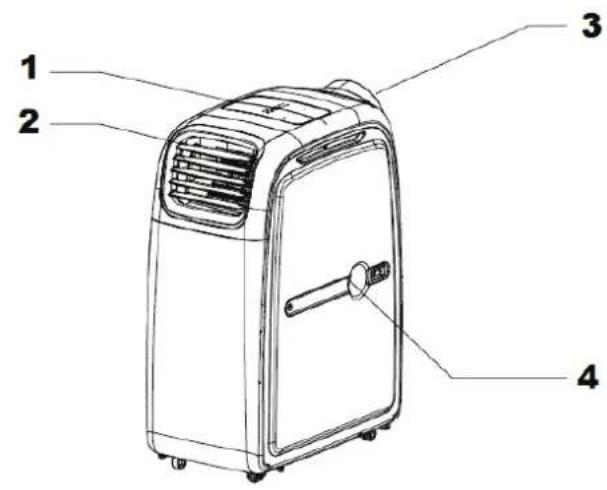

| 1 | แผงควบคุม | 5 | แผ่นกรอง |
| 2 | ช่องระบายอากาศเย็น | 6 | ช่องคอยล์เย็น |
| 3 | ช่องระบายอากาศร้อน | 7 | ช่องคอยล์ร้อน |
| 4 | รู้ระบายน้ํา | ||
การติดตั้ง
คำเตือน: ก่อนใช้งานเครื่องนี้โปรดวางเครื่องในดำเนftenตั้งตรงเป็นเวลาอย่างน้อย 3-4 ชั่วโมง
เครื่องนี้สามารถเคลื่อนย้ายจากห้องหนึ่งไปอีกห้องหนึ่งได้อย่างง่ายตาย
ขณะเคลื่อนย้ายเครื่อง โปรดทราบว่าจะต้องวางเครื่องให้ตั้งตรงและวางบนพื้นผิวที่เรียบ
การแกล่องเครื่องปรับอากาศ
เปิดกล่องและถอดกล่องต้านนอกโดยยกขึ้น
จับตัวเครื่องด้วยที่จับซึ่งอยู่ทั้งสองข้างของตัวเครื่องแล้วค่อยๆ ยกขึ้นจนกระทั่งเลื่อนออกจากรูานโพม
ติดตั้งท่อไอเสียบนตัวเครื่องก่อนใช้งาน:
อุปกรณ์ภายในกล่อง

ท่อลม

แผ่นยืดหน้าต่าง
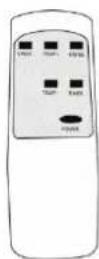
รีโมทคอนโทรล
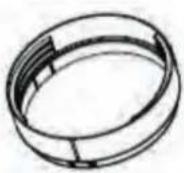
ฝากรอบท่อ

ฝากอปลายท่อ
การติดตั้งท่อ
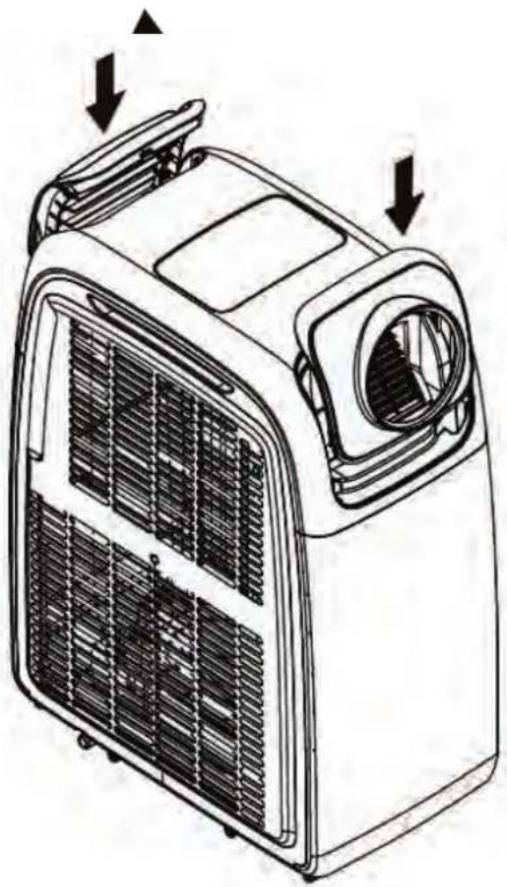
- ติดตั้งหน้ากากสำหรับใส่ท่อ
- ไส่ท่อและหมุนให้แน่นเข้ากับฝากรอบท่อ
3.หากต้องการถอดท่อ ให้บิดท่อไปในทิศทางตรงข้าม

การติดตั้งกับหน้าต่าง
เปิดหน้าต่างบางส่วนแล้วยืดชุดสำหรับติดตั้งเข้ากับหน้าต่าง ในแนวนอนหรือแนวตั้ง โดยให้ตัวเครื่องห่างจากหน้าต่าง อย่างน้อย 50 ชม. ติดตั้งท่อเข้ากับช่องระบายอากาศของเครื่อง ส่วนปลายท่ออีกด้านหนึ่ง ให้ติดตั้งกับชุดสำหรับหน้าต่าง ตรวจสอบให้นแน่ใจว่าตัวเครื่องตั้งตรงและไม่มีสิ่งก็ดขวางช่องระบาย อากาศเข้าและออก


ชุดหน้าต่างได้รับการออกแบบมาให้ติดตั้งกับหน้าต่างและประตูบานเลื่อนเท่านั้น ชุดหน้าต่างไม่ได้ผลิตขึ้นมาเพื่อใช้ กับหน้าต่างแบบอื่น อย่างไรก็ตาม สามารถต่อท่อ(แบบหางปลา)ได้โดยไม่ต้องใช้แล็บเลื่อนในหน้าต่าง แต่หากไม่ปิดช่องหน้าต่างส่วนที่เหลือ ประสิทธิภาพของชุดอุปกรณ์จะลดลง ตรวจสอบให้นแน่ใจว่าช่องหน้าต่างมีขนาดเล็ก ที่สุดเท่าที่จะเป็นไปได้
การติดตั้งที่ดีที่สุดคือติดตั้งท่อออกจากผนัง โปรดทราบว่าเครื่องยังคงต้องระบายอากาศในโหลดทําความเย็น โดยควรระบายอากาศผ่านผนัง

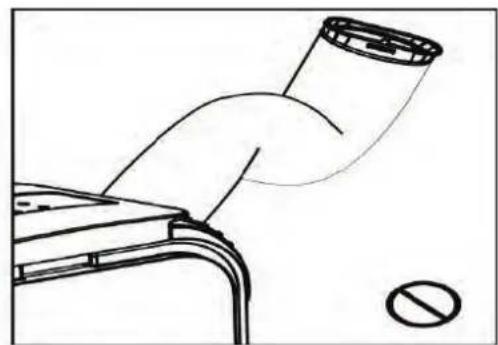
หมายเหตุ: หลักเลี่ยงการงอท่อลมเกิน 30 องศา! ข้อสำคัญ
ท่ progressesไว้ตั้งแต่ 28 ซม. ถึง 150 ซม. และตัวเครื่องจะรองรับท่อที่ยาวได้ถึง 300 ซม. หากท่อยาวเกินความยาวนี้ เครื่องอาจทำงานผิดปกติและอาจทำให้การรับประกันเป็นโมมะ ทอยิ่งสั้นเท่าไร ผลลัพธ์ที่ได้ก็จะยิ่งดีเท่านั้น เพื่อประสิทธิภาพ ที่ดีที่สุด ไม่ควรยืดท่อออกเกิน 40 ซม. ช่องระบายอากาศจะต้องระบายอากาศได้ดีและไม่ฏกปิดกั้น เพาะจะทำให้เครื่องร้อนเกินไป
แผงควบคุมและการตั้งค่า
เครื่องปรับอากาศแบบเคลื่อนที่มีฟังก์ชั้นต่างๆ เช่น ทำความเย็นและลดความชั้น
พัดลมมี 3 ระดับความเร็ว: สูงกลาง และต่ำ
การตั้งค่าช่วงอุณหภูมิคือ: 16-31°C
หน้าจอ LED สามารถแสดงค่าอุณหภูมิที่ตั้งไว้ รหัสข้อผิดพลาด

| 1 | ปุ่ม เปิด/ปิด เครื่อง | 9 | ช่องรับสัญญาณรีโมทคอนโทรล |
| 2 | ปรับอุณหภูมิ + | 10 | ไฟแสดงสถานะความเร็วลมสูง |
| 3 | เลือกโหมดการใช้งาน | 11 | ไฟแสดงสถานะความเร็วปานกลาง |
| 4 | ปุ่มตั้งเวลา | 12 | ไฟแสดงสถานะความเร็วต่ํา |
| 5 | ปรับอุณหภูมิ - | 13 | หน้าจอแสดงผล |
| 6 | ปุ่มความเร็วพัดลม | ||
| 7 | ไฟแสดงสถานะโหมดลดความซื้น | ||
| 8 | ไฟแสดงสถานะโหมดทําความเย็น |
เมื่อเสียบปลัก เครื่องจะเข้าสู่โหมด представленบายด์ โดยอัดโนมัติ
(1) ปุ่มสแดนด์บาย
กดปุมนี้เพื่อเปิดเครื่องและเข้าสู่โหมดทำความเย็น กดอีกครั้ง เครื่องจะปิด
(2) ปุ่ม TEMP+
ปุ่มเพิ่มอุณหภูมิที่ต้องการในโหมดทำความเย็น สามารถตั้งอุณหภูมิได้ระหว่าง 16 - 31°C
(3) ปุ่มฟังก์ชัน
กดปุ่มนี้เพื่อเลือกหมดทำความเย็น และลดความชั้น ในโหมดลดความชั้น ไม่ควรต่อท่อลม แต่ควรตั้งค่าเครื่องให้ระบายน้ำ ได้อย่างต่อเนื่อง
(4) ปุ่มตั้งเวลา
ปุ่มตั้งเวลาจะช่วยให้คุณตั้งค่าให้เครื่องเปิดหรือปิดหลังจากเวลาตามที่กำหนด ตั้งเวลาเปิดเครื่องโดยอัดโนมัติ
- เมื่อยู่ใน Holmes Streetนด์บาย ให้กตปุ่ม TIMER จากนั้นตั้งจำนวนชั่วโมงที่คุณต้องการโดยกตปุ่ม TEMP+ และ TEMP-
2.เมื่อหมดเวลาที่ตั้งไว้เครื่องจะเปิดโดยอัตโนมัติ
-
กดปุ่ม POWER ก่อนเวลาที่ตั้งไว้ เครื่องจะเปิดตามปกติและตัวตั้งเวลาจะถูกยกเลิก
-
สามารถตั้งค่าฟังก์ชันและความเร็วพัดลมได้ขณะตั้งเวลา
ตัวตั้งเวลาปิดอัตโนมัติ
- ในขณะที่เครื่องกำลังทำงาน ใหักดปุ่ม TIMER จากนั้นตั้งจำนวนชั่วโมงที่คุณต้องการโดยกดปุ่ม TEMP+ และ TEMP-
2.เมื่อหมดเวลาที่ตั้งไว้ เครื่องจะปิดโดยอัตโนมัติ
- กตบุ่ม POWER ก่อนที่เวลาจะหมด เวลาจะถูกยกเลิกและเครื่องจะปิดลง
(5) ปุม TEMP
ใช้เพื่อเพิ่ม/ลดอุณหภมิที่ต้องการ
ในโหมดทำความเย็น สามารถตั้งอุณหภูมีได้ระหว่าง 16 - 31°C
(6) ปุ่มปรับความเร็วพัดลม
ช่วยให้สามารถเปลี่ยนความเร็วพัดลมได้ระหว่างตัวเลือกต่อไปนี้:
สูง → ปานกลาง → ต่ํา
ในโหมดลดความชั้น พัดลมจะถูกตั้งค่าไว้ที่ความเร็วต่ำ
(7) ถึง (8) ตัวแสดงสถานะฟังก์ชัน -ไฟ LED จะสว่างขึ้นเพื่อแสดง因果การใช้งาน ณ ขณะนั้น: --- สามารถเปลี่ยนระหว่าง因果ดลดความชั้น (7), 因果ดทําความเย็น (8) ได้โดยใช้ปุ่มฟังก์ชัน (3)
(9) เซ็นเซอร์รับสัญญาณเริโมท รับสัญญาณจากรีโมทคอนโทรลที่ให้มา
(10) ถึง (12) ไฟแสดงสถานะความเร็วพัดลม ไฟ LED จะสว่างขึ้นเพื่อแสดงความเร็วพัดลม โดยสามารถเปลี่ยนความเร็วพัดลมได้ระหว่างสูง (10), ปานกลาง (11) และต่ํา (12) โดยใช้ปุ่มความเร็วพัดลม (6)
(15) จอแสดงผล แสดงอุณหภูมิที่ตั้งไว้หรือตัวตั้งเวลาขณะเครื่องทำงาน เมื่อปรับอุณหภูมิที่ตั้งไว้หรือตัวตั้งเวลาแล้ว การตั้งค่าใหม่จะปรากฏ บนจอแสดงผล
- เมื่อกดปุ่ม TEMP+ หรือ TEMP- จอแสดงผลจะแสดงอุณหภูมิที่ต้องการที่ตั้งไว้ในขณะนั้น
- เมื่อกดปุ่ม [TIMER] จำนวนชั่วโมงที่เหลือจะปรากฏขึ้นจนกว่าจะถึงฟังก์ชันหรือปิดการใช้งาน
- ในฟังก์ชั่นลดความชั้น จะแสดงอุณหภูมิบนจอแสดงผล
จอแสดงผล ยังใช้เพื่อแสดงรหัสข้อผิดพลาด
| E0 | เซ็นเซอร์อุณหภูมิชํารุด |
| E2 หรือ E4 | น้ําเต็มต้องระบายน้ําออก |
| E3 | เซ็นเซอร์ชุดคอยล์ชํารุด |
ฟังก์ชันป้องกันต่างๆ
การควบคุมป้องกันการแข็งตัว:
เมื่ออุณหภูมิแวดล้อมต่ําขณะอยู่ในโหมดทำความเย็น คอมเพราะเซอร์จะหยุดทำงานหากอุณหภูมิของคอยล์ทองแดงต่ํา หากอุณหภูมิของคอยล์ทองแดงเพิ่มขึ้น การป้องกันจะหยุดทำงาน โดยอัตโนมัติขณะอยู่ในโหมดนี้ จะแสดง “Df” บนหน้าจอ
การป้องกันน้ำเต็ม:
เมื่อระดับน้ำในถังน้ำภายในเกินระดับสูงสุด เครื่องจะส่งสัญญาณเตือนโดยอัตโนมัติและ E4 จะปรากฏขนหน้างอ โปรดระบายน้ำออกจากถังน้ำโดยปฏิบัติตามคําแนะนําในหัวข้อ "การระบายน้ำ"
การป้องกันคอมเพราะเซอร์
คอมเพราะซอร์มีระบบป้องกันความร้อนสูงเกินไป ซึ่งอาจหยุดทำงานเพื่อป้องกันความเสียหาย นอกจากนี้ คอมเพราะเซอร์ยังมีฟังก์ชันป้องกันการหน่วงเวลา 3 นาที ซึ่งจะหน่วงเวลาในการเริ่มต้นการทำงานของคอมเพราะเซอร์ เพื่อช่วยป้องกันคอมเพราะเซอร์ไม่ให้สูญเสียประสิทธิภาพในการใช้พลังงาน
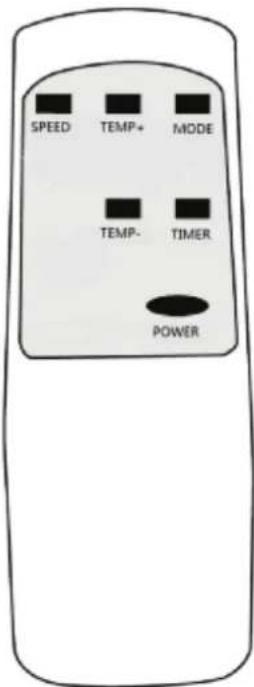
รีโมทคอนโทรล
| Power | เปิด / ปิด เครื่อง |
| Speed | การเลือกความเร็วพัดลม |
| Temp + | เพิ่มอุณหภูมิครั้งละ 1 องศา |
| Temp - | ลดอุณหภูมิครั้งละ 1 องศา |
| Mode | สลับโหมด ทำความเย็น ลดความชึ้น พัดลม |
| Timer | ปุ่มตั้งเวลา |
โหมดการทำงาน
โหมดทำความเย็น(Cooling)
ในวันที่อากาศร้อน เราชอแนะนําให้ตั้งโปรแกรมให้เครื่องเริ่มทํางานก่อนที่แสงแตดจะส่องเข้ามาในห้องโดยตรง โดยตั้งอุณหภูมิที่พอเหมาะสมที่ 20-22°C ในโหมดทำความเย็น เครื่องปรับอากาศ เป็นเครื่องปรับอากาศแบบระเหยน้ำได้เอง ดังนั้นโดยปกติแล้วไม่จำเป็นต้องระบายน้ำ otอกจาเครื่อง เมื่อใช้งานตามปกติ อย่างไรก์ตาม หากมีความชึ้นในอากาศสูง หรือเครื่องไม่ได้รับการระบายอากาศอย่างถูกต้อง น้ำจะถูกเก็บรวบรวมไว้นลาดภายในเครื่อง
หากเครื่องทำงานใน万亩ตําความเย็นเป็นเวลานาน โดยเฉพาะในช่วงที่มีความชั้นในอากาศสูง ภาคเก็บน้ำภายในอาจเต็ม และแผง LED จะแสดงข้อผิดพลาด E4 ซึ่งหมายความว่าจำเป็นต้องระบายน้ำออกจากเครื่องตามส่วนการระบายน้ำในกรณีดังกล่าว แนะนําให้ใช้การระบายน้ำออกอย่างต่อเนื่อง
การทำความเย็นเมื่อติดตั้งเครื่องปรับอากาศภายในอาคาร
เครื่องจะลูกวางไว้ในห้องที่ต้องการทำความเย็น จากนั้นต่อท่อเข้ากับช่องระบายลมร้อนของเครื่องปรับอากาศ หลักจากนั้นท่อลมจะเป้าลมร้อนออกจากห้องสู่ภายนอกในขณะที่ตะแกรงด้านหน้าจะปล่อยลมเย็นเพื่อทำให้ห้องเย็นลง

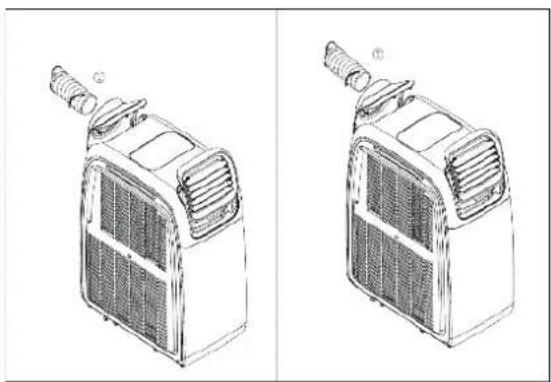
ท่อเชื่อมต่อผ่านทางหน้าต่าง ประตู หรือ รูผนัง ตรวจสอบให้นใจว่าไม่มีอากาศ จากภายนอกเข้ามาในห้อง ตั้งค่าโหมดเป็น "ทำความเย็น (COOLING)" และปรับอุณหภูมิ ตามต้องการโดย ช่วงอุณหภูมิที่สามารถเลือกได้อยระหว่าง 16℃ ถึง 31℃ และเครื่องควรใช้งาน ในสภาพแวดล้อมที่มีอุณหภูมิไม่เกิน 32℃ เท่านั้น
หมายเหตุ: หลังจากเปิดเครื่องแล้ว คอมเพราะเซอร์จะเริ่มทำงานหลังจากผ่านไป 3 นาที หากต้องการให้เครื่องทำงานเต็มที่ โปรดเผื่อเวลาการทำงานอีก 10 นาที
การทำความเย็นเมื่อติดตั้งเครื่องปรับอากาศไว้ภายนอก (การระบายอากาศเย็นเข้าไปในห้อง) ต่อท่อเข้ากับช่องลมเย็นของเครื่องปรับอากาศ ต้องทำการเปลี่ยนหน้าตะแกรง ท่ออากาศจะส่งอากาศเย็นเข้าไปในห้อง ในขณะที่หนักากด้านหน้าจะใส่อากาศร้อนออกไปยังภายนอก


โหมดลดความชั้น
เครื่องปรับอากาศ เป็นเครื่องลดความชั้นที่มีประสิทธิภาพ โดยมือัตรากลดความชั้น 70 ลิตรต่อวัน ที่ความชั้นมัพย์ 80% ความชั้นจะถูกตูตออกจากอากาศ รวบรวมไว้นลาดเก็บน้ํา และระบายออกผ่านท่อระบายน้ํา ขอแนะนําให้ใช้ภาดขนาดใหญ่หรือต่อสายท่อไว้ โปรดทราบว่าท่อระบายน้ําจำเป็นต้องมีแรงโน้มถ่วง ดังนั้นท่อจะต้องไหลลงจากที่สูงไปที่ต่ํา จึงจะระบายน้ําได้ เมื่อใช้เครื่องปรับอากาศในโหลดความชั้น ไม่จำเป็นต้องใช้ทอลม ตั้งค่าฟังก์ชันเป็น "ลดความชั้น" เนื่องจากเครื่องไม่มี ตัวควบคุมความชั้น เราจึงขอแนะนําให้ใช้ตัวตั้งเวลาในตัวเพื่อควบคุมระยะเวลาการทำงาน
การระบายน้ำ
เครื่องปรับอากาศรุ่นนี้เป็นเครื่องปรับอากาศแบบระเหยน้ําอัตโนมัติซึ่งช่วยลดความจำเป็นในการระบายน้ําออกจากถังน้ําใน โหมดทําความเย็น หากการระบายอากาศของเครื่องลูกต้อง น้ําส่วนใหญ่จะลูกนําไปใช้ซ้ำเพื่อทําความเย็นของให้กับคอนล์ร้อน และน้ําส่วนเกินจะลูกระเหยออกไป สําหรับโหมดทําความเย็น เพื่อให้นแน่ใจว่าเครื่องจะทํางานได้อย่างมีประสิทธิภาพสูงสุด เราขอแนะนําให้มระบายน้ําออกอย่างต่อเนื่อง
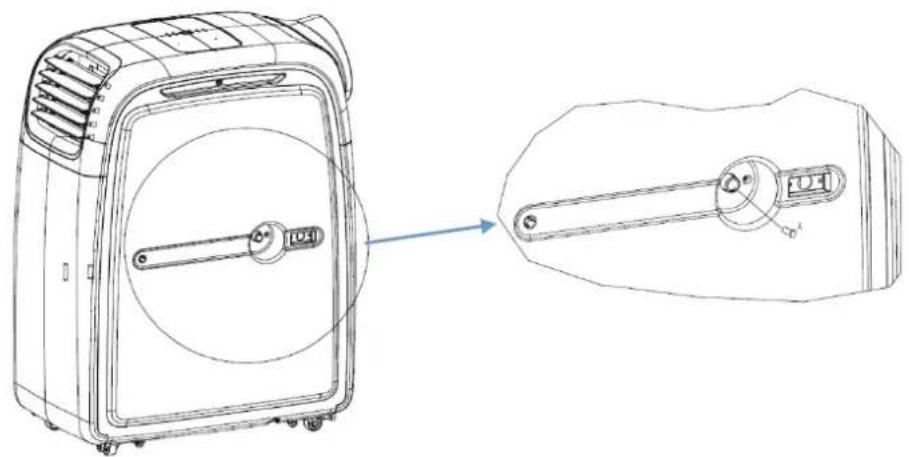
เมื่อน้ำภายในเครื่องเต็ม เครื่องจะหยุดทำงาน และเครื่องจะแสดง "E2" หรือ "E4"
ปิดเครื่องและถอดปลัก พยายามอย่าเคลื่อนย้ายเครื่องโดยทะทันหัน เพาะอาจทำให้มีน้ำร่วง otอกมาจากภายในเครื่องได้วงลาดไว้ได้ท่อระบายน้ำ
- ถอดจุกปิดท่อน้ำ และต่อทอระบายน้ำ
-น้ําจะระบายออกจากภาชนะ เมื่อระบายน้ำออกจนหมดแล้ว ให้ปีกจุกท่อน้ํากลับให้แน่น
การระบายน้ำอย่างต่อเนื่อง:
- ถอดปลักน้ำออก
- ต่อท่อน้ำเข้ากับช่องระบายน้ำ
- คุณสามารถต่อท่อนี้เข้ากับท่อน้ำทั้งได้
หมายเหตุ:
- โปรดตรวจสอบให้นใจว่าจุกยางหรือท่อระบายน้ำอยู่ในตําแหน่งที่ลูกต้องเมื่อเครื่องกำลังทำงาน
- เมื่อกังน้ำเต็ม จะแสดง "E2 หรือ "E4" บนแผงหน้าจอ โปรดถอดลูกยางออกจากช่องระบายน้ำและระบายน้ำที่รวบรวมไว้ หลังจากระบายน้ำเสร็จแล้ว โปรดรีสตาร์ทเครื่อง จากนั้นเครื่องก็จะทำงานได้ตามปกติ
การช่อมบำรุงรักษา
การทำความสะอาด
โปรดปิดเครื่องและกอดปลักไฟก่อนทำความสะอาดหรือดำเนินการบํารุงรักษาใด ๆ
ทำความสะอาดตัวเครื่อง
ทำความสะอาดตัวเครื่องที่เป็นพลาสติกด้วยไม้มัปดผุ่นหรือผ้าชุบน้ำหมด ๆ
ห้ามใช้ตัวทำละลายทางเคมี เช่น เปนชิน แอลกอฮอล์ หรือน้ํามันเบนชิน เพาะอาจทำให้เกิดความเสียหายที่ไม่สามารถแก้ไขได้
การทำความสะอาดแผ่นกรองอากาศ
1) ทำความสะอาดแผ่นกรองอากาศทุก 2 สัปดาห์ หากแผ่นกรองอากาศอุดตันประสิทธิภาพการทำงานของเครื่องจะลดลง
2) ดึงแผ่นกรองออกเบาฯ ตามภาพต้านล่าง
3) ล้างแผ่นกรองอากาศโดยแข่ในน้ำอุ่น (ประมาณ 40°C) พร้อมผงซักฟอก
4) ล้างออกให้สะอาดแล้วเช็ดให้แห้ง
5) ติดตั้งแผ่นกรองอากาศกลับเข้าที่อย่างระมัดระวัง

การบํารุงรักษาช่วงสิ้นสุดฤตกาล
- ตอดจุกปิตน้ำออกจากรูระบายน้ำและเทน้ำออกจากเครื่อง คุณสามารถช่วยระบายน้ำได้โดยเอียงตัวเครื่อง
2.จากนั้นเปิดเครื่องและตั้งค่าเป็นความเร็วลมต่ําในโหมดทําความเย็นโดยตั้งอุณหภูมิสูงกว่าอุณหภูมิห้อง
3 เปิดเครื่องไว้ในโหมดนี้เป็นเวลาครึ่งวัน จนกว่าท่อจะแห้ง การทำเช่นนี้จะช่วยให้ภายในเครื่องแห้งและป้องกันการเกิดเชื้อรา - ปิดเครื่องและดึงปลักออก
- ทำการจัดเก็บท่อลม และชิ้นส่วนต่างๆ
- ปิดเครื่องและเก็บไว้ในที่แห้ง
- นำแบตเตอร์ออกจากรีโมทคอนโทรล
วิธีการแก้ไขเบื้องต้น
ห้ามช่อมแซมหรือทอดประกอบอุปกรณ์ด้วยตนเอง การพยายามช่อมแซมโดยไม่ได้รับอนุญาตจะทำให้การรับประกันเป็นโม weeะ และอาจทำให้เกิดอันตรายต่อร่างกายได้
| ปัญหาที่พบ | การตรวจสอบ | การแก้ไข |
| เครื่องไม่ทำงาน | ไม่มีแหล่งจ่ายไฟ | ตรวจสอบให้นไงว่าเสียบปลักเครื่องแล้วและพยายามเปิดเครื่อง |
| ไฟแสดงสถานะน้ำเต็ม (E4) | ระบายน้ำภายในเครื่อง | |
| ฟังก์ชันตั้งเวลาทํางานอยู่ | ยกเลิกฟังก์ชันตั้งเวลา | |
| อุณหภูมิห้องต่ําเกินไปหรือสูงเกินไป | ใช้ได้เฉพาะในอุณหภูมิแวดล้อมระหว่าง 7-32°C | |
| แอร์ไม่เย็น | เครื่องอาจได้รับแสงแตกโดยตรง | ปิดม่าน เมื่อไม่ให้แสงแตก โดนช่องรับสัญญาณรีโมท |
| หน้าต่างหรือประดูเปิดอยู่จํานวนคนหรือแหล่งความร้อนในห้องสะสมมากเกินไป | ปิดหน้าต่างและเปิดเครื่องปรับอากาศอีกเครื่องหนึ่ง | |
| แผ่นกรองสกปรก | ทําความสะอาดหรือเปลี่ยนแผ่นกรองอากาศ | |
| ช่องรับลมเข้าหรือช่องระบายอากาศถูกปิดกั้น | ทําความสะอาดสิ่งสกปรก | |
| อุณหภูมิห้องต่ํากว่าอุณหภูมิที่ตั้งไว้ | เปลี่ยนอุณหภูมิที่ตั้งไว้ | |
| ตัวเครื่องมีเสียงตั้ง | เครื่องไม่ได้วางอยู่บนพื้นผิวเรียบ | วางเครื่องบนพื้นผิวเรียบ พรมจะดีที่สุดในการลดการสนิสะเทือนจากคอมเพราะเซอร์ |
| คอมเพราะเซอร์ไม่ทำงาน | การป้องกันความร้อนสูงเกินไปทํางานอยู่ | ตรวจสอบว่าช่องระบายอากาศตรงและไม่มีสิ่งก็ดขวางรีสตาร์ทเครื่องหลังจาก 5 นาทีเมื่อคอมเพราะเซอร์เย็นลง |
| รีโมทคอนโทรลไม่ทำงาน | ระยะการใช้งานอยู่ไกลเกินไป | เลื่อนรีโมทคอนโทรลให้เข้าใกล้ตัวเครื่องมากขึ้นและตรวจสอบให้นไงว่าเล็งไปที่เซ็นเซอร์ IR |
| แผงควบคุมไม่ได้รับการรับสัญญาณจากรีโมทคอนโทรล | ||
| แบตเตอรี่อ่อน | เปลี่ยนแบตเตอรี่ |
หมายเหตุ: เครื่องปรับอากาศแบบเคลื่อนที่มีระบบหน่วงเวลาคอมเพราะเซอร์ 3 นาที เพื่อบกป้องคอมเพราะเซอร์และยืดอายุการใช้งานของเครื่อง ซึ่งจะส่งผลต่อการเปิดเครื่อง (POWER) รวมถึงการสลับจากฟังก์ชันหนึ่งไปยังอีกฟังก์ชันหนึ่ง เช่น ลดความชั้นเป็นทำความเย็น
รหัสบ่งบอกสถานะเครื่อง
| หน้าขอแสดง | การตรวจสอบ |
| E0 | เซ็นเซอร์วัดออนหภมิท้องเปิดอยู่หรือมีไฟฟ้าลตวงจร ซึ่งไม่ควรส่งผล กระทบต่อการใช้ง้ํานปกติ |
| E2/E4 | น้ําเต็มต้องระบายน้ําออกด้วยมือ |
| E3 | เซ็นเซอร์วัดออนหภมิท้องเปิดอยู่หรือมีไฟฟ้าลตวงจร ซึ่งไม่ควรส่งผล กระทบต่อการใช้ง้ํานปกติ |
หากวิธีแก้ไขข้างต้นไม่สามารถแก้ไขปัญหาได้โปรดติดต่อศูนย์บริการ
ภาคผนวก

การกําจัด: ห้ามทั้งผลิตภัณฑ์นี้รวมกับขยะที่ไม่ได้คัดแยก การเก็บขยะดังกล่าวต้องได้รับการจัดการคัดแยก เนื่องจากต้องมีการจัดการให้ลูกต้อง ปัจจุบันมีสถานที่รีไซเคิลให้บริการแก่ลูกค้า ซึ่งคุณสามารถน่าผลิตภัณฑ์ไฟฟ้า เท่าให้ทางร้านรีไซเคิลได้ โปรดเจ้าไว้ว่าอุปกรณ์เหล่านี้จะได้รับการจัดการเพิ่มเติมในระหว่างกระบวนการรีไซเคิล
ดังนั้นโปรดติดต่อสถานที่รับรู้เชคิลหรือสอบถามเทศบาลเพื่อขอทราบรายละเอียดเกี่ยวกับศูนย์รู้เชคิลขยะในครัวเรือนในพื้นที่ของคุณ
CONTENTS
SAFETY INSTRUCTIONS 3
FEATURES AND PARTS LIST 5
INSTALLATION 6
CONTROL PANEL AND SETTINGS 9
OPERATION MODE 13
WATER-DRAINAGE 15
MAINTENANCE 16
TROUBLESHOOTING 17
APPENDIX 18
SAFETY INSTRUCTIONS
Important!
• Carefully read the instructions before operating the unit.
- This Air Conditioner has an IP. 0 rating. It is designed mainly for indoor use but will stand up to outdoor use being protected against light rain and splashing.
- Rating: This unit must be only connected to a 220-240 V / 50 Hz earthed outlet.

• Installation must be in accordance with regulations of the country where the unit is used.
- If you are in any doubt about the suitability of your electrical supply have it checked and, if necessary, modified by a qualified electrician.
- This air conditioner has been tested and is safe to use. However, as with any electrical appliance - use it with care.
- Disconnect the power from the unit before dismantling, assembling or cleaning.
- Avoid touching any moving parts of the appliance.
• Never insert fingers, pencils or any other objects through the guard
- This appliance is not intended for use by persons (including children) with reduced physical, sensory or mental capabilities. It is also not intended for use by those with a lack of experience and knowledge, unless they have been given supervision or instruction concerning the use of the appliance by a person responsible for their safety.
• Do not leave children unsupervised with this appliance.
• Do not clean the unit by spraying it or immersing it in water.
- Never connect the unit to an electrical outlet using an extension cord. If an outlet is not available, one should be installed by a qualified electrician.
- Never operate this appliance if the cord or plug is damaged. Ensure the power cord is not stretched or exposed to sharp objects or edges.
• The power cord must not be immersed in water, as this could result in electric shock.
- A damaged supply cord should be replaced by the manufacturer or a qualified electrician in order to avoid a hazard.
- Any service other than regular cleaning or filter replacement should be performed by an authorized service representative. Failure to comply could result in a voided warranty.
• Do not use the appliance for any other purposes than its intended use.
- The air conditioner unit must always be stored and transported upright, otherwise irreparable damage may be caused to the compressor; if in doubt we suggest waiting at least 24 hours before starting the unit.
- Avoid restarting the air conditioning unit unless 3 minutes have passed since being turned off. This prevents damage to the compressor.
- Never use the mains plug or an external plug in timer as a switch to start and turn off the air conditioning unit. Use the provided ON/OFF switch located on the control panel.
• Always place the unit on a dry and stable surface.
• The appliance should not be installed in laundry or wet rooms
• R290 refrigerant gas complies with European environmental directives.
• R290 has a low GWP (Global Warming Potential) of 3.
• The air conditioner contains about 235 g of R290 refrigerant gas.
- Do not use or store in an unventilated space with an area smaller than 11.3m2 per unit. The room must be such as to prevent stagnation of possible leaks of refrigerant gas as there could be a danger of fire or explosion hazard should the refrigerant come into contact with electric heaters, stoves or other sources of ignition.
- If the appliance is installed, used or stored in an unventilated room, the room must be such as to prevent stagnation of possible leaks of refrigerant gas as there could be a danger of fire or explosion should the refrigerant come into contact with electric heaters, stoves or other sources of ignition.
- Do not use the product and contact the retailer for advice, if damage has occurred to the unit which may have compromised the refrigerant system.
- Any repairs or maintenance must only be carried out on the unit by a suitably qualified engineer. Before opening and servicing the unit the authorized engineer must be in possession of a copy of the manufacturer's service manual and must follow the safety information contained within it to ensure all hazards are minimized.
• The refrigerant system should not be perforated or punctured. - Do not use means to accelerate the defrosting process or to clean, other than those recommended by the manufacturer.
- The appliance shall be stored in a room without continuously operating ignition sources (For example: open flames, an operating gas appliance or an operating electric heater)
• Do not pierce or burn. - Be aware that refrigerants may not contain an odour.
Energy Saving and Unit Safety Protection Tips
- Do not cover or restrict the airflow from the outlet or inlet grills.
- For maximum performance the minimum distance from a wall or objects should be 50cm. The unit is fitted with a thermal cut off sensor that will prevent overheating.
- Keep the filters clean. Under normal conditions, filters should only need cleaning once every three weeks (approximately). Since the filters remove airborne particles, more frequent cleaning maybe necessary, depending on the air quality.
- For the initial startup set the fan speed to maximum and the thermostat to 4-5 degrees lower than the current temperature. After, set the fan switch to low and set the thermostat to your desired setting.
- To protect the unit we recommend not using the cooling function when the ambient temperature is higher than 35° C.
FEATURES AND PARTS LIST
FEATURES
● Cooling, Heating and Dehumidifying for use all year round.
● Powerful and Flexible for both Domestic and Commercial use
- Both pipes can be connected to gravity flaps, allowing the unit to be situated outside the room, making it ideal for use in server rooms, offices, military tents or barracks, marquees
● Improves comfort and indoor air quality
● Self-evaporative system - No external water tank needed
- Compact, robust design
● Digital Control Panel with IP 24 splash proof protection
● Bright LED screen, indicates desired temperature and error codes
- Remote control and 24 hours start / stop timer that can be used both in cooling / heating or dehumidifier mode
- On/Off timer function – allows you to choose when the unit operates both in air conditioning or dehumidifying mode
● Advanced compressor protection technology
- On castors for improved portability
PARTS LIST

| 1 | Control Panel | 5 | Filter |
| 2 | Cold Air Outlet | 6 | Cold air inlet |
| 3 | Hot Air Outlet | 7 | Hot air inlet |
| 4 | Drain Hole | ||
INSTALLATION
Warning: Before using this unit, please keep it upright for at least 3-4 hours.
This unit can easily be moved from one room to another.
While moving the unit please note that it must always be kept upright and then placed on an even surface.
UNPACKING YOUR NEW AIR CONDITIONER
Open the box and remove the outer carton by sliding it upwards from the base.
Grip the unit by the carry handles located on either sides of the unit and carefully lift until it slides out of the foam base
Install the exhaust hose on the unit before operating.
CONTENTS

Exhaust hose

Mounting plate
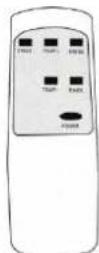
Remote control

Fuselage connectors
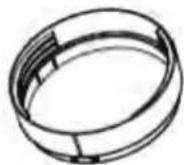
Air outlet connector
ATTACHING THE HOSE
- Clip the hose connector and front vent to the sides of the unit (after removing the hose from storage)
- Insert the hose and rotate it firmly into the adapter
- To remove the hose twist it in the opposite direction.

INSTALLATION OF WINDOW KIT
Partially open the window and then fix the window kit to the window horizontally or vertically. Keep at least 50 cm from any objects and the air inlets grills on the side of the unit.
Clip the other end of the hose with the fishtail adapter to the air outlet of the window slider. Make sure the unit is upright and there are no obstructions to the air inlet and outlet grills.
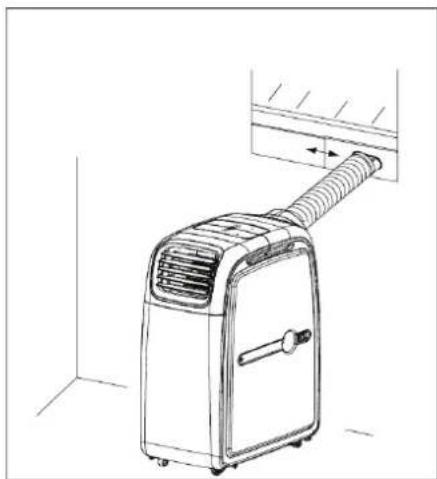
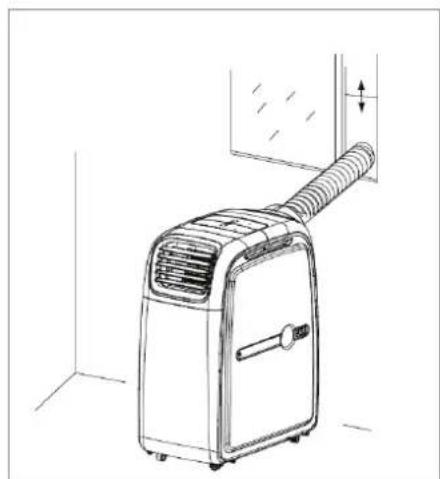
The window kit is only designed to be installed with sliding or sash windows and doors. The window kit is not made to be used with any other style of window. However the fish tail adaptor can be used without the slide bar on most windows and doors, but without sealing the rest of the window opening the efficiency of the unit will be reduced. Ensure that the opening left is as small as possible.
The best form of installation is through a wall duct.
Please note that the unit will still need to be vented in heating and cooling modes, ideally through the wall.


Note: Avoid bending the air hose more than 30 degrees!
IMPORTANT SAFEGUARDS
The soft hose will extend from 28 cm to 150 cm, and the unit will support hoses of upto 300cm. If hose is extended above this length the unit may malfunction and this can invalidate the warranty. The shorter the hose the better the results; ideally for best performance, do not extend the hose by more than 40 cm. The outlet vent must be well ventilated and not obstructed as this will cause the unit to overheat.
CONTROL PANEL AND SETTINGS
This portable air conditioner boasts the functions: cooling, heating, and dehumidify.
The fan has three speeds: high, medium and low
Temperature range settings are: 16 - 31°C.
The LED screen is able to display the temperature set, fault codes, diagnostic and protective codes.

Cold air
outlet side

| 1 | Standby Button | 9 | IR Remote Sensor |
| 2 | Temp + Button | 10 | High Fan Speed Indicator |
| 3 | Function Button | 11 | Medium Fan Speed Indicator |
| 4 | Timer Button | 12 | Low Fan Speed Indicator |
| 5 | Temp - Button | 13 | LED Display Panel |
| 6 | Fan Speed Button | ||
| 7 | Dehumidify Indicator | ||
| 8 | Cooling Indicator | ||
When plugged in the unit will automatically enter standby status
(1) STANDBY Button
Press this button to turn the unit on and enter cooling mode. Press again and the unit will switch off.
(2) TEMP + Button
These are used to increase the desired temperature In cooling mode, the temperature can be set between 16 – 31°C
(3) FUNCTION Button
Press this button to choose between the Cooling, and Dehumidifying modes. Please note when changing between heating and cooling modes, the exhaust hose needs moving onto the appropriate air outlet. In dehumidifying mode, the exhaust hose should not be connected, but the unit should be set up for continuous drainage.
(4) TIMER Button
The inbuilt timer will allow you to set the unit to turn on or turn off after a set period of time, Please note only one timer can be used at any time.
ON TIMER – The timer will turn on the unit automatically after the time set has elapsed.
- When on standby, press the TIMER button, then set the number of hours time you desire the unit to start by pressing the TEMP+ and TEMP- buttons.
- Once the set time has elapsed, the unit will turn on automatically.
- Press the POWER button before the time has elapsed and the unit will turn on as normal and the timer will be cancelled
- The function and fan speed can be set whilst setting the timer.
OFF TIMER – The timer will turn off the unit automatically after the time set has elapsed.
- While the unit is operating, press the TIMER button then set the number of hours time you desire the unit to stop by pressing TEMP+ and TEMP- buttons.
- Once the set time has elapsed, the unit will turn off automatically.
- Press the POWER button before the time has elapsed, the timer will be cancelled and the unit will turn off.
(5) TEMP - Button
This are used to reduce the desired temperature In cooling mode, the temperature can be set between 16-31°C
(6) FAN SPEED Button
Allows the fan speed to be changed between the following options: HIGH→MEDIUM→LOW
• In Dehumidifying mode, the fan is pre-set to low speed
(7) to (8) FUNCTION INDICATORS
An LED will illuminate to show which mode the unit is currently in. This can be changed between Dehumidify (7), Cooling (8) using the Function Button (3)
(9) IR REMOTE SENSOR
Receives infra red signals from the supplied remote control
(10) to (12) FAN SPEED INDICATORS
An LED will illuminate to show which fan speed the unit is currently set to. This can be changed between High (10), Medium (11), and Low(12) using the fan speed button (6).
(13) LED DISPLAY
Shows the set temperature or timer settings while in normal operation. When the set temperature or the timer is adjusted, the new setting is shown on the display.
- When the TEMP+ or TEMP- buttons are pressed, the display will show the desired temperature currently set.
- When the [TIMER] button is pressed the number of hours remaining will be shown until function is achieved or deactivated.
- In the dehumidification function, temperature will be shown in the display.
The LED display is also used to show error codes should a fault occur
| E0 | The room temperature sensor is open or of short circuit, but it does not affect the normal use. |
| E2 OR E4 | Water is full, needS manual drainage |
| E3 | The coil sensor is open or short circuited, but this should not affect the normal operation. |
MULTI PROTECTIVE FUNCTION
ANTI-FREEZE PROTECTION CONTROL:
When the ambient temperature is low while in Cooling Mode, the compressor and water pump will stop working if the copper coil temperature is too low. When the copper coil temperature increases, the protection will be stopped automatically. While in this mode "Df" will be displayed on the unit.
WATER-FULL PROTECTION:
When the water level in the internal water tank is above the maximum level, the unit will alert automatically and E4 will be displayed on the LED screen. Please discharge the water from the water tank by following the instructions in the "Water Drainage" section.
COMPRESSOR PROTECTION
The compressor has overheat protection which may stop the compressor to prevent damage. The compressor also has a 3 minute delay protection function which delays the start of the compressor, to help protect the compressor against repeated loss of power.
REMOTE CONTROL
| Power | To enter / exit standby Mode. |
| Speed | Fan speed selection (N/A in dehumidification mode) |
| Temp + | Increase desired temperature in 1 degree increments |
| Temp - | Decrease desired temperature in 1 degree increments |
| Mode | Change between Cooling, Dehumidifying, fan modes. |
| Timer | Set the timer. For more information see the Timer section on Page 10. |

OPERATION MODES
COOLING
On very warm days we recommend programming the unit to start early, before direct sunlight hits the room, set it to a comfortable 20-22°C in cooling mode.
The electriQ Airflex 15 is a self-evaporating air conditioner, so under normal use there is usually no need to empty the internal tank. However if there is a high amount of humidity in the air or if the unit is not vented correctly, water will be collected in the internal tank.
If the unit operates in cooling mode for a longer period and especially at a time of year with higher air humidity, the internal condensation tank may fill and an error E4 will be displayed on the LED panel, which means the unit will require emptying as per the water drainage section. In such instances it is recommended to use the permanent drainage.
COOLING WHEN THE AIR CONDITIONER IS PLACED INDOORS (NORMAL OPERATION)
The unit is placed in the room to be cooled.
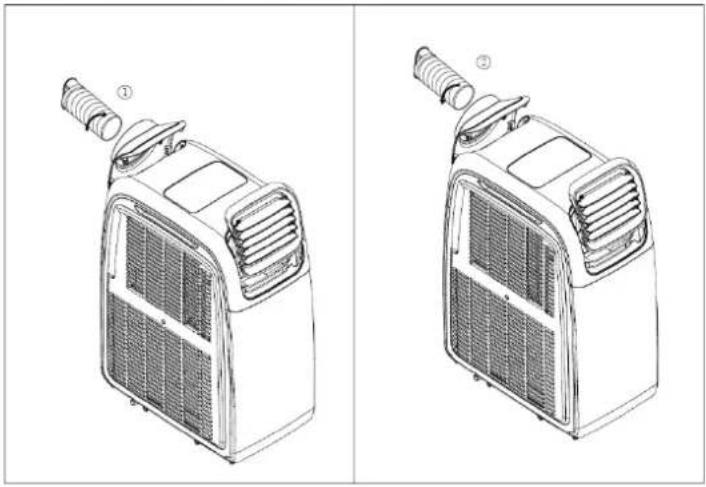
Connect the hose to the hot air outlet of the air conditioner, after exchanging the grills if necessary. The air hose will expel the hot air from the room outside while the front grills produce cold air, to cool the room.
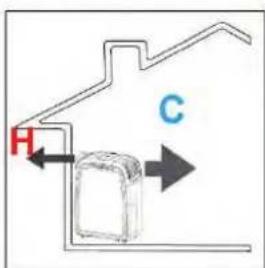
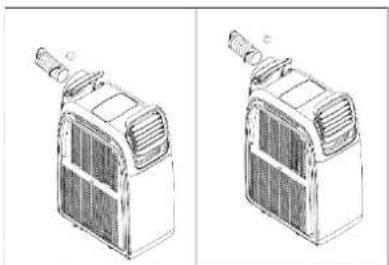
The hose can be vented via a tilted window, a door or wall aperture. Make sure that no warm air from outside can enter the room. Set the function to "COOLING". Set the target temperature using
the temperature control. The target temperature range is selectable between 16°C and 31°C . The unit must only be used in an ambient temperature of up to 32°C .
Note: After switching on, the compressor will only start after a 3 minute delay. For full cooling effect please allow a further 10 minutes of operation.
COOLING WHEN THE AIR CONDITIONER IS PLACED OUTDOORS (DUCTING THE COLD AIR INTO THE ROOM)
Connect the hose to the cold air outlet of the air conditioner, after exchanging the grills if necessary. The air hose will send cold air into the room, while the front grills will expel hot air.

DEHUMIDIFICATION
The Airflex 15 is a powerful commercial grade dehumidifier with an extraction rate of 70 litres per day at 80% RH. Humidity is extracted from the air, collected in the water tank and discharged via a condensation drain pipe. We recommend using a large bucket or running the condensate drain pipe to an external drain. Please note the condensate drain is gravity fed, and so the pipe must run downhill for drainage to occur. Alternatively it is possible to connect an inline pump for sending the condensate longer distances or uphill.
When using the air conditioner in dehumidify mode, the exhaust hose is not required. Set the function to "Dehumidify". As the unit does not have a humidistat we recommend using the inbuilt timer to control the length of operation.
WATER-DRAINAGE
This model is an advanced self-evaporative air conditioner, which reduces the need to empty the water tank in cooling mode. If the unit is vented correctly most of the water is reused to cool the condenser coils and any excess is evaporated. As such for cooling mode, to ensure the unit runs at maximum efficiency, we would advise for continuous drainage not to be used.

MANUAL
DRAINAGE:
- When the internal water tank is full the unit will stop working, and the unit will display "E2" or "E4"
- Shut off the unit and unplug. Try not to move the model abruptly as this may cause water to spill out from the internal water tank.
- Place a tray under the water plug.
- Remove the water plug and attach a drain pipe running to the water container - water will drain from the internal container.
• Put the water plug back securely.
CONTINUOUS DRAINAGE:
- Remove the water plug
- Connect a water pipe to the water outlet.
- You can plumb this pipe into your current plumbing system, lead it outside or use a water pump.
NOTE:
- Please make sure that the rubber bung or a drain pipe is in place when the unit is running.
- When operating the heating function, a drain pipe should be installed in order to improve the heating effect.
- When operating the dehumidifying function the unit must be used with a drain hose.
- When the water tank is full,"E2" or "E4" will be displayed on the display panel. Please remove the rubber bung from the drain port and remove the water collected. After the drainage is completed, please restart the unit and then the unit can operate normally.
MAINTENANCE
CLEANING
Please shut off the unit and unplug from the mains before cleaning or performing any maintenance
CLEAN THE SURFACE
Clean the plastic housing with a duster or a soft wet cloth.
Do not use chemical solvents (such as benzene, alcohol or gasoline) as they may cause irreversible damage.
AIR FILTER CLEANING
a) Clean the air filter every 2 weeks. If the air filter is blocked with dust, the unit's performance will be significantly affected.
b) Pull out lightly the filter as shown below
c) Wash the air filter by immersing it in warm (about 40°C) water with a neutral detergent.
d) Rinse it and then dry it thoroughly.
e) Carefully re-install the air filter

END OF SEASON MAINTENANCE:
- Pull out the plug from the drainage hole and empty the internal tank. You can also drain the water by leaning the unit.
- Then switch the unit to low fan mode in cooling mode with the desired room temperature set above the rooms temperature.
- Keep the unit in this mode for half day - until the conduit is dried. Doing this helps to keep the inside of the unit dry and prevents mould developing
- Turn off the unit and pull out the plug.
- Separate the vent pipe and store it safely.
- Cover the unit and keep it in a dry place.
- Take the batteries out of remote control and store, or dispose of them safely
TROUBLESHOOTING
Do not repair or disassemble the unit by yourself, unauthorized repair attempts will invalidate the warranty and may cause bodily harm.
| Problem | Reason | Solution |
| The unit does not work | No power supply | Ensure the unit is plugged in and attempt to turn on the unit. |
| Water-full indicator (E4) | Drain the internal water tank | |
| Timer function is active | Cancel the Timer function | |
| Room temperature too low or too high | Use only in ambient temperatures between 7 – 32°C | |
| The unit does not seem to perform. | In direct sunlight | Draw the curtains, UV affects RC |
| Windows or doors open.Large amount of people or a heat source in the room. | Close windows and turn on another air conditioner | |
| Filter is very dirty | Clean or change the air filter | |
| Air inlet or air outlet is blocked | Clear out debris | |
| Room temperature is lower than the temperature set | Change the set temperature | |
| The unit is loud | The unit is not on flat surface. | Put the unit on a flat surface. Carpet is best for reducing vibrations from the compressor |
| Compressor does not work | Overheating protection is active | Check the vent is straight and unrestrictedRestart the unit after 5 minutes when the compressor has cooled |
| Remote control doesn’t work | Operating distance is too far. | Move remote control closer to the unit and make sure it is aimed at the IR sensor |
| Control panel has not received the signal from remote control. | ||
| The batteries are flat | Replace the batteries |
Note: The mobile air conditioner is equipped with a 3 minute compressor-delay system to protect the compressor and prolong the life of the unit. This affects the switching on of the unit (POWER) as well as switching over from one function to the next, e.g. dehumidify to cooling or heating.
SELF DIAGNOSTIC CODES
| DISPLAY | AUTOMATIC DIAGNOSTICS |
| E0 | The room temperature sensor is open or short circuited. This should not affect the normal use. |
| E2/E4 | Water is full, need to be manually drained |
| E3 | The room temperature sensor is open or short circuited. This should not affect the normal use. |
If the above solutions do not resolve the problem please contact the service centre.
APPENDIX

Disposal: Do not dispose this product as unsorted municipal waste. Collection of such waste must be handled separately as special treatment is necessary.
Recycling facilities are now available for all customers at which you can deposit your old electrical products. Customers will be able to take any old electrical equipment to participating civic amenity sites run by their local councils. Please remember that this equipment will be further handled during the recycling process, so please be considerate when depositing your equipment. Please contact the local council for details of your local household waste recycling centres.
APPENDIX

Disposal: Do not dispose this product as unsorted municipal waste. Collection of such waste must be handled separately as special treatment is necessary.
Recycling facilities are now available for all customers at which you can deposit your old electrical products. Customers will be able to take any old electrical equipment to participating civic amenity sites run by their local councils. Please remember that this equipment will be further handled during the recycling process, so please be considerate when depositing your equipment. Please contact the local council for details of your local household waste recycling centres.
บริษัท ไฟฟ เอเรียนท์ ไทย จําทัต (บทชน) HIFI ORIENT THAI PUBLIC COMPANY LIMITED
83/161 -162 ซอยงามวงศ์วาน47(ชินเขต2)
Inr. 0-2954-5281, 0-2580-6955
แขวงทุ่งสองห้อง เขตหลักสี่
Care line. 02-591-9444, 02-589-5115
กรุงเทพมหานคร 10210
Website. www.aconatic.com
Aconatic

- สารบัญ
- คำแนะนำต้านความปลอดภัย
- ข้อสำคัญ
- เคล็ดลับการประหยัดพลังงานและการป้องกันความปลอดภัย
- รายละเอียดสินค้าและรายการชิ้นส่วน
- รายละเอียดสินค้า
- การติดตั้ง
- อุปกรณ์ภายในกล่อง
- การติดตั้งท่อ
- การติดตั้งกับหน้าต่าง
- รีโมทคอนโทรล
- โหมดการทำงาน
- โหมดทำความเย็น(COOLING)
- การทำความเย็นเมื่อติดตั้งเครื่องปรับอากาศภายในอาคาร
- โหมดลดความชั้น
- การระบายน้ำ
- การช่อมบำรุงรักษา
- การทำความสะอาด
- ทำความสะอาดตัวเครื่อง
- การทำความสะอาดแผ่นกรองอากาศ
- การบํารุงรักษาช่วงสิ้นสุดฤตกาล
- วิธีการแก้ไขเบื้องต้น
- ภาคผนวก
- CONTENTS
- SAFETY INSTRUCTIONS
- IMPORTANT
- ENERGY SAVING AND UNIT SAFETY PROTECTION TIPS
- FEATURES AND PARTS LIST
- FEATURES
- INSTALLATION
- UNPACKING YOUR NEW AIR CONDITIONER
- ATTACHING THE HOSE
- INSTALLATION OF WINDOW KIT
- IMPORTANT SAFEGUARDS
- CONTROL PANEL AND SETTINGS
- STANDBY BUTTON
- TEMP + BUTTON
- FUNCTION BUTTON
- TIMER BUTTON
- TEMP - BUTTON
- FAN SPEED BUTTON
- TO (8) FUNCTION INDICATORS
- IR REMOTE SENSOR
- TO (12) FAN SPEED INDICATORS
- LED DISPLAY
- MULTI PROTECTIVE FUNCTION
- ANTI-FREEZE PROTECTION CONTROL
- WATER-FULL PROTECTION
- COMPRESSOR PROTECTION
- REMOTE CONTROL
- OPERATION MODES
- COOLING
- COOLING WHEN THE AIR CONDITIONER IS PLACED INDOORS (NORMAL OPERATION)
- COOLING WHEN THE AIR CONDITIONER IS PLACED OUTDOORS (DUCTING THE COLD AIR INTO THE ROOM)
- DEHUMIDIFICATION
- WATER-DRAINAGE
- MANUAL
- DRAINAGE
- CONTINUOUS DRAINAGE
- NOTE
- MAINTENANCE
- CLEANING
- CLEAN THE SURFACE
- AIR FILTER CLEANING
- END OF SEASON MAINTENANCE
- TROUBLESHOOTING
- APPENDIX
- บริษัท ไฟฟ เอเรียนท์ ไทย จําทัต (บทชน) HIFI ORIENT THAI PUBLIC COMPANY LIMITED
- ACONATIC
Marque : Aconatic
Modèle : AN-PAC14D1
Catégorie : Climatisation