MS12LW - Caisson de basses Rockville - Notice d'utilisation et mode d'emploi gratuit
Retrouvez gratuitement la notice de l'appareil MS12LW Rockville au format PDF.


| Type de produit | Caisson de basses |
| Marque | Rockville |
| Modèle | MS12LW |
| Haut-parleur | 12 pouces (30 cm) |
| Puissance RMS | 400 W |
| Puissance maximale | 800 W |
| Impédance | 4 ohms |
| Réponse en fréquence | 20 Hz – 200 Hz |
| Sensibilité | 88 dB |
| Dimensions (L x l x h) | 34 x 30 x 28 cm |
| Poids | 10 kg |
| Matériau du cône | Polypropylène |
| Bobine mobile | 2 pouces |
| Aimant | Ferrite |
| Finition du coffret | MDF |
| Type de charge | Bass-reflex |
| Utilisation | Voiture |
| Entrées | Haut niveau et bas niveau |
| Réglages | Phase, niveau, filtre passe-bas |
| Protection | Thermique |
| Connectique | Bornier à vis |
| Grille incluse | Oui |
| Entretien | Nettoyer avec un chiffon sec |
FOIRE AUX QUESTIONS - MS12LW Rockville
Questions des utilisateurs sur MS12LW Rockville
0 question sur cet appareil. Repondez a celles que vous connaissez ou posez la votre.
Poser une nouvelle question sur cet appareil
Téléchargez la notice de votre Caisson de basses au format PDF gratuitement ! Retrouvez votre notice MS12LW - Rockville et reprennez votre appareil électronique en main. Sur cette page sont publiés tous les documents nécessaires à l'utilisation de votre appareil MS12LW de la marque Rockville.
MODE D'EMPLOI MS12LW Rockville
Wiring Diagrams
One 4 ohm DVC woofer with a 2 ohm load

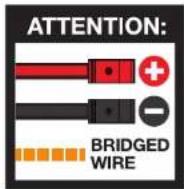
Two 4 ohm DVC woofers with a 4 ohm load
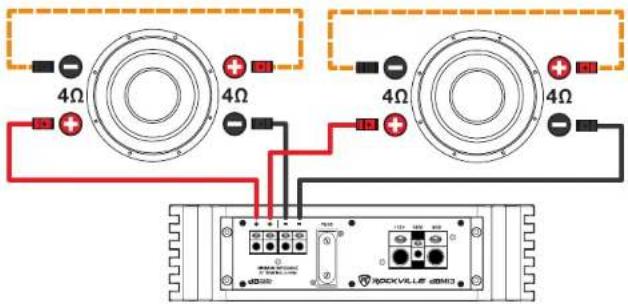
Two 4 ohm DVC woofers with a 1 ohm load

ROCKVILLE
MS10L/MS12L
MARINE/BOAT 10" and 12" FREE AIR SUBWOOFERS w/LEDs
OWNER'S MANUAL
ATTENTION:
WATCH THIS VIDEO BEFORE FIRST USE!
Who reads manuals?
Scan the QR codes or go to the URLs to access how-to video(s), the owner's manual, and other important information you may need to get the most out of your item.
If you prefer written instructions, please read ahead!
With Rockville you get many options.

rockvillesupport.com/ms10lw

rockvillesupport.com/ms10lb

rockvillesupport.com/ms12lw

rockvillesupport.com/ms12lb
Missing items? If you ordered a bundle that includes more than one product and you are missing part of your bundle, then it just means your order shipped from two different warehouses. You will receive the remaining items very soon. If you have any concerns or inquiries, feel free to call our customer support center at 1-646-758-0144, 24 hours a day/7 days a week.
The Rockville MS-L series marine subwoofer is one of the most powerful on the market. What really makes this sub stand out is the sound quality and durability. The frequency range of these subs is so good that it will make all your songs sound so much better! These play frequencies that normal full range speakers cannot hit adding depth and richness to all your music. We added an awesome LED lighting effect to these subs to really make your system shine. The MS-L series subwoofer was designed in a molded ABS plastic basket made with a special blend that is waterproof and un-breakable.
Using only true marine grade components and materials, the MS-L series subwoofers are fully marinized against salt & fresh water conditions. These subs are completely waterproof and protected from the elements! They are UV treated and have a special waterproof coating to prevent water damage.
Please read this guide carefully for proper use of your MS-L series marine subwoofer. Should you need assistance, please call our technical help line at 1-646-758-0144, 24 hours a day/7 days a week.
Features/Specifications MS10L
• Max power: 2400 Watts
• RMS power: 600 Watts
• Injection Cone with Santoprene Surround
- 2" 4 Layer dual voice coil
- Molded ABS plastic basket made with a special blend that is water proof and unbreakable
• Cool LED lighting effect
• 80oz double stacked magnet
• Frequency response: 30Hz – 4kHz
• Impedance: Dual 4 ohms
- Sensitivity: 90dB
• Total diameter: 10.55"
- Cutout diameter: 9.0"
- Mounting depth: 5.6"
• Available in Black or White
MS12L
• Max power: 2800 Watts
• RMS power: 700 Watts
• Injection Cone with Santoprene Surround
• 2.5" 4 Layer dual voice coil
- Molded ABS plastic basket made with a special blend that is water proof and unbreakable
• Cool LED lighting effect
• 100oz double stacked magnet
• Frequency response: 20Hz - 4kHz
- Impedance: Dual 4 ohms
- Sensitivity: 90dB
• Total diameter: 12.8"
- Cutout diameter: 11"
- Mounting depth: 6.1"
• Available in Black or White
LED Wiring Instructions
- Connect the red cable of the included LED power harness to your vessel's acc/ignition switch. You can also connect it to the remote terminal of your amp if it is nearby. This will turn the LEDs on or off when you power up or power down your radio/headunit. Connect the black cable to the negative terminal of your power supply.
- Connect the receptacle at the end of the harness to the corresponding receptacle protruding from the back of the subwoofer, near the terminals. Refer to step 6 of the installation instructions on the facing page.
CAUTION! DO NOT SHORT CIRCUIT THE LED OUTPUT, THIS MAY LEAD TO PERMANENT DAMAGE!
Subwoofer Installation

Find a mounting location that does not interfere with the safe operation of your vessel. For example, under the seat or the bow. Or, if the vessel is large, you can put two in different locations. Make sure the mounting screws will not puncture wiring harnesses, control cables, hydraulic lines, fuel lines, the fuel tank, or the hull. These may be located behind or under the mounting surfaces.

Create a mounting template using the provided measurements and place it on the desired surface. Use a drill to drill the holes for the mounting screws.

Use the drill to make the mounting holes, being careful to not rip the template.

Use a utility knife (pictured), jigsaw, rotary cutting tool, or other appropriate tool to cut out the mounting hole.
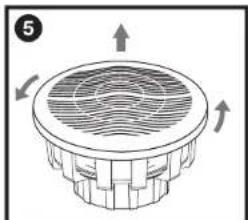
Remove the subwoofer's grill in order to expose the mouting holes. Simply press down, turn the cover counterclockwise (to the left) and carefully pull it up.

Connect your pre-routed speaker cables (fig. a) and LED power wires (fig. b) to the woofer (refer to the LED Wiring Instructions section on the facing page). Make sure to place the vibration dampening gasket (fig. c) as shown in the diagram. Insert the woofer into the mounting hole, align the mounting screw holes, insert the screws and tighten them. Do not over tighten. To replace the grill, place it upon the sub, press lightly, and carefully turn it clockwise (to the right).
RockvilleAudio.com
©2024 ROCKVILLE // Features and specifications are subject to change and/or improvement without notice.
Marque : Rockville
Modèle : MS12LW
Catégorie : Caisson de basses