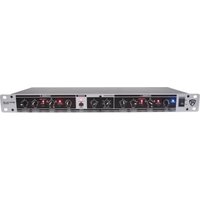
RX230 - Crossover audio Rockville - Notice d'utilisation et mode d'emploi gratuit
Retrouvez gratuitement la notice de l'appareil RX230 Rockville au format PDF.


| Type de produit | Amplificateur/récepteur stéréo |
| Dimensions (L x H x P) | 430 x 130 x 300 mm |
| Poids | 5 kg |
| Alimentation | 230 V AC, 50 Hz |
| Puissance de sortie | 100 W par canal (RMS) |
| Impédance des enceintes | 4-8 ohms |
| Entrées audio | 2 x RCA, 1 x optique, 1 x coaxial |
| Sorties | 2 paires de bornes d'enceintes, 1 x pré-out caisson |
| Radio intégrée | FM/AM avec 30 présélections |
| Connectivité | Bluetooth 5.0, USB (lecture MP3) |
| Réponse en fréquence | 20 Hz - 20 kHz |
| Rapport signal/bruit | > 90 dB |
| Télécommande | Fournie (pile CR2025 incluse) |
| Fonctions principales | Amplification stéréo, réception radio, lecture USB/Bluetooth, contrôle de tonalité |
| Entretien et nettoyage | Débrancher l'appareil, nettoyer avec un chiffon doux et sec. Ne pas utiliser de produits abrasifs. |
| Sécurité | Ne pas exposer à l'humidité ou à des températures extrêmes. Ne pas obstruer les ouvertures de ventilation. |
| Pièces détachées et réparabilité | Fusible de rechange, cordon d'alimentation, télécommande (réf. RC-RX230) |
| Informations générales | Marque Rockville, modèle RX230. Garantie 2 ans. |
FOIRE AUX QUESTIONS - RX230 Rockville
Questions des utilisateurs sur RX230 Rockville
0 question sur cet appareil. Repondez a celles que vous connaissez ou posez la votre.
Poser une nouvelle question sur cet appareil
Téléchargez la notice de votre Crossover audio au format PDF gratuitement ! Retrouvez votre notice RX230 - Rockville et reprennez votre appareil électronique en main. Sur cette page sont publiés tous les documents nécessaires à l'utilisation de votre appareil RX230 de la marque Rockville.
MODE D'EMPLOI RX230 Rockville
ROCKVILLE
RX230
2-WAY STEREO/3-WAY MONO RACK MOUNTABLE CROSSOVER
OWNER'S MANUAL
ATTENTION:
VISIT THE ROCKVILLE SUPPORT SITE BEFORE FIRST USE!

Who reads manuals?
Scan the QR code or go to rockvillesupport.com/rx230 to access how-to video(s), the owner's manual, and other important information you may need to get the most out of your item.
If you prefer written instructions, please read ahead!
With Rockville you get many options.
Missing items? If you ordered a bundle that includes more than one product and you are missing part of your bundle, then it just means your order shipped from two different warehouses. You will receive the remaining items very soon. If you have any concerns or inquiries, feel free to call our customer support center at 1-646-758-0144, Monday through Thursday, 9am to 10pm EST, and Fridays, 9am to 3pm EST.
Thank you for purchasing this Rockville RX230 2-Way Stereo/3-Way Mono Rack Mountable Crossover. Please read this installation guide carefully for proper use of your Rockville RX230 crossover. Should you need assistance, please call our technical help line at 1-646-758-0144, Monday through Thursday, 9am to 10pm EST, and Fridays, 9am to 3pm EST.
IMPORTANT SAFETY INSTRUCTIONS

- To reduce risk of electric shock, never open the unit. There are no serviceable parts. For service contact Rockville.
- Do not expose this unit to any kind of moisture.
- Please ensure that the unit is situated in a properly ventilated area.
- Make sure the unit is placed on a level and stable surface.
Introduction
If you want to operate a loudspeaker system, which consist of several loudspeakers covering different frequency bands, then you naturally have to work with suitably differentiated input signals for each loudspeaker. To do this you need a frequency crossover which can split the input signal into several frequency bands. Please note the difference between passive crossovers which are wired between amplifier and speaker, and active systems which are placed before the amplifiers in the signal chain. Multi-way speaker systems can be found almost everywhere today—and not only in stereo systems, but in cinemas, discotheques and concert halls. As customers have become more demanding they can even be found now in such “simple” products as TV sets. Why?
With the same sound pressure, low-frequency sound waves have a much greater amplitude (oscillation range) than high-frequency waves. When a single loudspeaker tries to produce bass and treble frequencies at the same time, a so-called inter-modulation distortion will occur. This means that, when the speaker diaphragm is displaced by low frequencies, the treble frequencies seem to be raised in loudness, or lowered when the diaphragm reverses its direction.
We can not therefore expect a single loudspeaker to reproduce signals, spanning the whole audible frequency spectrum at the same level of quality. If, using a frequency crossover, a loudspeaker only has to reproduce a limited part of the frequency spectrum and it will do so at a greatly increased level of quality—thus producing a more regular frequency response and dispersion pattern.
Functions

- Power switch
- Power-on LED indicator
Channel 1 (Stereo/Mono)
- Input gain control: ±12dB
- Low-cut switch (40Hz high-pass filter) with LED indicator
- Crossover frequency control (Stereo: Low/High) (Mono: Low/Mid)
- Crossover frequency switch (x1: 100Hz - 1KHz/x10: 1KHz - 10KHz) with LED indicator
- Low output gain control: -∞ to +6dB
- High output gain control: -∞ to +6dB (STEREO MODE ONLY)
Subwoofer
- Crossover frequency control
- Subwoofer gain control
Mode
- Stereo/mono mode switch

WARNING: Never activate the MODE and XOVER FREQ switches without having first switched off the unit. Switching between these while the unit is in use produces heavy interference noise which could damage your loudspeakers or your system.
Channel 2 (Stereo/Mono)
-
Input gain control: ±12dB
-
Low-cut switch (40Hz high-pass filter) with LED indicator
- Crossover frequency control (Stereo: Low/High) (Mono: Mid/High)
- Crossover frequency switch (x1: 100Hz - 1KHz/x10: 1KHz - 10KHz) with LED indicator
- Low output (stereo)/Mid output (mono) gain control: -∞ to +6dB
- High output gain control: -∞ to +6dB
- Rack ears: Allows for unit rack mount using four attaching screws and washers (not included).

Channel 2 (Stereo/Mono)
- High output
- Low output (stereo)/Mid output (mono)
- Signal input
Subwoofer
- Subwoofer output
Channel 1 (Stereo/Mono)
- High output (stereo only)
- Low output
- Signal input
- DC 12V power input
Applications
You will need some tools to help set us this CROSSOVER to its optimal configuration. To set up the crossover frequency you need to know which frequency range a loudspeaker stack covers, over which range the sound energy is linearly transmitted, and where reductions or increases in the frequency response occur. In addition, every room has different size and quality characteristics. These strongly influence the sound response, since resonances and reflections in different frequency ranges can also lead to reduction or increases in the sound picture. You will need suitable equipment in order to be able to recognize and compensate for these features.
Tools
You will need a high-grade microphone for making measurements. This should have a frequency response that should be as linear as possible. And at least linear over the range from 90Hz – 15KHz. Place the microphone about 5 meters in front of the speaker system and between the diaphragms of the two frequency bands you wish to measure. When using a measuring microphone to set the levels for the individual frequency bands and the crossover frequencies, you should only operate one loudspeaker stack. For optimal settings you will usually need to reposition the microphone between two successive measurements. When used in combination with a measuring microphone and a generator producing pink noise via an input into the P.A. mixing console, an analyzer will show the sound energy distribution over the individual frequency bands (usually in 1/3 of an octave).
When listening to the overall sound of your system, you should walk around in the audience area and try to detect resonance frequencies or cancellations. The sound should be optimized for the position where most of the audience will be gathered, without however neglecting other areas. This often means that the system must be operated in mono. Whenever you use technical aids such as analyzers, measuring microphones etc, you should check the desired results with your own ears.
Setting Input and Output levels
Both inputs offer a gain or loss of up to 12dB. Normally, the output level on the mixing console and the input sensitivity of the amplifiers are identical. In other words, 0dB at the mixing console corresponds with 0dB at the amplifiers. This means that there is fully control over the amplifiers. In this case the CROSSOVER should have no effect on the system level and all input and output level settings should be set at 0dB. Where e.g. a home recording or disc console is being used with an operating level of -10dBV but the amplifiers need +4dBu for complete control, then an additional gain of 12dB must be provided between them. In this case the INPUT control of this CROSSOVER should be set to the maximum.
The output levels of the single bands can be raised/lowered by as much as 6dB. To achieve a linear frequency response in the system, all output levels should be adjusted with the help of an analyzer. To check the crossover frequencies and levels, mute all outputs except for one, and play back pink noise over the system at an appropriate volume level. When you now switch on the adjacent band, the level measured around the crossover frequency should go up by 3dB. Repeat this process for all crossover frequencies.
Correcting Problems
Check the entire frequency response of the system. Rooms have quite an impact on the frequency response of speaker systems, due to resonance and various reflections, so you can not expect to achieve a linear frequency response fight from the star. To achieve this, you need an equalizer, such as the Rockville REQ215 or REQ231. Look for drop-outs around the crossover frequencies. If the frequency response is very irregular, then it can make sense to grade adjust it using the frequency crossover, before using an equalizer. The errors in the crossover frequency must then be as far as possible corrected using the EQ.
If the loudspeaker diaphragms in a multi-way system are not exactly aligned along a vertical axis, the varying distances between the sound source and the listener result in phase errors and cancellations (also known as the "comb filter effect"). Particularly in the higher frequencies it is important, due to the shorter wavelengths, to position the diaphragms above each other and not next to each other. The various types of construction used in individual systems (horns, bass reflex cabinets etc.) still give rise to ran time differences, even where the front sides of all systems are aligned vertically above each other. In this case a run time correction must be mad by electronic means. This can be done by using a delay function. Run time difference can be compensated by delaying the frequency bands over a range of milliseconds. This helps avoid loss of sound quality, particularly in the high tone ranges.

WARNING: Runtime correction is not the same as phase correction. If a speaker system has the same run times then it also has the same phases (unless the polarity of the cable has been reversed). However the opposite is not necessarily true.
Applications (continued)
Setting the Crossover frequencies
The frequency range from which the crossover frequencies can be selected, can be one of two ranges — from 100Hz – 1KHz and from 1KHz – 10KHz. To set the crossover frequencies, please first read the manufacturers' specifications for the individual loudspeaker components. To use the capacity of your system at its best you should set up the crossover frequencies in accordance with the frequency diagrams on the individual loudspeaker boxes. Further, the crossovers should not lie on peaks or drop-outs. Look for a range with the flattest possible curve. If folded bass horns are being used, then the length of the horn path must also be taken into to account, since the run time displacements arising from differing long paths can also have a negative effect on the frequency development.
WARNING: Never operate loudspeaker or horn drivers below the limiting frequency specified by the manufacturer!
Subwoofer output
To achieve a very loud and deep bass playback this CROSSOVER has an additional mono sub woofer output for 2-way and 3-way operation. In this sense this CROSSOVER is a stereo 2-way + mono 1-way or mono 4-way frequency crossover. The subwoofer signal is mono, since people can not sense the location of lower frequencies. Another reason is that combining all bass signals into a single signal produces an excellent effect. This is because two bass speaker boxes combined together produce 3dB more sound pressure than if they were separated from each other by a small distance. The increased pressure is due to the speakers producing a single wave front. With four loudspeaker boxes the increase is 6dB. The reason here is the spherical shape of the expanding low-frequency sound waves. Bass boxes which are separate from each other can mutually disrupt each other where their sound waves meet (what happens here can be easily imagined if you throw two stones into water—first separately and then stuck together).
Audio Connections
As a standard, this CROSSOVER is equipped with electronically servo-balanced inputs and outputs. The circuit design features automatic hum suppression for balanced signals and so ensures trouble-free operation, even at the highest operating levels. Externally induced mains hums etc. can therefore be effectively suppressed. The automatic servo-function recognizes the presence of unbalanced connectors and adjusts the nominal level internally to avoid level difference between the input and output signals. (6dB correction).
WARNING: Please ensure that only qualified persons install and operate the CROSSOVER. During installation and operation the user must be properly grounded. Electrostatic charges might affect the operation of the unit.
Features/Specifications
- Ability to mix 2 channel's output
• 24dB/Octave filters - Mute switches
• Channel Gain Control: 0 to +12dB - Low Frequency Level Control: -∞ to +6dB
• High Frequency Level Control: -∞ to +6dB - Low Frequency to High Frequency crossover: 100Hz – 1KHz x10 range: Changes Low Frequency to Mid Frequency from (100 Hz – 1KHz) to (1KHz – 10KHz)
- Switchable 2-way stereo or 3-way mono operation
- Subwoofer out
- Subwoofer X-Over Freq (30Hz – 200Hz) adjustable
- Subwoofer Gain ±6dB
• Each output is -3dB at the selected crossover frequency value. Outputs are essentially flat within their relative pass bands.
• Distortion: Less than 0.02% THD @ +4dB,@ 1KHz - Hum and Noise: Crossover controls set @ 1KHz, all level controls set at 0dB; 22Hz to 22KHz, unweighted gain @ 0dB (ref +4dBu) – 90dB
- Low Frequency Output: -86dB below 80dB
• High Frequency Output: -84dB below -78dB
• Maximum Input Level: +14dB, (channel gain @ 0dB input level controls set at 0dB) +22dB
• Maximum Output Level: +22dB, unbalanced +28dB, balanced - Input Impedance: 10k ohms unbalanced
- Inputs: XLR Balanced
• Outputs: XLR Balanced
• Power Requirements: DC12V/1A
Features/Specifications (continued)
• 110 – 240V worldwide voltage adaptor
• Maximum Input Level: +14dB, (channel gain @ 0dB input level controls set at 0dB) +22dB
• Maximum Output Level: +22dB, unbalanced +28dB, balanced
• Input Impedance: 10K ohms unbalanced
ROCKVILLE

RockvilleAudio.com
© 2021 ROCKVILLE // Features and specifications are subject to change and/or improvement without notice.
- ROCKVILLE
- RX230
- 2-WAY STEREO/3-WAY MONO RACK MOUNTABLE CROSSOVER
- OWNER'S MANUAL
- ATTENTION
- VISIT THE ROCKVILLE SUPPORT SITE BEFORE FIRST USE
- IMPORTANT SAFETY INSTRUCTIONS
- INTRODUCTION
- CHANNEL 1 (STEREO/MONO)
- SUBWOOFER
- MODE
- CHANNEL 2 (STEREO/MONO)
- APPLICATIONS
- TOOLS
- SETTING INPUT AND OUTPUT LEVELS
- CORRECTING PROBLEMS
- APPLICATIONS (CONTINUED)
- SETTING THE CROSSOVER FREQUENCIES
- WARNING: NEVER OPERATE LOUDSPEAKER OR HORN DRIVERS BELOW THE LIMITING FREQUENCY SPECIFIED BY THE MANUFACTURER
- SUBWOOFER OUTPUT
- AUDIO CONNECTIONS
- WARNING: PLEASE ENSURE THAT ONLY QUALIFIED PERSONS INSTALL AND OPERATE THE CROSSOVER. DURING INSTALLATION AND OPERATION THE USER MUST BE PROPERLY GROUNDED. ELECTROSTATIC CHARGES MIGHT AFFECT THE OPERATION OF THE UNIT
- FEATURES/SPECIFICATIONS
- FEATURES/SPECIFICATIONS (CONTINUED)
- ROCKVILLEAUDIO.COM
Marque : Rockville
Modèle : RX230
Catégorie : Crossover audio