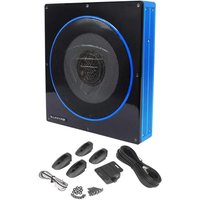
RW10CA - Caisson de basses Rockville - Notice d'utilisation et mode d'emploi gratuit
Retrouvez gratuitement la notice de l'appareil RW10CA Rockville au format PDF.


| Type de produit | Caisson de basses actif |
| Marque | Rockville |
| Modèle | RW10CA |
| Haut-parleur | 10 pouces (25,4 cm) |
| Puissance RMS | 200 Watts |
| Puissance en crête | 400 Watts |
| Réponse en fréquence | 20 Hz - 200 Hz |
| Impédance | 4 Ohms |
| Dimensions (L x H x P) | 35 x 30 x 35 cm (approx.) |
| Poids | 8 kg (approx.) |
| Alimentation | 110-240 V AC, 50/60 Hz |
| Connectivité | Entrée ligne RCA, entrée haut niveau (bornier) |
| Contrôles | Crossover variable, volume, phase (0/180°), mode auto |
| Matériau du coffret | MDF avec placage vinyle |
| Entretien et nettoyage | Dépoussiérer avec un chiffon sec et doux. Ne pas utiliser de produits abrasifs. |
| Sécurité | Ne pas exposer à l'humidité ni aux liquides. Débrancher avant nettoyage. |
| Pièces détachées et réparabilité | Contactez le service après-vente Rockville pour les pièces de rechange. |
FOIRE AUX QUESTIONS - RW10CA Rockville
Questions des utilisateurs sur RW10CA Rockville
0 question sur cet appareil. Repondez a celles que vous connaissez ou posez la votre.
Poser une nouvelle question sur cet appareil
Téléchargez la notice de votre Caisson de basses au format PDF gratuitement ! Retrouvez votre notice RW10CA - Rockville et reprennez votre appareil électronique en main. Sur cette page sont publiés tous les documents nécessaires à l'utilisation de votre appareil RW10CA de la marque Rockville.
MODE D'EMPLOI RW10CA Rockville
ROCKVILLE
RW-CA Series
RW8CA 8" and RW10CA 10"
LOW PROFILE POWERED SUBWOOFERS
OWNER'S MANUAL
ATTENTION:
VISIT THE ROCKVILLE SUPPORT SITE FIRST
Who reads manuals?
Scan the QR codes below or go to rockvillesupport.com/rw8ca or rockvillesupport.com/rw10ca to access how-to video(s), the owner's manual, and other important information you may need to get the most out of your item.
If you prefer written instructions, please read ahead!
With Rockville you get many options.

RW8CA

RW10CA
Missing items? If you ordered a bundle that includes more than one product and you are missing part of your bundle, then it just means your order shipped from two different warehouses. You will receive the remaining items very soon. If you have any concerns or inquiries, feel free to call our customer support center at 1-646-758-0144, Monday through Thursday, 9am to 10pm EST, and Fridays, 9am to 3pm EST.
Thank you for purchasing this Rockville RW-CA Series Low Profile Powered Subwoofers. Please read this owner's manual carefully for proper use of your RW-CA series powered subwoofer. Should you need assistance, please call our technical help line at 1-646-758-0144, Monday through Thursday, 9am to 10pm EST, and Fridays, 9:00am to 3pm EST.
INCLUDES
- Dash mounted bass remote
• 16ft RJ12 cable (for remote)
• High level input harness - Mounting hardware
IMPORTANT SAFETY INSTRUCTIONS
- To reduce risk of electric shock, never open the unit. There are no serviceable parts.
- Do not expose this unit to any kind of moisture.
- Please ensure that the unit is situated in a properly ventilated area.
- Make sure the unit is placed on a level and stable surface.

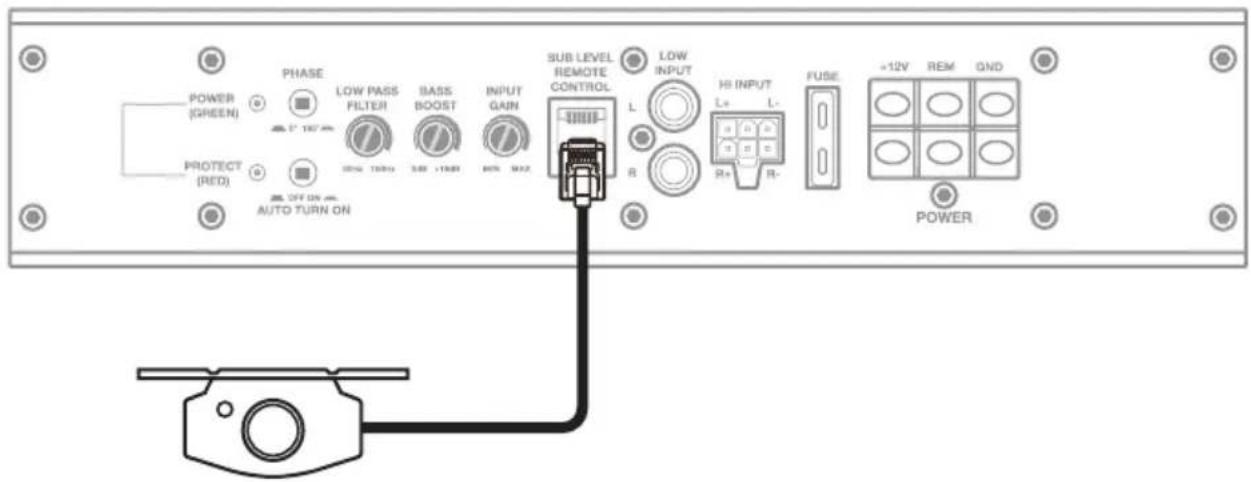
1. POWER/PROTECT STATUS LEDs
The top green LED (a) indicates that the unit is receiving power. The bottom red LED (b), when illuminated, indicates that the unit has gone into protect mode.
2. PHASE SHIFT BUTTON
The Phase Shift switch allows you to synchronize the phase of your subwoofer output to that of the other speakers in the vehicle. It can be set to 0 or 180 degrees. Set the amp to 0 and listen to a track with some bass. Now set the control to 180 degrees, listen to the same track, and see if the bass output improves or becomes worse. Set the button to the setting which achieves the best results.
3. AUTO POWER ON
The AUTO POWER ON setting is used in conjunction with high level (speaker evel) connections. When the switch is in the ON position, the subwoofer will automatically power on when there is an input signal. Please note, this feature only works when connecting via high level inputs. It will not function when using low level (RCA) inputs. Do not use the remote turn on connection when using high level inputs.
4. LOW PASS FILTER
The control marked LOW PASS FILTER will control the low-pass frequencies from 50Hz to 150Hz. It allows you to set the frequency range which the subwoofer will receive. The subwoofer will reproduce all sound below the frequency you set. If your system is unable to accurately reproduce midrange frequencies, you may want to set this control closer to 150Hz. If your system accurately reproduces midrange frequencies, set the control lower.
5. BASS BOOST
The control marked BASS BOOST will allow you to increase the sound level of bass frequencies up to 18 decibels.
6. INPUT GAIN CONTROL
Once your system is operational, set the input sensitivity using the control marked GAIN. Turn it counterclockwise to the MIN position. Adjust your head unit's volume gain to the maximum it can go before signal distorts or to the loudest gain, which is usually about 75% – 85% on most head units (you can also use an oscilloscope to see at what gain level your head unit distorts). When you begin to hear distortion, back down one notch. Now turn the GAIN control clockwise until you hear distortion, then turn it counterclockwise by a notch or until the distortion is gone. The RW-CA unit's input sensitivity is now set. Please note that the GAIN control should not be mistaken for a volume control. It is intended to match the output level of your source unit to the input level of the RW-CA unit. Do not adjust the GAIN to maximum unless your input level requires it.
7. SUB LEVEL REMOTE CONTROL
The dash-mounted bass remote allows you to control the amplifier's bass level from the comfort of the driver's seat. It features a power LED which indicates the unit is receiving power and operating nominally.
8. LOW LEVEL RCA INPUTS
If your head unit has RCA outputs, connect these to the RW-CA unit's Left and Right RCA input jacks. For best audio performance be sure to use high-quality RCA cables. Please note, when using these inputs, the AUTO POWER ON button should be set to the OFF position.
FUNCTIONS (continued)
9. HIGH LEVEL (SPEAKER LEVEL) INPUTS
Many factory radios do not have preamp outputs, so we've equipped the RW-CA units with High Level inputs. These inputs, also referred to as Speaker Level inputs, allow you to connect to the factory speaker wires (see page 3). They are called High Level inputs because they convert the high voltage running through factory speaker wires to one the RW-CA unit can handle.
10. FUSE
The RW8CA uses a 20 amp fuse and the RW10CA uses a 25 amp fuse. Never replace the supplied fuse with one of larger value. Use of a higher amperage fuse may cause damage.
11. POWER/GROUND TERMINALS and REMOTE TURN-ON CONNECTION
See page 4 for instructions on how to properly connect power, ground, and remote connections.
LOW LEVEL INPUT
The low level (RCA) inputs are the preferred connection method. Most trunk or hatchback installations will require a 15–20 foot RCA cable, while pickup trucks and under-seat installations will require a 6–12 foot cable. For best audio performance be sure to use high-quality RCA cables. Be sure to run the RCA cables on the side of the vehicle opposite to the side used to carry the power and ground leads of the amplifier.
WARNING: Do not use high level and low level inputs at the same time. Make sure that the AUTO TURN ON button is set to the OFF position when using low level inputs.

HIGH LEVEL INPUT
The high level input should only be used when your head unit lacks RCA outputs. Connect the harness to the high level input port, then connect the wires from the harness to the corresponding speaker wires from the head unit. Be sure to observe proper polarity in order to avoid audio phase problems.
WARNING: Do not use high level and low level inputs at the same time. Make sure to set the AUTO TURN ON button to the ON position. Do not connect the remote turn on terminal when using high level inputs.

WIRING
GROUND
Attach a 10-gauge or heavier wire to the terminal marked GROUND. The connection should be as close to the RW-CA unit as possible (40 inches or less). Connect the wire to any part of the vehicles's metal chassis. Make sure that there is no paint or other insulator blocking a good ground connection.
REMOTE
Connect the remote terminal to the head unit's remote output using an 16-gauge or heavier wire. This connection is responsible for turning the amplifier on and off with the rest of the system. If there is no dedicated remote output, make this connection to the power antenna lead. Should your head unit not have any turn-on leads, you can wire the remote terminal to an accessory lead, which will turn the RW-CA unit on with your vehicles's ignition.
WARNING: Do not use the remote connection when using high level inputs. Make sure that the AUTO TURN ON button is set to the OFF position.
POWER
Using a 10-gauge (RW8CA) or an 8-gauge (RW10CA) wire, connect an in-line fuse holder to the vehicle battery's POSITIVE (+) terminal. This in-line fuse offers protection against damage to the battery and electrical systems that may be caused by short circuits. Ensure the fuse holder is within 18 inches of the battery. Connect the fuse holder to the RW-CA unit's +12V terminal.

REMOTE CONTROL CONNECTION
Install the remote control securely under the dash or in a similar location where it will not distract the driver.
FEATURES and SPECIFICATIONS
RW10CA
• 800 Watts Peak/200 Watts RMS
• PWM MOSFET Power Supply
- Low Level RCA Input
• High Level Inputs with Auto Turn-On Technology
- Adjustable Input Sensitivity
- Soft Delayed Remote Turn-On
• Thermal Protection Circuit, Short Protection Circuit
• Overload Protection Circuit
• Phase Switch: 0° or 180°
- Low Pass Filter: 50Hz - 150Hz
• Bass Boost: 0 – 18dB @ 45Hz
- Subwoofer Level Remote Control
• Built in Subsonic Filter @ 29Hz
• Frequency Response: 20Hz – 150Hz
• Sensitivity: 90dB @ 1w/1m
• High Level Input Sensitivity: 0.61V
- Low Level Input Sensitivity: 200mV
- THD: < 0.4%
- Impedance: 2 Ohm
- Fuse: 25A
• Dimensions: 12.4 x 13 x 2.7 (L x W x H) Inches
RW8CA
• 600 Watts Peak/150 Watts RMS
• PWM MOSFET Power Supply
- Low Level RCA Input
• High Level Inputs with Auto Turn-On Technology
- Adjustable Input Sensitivity
- Soft Delayed Remote Turn-On
• Thermal Protection Circuit, Short Protection Circuit
• Overload Protection Circuit
• Phase Switch: 0° or 180°
- Low Pass Filter: 50Hz - 150Hz
• Bass Boost: 0 – 18dB @ 45Hz
- Subwoofer Level Remote Control
• Built in Subsonic Filter @ 29Hz
• Frequency Response: 20Hz – 150Hz
• Sensitivity: 90dB @ 1w/1m
• High Level Input Sensitivity: 0.61V
- Low Level Input Sensitivity: 200mV
- THD: < 0.4%
- Impedance: 2 Ohm
- Fuse: 20A
• Dimensions: 12.4 x 11 x 2.7 (L x W x H) Inches
TROUBLESHOOTING
| PROBLEM | SOLUTION |
| No power | 1. Check your ground and power connections.2. Make sure the power terminal is receiving at least 12V.3. If Using RCA inputs, make sure the Remote turn on is receiving at least 5VDC.4. Check the fuse and replace if necessary.5. Make sure the Protect LED is not illuminated. If it is, turn the amplifier off and then back on. |
| Protection LED illuminates when the unit is powered on | 1. Check for short-circuits on speaker leads.2. Turn down the head unit's volume to prevent overdriving.3. Remove the speaker leads and reset the amplifier (turn off and then on). If the Protect LED still illuminates, the amp is faulty and needs servicing. |
| No output | 1. Check the fuse and replace if necessary.2. Make sure the unit is properly grounded.3. Make sure the Remote turn on is receiving at least 5VDC.4. Make sure the RCA cables are properly connected.5. Check your high level connections.6. If your head unit has a separate subwoofer output, check the settings to make sure it is enabled. |
| Low output | 1. Reset the gain control.2. Check the crossover control settings.3. Power and ground cables that are too thin a gauge size for the terminals may cause low sound. Determine the proper cable gauge necessary and replace existing cables. |
| High hiss sound | 1. Check to see how your wires are run. If your RCA cables and speaker wire are run alongside your power cables, they will pick up feedback. If this is the case, you will need to run the RCA cable on the other side separate from your power cable.2. Noise can be picked up due to bad RCA cables. We recommend doing a test with different RCA cables. Replace the RCA cables if needed. |
| Squealing noise | Check for improperly grounded RCA interconnects. |
| Distorted sound | 1. Make sure the input level control is set to match the signal level of the head unit. Always try to set the input level as low as possible.2. Make sure all crossover frequencies are properly set.3. Check for short circuits on the speaker leads. |
| Amplifier gets very hot | 1. Make sure the wiring is correct and you are using the proper wires for your system.2. A poor ground cable connection can cause your amp to get very hot. Check your ground connection and make sure that the cable is securely tightened.3. Check the location where your amp is mounted. Make sure it is in a spot where it will receive proper ventilation. |
| Engine noise (static type) | This is usually caused by poor quality RCA cables, which can pick up radiated noise. Use high quality cables and route them away from power cables. |
| Engine noise (alternator whine) | 1. Make sure the RCA grounds are not shorted to the vehicle's chassis.2. Make sure the head unit is properly grounded. |
ROCKVILLE

- ROCKVILLE
- RW-CA SERIES
- ATTENTION
- WHO READS MANUALS
- INCLUDES
- IMPORTANT SAFETY INSTRUCTIONS
- POWER/PROTECT STATUS LEDS
- PHASE SHIFT BUTTON
- AUTO POWER ON
- LOW PASS FILTER
- BASS BOOST
- INPUT GAIN CONTROL
- SUB LEVEL REMOTE CONTROL
- LOW LEVEL RCA INPUTS
- FUNCTIONS (CONTINUED)
- HIGH LEVEL (SPEAKER LEVEL) INPUTS
- FUSE
- POWER/GROUND TERMINALS AND REMOTE TURN-ON CONNECTION
- LOW LEVEL INPUT
- WARNING: DO NOT USE HIGH LEVEL AND LOW LEVEL INPUTS AT THE SAME TIME. MAKE SURE THAT THE AUTO TURN ON BUTTON IS SET TO THE OFF POSITION WHEN USING LOW LEVEL INPUTS
- HIGH LEVEL INPUT
- WARNING: DO NOT USE HIGH LEVEL AND LOW LEVEL INPUTS AT THE SAME TIME. MAKE SURE TO SET THE AUTO TURN ON BUTTON TO THE ON POSITION. DO NOT CONNECT THE REMOTE TURN ON TERMINAL WHEN USING HIGH LEVEL INPUTS
- WIRING
- GROUND
- REMOTE
- POWER
- REMOTE CONTROL CONNECTION
- FEATURES AND SPECIFICATIONS
- RW10CA
- RW8CA
Marque : Rockville
Modèle : RW10CA
Catégorie : Caisson de basses