MDS-4KVX - Support d'instrument de musique ROLAND - Notice d'utilisation et mode d'emploi gratuit
Retrouvez gratuitement la notice de l'appareil MDS-4KVX ROLAND au format PDF.


| Type de produit | Tabouret de batterie (drum throne) pliable |
| Marque | Roland |
| Modèle | MDS-4KVX |
| Matériau de l'assise | Vinyle rembourré |
| Dimensions de l'assise | 42 x 31 cm |
| Plage de hauteur réglable | 39 à 49 cm |
| Poids | 4,5 kg |
| Charge maximale | 120 kg |
| Pliabilité | Oui, se plie pour le transport |
| Pieds antidérapants | Oui, en caoutchouc |
| Mécanisme de réglage | Molette de verrouillage |
| Utilisation recommandée | Batterie acoustique ou électronique |
| Entretien | Nettoyer avec un chiffon doux et sec |
| Stockage | À l'abri de l'humidité et de la chaleur excessive |
| Garantie | 2 ans (selon pays) |
| Contenu de l'emballage | Tabouret, notice d'utilisation |
| Réparabilité | Pièces disponibles auprès du fabricant |
FOIRE AUX QUESTIONS - MDS-4KVX ROLAND
Questions des utilisateurs sur MDS-4KVX ROLAND
0 question sur cet appareil. Repondez a celles que vous connaissez ou posez la votre.
Poser une nouvelle question sur cet appareil
Téléchargez la notice de votre Support d'instrument de musique au format PDF gratuitement ! Retrouvez votre notice MDS-4KVX - ROLAND et reprennez votre appareil électronique en main. Sur cette page sont publiés tous les documents nécessaires à l'utilisation de votre appareil MDS-4KVX de la marque ROLAND.
MODE D'EMPLOI MDS-4KVX ROLAND
How to Set Up the Stand
Before you start assembling the stand, make sure that you have all of the parts.

| No. | Name Quantity | |
| 1 | Stand 1 | |
| 2 | Curved pipe L 1 | |
| 3 | Curved pipe R (with Pad mount) 1 | |
| 4 | Straight pipe L (Long) 1 | |
| 5 | Straight pipe R (Short) 1 | |
| 6 | Snake pipe 1 | |
| 7 | Mount holder L | 2 |
| 8 | Mount holder R | 1 |
| 9 | Pad mount | 2 |
| 10 | Pad mount (ball type) 1 | |
| 11 | Cymbal mount | 3 |
| 12 | Drum key | 1 |
| 13 | Cable clip | 4 |
| 14 | Cable tie | 2 |
Fully Assembled View
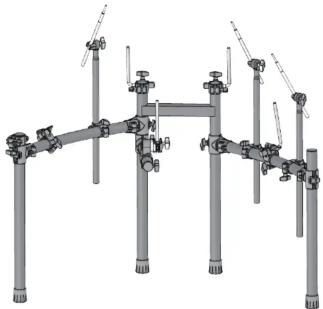
NOTE
- Be very careful, when you assemble and move the stand, to
make sure that you do not drop it on your hands or feet.
- Prepare an area in which you can perform the assembly safely.
safety
- Do not use a power tool (e.g., an electric screwdriver) to
assemble the stand. You risk damaging or stripping the screws.
* If the drum stand is to be used for extended periods in the same
location, we recommend using a Roland drum mat (TDM series) to prevent discoloration of flooring by the rubber feet.
- Using a drum key, loosen the bolt on the holder of curved pipe "L," then insert straight pipe "L."
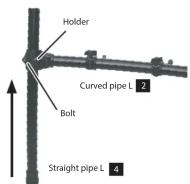
- Attach mount holder "L" to straight pipe "L." Then, after pulling down straight pipe "L" until it can move no further, tighten the bolt.

- Using a drum key, loosen the bolt on the holder of curved pipe "R," then insert straight pipe "R."

- Position straight pipe "R" so that its tip protrudes by about 7 cm, and then tighten the holder.
Perform steps 5–8 of the assembly procedure with the stand laying down on the floor; do not place it upright yet.
- Use a drum key to loosen bolt of the holder "A" (attached to the left-side pipe of the stand), and insert curved pipe "L" (of the assembly you created in step 1–2) into holder "A" of the stand.

As a general rule, insert curved pipe "L" until the mark on the pipe can be seen through the gap in the holder.
After firmly inserting it all the way, use the drum key to firmly tighten bolt.

- Lower holder "B" (attached to the right-side pipe of the stand) to the same position as holder "C" (attached to the left-side pipe of the stand).
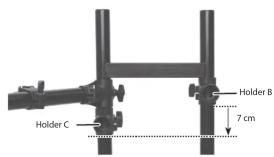
- Use the drum key to loosen bolt of the holder "B," and insert curved pipe "R" (of the assembly you created in step 3-4) into holder "B" of the stand.
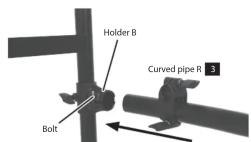
As a general rule, insert curved pipe "R" until the mark on the pipe can be seen through the gap in the holder.
After firmly inserting it all the way, use the drum key to firmly tighten bolt.

- Use the drum key to loosen bolt of the holder "C," and insert the snare pipe into holder "C" of the stand. After firmly inserting it all the way, use the drum key to firmly tighten bolt.
Insert the end of the snare pipe that doesn't have a cap on it into holder "C"
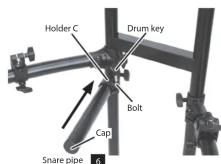
- Place the stand upright, then loosen the hand knobs of holders "A" and "B" (two places). Next, spread open the pipes at left and right.
If the stand wobbles, loosen the bolts on the holders of curved pipes "L" and "R," and adjust the height. After adjusting the height, tighten the bolts on the holders.
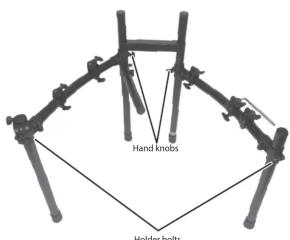
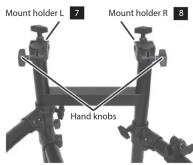
- Attach mount holder "L" to the top left of the stand, attach mount holder "R" to the top right of the stand, and tighten the respective hand knobs.
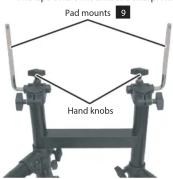
- Attach the pad mounts to mount holder "L" and mount holder "R," and firmly tighten the respective hand knobs. * The tips of the mounts are sharp. Handle them with care.
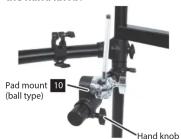
- Attach pad mount (ball type) to the snare pipe, and tighten the hand knob.
- Insert the three cymbal mounts into the holders of the curved pipes, and adjust all the holders as shown in the illustration to complete setup.

* The tips of the mounts are sharp. Handle them with care.
Notes
- When setting up or storing the stand, be careful not to pinch the fingers you use to handle the stand.
- Regarding the way of mounting a sound module, pads, or cymbals, please refer to the owner's manual supplied with them.
- The pad mount can be adjustable to slide through the holder.

Please keep the top of the pad mount over the holder for securement in its adjustment.
WARNING: Caution during setup
When setting-up, you must observe the following cautions. If you fail to observe these cautions, the stand might overturn or fall, causing injury.
- Do not spread the stand wider than 1.2 meters (48 inches).

- Adjust the rod height so that no part of any cymbal is higher than 1.2 meters (48 inches) above the floor.
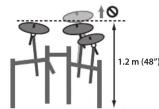
Attach the cymbals in such a way that the center of the cymbal does not extend beyond the rear pipes of the stand.
Center of cymbal must not extend beyond rear of stand

USING THE UNIT SAFELY
INSTRUCTIONS FOR THE PREVENTION OF FIRE, ELECTRIC SHOCK, OR INJURY TO PERSONS
About ⚠ WARNING and ⚠ CAUTION Notices
| WARNING | Used for instructions intended to alert the user to the risk of death or severe injury should the unit be used improperly. |
| CAUTION | Used for instructions intended to alert the user to the risk of injury or material damage should the unit be used improperly.* Material damage refers to damage or other adverse effects caused with respect to the home and all its furnishings, as well to domestic animals or pets. |
About the Symbols
| A | The △ symbol alerts the user to important instructions or warnings. The specific meaning of the symbol is determined by the design contained within the triangle. In the case of the symbol at left, it is used for general cautions, warnings, or alerts to danger. |
| B | The □ symbol alerts the user to items that must never be carried out (are forbidden). The specific thing that must not be done is indicated by the design contained within the circle. In the case of the symbol at left, it means that the unit must never be disassembled. |
| C | The ● symbol alerts the user to things that must be carried out. The specific thing that must be done is indicated by the design contained within the circle. In the case of the symbol at left, it means that the power-card plug must be unplugged from the outlet. |
ALWAYS OBSERVE THE FOLLOWING
WARNING
Do not disassemble or modify by yourself
Do not carry out anything unless you are instructed to do so in the owner's manual. Otherwise, you risk causing malfunction.
Do not repair or replace parts by yourself
Refer all servicing to your retailer, the nearest Roland Service Center, or an authorized Roland distributor, as listed on the "Information."
Do not use or store in the following types of location
- Subject to temperature extremes (e.g., direct sunlight in an enclosed vehicle, near a heating duct, on top of heat-generating equipment); or are
- Damp (e.g., baths, washrooms, on wet floors); or are
- Exposed to steam or smoke; or are
- Subject to salt exposure; or are
- Exposed to rain; or are Dusty as readily as are
- Dusty or sandy, or are
- Subject to high levels of vibration and shakiness; or are
- Placed in a poorly ventilated location
- Placed in a poorly ventilated location.
DO NOT PLACE IN AN UNSTABLE LOCATION
Otherwise, you risk injury as the result of the unit toppling over or dropping down.
Do not allow foreign objects or liquids to enter unit; place containers with liquid on unit
Do not place containers containing liquid (e.g., flower vases) on this product. Never allow foreign objects (e.g., flammable objects, coins, wires) or liquids (e.g., water or juice) to enter this product. Doing so may cause short circuits, faulty operation, or other malfunctions.
Be cautious to protect children from injury Always make sure that an adult is on hand to provide supervision and guidance when using the unit in places where children are present, or when a child will be using the unit.
Do not drop or subject to strong impact
Otherwise, you risk causing damage or malfunction.
[Non-Text]
[EMPTY]


IMPORTANT NOTES
Placement
- Do not paste stickers, decals, or the like to this instrument. Peeling such matter off the instrument may damage the exterior finish.
- Depending on the material and temperature of the surface on which you place the unit, its rubber feet may discolor or mar the surface.
- Do not place containers or anything else containing liquid on top of this unit. Also, whenever any liquid has been spilled on the surface of this unit, be sure to promptly wipe it away using a soft, dry cloth. Maintenance
- Never use benzine, thinners, alcohol or solvents of any kind, to avoid the possibility of discoloration and/or deformation. Additional Precautions
- Since sound vibrations can be transmitted through floors and walls to a greater degree than expected, take care not to allow such sound to become a nuisance to others nearby.

Roland Service Centers and Distributors
When you need repair service, access this URL and find your nearest Roland Service Center or authorized Roland distributor in your country.
http://roland.cm/service

Marque : ROLAND
Modèle : MDS-4KVX
Catégorie : Support d'instrument de musique