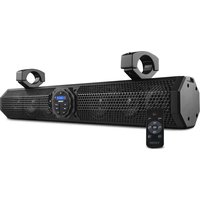
SB24BTX - Barre de son DS18 - Notice d'utilisation et mode d'emploi gratuit
Retrouvez gratuitement la notice de l'appareil SB24BTX DS18 au format PDF.


| Type de produit | Barre de son |
| Marque | DS18 |
| Modèle | SB24BTX |
| Dimensions (L x H x P) | Environ 90 x 6 x 8 cm |
| Poids | Environ 2,5 kg |
| Alimentation | Adaptateur secteur 12 V / 2 A (inclus) |
| Puissance de sortie | 2 x 20 W RMS |
| Connectivité | Bluetooth 5.0, entrée AUX 3,5 mm, port USB |
| Fonctions principales | Lecture Bluetooth, USB et AUX ; télécommande incluse ; contrôle du volume et des basses |
| Accessoires inclus | Télécommande, câble AUX, adaptateur secteur, manuel d'utilisation |
| Entretien et nettoyage | Utiliser un chiffon doux et sec ; éviter les solvants et l'eau |
| Sécurité | Ne pas exposer à l'humidité ; assurer une ventilation adéquate ; débrancher en cas d'orage |
| Pièces détachées et réparabilité | Pas de pièces détachées disponibles ; contacter le SAV DS18 |
| Garantie | 2 ans (selon conditions du vendeur) |
FOIRE AUX QUESTIONS - SB24BTX DS18
Questions des utilisateurs sur SB24BTX DS18
0 question sur cet appareil. Repondez a celles que vous connaissez ou posez la votre.
Poser une nouvelle question sur cet appareil
Téléchargez la notice de votre Barre de son au format PDF gratuitement ! Retrouvez votre notice SB24BTX - DS18 et reprennez votre appareil électronique en main. Sur cette page sont publiés tous les documents nécessaires à l'utilisation de votre appareil SB24BTX de la marque DS18.
MODE D'EMPLOI SB24BTX DS18
DS18®
OWNER'S MANUAL
MANUAL DE USUARIO
SB24BTX
AMPLIFIED SOUND-BAR WITH BLUETOOTH® AND USB PLAYER
BARRA DE SONIDO AMPLIFICADA CON REPRODUCTOR BLUETOOTH® Y USB

Bluetooth®

ENGLISH | ESPAÑOL


FOR ALL ELEMENTS



WELIKEITLOUD @ f ▶ X 🌐 in
KNOWING YOUR SB24BTX
CONOCIENDO TU SB24BTX

PACKAGING INCLUDES
LA CAJA INCLUYE
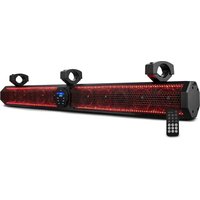
1x SB24BTX Soundbar
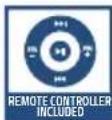
1x Remote Control
2x Tube clamp adjustable 1.5" to 2.25" diameter
4x NBR pad
1x Set of screws and stop washers
NOTE: The stainless steel hardware supplied with your soundbar has been chosen to resist rust and corrosion. If the particular hardware supplied will not work for your installation purposes, please be sure to use only appropriate marine grade (stainless steel) mounting hardware.
1x SB24BTX barra de sonido
1x Control remoto
2x Abrazaderas de tubo ajustables de 1.5" a 2.25" de diámetro
4x Almohadilla de caucho
1x Juego de tornillos y arandelas de presión
NOTA: El hardware de acero inoxidable suministrado con su barra de sonido ha sido elegido para resistir la oxidación y la corrosión. Si el hardware suministrado no funciona para sus propósitos de instalación, asegúrese de utilizar únicamente hardware de montaje con un grado marino adecuado (acero inoxidable).

PAIRING & DISCOVERING A NEW BLUETOOTH® CONNECTION
EMPAREJANDO Y DESCUBRIENDO UNA NUEVA CONEXIÓN BLUETOOTH®
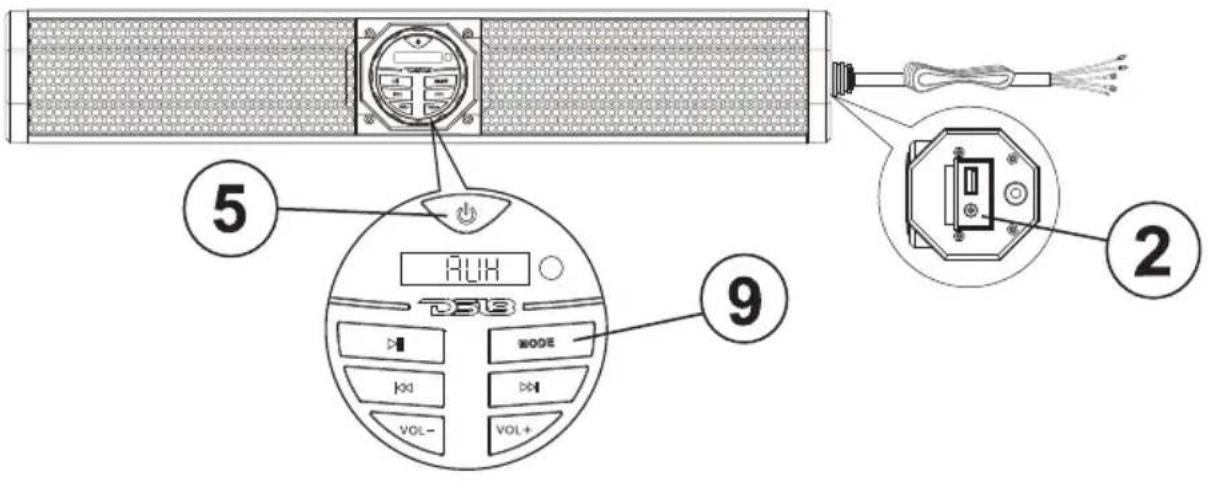
- Hold down the POWER button ⑤ until the soundbar turns on.
- The SB24BTX will automatically go into paring mode:
ANDROID AND iOS USERS:
A. Go to the settings menu of your device
B. Enter the BLUETOOTH® Menu
C. Turn on BLUETOOTH® and press SCAN
D. "SB24BTX" will now be displayed under AVAILABLE DEVICES
E. If prompted, enter pass code: "0000"
- If the SB24BTX is not detected, repeat the steps above to refresh the device list.
-
When the connection is successful, you are now ready to stream music from your favorite media player to the SB24BTX.
-
Mantenga presionado el botón de ENCENDIDO ⑤ hasta que se encienda la barra de sonido.
- El SB24BTX entrará automáticamente en modo de emparejamiento:
iOS Y ANDROID:
A. Vaya al menú de configuración de su dispositivo
B. Ingrese al menú BLUETOOTH®
C. Encienda BLUETOOTH® y presione ESCANEAR
D. "SB24BTX" ahora se mostrará en DISPOSITIVOS DISPONIBLES
E. Si se le solicita, ingrese el código de acceso: "0000"
- Si no se detecta el SB24BTX, repita los pasos anteriores para actualizar la lista de dispositivos.
- Cuando la conexión sea exitosa, estará listo para transmitir música desde su reproductor multimedia favorito al SB24BTX.

MULTIFUNCTION CONTROLLER BLUETOOTH® OPERATION
OPERACIÓN DEL CONTROLADOR MULTIFUNCIÓN DE BLUETOOTH®
- Use the PLAY/PAUSE button⑧ to play or pause the music from your device.
- Use the NEXT button ⑪ to select the next track or song on your playlist.
- Use the PREVIOUS button ⑥ once to restart the song that is playing, or press it again to go back to the previous song in your playlist.
-
Press the MODE button ⑨ to cycle through the following modes: Bluetooth®, AUX, and USB.
-
Utilice el botón REPRODUCIR/PAUSAR para reproducir o pausar la música de su dispositivo.
- Utilice el botón SIGUIENTE ⑪ para seleccionar la siguiente pista o canción de su lista de reproducción.
- Utilice el botón ANTERIOR ⑥ una vez para reiniciar la canción que se está reproduciendo, o presione nuevamente para volver a la canción anterior en su lista de reproducción.
- Presione el botón de MODO ⑨ para alternar entre los siguientes modos: Bluetooth®, AUX y USB.
VOLUME CONTROL
CONTROL DE VOLUMEN
- To raise the volume, press the VOL+ button ⑩ or use the volume control on your connected device.
- To lower the volume, press the VOL-button ⑦ or use the volume control on your connected device.
- Para subir el volumen, presione el botón VOL+ (10) o use los controles de su dispositivo conectado.
- Para bajar el volumen, presione el botón VOL-⑦ o use los controles de su dispositivo conectado.
TIPS

For maximum audio performance, depending on your type of music, you can change the EQ presets using your remote control to avoid distortion at high volume levels.
Para obtener el máximo rendimiento de audio, dependiendo de su tipo de música, puede cambiar los ajustes preestablecidos del ecualizador desde su control remoto para evitar distorsión a altos niveles de volumen.
AUX-IN OPERATION
OPERACIÓN DE LA ENTRADA AUXILIAR
- Hold down the POWER button ⑤ until the soundbar turns on.
- Use a 3.5mm Jack cable from your device and connect it to the AUX-IN② Jack connector located behind the rubber cover on one side of the soundbar.
- The AUX mode is activated once the Jack connector is inserted. You can now adjust the volume to your preference and play audio from your device.
-
Press the MODE button ⑨ to cycle through the following modes: Bluetooth®, AUX, and USB.
-
Mantenga presionado el botón de ENCEN-DIDO ⑤ hasta que se encienda la barra de sonido.
- Utilice un cable Jack de 3.5 mm de su dispositivo y conéctelo al conector Jack AUX-IN ② ubicado detrás de la tapa de goma en un lado de la barra de sonido.
- El modo AUX se activa una vez que el conector Jack está conectado. Ahora puede ajustar el volumen según sus preferencias y reproducir audio desde su dispositivo.
- Presione el botón de MODO ⑨ para recorrer los siguientes modos: Bluetooth®, AUX y USB.
TIPS

It is recommended to set the volume at a minimum of 75% on your device to prevent distortion. Ensure that you exclusively utilize the volume control on the soundbar as the master control for optimal performance
Se recomienda ajustar el volumen de su dispositivo al menos al 75% para evitar distorsión. Asegúrese de utilizar exclusivamente el control de volumen de la barra de sonido como el control principal para un rendimiento óptimo.

USB CONTROLS OPERATION
OPERACIÓN DE LOS CONTROLES DE USB
- Hold down the POWER button⑤ until the soundbar turns on.
- Insert a USB Flash Drive into the USB port ③ located behind the rubber cover on one side of the soundbar. Once inserted, the audio files will start playing automatically.
- Press the PLAY/PAUSE button 8 to play or pause the audio files from your USB.
- Use the NEXT button ⑪ to select the next track or song on your USB playlist.
- Press the PREVIOUS button ⑥ once to restart the song that is currently playing, or press it again to go back to the previous song in your USB playlist.
-
Press the MODE button ⑨ to cycle through the following modes: Bluetooth®, AUX, and USB.
-
Mantenga presionado el botón de ENCEN-DIDO ⑤ hasta que se encienda la barra de sonido.
- Inserte una Memoria USB en el puerto USB ③ que se encuentra detrás de la cubierta de goma en un lado de la barra de sonido; una vez insertada, los archivos de audio comenzarán a reproducirse automáticamente.
- Presione el botón de REPRODUCIR/PAUSAR ⑧ para reproducir o pausar los archivos de audio de su USB.
- Utilice el botón de SIGUIENTE 11 para seleccionar la siguiente pista o canción en su lista de reproducción USB.
- Utilice el botón de ANTERIOR ⑥ una vez para reiniciar la canción que se está reproduciendo, o presiónelo nuevamente para regresar a la canción anterior en su lista de reproducción USB.
- Presione el botón de MODO 9 para alternar entre los siguientes modos: Bluetooth®, AUX y USB.
TIPS

The USB player exclusively accepts MP3 and WMA formats. Additionally, it functions as a 1-amp charger port for added convenience
El reproductor USB acepta exclusivamente formatos MP3 y WMA. Además, funciona como un puerto de carga de 1 amperio para mayor comodidad.

REMOTE CONTROL OPERATION
OPERACIÓN DEL CONTROL REMOTO
- Ensure that the battery is installed, and remove the battery protector before operation.
-
The remote control needs to be pointed at the IR sensor 12 on the soundbar to operate it.
-
Asegúrese de que la batería esté instalada y retire el protector de la batería antes de utilizarlo.
- El control remoto debe apuntar al sensor de infrarrojos 12 en la barra de sonido para controlarla.
![graph TD A["1: Power On/Off Encendido/Apagado"] --> B["2: Mode Modo"] B --> C["3: EQ Presets Ecualización preestablecida"] C --> D["4: Next Siguiente"] D --> E["5: Volumen Down Bajar volumen"] E --> F["6: Play/Pause Reproducción/Pausa"] F --> G["7: Volumen UP Subir volumen"] G --> H["8: Previous Ant…](/content/2026/07/1429827/images/e62c0b0bb99eed9feb253f0d095cd96d63ffaff520f675a320e535337fc5652c.jpg)
REPLACEMENT BATTERY - CR2025
BATERÍA DE REEMPLAZO - CR2025
READ BEFORE INSTALLATION
- Be sure to carefully read and understand the instructions before attempting to install this soundbar.
- For safety, disconnect the negative battery terminal from the battery prior to beginning the installation.
- For easier assembly, we suggest having all your tools on hand: drill, Allen set, crimping tool, soldering iron, wire strippers, heat shrink, etc.
- Use high-quality "Water Resistant" connectors for a reliable installation and to minimize signal or power loss.
- Think before you drill! Be careful not to cut or drill into the gas tank, fuel lines, brake or hydraulic lines, vacuum lines or electrical wiring when working on any vehicle.
- Never run wires near fuel lines or power (if possible). Running the wires inside the hull or car area provides the best protection.
- Avoid running wires over or through sharp edges. Use rubber or plastic grommets to protect any wires routed through metal, especially on the Roll Cage.
- Make sure that the mounting clamp is tight before leaving the vehicle.
LEER ANTES DE LA INSTALACIÓN
- Asegúrese de leer y comprender atentamente las instrucciones antes de intentar instalar esta barra de sonido.
- Por seguridad, desconecte el terminal negativo de la batería antes de comenzar la instalación.
- Para un montaje más fácil, le sugerimos tener todas sus herramientas a mano: taladro, juego Allen, engarzado, soldador, pelacables, termorretráctil, etc.
- Utilice conectores "resistentes al agua" de alta calidad para una instalación confiable y para minimizar la pérdida de señal o energía.
- ¡Piensa antes de perforar! Tenga cuidado de no cortar ni perforar el tanque de gasolina, las líneas de combustible, las líneas hidráulicas o de freno, las líneas de vacío o el cableado eléctrico cuando trabaje en cualquier vehículo.
- Nunca tienda cables cerca de líneas de combustible o de energía (si es posible). Pasar los cables dentro del casco o el área del automóvil proporciona la mejor protección.
- Evite pasar cables sobre o a través de bordes afilados. Utilice ojales de goma o plástico para proteger los cables que pasen a través de metal, especialmente en la jaula antivuelco.
- Asegúrese de que la abrazadera de montaje esté apretada antes de salir del vehículo.

INSTALLATION EQUIPMENT
- 5mm Allen Key
EQUIPO DE INSTALACIÓN
- LLave Allen de 5mm
BEGINNING MOUNTING
Step 1: Remove the soundbar from the packaging and ALL hardware.
Step 2: Find a GOOD location that allows for easy wiring of the soundbar (Power Wire). PLUS: does NOT impair your movement around the location.
Step 3: Using a 5mm Allen key, spin out the screw that holds the top clamp (if it was mounted).
Step 4: Take the base clamp (D) and align it to the soundbar hole and secure it with the short screw (C) using a 5mm Allen key.
Step 5: Wrap the rubber pad around the pipe and lock the top clamp (B).
Step 6: Align clamp (B) with the base clamp (D) and use the supplied screws (A) to tighten the clamps with the 5mm Allen key.
Step 7: Do the same procedure on each clamp supplied, you may need help holding up the soundbar during installation.
Step 8: Once you have tightened all screws, run the Power Wire to the Battery and connect to their respective terminals. If you are installing an external amplifier use the RCA'S and the Blue Remote Out Signal Wire provided. Use zip ties to secure the cable from elements that can damage it.
This is it! Enjoy your new SB24BTX Soundbar.
COMIENZO DEL MONTAJE
Paso 1: Retire la barra de sonido del embalaje y TODO el hardware.
Paso 2: Encuentre una BUENA ubicación que permita un fácil cableado de la barra de sonido (cable de alimentación) - ADEMÁS: NO impida su movimiento alrededor de la ubicación.
Paso 3: Con una llave Allen de 5 mm, desenrosque el tornillo que sujeta la abrazadera superior (si estaba montada).
Paso 4: Tome la abrazadera de la base (D), alinéela con el orificio de la barra de sonido y asegúrela con el tornillo corto (C) usando una llave Allen de 5 mm.
Paso 5: Envuelva la almohadilla de caucho alrededor del tubo y bloquee la abrazadera superior (B).
Paso 6: Alinee la abrazadera (B) con la abrazadera de la base (D) y use los tornillos suministrados (A) para apretar las abrazaderas con la llave Allen de 5 mm.
Paso 7: Realice el mismo procedimiento en cada abrazadera suministrada; es posible que necesite ayuda para sostener la barra de sonido durante la instalación.
Paso 8: Una vez que haya apretado todos los tornillos, pase el cable de alimentación a la batería y conéctelo a sus respectivos terminales. Si está instalando un amplificador externo, utilice los cables RCA y de señal de salida remota azul proporcionados. Utilice bridas para asegurar el cable de elementos que puedan dañarlo.
¡Eso es todo! Disfruta de tu nueva barra de sonido SB24BTX.
IMPORTANT | IMPORTANTE

For water resistance purposes, remove any USB or auxiliary cables. Make sure to put the rubber caps or covers in place before using this soundbar in wet locations or when washing your vehicle.
Para fines de resistencia al agua, retire todos los cables USB o auxiliares y asegúrese de colocar las tapas o cubiertas de goma en su lugar antes de usar esta barra de sonido en lugares húmedos o cuando lave su vehículo.
CAUTION | ATENCIÓN

Using other mounting methods may void this warranty
El uso de otros métodos de montaje puede anular esta garantía.
![graph TD A["15A"] --> B["Fuse and fuse holder (not included)"] B --> C["Fusible y soporte de fusibles (no incluido)"] C --> D["BATTERY / BATERIA"] D --> E["Chassis ground point"] D --> F["Punto de tierra del chasis"] G["Recommended 12~14GA wire (Not included)"] --> H["Cable recomendado de 12~14GA (N…](/content/2026/07/1429827/images/6eaff34a93bf03d3e252813a84a27031d53102f29bce6b81595165abfda12532.jpg)
WE LIKE IT LOUD

| TROUBLE / PROBLEMA | CAUSE / CAUSA | SOLUTION / SOLUCIÓN |
| Unit will not turn on La unidad no enciende | The fuse is blownEl fusible esta quemado | Check/Replace the fuseRevisar/Remplazar el fusible |
| Main ACC switch not engagedEl interruptor de acceso principal no está activado | Turn switch to on positionGire el interruptor a la posición de encendido | |
| No sound is heardNo se escucha nada | Device volume is low/mutedEl volumen del dispositivo es bajo/silenciado | Turn the volume level upSubir el nivel de volumen |
| Cannot pair Bluetooth®No empareja el Bluetooth® | The device's Bluetooth®Function is not enabledLa función Bluetooth®del dispositivo no está habilitada | Refer to the device's user manual for how to enable the Bluetooth® functionConsulte el manual del usuario del dispositivo para saber cómo habilitar la función Bluetooth® |
| The audio quality is poor after connecting to a Bluetooth®-enabled device.La calidad de audio es débil después de la conexión con un dispositivo habilitado para Bluetooth® | The Bluetooth®reception is poorLa recepción de Bluetooth®es débil | Move the device closer to the audio system or remove any obstacle between the device and the systemAcerque el dispositivo al sistema de audio o elimine cualquier obstáculo entre el dispositivo y el sistema. |
| Unit has become unresponsiveLa unidad no responde | Power glitch or interferenceFalla de alimentación o interferencia | Disconnect power for 10 seconds to resetDesconecte la corriente de energía por 10 segundos para reiniciar. |

SPECIFICATIONS / ESPECIFICACIONES
Nominal Size / Medida nominal 24" / 610mm
Total Watts (Peak)/ Watts totales ( Pico)....600 Watts
RMS Power @ 4 ohm / Potencia RMS @ 4 ohm....100 Watts
Max Power @ 4 ohm / Potencia MAX @ 4 ohm....200 Watts
Frequency Response / Respuesta de frecuencia....45Hz-20KHz
Storage Temperature / Temperatura de almacenaje 5°F \~ 176°F (-15°C \~ 80°C)
Operation Temperature / Temperatura de operación....32°F \~ 140°F (0°C \~ 60°C)
Operation Voltage / Voltaje de operación.... 12 Volts (10\~16 Volts Range) /
12 Voltios (Rango de 10\~16 voltios)
BODY/FEATURES / CARCASA/CARACTERÍSTICAS
Marine Grade Type / Tipo de grado marino IP35
Body Material / Color / Finish ......Aluminum / Oxidized Black Hemp Sand /
Material de la carcasa / Color / Acabado Aluminio / Arena de cáñamo negro oxidado
Grille Type / Tipo de rejilla....Steel Mesh / Malla de acero
Qty on Box / Cantidad en la caja.... 1 pcs / 1 Unidad
Clamps / Abrazaderas....2 Sets (Tube Clamp Adjustable 1.5" \~ 2.25" / 3.81cm \~ 5.715cm) /
2 juegos (Abrazadera de tubo ajustable 1.5 "\~ 2.25" / 3.81cm \~ 5.715cm)
Front Logo / Logo frontal ....Yes / Sí
RCA Line Out (Pre-Amp) / Salida de línea RCA (preamplificador) ......Yes (L/R 2 Volts)
Sí (L/R 2 voltios)
Aux Line Input / Entrada de línea Auxiliar ....Yes, (720mV) / Sí, (720mV)
EQ | DSP / EQ | DSP 5 Preset EQ (for Bluetooth® and USB Mode)
5 ecualizadores preestablecidos (para modo Bluetooth® y USB)
Remote Out / Salida remota.... Yes (+12V) / Sí (+12V)
USB Player / Reproductor USB ....Yes (WMA, MP3 files) / Sí (Archivos MP3, WMA)
USB Charge / Carga USB .... Yes (1Amp) / Sí (1Amp)
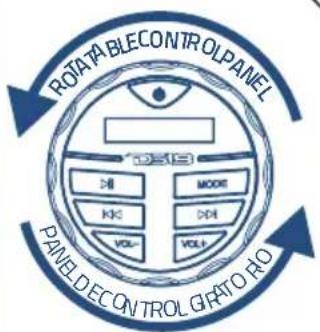
Rotatable Control Panel / Panel de control giratorio....Yes / Sí
Buttons | Controls / Botones / Controles ...... Yes (Power, Mode, Play/Pause, Fwd, Bwd, Vol+/Vol-)
Sí (Encendido, Modo, Reproducir/Pausar, Adelante, Atras, Vol+/Vol-)
Remote Control / Control remoto....Yes (IR Card Type) / Sí (IR tipo tarjeta)
Illumination / Iluminación ....Yes (Blue Backlit) / Sí (Azul retroiluminado)
WOOFER SPECIFICATIONS / ESPECIFICACIONES DEL WOOFER
Nominal Diameter / Diámetro nominal....3" / 76.2mm (4 Pcs / 4 piezas)
Voice Coil Diameter / Diámetro de la bobina de voz.... 0.8" / 20.4mm
Voice Coil Former Material / Material interior de la bobina de voz Kapton
Cone Material / Material del cono...... Water Resistant Paper / Papel resistente al agua
Surround Material / Material de la suspensión.....Cloth / Tela
Basket Material / Material de la canasta....Steel / Acero
Magnet Material / Material del imán....Ferrite / Ferrita
Motor Diameter / Diámetro del motor 2.36" / 60mm
TWEETER SPECIFICATIONS / ESPECIFICACIONES DEL TWEETER
Nominal Diameter / Diámetro nominal....0.94" / 24mm (2 Pcs)
Voice Coil Diameter / Diámetro de la bobina de voz.... 0.8" / 20.4mm
Type /Tipo......Dome / Domo
Diaphragm Material /Material del diafragma....Soft Dome / Cúpula blanda
Magnet Material /Material del imán......Neodymium / Neodimio
Crossover....6dB/oct
AMPLIFIER SPECIFICATIONS / ESPECIFICACIONES DEL AMPLIFICADOR
Amplifier Class / Clase del amplificador.... Class A/B / Clase A/B
Amplifier Type /Tipo de amplificador.... Stereo Full Range / Estéreo de rango completo
Number of Channels / Numero de canales....4
Minimum Impedance /Impedancia mínima.... 3 ohms
Signal to Noise Ratio /Relación señal/ruido 68dB
T.H.D. /T.H.D....1% @ 1000Hz
Channel Separation / Separación de canales 60dB
Audio Source /Fuentes de audio .... Bluetooth®, USB, AUX
Power Input Wire Size / Tamaño del cable de entrada de energía.... 2x16ga
Recommend Fuse Size / Tamaño recomendado del fusible 10A
MAX Current Draw / Consumo de corriente MAX....7A
Thermal Protection / Protección térmica ....Yes (>284°F / 140°C) / Sí (>284°F / 140°C)
Over-Load Protection / Protección de sobrecarga .... Yes / Sí
Short Circuit Output Protection / Protección de salida de cortocircuito ....Yes / Sí
BLUETOOTH® SPECIFICATIONS / ESPECIFICACIONES DEL BLUETOOTH®
Version / Versión......V5.0
Audio Protocols / Protocolos de audio....A2DP
Range / Rango ....>33ft (10m)* / Class 2 / >33ft (10m)* / Clase 2
MEASUREMENTS / MEDIDAS
Overall Width / Ancho total 24.6" / 625 mm
Overall Height / Altura total....3.98" / 101 mm
Overall Depth / Profundidad total.... 3.98" / 101 mm
Gross Single Unit Weight / Peso unitario bruto....7.5Lb / 3.4Kg
WARRANTY
Please visit our website DS18.com for more information on our warranty policy.
We reserve the right to change products and specifications at any time without notice. Images may or may not include optional equipment.

WARNING:
Cancer and Reproductive Harm. www.P65Warning.ca.gov
GARANTÍA
Visite nuestra página web DS18.com para obtener más información sobre nuestra garantía.
Nos reservamos el derecho de cambiar productos y especificaciones en cualquier momento sin previo aviso. Las imágenes pueden incluir o no equipo opcional.

ADVERTENCIA:
Cáncer y Daño Reproductivo. www.P65Warning.ca.gov

FCC ID: 2AYOQ-SB26BTXRGB
This device complies with part 15 of the FCC Rules. Operation is subject to the following two conditions: (1) this device may not cause harmful interference, and (2) this device must accept any interference received, including interference that may cause undesired operation.
Note: This equipment has been tested and found to comply with the limits for a Class B digital device, pursuant to part 15 of the FCC Rules. These limits are designed to provide reasonable protection against harmful interference in a residential installation. This equipment generates, uses, and can radiate radio frequency energy and, if not installed and used in accordance with the instructions, may cause harmful interference to radio communications. However, there is no guarantee that interference will not occur in a particular installation.
If this equipment does cause harmful interference to radio or television reception, which can be determined by turning the equipment off and on, the user is encouraged to try to correct the interference by one or more of the following measures:
■ Reorient or relocate the receiving antenna.
■ Increase the separation between the equipment and receiver.
- Connect the equipment to an outlet on a circuit different from that to which the receiver is connected.
- Consult the dealer or an experienced radio/TV technician for help.
Changes or modifications to this product not authorized by DS18 could void the electromagnetic compatibility (EMC) and wireless compliance and negate your authority to operate the product.
Este dispositivo cumple con la parte 15 de las normas de la FCC. Su uso está sujeto a las dos condiciones siguientes: (1) este dispositivo no puede ocasionar interferencias perjudiciales, y (2) este dispositivo debe aceptar cualquier interferencia recibida, incluidas aquellas que puedan causar un funcionamiento no deseado.
Nota: este equipo ha sido probado y cumple con los límites establecidos para dispositivos digitales de Clase B, de acuerdo con el apartado 15 de las normas de la FCC. Estos límites han sido fijados para proporcionar una protección razonable frente a interferencias perjudiciales en instalaciones residenciales.
Este equipo genera, usa y puede irradiar energía de radiofrecuencias, de modo que, si no se instala y se usa según las instrucciones, podría producir interferencias perjudiciales para las radiocomunicaciones. No obstante, no hay garantía alguna de que no se den interferencias en una instalación en particular.
Si este equipo provoca interferencias perjudiciales en la recepción de la señal de televisión o radio, lo cual puede determinarse encendiendo y apagando el equipo, el usuario deberá intentar corregir la interferencia tomando una o varias de las siguientes medidas:
- Cambiar la orientación o la ubicación de la antena receptora.
- Aumentar la separación entre el equipo y el receptor.
- Conectar el equipo a un enchufe de un circuito diferente al que esté conectado el receptor.
- Consultar con el distribuidor o con un técnico especialista en radio/television para obtener ayuda.
Los cambios o modificaciones realizados en este producto sin la autorización de DS18 podrían invalidar el cumplimiento de la normativa de compatibilidad electromagnética (EMC) y redes inalámbricas, así como anular la autoridad del usuario para manejar el producto.

FOR MORE INFORMATION
PLEASE VISIT
DS18.COM
WE LIKE IT LOUD
DS18®
- DS18®
- SB24BTX
- WELIKEITLOUD @ F ▶ X 🌐 IN
- KNOWING YOUR SB24BTX
- PACKAGING INCLUDES
- PAIRING & DISCOVERING A NEW BLUETOOTH® CONNECTION
- ANDROID AND IOS USERS
- IOS Y ANDROID
- MULTIFUNCTION CONTROLLER BLUETOOTH® OPERATION
- VOLUME CONTROL
- CONTROL DE VOLUMEN
- TIPS
- AUX-IN OPERATION
- OPERACIÓN DE LA ENTRADA AUXILIAR
- USB CONTROLS OPERATION
- OPERACIÓN DE LOS CONTROLES DE USB
- REMOTE CONTROL OPERATION
- OPERACIÓN DEL CONTROL REMOTO
- READ BEFORE INSTALLATION
- LEER ANTES DE LA INSTALACIÓN
- BEGINNING MOUNTING
- COMIENZO DEL MONTAJE
- IMPORTANT | IMPORTANTE
- CAUTION | ATENCIÓN
- SPECIFICATIONS / ESPECIFICACIONES
- BODY/FEATURES / CARCASA/CARACTERÍSTICAS
- WOOFER SPECIFICATIONS / ESPECIFICACIONES DEL WOOFER
- TWEETER SPECIFICATIONS / ESPECIFICACIONES DEL TWEETER
- AMPLIFIER SPECIFICATIONS / ESPECIFICACIONES DEL AMPLIFICADOR
- BLUETOOTH® SPECIFICATIONS / ESPECIFICACIONES DEL BLUETOOTH®
- MEASUREMENTS / MEDIDAS
- WARRANTY
- WARNING
- GARANTÍA
- ADVERTENCIA
- FCC ID: 2AYOQ-SB26BTXRGB
- FOR MORE INFORMATION
- PLEASE VISIT
- DS18.COM
- WE LIKE IT LOUD
Marque : DS18
Modèle : SB24BTX
Catégorie : Barre de son