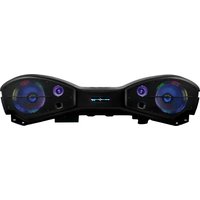
JL24-SBAR22 - Barre de son DS18 - Notice d'utilisation et mode d'emploi gratuit
Retrouvez gratuitement la notice de l'appareil JL24-SBAR22 DS18 au format PDF.


| Type de produit | Haut-parleur coaxial |
| Marque | DS18 |
| Modèle | JL24-SBAR22 |
| Dimensions | 6 x 9 pouces |
| Impédance | 4 ohms |
| Puissance RMS | 200 watts |
| Puissance crête | 400 watts |
| Réponse en fréquence | 50 Hz - 20 kHz |
| Sensibilité | 92 dB |
| Matériau du cône | Polypropylène avec fibre de verre |
| Matériau du tweeter | Dôme en soie |
| Alimentation | Passive (nécessite amplificateur externe) |
| Entretien et nettoyage | Nettoyer avec un chiffon microfibre sec. Éviter les solvants. |
| Sécurité | Ne pas exposer à l'humidité ou à une chaleur excessive. |
| Pièces détachées | Contacter le service client DS18 pour les pièces de rechange. |
| Réparabilité | Réparation possible par un technicien qualifié. |
| Garantie | 1 an |
FOIRE AUX QUESTIONS - JL24-SBAR22 DS18
Questions des utilisateurs sur JL24-SBAR22 DS18
0 question sur cet appareil. Repondez a celles que vous connaissez ou posez la votre.
Poser une nouvelle question sur cet appareil
Téléchargez la notice de votre Barre de son au format PDF gratuitement ! Retrouvez votre notice JL24-SBAR22 - DS18 et reprennez votre appareil électronique en main. Sur cette page sont publiés tous les documents nécessaires à l'utilisation de votre appareil JL24-SBAR22 de la marque DS18.
MODE D'EMPLOI JL24-SBAR22 DS18

OWNER'S MANUAL
MANUAL DEL USUARIO
JL24-SBAR22LD
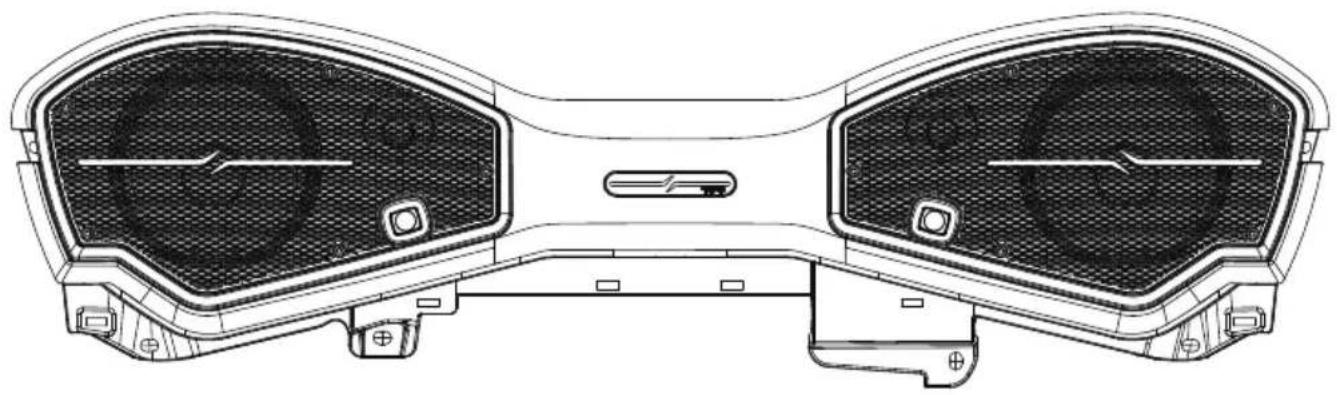
LOADED JEEP OVERHEAD SOUND BAR
BARRA DE SONIDO DE TECHO CARGADA PARA JEEP
DESIGNED FOR 2024 JEEPS:




▲FOR ALLELEMENTS
ENGLISH | ESPAÑOL


LOADED JEEP OVERHEAD SOUND BAR
BARRA DE SONIDO DE TECHO CARGADA PARA JEEP
DESIGNED FOR 2024 JL/JLU/JT JEEPS
- 2 X 8" 8PRO300MB-4 Speakers Included
- 2 X 3.8" PRO-TWX1/BK Tweeters Included
- No Modification to OEM Dome Light Needed
- OEM fitment using factory bolts and location, no modifications or cutting necessary.
- Plug & Play Wire Harness Included
■ OFC Wire Harness Kit with All Factory-Style Connectors and Terminals
■ High-Density Plastic Molded with Color Injection (Available in Black, Red or White) - UV Protected and Ready for All Elements
■ Lightweight and Strong Material - Digital LED Lighting
ITEMS INCLUDED:
- Loaded Overhead Soundbar
■ Wire Harness - Manual
TOOLS NEEDED:
T20 TORX
T25 TORX
- Panel Puller Tool
■ Ratchet with a 10mm Socket
- 4mm Allen Tool
DISEÑADO PARA JEEPS JL/JLU/JT 2024
- 2 X 8" 8PRO300MB-4 Altavoces incluidos
■ 2 X 3.8" PRO-TWX1/BK Tweeters incluidos - No se necesitan modificaciones en la luz de techo OEM
- Ajuste OEM utilizando los pernos y la ubicación de fábrica, no es necesario realizar modificaciones ni cortes.
- Cableado incluido listo para conectar rápido y fácilmente
- Kit de arnés de cables OFC con todos los conectores y terminales con estilo de fábrica
- Plástico de alta densidad moldeado con color inyectado (Disponible en Negro, Rojo y Blanco)
■ Protección UV y listo para todos los elementos - Peso ligero y material resistente
■ Luces LED digitales
ARTÍCULOS INCLUIDOS:
■ Barra de sonido de techo cargada
■ Mazo (arnés) de cables
■ Manual
HERRAMIENTAS NECESARIAS:
■ T20 TORX
■ T25 TORX
■ Herramienta extractora de paneles
- Trinquete con dado de 10 mm
■ Herramienta Allen de 4 mm.
DISASSEMBLY INSTRUCTIONS / INSTRUCCIONES DE DESMONTAJE
- Disconnect negative battery terminal.
- Remove driver and passenger front roof panels per the vehicle's owner manual.
- Desconecte el terminal negativo de la batería.
- Retire los paneles del techo delantero del conductor y del pasajero según el manual del propietario del vehículo.

- Remove five T25 Torx from the front of the middle ROPs cover.
- Retire cinco tornillos Torx T25 de la parte delantera de la cubierta central del ROPs.

- Carefully unclip the middle ROPs cover from the OEM soundbar and remove from the vehicle.
- Desenganche con cuidado la cubierta del ROP central de la barra de sonido OEM y retírela del vehículo.

DISASSEMBLY INSTRUCTIONS / INSTRUCCIONES DE DESMONTAJE
Unclip the two panels on the b-pillar sill panel. Picture 4 and 5. Then remove the b-pillar sill panel.
■ Desenganche los dos paneles en el panel del umbral del pilar B. Foto 4 y 5. Luego retire el panel del umbral del pilar B.


- Disconnect the OEM wiring connector from the OEM soundbar.
- Desconecte el conector de cableado OEM de la barra de sonido OEM.

■ Remove three bolts with a 10mm socket on the passenger side. Repeat on driver side.
- Then remove soundbar from vehicle.
NOTE - We recommend having additional helping hands for this step
- Retire tres pernos con un dado de 10 mm en el lado del pasajero. Repita en el lado del conductor.
- Luego retire la barra de sonido del vehículo.
NOTA: recomendamos contar con ayuda adicional para este paso.
- Remove the five 4mm allen head screws from the OEM Soundbar to access the LED dome-light module. Repeat on the other side.
- Retire los cinco tornillos de cabeza Allen de 4 mm de la barra de sonido OEM para acceder a los módulos luz de techo LED. Repita en el otro lado.
- Unclip the LED dome-light module harness. Remove the two T20 Torx screws that hold the LED dome-light module. Repeat on the other side.
■ Suelte el arnés del módulo luz de techo LED. Retire los dos tornillos Torx T20 que sujetan el módulo luz de techo LED. Repita en el otro lado.


DISASSEMBLY INSTRUCTIONS / INSTRUCCIONES DE DESMONTAJE
- Remove the five 4mm screws to access the LED panel on the soundbar. Make sure to do this on both sides.
- Retire los cinco tornillos de 4mm para acceder al panel LED de la barra de sonido. Asegúrese de hacer esto en ambos lados.
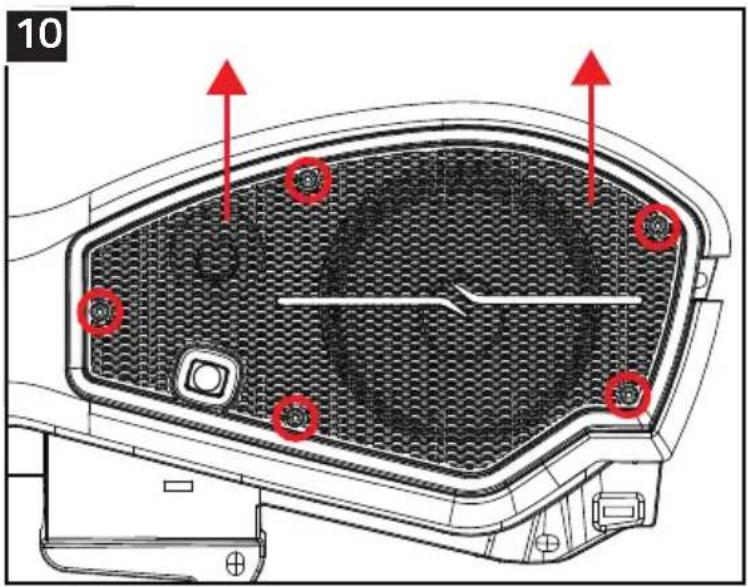
- Place the LED dome-light module face down on the back panel of the grill and secure with the two T20 Torx screws. Be sure to connect the LED light harness. Reinstall the grill on the sound bar and replace the five 4mm screws as in the image (10). Do this for both sides.
- Coloque el módulo luz de techo LED hacia abajo en el panel de la parte de atras de la parrilla, asegúrelo con dos tornillos T20 Torx. Asegúrese de conectar el arnés de la luz LED. Instale nuevamente la parrilla en la barra de sonido y ponga los cinco tornillos de 4 mm de vuelta como en la imagen (10). Haga esto para ambos lados.
- Install the DS18 Soundbar using the bolts from the previous step. (Some help is needed.) Loosely install three bolts on the passenger side and repeat on the driver's side. Once all six bolts are installed, go back and tighten them with a 10mm socket.
- Instale la barra de sonido DS18 usando los pernos del paso anterior. (Se necesita algo de ayuda.) Sin apretar, instale tres pernos en el lado del pasajero y repita en el lado del conductor. Una vez instalados los seis pernos, regrese y apriételos con un dado de 10 mm.


- With the DRM RGB cable secured down the B-pillar, route the cable toward your LC-DRM (optional), making the appropriate wiring connections.
- Con el cable DRM RGB asegurado en el pilar B, dirija el cable hacia su LC-DRM (opcional), realizando las conexiones de cableado apropiadas.
■ After ensuring that everything is checked, functional, and tightened, repeat steps 1-7 in reverse order to reassemble your vehicle.
- The final step is turning it up and becoming a part of the We Like It LOUD Crew.

- Después de revisar y asegurarse de que todo funcione y este apretado, repita los Pasos 1-7 en orden inverso para volver a ensamblar su vehículo.
- El último paso es subirle el volumen y ser parte del grupo We Like It LOUD.
INSTALLATION PLACEMENT / UBICACIÓN DE LA INSTALACIÓN
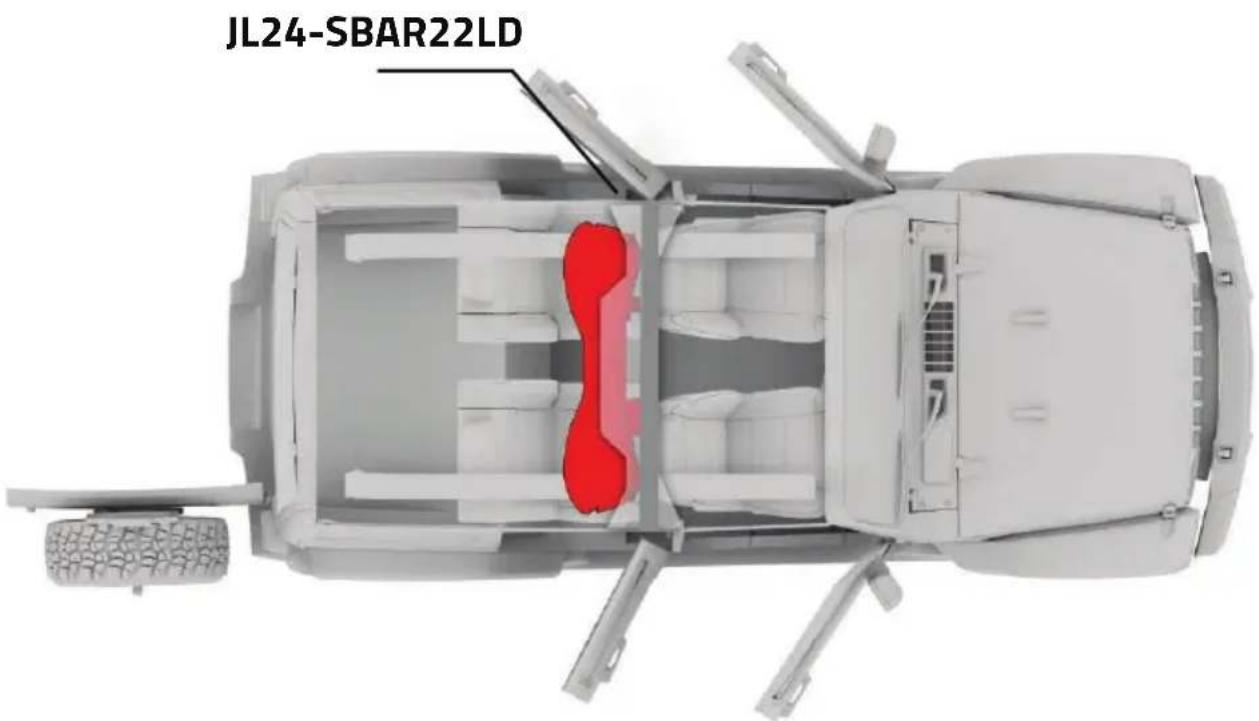

JL24-SBAR22LD SOUND BAR
INSTALLATION
WIRING FOR JEEP:
This cable is designed to facilitate the installation of your JL24-SBAR22LD on your JEEP JL / JLU / JT, when upgrading your sound system. The wiring includes the OEM Connector and Optional DRM RGB cable for seamlessly integrating to your OEM stereo, adding Digital RGB lights into your system.



CABLEADO PARA LA INSTALACIÓN DE LA BARRA DE SONIDO JL24-SBAR22LD PARA JEEP JL/JLU/JT
Este cable está diseñado para facilitar la instalación de su JL24-SBAR22LD en su JEEP JL / JLU / JT cuando actualice su sistema de sonido. El cableado incluye el conector OEM y el cable DRM RGB opcional para integrarse perfectamente con su estéreo OEM, añadiendo luces RGB digitales a su sistema.

ATTENTION
Installation of mobile audio and video components requires experience with a variety of mechanical and electrical procedures. Although this manual provides general installation and operation instructions, it does not show the exact installation methods for your vehicle. If you do not have the required knowledge and experience to successfully complete the installation, consult an authorized dealer about professional installation service.

ATTENTION
Disconnect the negative post (Ground) of the battery before you start the installation. This helps avoid airbags coding and malfunctions, codes module malfunction or any electrical issues

ATENCIÓN
La instalación de componentes móviles de audio y video requiere experiencia con una variedad de procedimientos mecánicos y eléctricos. Aunque este manual proporciona instrucciones generales de instalación y funcionamiento, no muestra los métodos de instalación exactos para su vehículo. Si no tiene los conocimientos y la experiencia necesarios para completar con éxito la instalación, consulte a un distribuidor autorizado sobre el servicio de instalación profesional.

ATENCIÓN
Desconecte el poste negativo (tierra) de la batería antes de comenzar la instalación. Esto ayuda a evitar la codificación y el mal funcionamiento de las bolsas de aire, el mal funcionamiento del módulo de códigos o cualquier problema eléctrico.
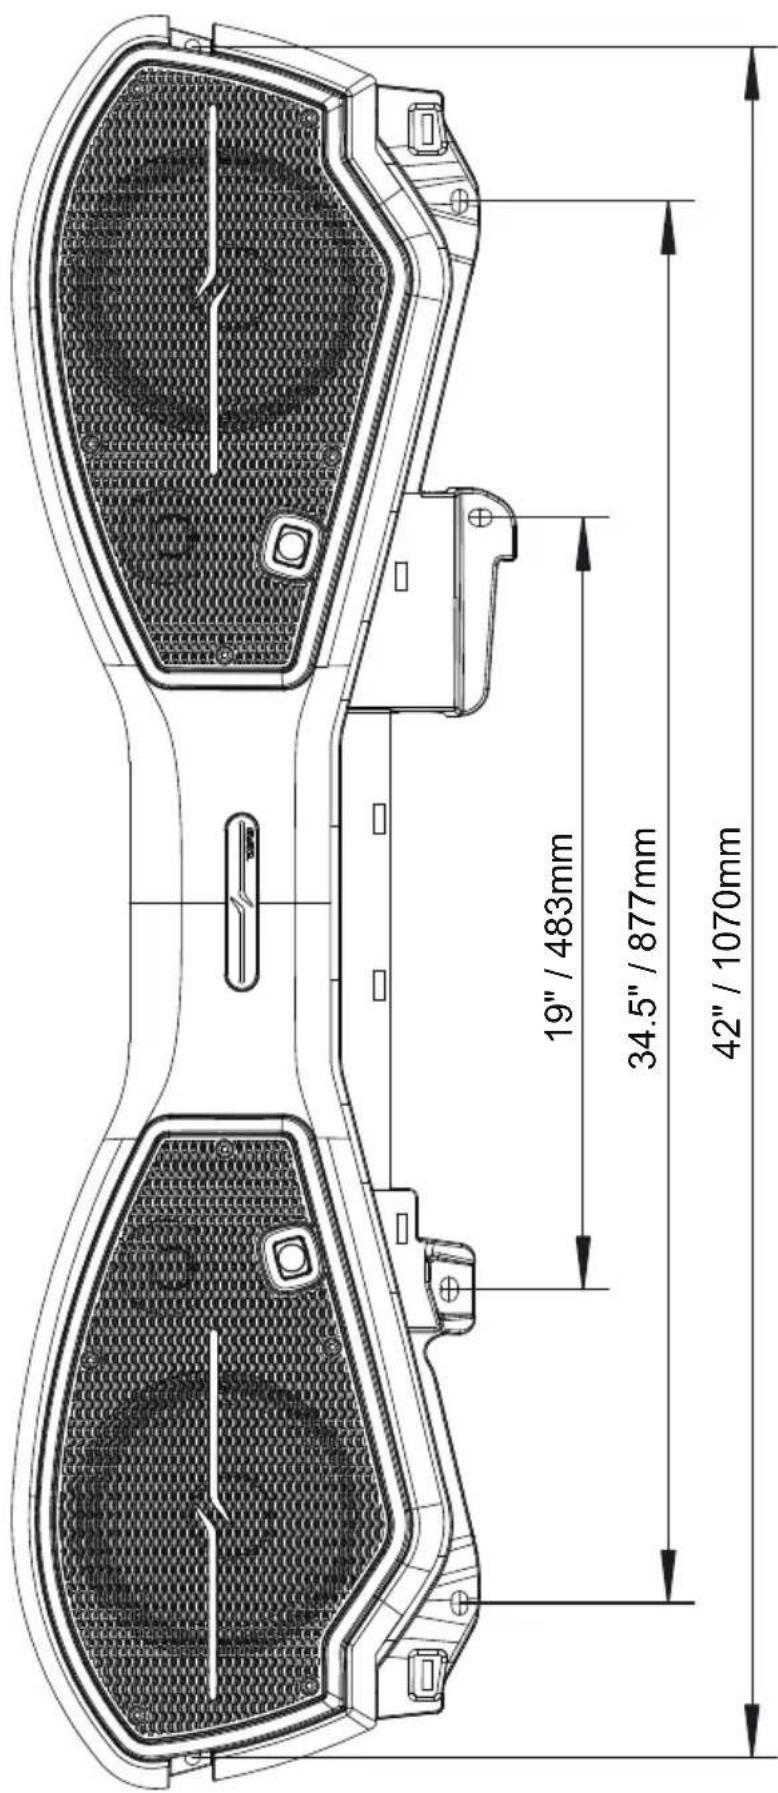
OVERALL VIEW
VISTA GENERAL

SOUNDBAR (JL24-SBAR22LD)
DIGITAL LED INSTALLATION
INSTALACIÓN DE LED DIGITALES
- If using the digital LED module LC-DRM (sold separately) follow the steps below.
-
Route this to the roof area and connect it in to the DS18 Soundbar DRM RGB Cable.
-
Si utiliza el módulo LED digital LC-DRM (se vende por separado), siga los pasos a continuación.
- Dirija esto al área del techo y conéctelo al
Cable DRM RGB para barra de sonido DS18.
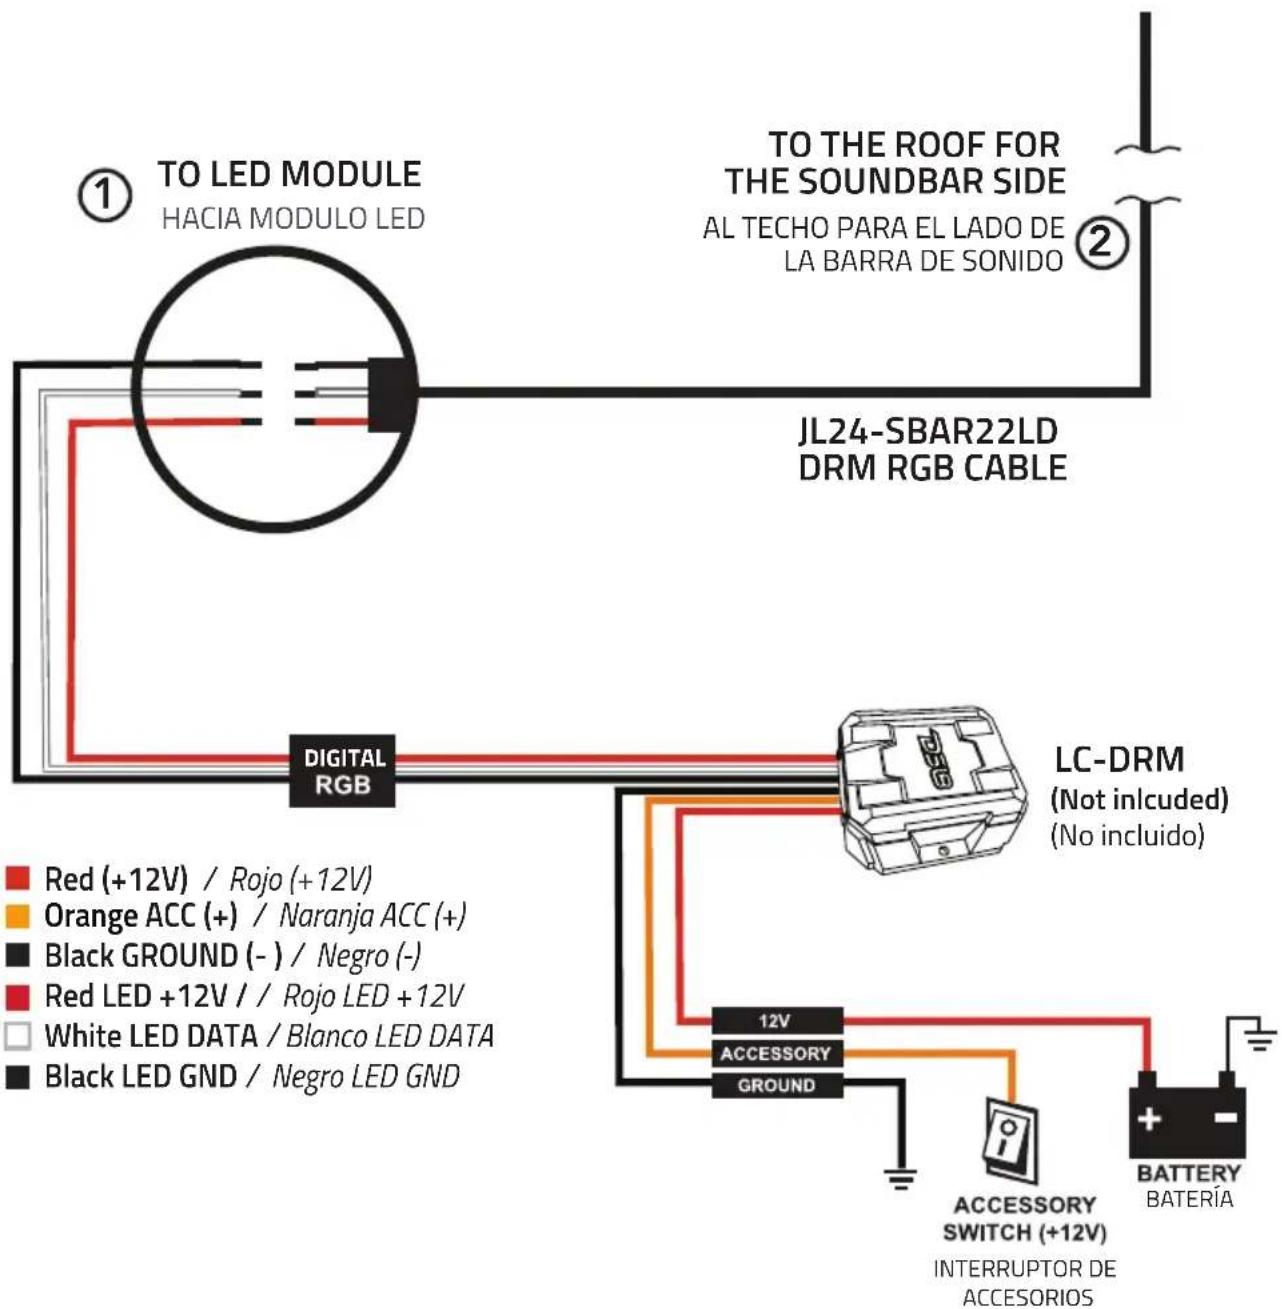
BT Digital LED Control Module (LC-DRM) for multi functional digital RGB-LED lighting (sold separately). The applications for this module are limitless and compatible for all environments, wet or dry.
Módulo de control LED digital BT (LC-DRM) para iluminación LED RGB digital multifuncional (se vende por separado). Las aplicaciones para este módulo son ilimitadas y compatibles para todos los ambientes, húmedos o secos.

Download the DS18 LC APP compatible with the DS18 LC-DRM module. This App works with both Android and iPhone.
Descarga la APP DS18 LC compatible con el módulo DS18 LC-DRM. Esta aplicación funciona tanto con Android como con iPhone.
SPEAKER SPECIFICATIONS / ESPECIFICACIONES DE LOS ALTAVOCES
SPEAKER / ALTAVOZ (8PRO300MB-4):
Nominal Diameter / Diámetro nominal....8" / 203 mm
Nominal Impedance / Impedancia nominal....4 OHMS
RMS Power Handling / Manejo de Potencia RMS 150 Watts
MAX Power Handling / Manejo de Potencia MAX 300 Watts
Sensitivity (1w/1m) / Sensibilidad (1w /1m) 97 dB
Frequency Response / Respuesta de frecuencia....60Hz-5KHz
Recommended Hi Pass Crossover / Crossover paso alto recomendado 80 Hz
MOTOR / MOTOR:
Voice Coil Diameter / Diámetro de la bobina de voz 1.5" / 38.1 mm
VC Former Material / Material interior de la bobina de voz Kapton
Winding Material / Material del bobinado .... CCAW
Cone Material / Material del cono.... Paper / Papel
Dust Cap Material / Material de la tapa antipolvo....Paper / Papel
Surround Material / Material de la suspensión....Cloth / Tela
Basket Material / Material de la canasta.... Steel / Acero
Basket Color/Finish / Color/Acabado de la canasta.... Satin Black / Negro satinado
Magnet Material / Material del imán....Ferrite / Ferrita
Magnet Weight / Peso del imán....20 Oz
Displacement Volume / Volumen de desplazamiento....0.48L / 0.016ft3
TWEETER (PRO-TWX1/BK):
Nominal Diameter / Diametro nominal....3.8"
Nominal Impedance / Impedancia nominal 4 OHMS
AES Power Handling / Manejo de Potencia AES....60W
Program Power Handling / Manejo de Potencia del Programa 120W
Peak Power Handling / Manejo de potencia pico 240W
Sensitivity (1w/1m) / Sensibilidad (1w / 1m).... 103 dB
Frequency Response / Respuesta de frecuencia....3.5KHz - 20KHz
Recommended Hi Pass Crossover / Crossover paso alto recomendado 2 KHz
MOTOR / MOTOR:
Voice Coil Diameter / Diámetro de la bobina de voz 1" / 25.4mm
Voice Coil Former Material / Material interior de la bobina de voz ....KAPTON
Winding Material / Material de bobinado .... CCAW
Diaphragm Material / Material del diafragma....Aluminum / Aluminio
Magnet Material / Material del imán....Ferrite / Ferrita
Body Material / Material de la carcasa....Aluminum / Aluminio
Bullet Material / Material de la bala....Aluminum / Aluminio
Body Color / Color .... Black / Negro

WARRANTY GARANTÍA
Please visit our website DS18.com for more information on our warranty policy.
We reserve the right to change products and specifications at any time without notice. Images may or may not include optional equipment.
Visite nuestra página web DS18.com para obtener más información sobre nuestra garantía.
Nos reservamos el derecho de cambiar productos y especificaciones en cualquier momento sin previo aviso. Las imágenes pueden incluir o no equipo opcional.

WARNING:
Cancer and Reproductive Harm.
www.P65Warning.ca.gov

ADVERTENCIA:
Cáncer y Daño Reproductivo.
www.P65Warning.ca.gov

FOR MORE INFORMATION
PLEASE VISIT
DS18.COM
WELIKEITLOUD
f X in
DS18®
- OWNER'S MANUAL
- JL24-SBAR22LD
- LOADED JEEP OVERHEAD SOUND BAR
- DESIGNED FOR 2024 JL/JLU/JT JEEPS
- ITEMS INCLUDED
- TOOLS NEEDED
- DISEÑADO PARA JEEPS JL/JLU/JT 2024
- ARTÍCULOS INCLUIDOS
- HERRAMIENTAS NECESARIAS
- DISASSEMBLY INSTRUCTIONS / INSTRUCCIONES DE DESMONTAJE
- NOTE - WE RECOMMEND HAVING ADDITIONAL HELPING HANDS FOR THIS STEP
- INSTALLATION PLACEMENT / UBICACIÓN DE LA INSTALACIÓN
- JL24-SBAR22LD SOUND BAR
- INSTALLATION
- WIRING FOR JEEP
- CABLEADO PARA LA INSTALACIÓN DE LA BARRA DE SONIDO JL24-SBAR22LD PARA JEEP JL/JLU/JT
- ATTENTION
- ATENCIÓN
- OVERALL VIEW
- DIGITAL LED INSTALLATION
- INSTALACIÓN DE LED DIGITALES
- SPEAKER SPECIFICATIONS / ESPECIFICACIONES DE LOS ALTAVOCES
- SPEAKER / ALTAVOZ (8PRO300MB-4)
- MOTOR / MOTOR
- TWEETER (PRO-TWX1/BK)
- WARRANTY GARANTÍA
- FOR MORE INFORMATION
- PLEASE VISIT
- DS18.COM
- WELIKEITLOUD
Marque : DS18
Modèle : JL24-SBAR22
Catégorie : Barre de son