Express 200 - Vélo d'appartement Horizon Fitness - Notice d'utilisation et mode d'emploi gratuit
Retrouvez gratuitement la notice de l'appareil Express 200 Horizon Fitness au format PDF.


| Type de produit | Vélo d'appartement |
| Marque | Horizon Fitness |
| Modèle | Express 200 |
| Dimensions (L x l x H) | 100 x 50 x 130 cm |
| Poids net | 30 kg |
| Poids maximal utilisateur | 120 kg |
| Alimentation | Pile AA (non fournie) ou génératrice autonome |
| Système de résistance | Frein magnétique avec plusieurs niveaux |
| Nombre de niveaux de résistance | 8 |
| Affichage | LCD rétroéclairé : temps, distance, calories, vitesse, pouls |
| Capteur de pouls | Poignées intégrées |
| Selle réglable | Oui, verticalement et horizontalement |
| Pédales | Standard avec cale-pieds |
| Roues de transport | Oui, pour faciliter le déplacement |
| Niveau sonore | Silencieux |
| Fonctions principales | Entraînement cardio, programmes prédéfinis (manuel, intervalle, objectif) |
| Entretien et nettoyage | Essuyer avec un chiffon humide, lubrifier la chaîne tous les mois |
| Sécurité | Frein d'urgence sur la poignée, stabilisateurs au sol |
| Pièces détachées et réparabilité | Disponibles sur le site du fabricant, garantie 2 ans |
FOIRE AUX QUESTIONS - Express 200 Horizon Fitness
Questions des utilisateurs sur Express 200 Horizon Fitness
0 question sur cet appareil. Repondez a celles que vous connaissez ou posez la votre.
Poser une nouvelle question sur cet appareil
Téléchargez la notice de votre Vélo d'appartement au format PDF gratuitement ! Retrouvez votre notice Express 200 - Horizon Fitness et reprennez votre appareil électronique en main. Sur cette page sont publiés tous les documents nécessaires à l'utilisation de votre appareil Express 200 de la marque Horizon Fitness.
MODE D'EMPLOI Express 200 Horizon Fitness
U N P A C K I N G
Unpack your Exercise Bike where you will be using it. Place your bike on a level flat surface. It is recommended that you place a protective covering on your floor. You will only need to attach the following items. Verify that the following parts and tools are included:
Parts
• 1 Rear Foot Tube
• 2 Handlebar Set
• 2 Handlebar • 1 Seat Back
• I Seat Post
• 1 Seat
• 1 Console Mast
• 1 Console Mast Boot
• 2 Mobile Wheels
• 1 Console
- 1 Console
• 2 AA Batteries
• 2 Pedals
• 2 Wheel Sleeves
• 1 Tension Knob
• 2 Handlebar Links
• 1 Hardware Pack (contents listed below)
H a r d w a r e
(Actual Size)

A) 20mm Bolt
Quantity: 2

C) Teflon Washer

E) 13mm Nut
Quantity: 2

B) 35mm Washer
Quantity: 2

D) 15mm Bolt
Quantity: 4
[NO TEXT]
E) 13mm Nut
Quantity: 2

K) 20mm Bolt
Quantity: 2
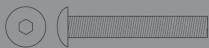
L) 90mm Bolt
Quantity: 2

F) 45mm Bolt
Quantity: 2

H) Linkarm Spacer (Outer)
karm Spacer (Inner)
Quantity:2

I) 12mm Screw

P) Pedal Spacer (Inner)
Quantity: 2

O) Pedal Spacer (Outer)
Quantity: 2

J) 14mm Washer
Quantity: 2

M) Acorn Nut

N) 20mm Arc Washer
Quantity: 4
STEP I
Attach the Front Foot Wheels
a. Insert the wheel sleeves on each side of the front wheel tube.
b. Align the holes in the wheel sleeves with the holes in the wheel tube.
Insert two 12mm screws (I) and
insert two 12mm screws (1)
secure with the screwdriver.
c. Attach the mobile wheels to the
wheel sleeves. Insert two 14mm
workers (T) and two 30mm bolts
washers (1) and two 20mm bolts
(K) and secure with a screwdriver.
STEP 2
Attach the Rear Foot Tube and
Pads
a. Align the holes of the rear foot tube with the holes in the base frame.
b. Insert two 90mm bolts (L), two 20mm arc washers (N) and acorn nut (M) secure with a 5mm allen wrench
c. Slide the rear foot pads to each
- Chado the rear foot pads and of the rear foot tube
STEP 3
Attaching the Console Mast
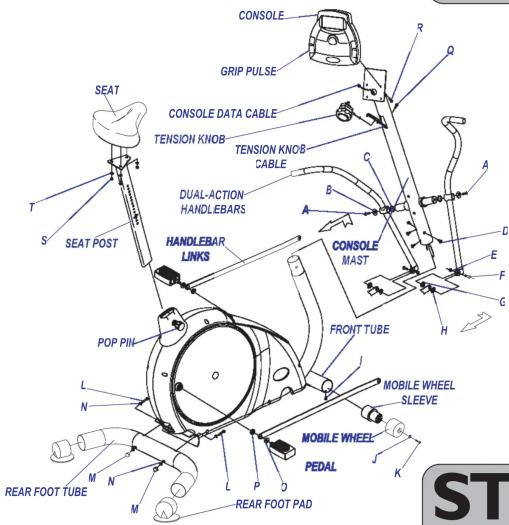
a. Unfold the console cable and the tension knob cable, which is folded into the console mast base. b. Slide the console mast boot onto the bottom of the console mast. c. Slide the tension knob cable and the console cable through the console mast. (Note: The tension knob cable will only pull as far as the rectangular opening in the console mast. The console cable will need to be pulled through the end of the console mast.) To assist in pulling the console cable and tension knob cable through the console mast, there should be a guide wire attached to the top of the console mast.
d. Insert the console mast into the base, secure both sides of the mast with four 15mm bolts (D) using the 5mm allen wrench. Slide the console mast boot into place.
NOTE: It is recommended that you apply grease to the threads of each bolt as you assemble your Exercise Bike, to prevent loosening and noise. Also, during each assembly step, ensure that ALL nuts and bolts are in place and partially threaded in before completely tightening any ONE bolt.

ASSEMBLY GUIDE

STEP 4
Connecting the Tension Knob
a. Remove the 20mm long bolt (Q) on the back of the tension knob.
b. Turn the tension knob to level 15. Connect the tension knob to the bottom of the tension knob cable (Figure A, Step 2).
c. Grasp the tension knob and firmly pull the tension knob assembly away from the machine in order to attach to the top of the tension knob cable (Figure B, Step 3). Make sure that the copper cable end is seated properly into the "key hole".
d. Insert the tension knob into the rectangular opening on the console mast (Figure C, Step 5).
e. Secure the tension knob with the 20mm bolt (C) by using a screw driver (Figure D, Step 6).

Figure A

Figure B

Figure C

Figure D
STEP 8
Attach the Pedals
a. Attach pedal spacer (P), handlebar link, and 30mm washer (O) onto the right pedal. Note: The pedals are labeled on the end of each threaded shaft for reference.
b. Tighten the pedal with the flat wrench.
Repeat for left side.
STEP 5
Attaching the Dual-Action
Handlebars
a. Attach console mast spacer (C) onto the console mast.
b. Align the holes of the handlebar and slide it onto the console mast. Attach a 35mm washer (B) and 20mm bolt (A) and secure with a 5mm Allen wrench. Repeat for other side.
c. Insert two link arm spacers (H,G) into the lower handlebar bracket.
d. Align the holes for the handlebar link and the lower handlebar. Insert a 45mm bolt (F) and secure with a 13mm nut (E) using a flat wrench. Repeat for other side.
STEP 6
Attaching the Console
a. Open the battery cover on the back of the console, insert two AA batteries into the console and replace the battery cover.
b. Connect the cables from the console to the console cables running through the console mast, making sure that both ends snap together tight.
c. Attach the console to the console mast plate with the 15mm screws (R). Secure using a screwdriver. Note: Screws (R) are located on the back side of the console.
STEP 7
Attach the Seat
a. Remove the three nuts (S) and washers (T) from the bottom of the seat.
b. Attach the seat to the seat post with the three nuts (S) and washers (T), securing with the flat wrench.
c. Loosen the pop pin by turning it one or two revolutions, then pull the pop pin mechanism to the outward position.
d. With the pop pin in the outward position, slide the seat post into the base.
e. Release the pop pin and tighten to the proper position.
CUSTOMER ASSISTANCE CENTER 1.888.993.3199 or www.horizonfitness.com