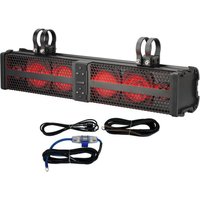
XBAR-24 - Barre de son Rockville - Notice d'utilisation et mode d'emploi gratuit
Retrouvez gratuitement la notice de l'appareil XBAR-24 Rockville au format PDF.


| Type de produit | Barre de son |
| Marque | Rockville |
| Modèle | XBAR-24 |
| Dimensions (L x H x P) | Environ 100 x 7 x 8 cm |
| Poids | Environ 2,5 kg |
| Alimentation | Adaptateur secteur 100-240V, 50/60Hz |
| Consommation électrique | 30 W (max) |
| Puissance de sortie | 60 W RMS (2 x 30 W) |
| Connectivité | Bluetooth 5.0, Entrée AUX 3,5 mm, USB, HDMI ARC |
| Fonctions principales | Amplification intégrée, contrôle du volume, égaliseur préréglé |
| Compatibilité | Téléviseurs, smartphones, tablettes, ordinateurs |
| Matériau du boîtier | Plastique ABS avec grille en métal |
| Couleur | Noir |
| Entretien et nettoyage | Essuyer avec un chiffon doux et sec. Ne pas utiliser de produits abrasifs. |
| Sécurité | Ne pas exposer à l'humidité. Débrancher avant nettoyage. Utiliser uniquement l'adaptateur fourni. |
| Pièces détachées et réparabilité | Pièces non disponibles séparément. Contacter le SAV Rockville. |
| Contenu de l'emballage | Barre de son, télécommande, adaptateur secteur, câble AUX, câble HDMI, manuel d'utilisation |
| Garantie | 2 ans (selon législation en vigueur) |
| Température de fonctionnement | 0°C à 40°C |
FOIRE AUX QUESTIONS - XBAR-24 Rockville
Questions des utilisateurs sur XBAR-24 Rockville
0 question sur cet appareil. Repondez a celles que vous connaissez ou posez la votre.
Poser une nouvelle question sur cet appareil
Téléchargez la notice de votre Barre de son au format PDF gratuitement ! Retrouvez votre notice XBAR-24 - Rockville et reprennez votre appareil électronique en main. Sur cette page sont publiés tous les documents nécessaires à l'utilisation de votre appareil XBAR-24 de la marque Rockville.
MODE D'EMPLOI XBAR-24 Rockville
ROCKVILLE
XBAR-24
24" POWERED ATV/UTV SOUNDBAR w/BLUETOOTH & LED LIGHTS
OWNER'S MANUAL
ATTENTION:
VISIT THE ROCKVILLE SUPPORT SITE FIRST!
Who reads manuals?
Scan the QR code or go to rockvillesupport.com/xbar-24 to access how-to video(s), the owner's manual, and other important information you may need to get the most out of your item.
If you prefer written instructions, please read ahead!
With Rockville you get many options.

Missing items? If you ordered a bundle that includes more than one product and you are missing part of your bundle, then it just means your order shipped from two different warehouses. You will receive the remaining items very soon. If you have any concerns or inquiries, feel free to call our customer support center at 1-646-758-0144, 24 hours a day/7 days a week.
Thank you for purchasing this Rockville XBAR-24. Please read this owner's manual carefully for proper use of your XBAR-24. Should you need assistance, please call our technical help line at 1-646-758-0144, 24 hours a day/7 days a week.
Includes
- 1.75" & 2" clamps
• 1.5" & 1.875" rubber pads - Mounting screws
- Wiring installation kit
- User manual
Parts List
| 1 | Clamp base | 2 PCS |
| 2 | Non-slip rubber strip (45 x 10mm) | 4 PCS |
| 3 | M5x24mm screw | 2 PCS |
| 4 | Spring washer for M5 screw | 2 PCS |
| 5 | Non-slip rubber pad (48 x 30mm) | 2 PCS |
| 6 | Non-slip rubber strip (120 x 14 x 1mm) | 4 PCS |
| Non-slip rubber strip (120 x 14 x 4mm) | 4 PCS | |
| Non-slip rubber strip (130 x 14 x 2mm) | 4 PCS | |
| 7 | Clamp ring 1.75" | 4 PCS |
| 8 | Aluminum ring 2" | 4 PCS |
| 9 | M6x60mm screw | 4 PCS |
| 10 | Non-slip flat washer for M6 screw | 4 PCS |
| 11 | Non-slip nut for M6 screw | 4 PCS |

Functions
- Aluminum rings
- Mounting clamp
- Power button: Press and hold for 3 seconds to power on or off.
- Play/Pause
- Source: Press to switch between Bluetooth and auxiliary input. This button will also act as the LED indicator for BT (blue) and auxiliary (green) modes.
- LED control: Press to turn on LEDs, and continue pressing to cycle through the available modes (red LED/blue LED/purple LED/cycle through colors/off).
- Volume +/Volume -: Short-press to increase or decrease volume in increments. Press and hold to continuously increase or decrease the volume.
- Previous track/Next track
- 3.5mm AUX input
- L/R RCA outputs
- Power harness
- Fuse

Installation
- Stick two of the 45 x 10mm non-slip rubber strips (parts list no. 2) to the bottom of each clamp base (parts list no. 1) (fig. a), then insert the base clamps into the corresponding grooves at the top of the unit (fig. b).

Installation (continued)
- Align the screw holes at the bottom of the base clamps with the positioning holes in the groove (fig. c). Use the M5 x 24mm screws (parts list no. 3) and M5 spring washers (parts list no. 4) to secure the clamps (fig. d).


- Stick a 48 x 30mm non-slip rubber pad (parts list no. 5) on top of each clamp.

- Dermine the size of the bar and then select the appropriate size clamp ring. The XBAR offers a 1.75" and a 2" clamp ring (parts list nos. 7 and 8) to fit bars from 1.5" to 2". Refer to the chart below to select the appropriate size clamp ring.
| Bar Size | Ring | Rubber Strip Size |
| 2" | 2" | 120 x 14 x 1mm |
| 1.875" | 2" | 130 x 14 x 2mm |
| 1.75" | 1.75" | 120 x 14 x 1mm |
| 1.5" | 1.75" | 120 x 14 x 4mm |
- Once you've determined the ring size, wrap the proper size non-slip rubber strip (parts list no. 6) around the bar to prevent it from being scratched by the ring. Refer to the chart above for appropriate rubber strip size.

- Place the clamp ring over the bar (fig. f). Ensure that the ring's screw holes are aligned with the clamp base's screw holes and insert M6 x 60mm screws (parts list no. 9) with M6 spring washers (parts list no. 10) into the holes (fig. g). Secure the screws using M6 nuts (parts list no. 11) (fig. h). Do not overtighten.


- Installation is now complete (fig. i). The XBAR can also be installed above the bar (fig. j). To do so, simply slide the base clamps onto the corresponding grooves on the bottom of the bar and follow the rest of the installation steps.


Wiring

Operation
Power
Press and hold for 3 seconds to power on and off. While the power is on, the background LED will be white.
Bluetooth Pairing
- Power on the unit. It will automatically enter pairing mode and begin to search for discoverable devices. The Bluetooth LED indicator will flash intermittently.
- Make sure that your device is discoverable. Look for and select XBAR-24 from the list of available Bluetooth devices. Once paired, the Bluetooth LED indicator will remain solid.
- Use your device or the XBAR to control playback functions and set the volume.
Auto-Connect
If the unit is disconnected from the device it is paired to, it will automatically try to pair with that device the next time it is within range. When disconnected, the XBAR will enter pairing mode and the Bluetooth indicator LED will flash blue. If the device is not in range within 10 minutes, the unit will exit pairing mode and the pairing procedure will have to be repeated to reconnect.
Please note: It is possible to connect another device within the 10-minute period. If that happens, you must repeat the pairing procedure to reconnect the previously connected device.
Auxiliary Input
Connect a 3.5mm jack to the AUX input and press play on the input device. The indicator LED will be green. If the unit is in Bluetooth mode, press the SRC button to switch to Aux-In mode. Use your device to control playback functions. Volume may be controlled via the XBAR or your device.
Features and Specifications
- 24" amplified Bluetooth sound system
• Built-in class D stereo power amplifier
• 200 watts RMS/400 watts peak
• (4) 3.5" mid-bass drivers with Y35 ferrite magnets
• Polypropylene mica cone - Butyl rubber surround
- Forward-firing speakers for maximum SPL and sound staging
• (2) 1" PEI dome tweeters
• Built-in Bluetooth technology - Bluetooth version 5.0
• Supports A2DP audio streaming -
Bluetooth range up to 32.8 feet
• 3.5mm auxiliary input -
RCA output for a second sound bar, subwoofer, amplifier, or powered speakers
• Built-in LED lights (red, blue, purple)
• LED modes: solid color, pulsating - Marine-rated with rugged weatherproof exterior
• IPX6 waterproofing/weatherproofing
• Weather-resistant grills and hardware - Clean installation (includes a harness that gets hard-wired to the vehicle battery)
• Frequency response: 20Hz – 20kHz - Dimensions (H x L x D): 4.65" x 23.42" x 4.69"
- Multi-angle adjustable clamp system fits 1.5"/1.75"/1.875"/2" bars
FEDERAL COMMUNICATIONS COMMISSION COMPLIANCE INFORMATION
Responsible party name: Rockville
Address: 600 Bayview Ave.
Entrance A Inwood, NY 11096
Hereby declares that the product XBAR-24 complies with FCC rules as mentioned in the following paragraph:
This device complies with Part 15 of the FCC rules. Operation is subject to the following two conditions: (1) this device may not cause harmful interference, and (2) this device must accept any interference received, including interference that may cause undesired operation.
Note: This equipment has been tested and found to comply with the limits for a Class B digital device, pursuant to Part 15 of the FCC rules. These limits are designed to provide reasonable protection against harmful interference in a residential installation. This equipment generates, uses, and can radiate radio frequency energy and, if not installed and used in accordance with the instructions, may cause harmful interference to radio communications. However, there is no guarantee that interference will not occur in a particular installation. If this equipment does cause harmful interference to radio or television reception, which can be determined by turning the equipment off and on, the user is encouraged to try to correct the interference by one or more of the following measures:
- Reorient or relocate the receiving antenna.
- Increase the separation between the equipment and receiver.
- Connect the equipment to an outlet on a circuit different from that to which the receiver is connected.
- Consult the dealer or an experienced radio/TV technician for help.

ROCKVILLE


Marque : Rockville
Modèle : XBAR-24
Catégorie : Barre de son