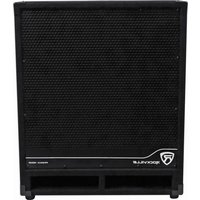
RBG18S - Caisson de basses Rockville - Notice d'utilisation et mode d'emploi gratuit
Retrouvez gratuitement la notice de l'appareil RBG18S Rockville au format PDF.


| Type de produit | Caisson de basses passif |
| Marque | Rockville |
| Modèle | RBG18S |
| Dimensions (L x H x P) | 508 x 610 x 508 mm |
| Poids | 23 kg |
| Type d'enceinte | Bass-reflex avec évent |
| Haut-parleur | 18 pouces (457 mm) |
| Puissance admissible (RMS) | 600 W |
| Puissance de crête | 1200 W |
| Impédance | 4 ohms |
| Réponse en fréquence | 30 Hz - 250 Hz |
| Niveau de pression acoustique max | 98 dB |
| Entrées | Bornier à vis (compatible fil nu, fourche, banane) |
| Sorties | Bornier à vis (repassage) |
| Matériau du coffret | MDF 18 mm |
| Finition | Tapis noir |
| Protection | Filtre passe-bas intégré, protection thermique |
| Refroidissement | Ventilation naturelle |
| Entretien et nettoyage | Dépoussiérer avec un chiffon doux sec ; éviter les produits abrasifs |
| Sécurité | Ne pas exposer à l'humidité ; éteindre avant manipulation |
| Pièces détachées et réparabilité | Haut-parleur remplaçable ; circuit simple |
| Informations générales | Utilisation en sonorisation professionnelle ou home cinéma |
FOIRE AUX QUESTIONS - RBG18S Rockville
Questions des utilisateurs sur RBG18S Rockville
0 question sur cet appareil. Repondez a celles que vous connaissez ou posez la votre.
Poser une nouvelle question sur cet appareil
Téléchargez la notice de votre Caisson de basses au format PDF gratuitement ! Retrouvez votre notice RBG18S - Rockville et reprennez votre appareil électronique en main. Sur cette page sont publiés tous les documents nécessaires à l'utilisation de votre appareil RBG18S de la marque Rockville.
MODE D'EMPLOI RBG18S Rockville
ROCKVILLE
RBG15S/RBG18S
ACTIVE POWERED PRO/DJ PA SUBWOOFER w/DSP and LIMITER
OWNER'S MANUAL
ATTENTION: WATCH THIS VIDEO BEFORE FIRST USE!
Who reads manuals?
Scan the QR codes or go to the URLs to access how-to video(s), the owner's manual, and other important information you may need to get the most out of your item.
If you prefer written instructions, please read ahead!
With Rockville you get many options.

rockvillesupport.com/rbg15s

rockvillesupport.com/rbg18s
Missing items? If you ordered a bundle that includes more than one product and you are missing part of your bundle then it just means your order shipped from two different warehouses. You will receive the remaining items very soon. If you have any concerns or inquiries, feel free to call our customer support center at 1-646-758-0144, 24 hours a day/7 days a week.
Thank you for purchasing this Rockville Bass Gig series pro audio speaker. Please read this installation guide carefully for proper use of your Bass Gig series pro audio speaker. Should you need assistance during or after your installation please call our technical help line at 1-646-758-0144, 24 hours a day/7 days a week.
IMPORTANT SAFETY INSTRUCTIONS

CAUTION
RISK OF ELECTRIC SHOCK. DO NOT OPEN

- To reduce risk of electric shock, never open the unit. There are no user serviceable parts, refer service to the Rockville service center.
- Do not expose this unit to any kind of moisture.
• Unit should be situated away from heat sources.
- Do not obstruct vents or exhaust fan.
- Please ensure that the unit is situated in a properly ventilated area.
- Make sure the unit is placed on a level and stable surface. This unit should not be mounted to a wall or ceiling.
- If this product is equipped with a polarized alternating current line plug (a plug having one blade wider than the other), it will fit into the outlet only one way. This is a safety feature. If you are unable to insert the plug fully into the outlet, try reversing the plug. If the plug should still fail to fit, contact your electrician to replace your obsolete outlet. Do not defeat the safety purpose of the polarized plug. If this product is equipped with a three-wire grounding type plug, a plug having a third (grounding) pin, it will only fit into a grounding type power outlet. This is a safety feature. If you are unable to insert the plug into the outlet, contact your electrician to replace your obsolete outlet. Do not defeat the safety purpose of the grounding type plug.
Balanced vs. Unbalanced Lines
A balanced line is a three-conductor system in which two signal wires carry an equal, but opposite voltage with respect to the ground wire. The ground wire acts only as a shield and does not carry any audio signal current. Outside interference is either shielded from the internal signal conductor, or if it gets into the cable is cancelled out by the opposite signals at the receiving end. Balanced connections are preferred for long cable runs.
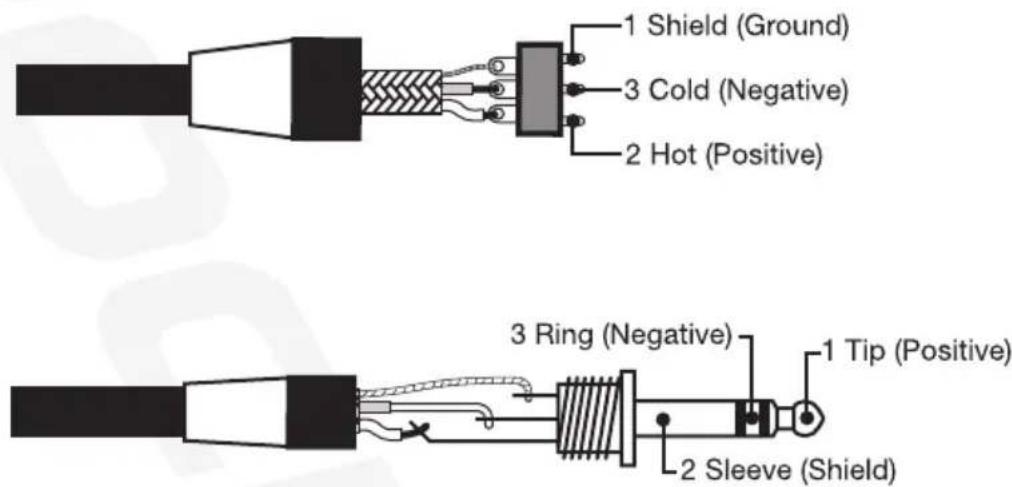
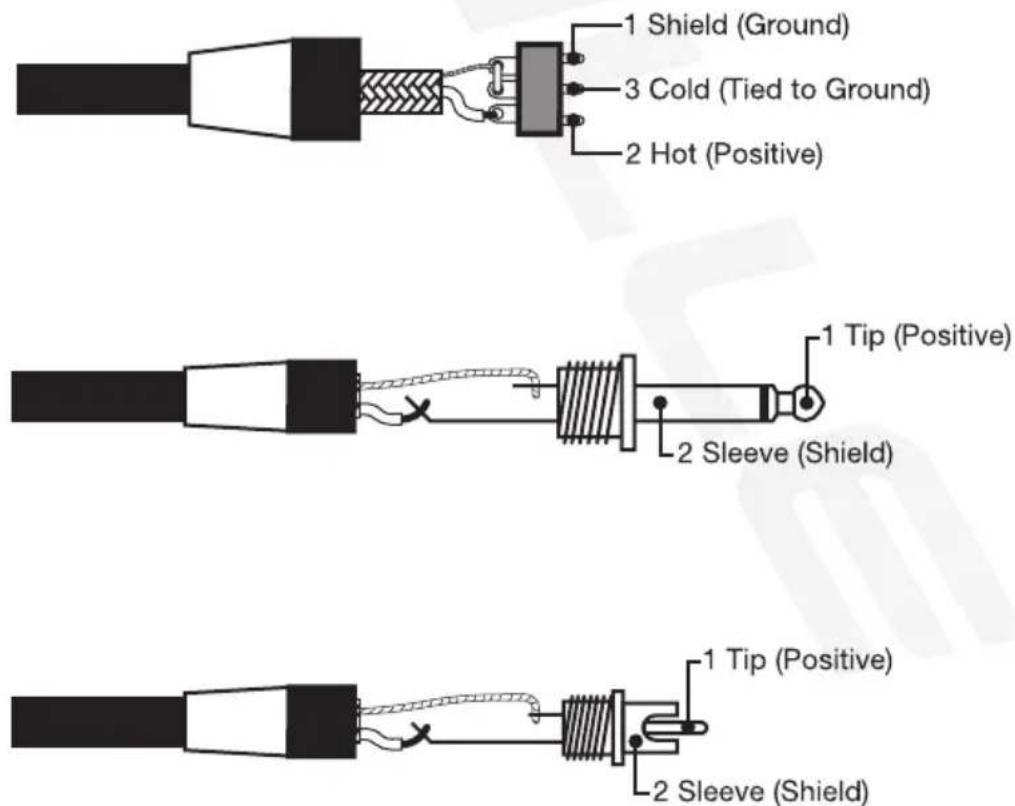
An unbalanced cable is a two-wire system where the shield (ground wire) acts as one of the current carrying signal conductors. The center conductor enclosed by the shield is commonly known as the "hot" conductor. Unbalanced audio cables do not reject noise as well as balanced lines. Unbalanced lines are typical in home hi-fi type systems and on the outputs of electronic musical instruments. These work well if the distance between the components is short, the signal level is relatively high and all of the electronics used in the system are plugged into the same AC outlet.
Configuration
Signal from the mixer's left Main Mix Out XLR jack to the RBG18S unit's left 1/4 //XLR combo jack input*.

Signal from the mixer's right Main Mix Out XLR jack to the RBG18S unit's right 1/4 "XLR combo jack input*.
Signal output from the RBG18S units' XLR outputs to the RPG15 speakers' balanced XLR inputs.

* Pictured interconnect cables not included.
Configuration (continued)
If you are comfortable using this professional sub in your home theater setup, please see the diagram below.

Subwoofer Placement & Time Alignment
Different venues will require you to place your Bass Gig unit in different locations. If your subwoofer is set too far away from the main speakers a time anomaly occurs making the bass seems out of alignment with the speakers. Although you can place the subwoofer in a variety of locations within your listening environment, you'll enjoy the best performance when it's on the same side of the room as your system's front speakers. You can also place the subwoofer in a corner or near a wall to increase its loudness. Be sure to place it feet-side down and, if at all possible, away from an open door way. Ultimately, the best way to learn where in the room you can achieve optimal sound quality is by placing the sub in different locations.
When set up near your front supporting speakers the time alignment of the subwoofers and the speakers will be in near alignment so you should set your Bass Gig Polarity setting to 0 degrees.
Subwoofer
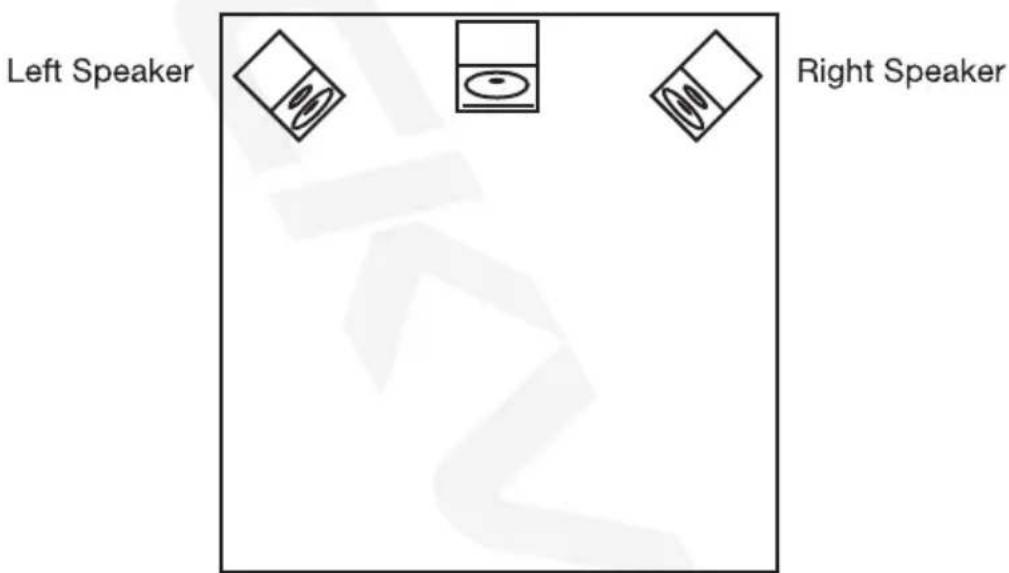
If you are required to set up your subwoofer in the back of the venue while your sound reinforcement speakers are in front, set the Bass Gig Polarity to 180 degrees which will time align the subwoofer with the speakers so there is no delay and the bass + full range sound will be in sync.

Functions

-
Unbalanced Line-in RCA jacks
-
The Level knob is used to regulate the output level of the subwoofer. It allows you to set the balance between the speakers and subwoofers.
-
Full Range XLR/TRS 1/4" combo input will accept line input signal from any line level device with a balanced output jack.
-
Full Range XLR output will send the signal from the Full Range XLR/TRS inputs to another device.
-
Polarity switch button reverses polarity of subwoofer and is dependent on the placement of the subwoofer relative to the speakers or another subwoofer.
-
Indicator lights.
-
Limit LED lights when limiter circuit automatically detects signal is being over driven so that signal does not clip & distort.
- Amplifier Clip LED indicator lights up when the amplifier is near clipping. If LED is lit continuously adjust the Level control and reduce the output level of connected sources. Failure to do so may lead to premature failure of your subwoofer.
-
Signal LED indicator. Indicates signal input from connected sources.
• Power LED indicator. -
Front LED Power on/off button.
- D-XSUB LED indicator.
- Bass boost selector.
- Boost increases bass frequencies by 6dB @ 80Hz.
- Extended Low Frequency increases the low frequency range for really deep chest-thumping bass.
-
Low Pass Frequency switch offers the user three Low Pass frequency settings. Use this setting to filter out frequencies so it plays only the selected frequency and any frequencies below that. These settings will allow you to achieve a balanced sound when pairing this unit with your speakers. For example, if your mains are 15" PAs, you can set the low pass frequency lower. Whereas if you are using 8" PAs you will want to set the low pass frequency higher.
-
Voltage selector switch.
- IEC AC Power socket with user serviceable fuse compartment
- Power switch
- Cooling fan
Specifications RBG15S
• 400 Watts RMS/800 Watts Program/1600 Watts Peak
- 15" Woofer with 90oz Magnet and 3" Voice Coil
• Frequency Response: (±3dB) 35Hz – 150Hz
• Maximum SPL @ 1w/1m: 120dB Peak/115dB Continuous
Specifications RBG18S
- 500 Watts RMS/1000 Watts Program/2000 Watts Peak
- 18" Woofer with 120oz Magnet and 4" Voice Coil
• Frequency Response: (±3dB) 29Hz - 150Hz
• Maximum SPL @ 1w/1m: 125dB Peak/120dB Continuous
Features RBG15S / RBG18S
- Powered Bass Reflex subwoofer
- DSP Digital Signal Processor with selectable 6dB Boost @ 80Hz or +3dB Extended Low Frequency extension
• Power-On and Signal Input LED Indicators - Clip Limiter Circuitry with LED Indicator
• Balanced XLR + 1/4" TRS combo input jacks
• Balanced XLR thru/output jacks for parallel connections
• Unbalanced RCA line input
• Passive heat sink with heat sensitive variable speed auto turn-on fan for cooling - Subwoofer Crossover 80Hz/100Hz/120Hz Low Pass
- Subwoofer Level Adjustment
- Subwoofer Phase Control
• Built-in pole mount socket
• Built-in carrying handle
• 3" Heavy-duty locking wheel casters (RBG-18S only) - Custom metal grill
• Durable black carpet with black metal corners - 7-layer Birch 5/8" plywood baffle board construction
- Dimensions: RBG15S - 23.25" x 20.75" x 19.75"/RBG18S - 26.5" x 22" x 24.25"
• Weight: RBG15S - 73Lbs / RBG18S - 84Lbs
Troubleshooting
| PROBLEM | SOLUTION |
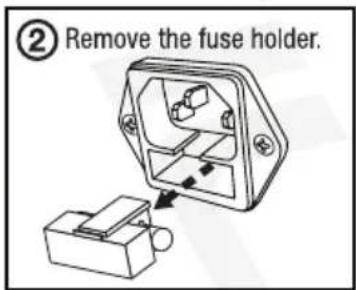
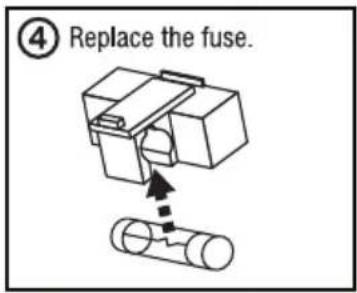
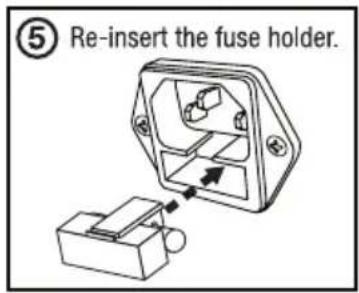
| No power | 1. Make sure the unit is plugged in and the power switch is in the ON position.2. Check that the power cable is plugged in tightly to the unit.3. Check and replace the fuse if necessary. See fuse replacement diagram below.4. If people or equipment tend to step on, roll over or stretch your power cable it can get damaged. Always try a second cable to test for shorts in original cable. Dispose of original damaged power cables immediately. |
| No sound/distorted sound/ | 1. Make sure you are using balanced XLR cables.2. Check that all cables are plugged in correctly.3. Check the Output Level and Subwoofer Crossover settings.4. If using a mixing console, make sure fader and balance are set to center positions and levels are increased. |
| noise/buzzing/hiss/hum at output | 1. Check the requirements of the connected gear and the input of the speaker.2. Make sure you are using balanced XLR cables.3. Check that you are connected to a three prong outlet. If not plug the unit into a three prong outlet. If none is available we suggest using a Ground Lift adapter or upgrading your electrical outlets.4. Lower level of your mixer going to the sub or adjust sub level knob. |
Fuse Replacement Diagram


ROCKVILLE

- ROCKVILLE
- RBG15S/RBG18S
- ATTENTION: WATCH THIS VIDEO BEFORE FIRST USE
- WHO READS MANUALS
- IMPORTANT SAFETY INSTRUCTIONS
- CAUTION
- BALANCED VS. UNBALANCED LINES
- CONFIGURATION
- CONFIGURATION (CONTINUED)
- SUBWOOFER PLACEMENT & TIME ALIGNMENT
- SPECIFICATIONS RBG15S
- SPECIFICATIONS RBG18S
- FEATURES RBG15S / RBG18S
- TROUBLESHOOTING
- FUSE REPLACEMENT DIAGRAM
Marque : Rockville
Modèle : RBG18S
Catégorie : Caisson de basses