
4-STROKE BACKPACK BLOWER - Souffleur à dos à moteur 4 temps MTD - Notice d'utilisation et mode d'emploi gratuit
Retrouvez gratuitement la notice de l'appareil 4-STROKE BACKPACK BLOWER MTD au format PDF.


| Type de produit | Souffleur à dos 4 temps |
|---|---|
| Caractéristiques techniques principales | Moteur 4 temps, capacité de soufflage élevée, faible niveau de bruit |
| Alimentation | Essence |
| Dimensions approximatives | Longueur : 50 cm, Largeur : 40 cm, Hauteur : 30 cm |
| Poids | Environ 10 kg |
| Compatibilités | Compatible avec divers accessoires MTD |
| Type de batterie | Non applicable (moteur à essence) |
| Tension | Non applicable (moteur à essence) |
| Puissance | Environ 2,5 kW |
| Fonctions principales | Soufflage de feuilles, débris et autres déchets de jardin |
| Entretien et nettoyage | Vérifier régulièrement le filtre à air, nettoyer le carter et vérifier l'huile moteur |
| Pièces détachées et réparabilité | Disponibilité de pièces détachées via le réseau MTD |
| Sécurité | Utiliser des lunettes de protection et des gants, respecter les consignes de sécurité du fabricant |
| Informations générales utiles | Idéal pour les utilisateurs professionnels et particuliers, garantie de 2 ans |
FOIRE AUX QUESTIONS - 4-STROKE BACKPACK BLOWER MTD
Questions des utilisateurs sur 4-STROKE BACKPACK BLOWER MTD
0 question sur cet appareil. Repondez a celles que vous connaissez ou posez la votre.
Poser une nouvelle question sur cet appareil
Téléchargez la notice de votre Souffleur à dos à moteur 4 temps au format PDF gratuitement ! Retrouvez votre notice 4-STROKE BACKPACK BLOWER - MTD et reprennez votre appareil électronique en main. Sur cette page sont publiés tous les documents nécessaires à l'utilisation de votre appareil 4-STROKE BACKPACK BLOWER de la marque MTD.
MODE D'EMPLOI 4-STROKE BACKPACK BLOWER MTD
A
108
FORM NO. 769-03460A
1

2
a
b
C
d
3
4
5
6
8
9
10
11
12
13
14
15
16
17
18
19
20
Contents
Safe operating practices 6
Operating and display elements.. 8
Installation manual 8
Oil and petrol 9
Operation. 9
Maintenance and cleaning . . . . . 10
Warranty 12
Troubleshooting. 12
Details on the ratings plate
Enter all information on the rating plate of your unit in the following field. You can find the rating plate near the engine.
These specifications are very important for subsequent identification when ordering spare parts and for customer service.

These and other details for your appliance can be found on the separate CE declaration of conformity that forms an integral part of these operating instructions.
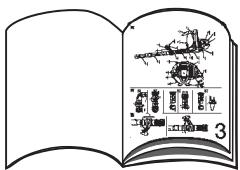
Illustrations
Safe operating practices
Using the unit correctly
This unit is designed exclusively for use
- as a leaf blower around the outside of the house and in the garden,
- according to the descriptions and safety instructions indicated in this operating manual.
It is not permitted to use this unit for any other purposes. The user is liable for all injuries to third parties and damage to their property.
Operate the unit only in the technical condition as stipulated and delivered by the manufacturer.
Arbitrary changes to the unit will exclude the manufacturer from any liability for resulting injury and/or damage.
Read all instructions before operating
- Please read these instructions carefully. Familiarize yourself with the operation and handling of the unit.
- Do not use this unit if you are tired or ill or under the influence of alcohol, drugs or medication.
- Children and persons under the age of 16 must not operate the unit - local regulations may specify the minimum age of users.
- Check the unit before using it. Replace damaged parts. Check whether fuel is leaking out Ensure that all connections are attached and tight. If these instructions are not followed, the user and bystanders may be injured or the unit damaged.
Always be aware of the risk of injury to head, hands and feet. - Keep children, onlookers and animals out of the area in which you want to work. Keep children, onlookers and animals outside a perimeter of at least 15 ~m ; there is always a risk of onlookers being hit by ejected objects. Bystanders should wear eye protection. If you are approached, switch off the engine immediately.
Safety instructions for petrol-driven units
Petrol is highly flammable and the vapours may explode if ignited.
Take the following precautions:
- Store petrol in designated and permitted containers only.
-
Keep ignition sources away from spilled petrol. Do not start the engine until the petrol vapours have evaporated.
-
Before filling the tank, always switch off the engine and leave it to cool down. Never remove the tank cap or fill the tank while the engine is hot. Before using the unit, ensure that the tank cap is screwed on tightly.
Slowly unscrew the tank cap to reduce the pressure in the tank gradually.
- Fill the petrol tank in a clean, well ventilated area outdoors where there are no sparks or flames. After switching off the engine, slowly unscrew the tank cap. Do not smoke while handling petrol. Immediately wipe any spilled petrol off the unit.
- Before switching on the engine, carry the unit at least 10m away from the filling station. While filling the tank or using the unit, do not smoke and keep sparks and naked flames out of the area.
Operating the unit
- Use this unit for its designated purpose only.
- Never start the unit and never leave it running in a closed room or building. The inhalation of exhaust gases may be fatal. Use the unit outdoors only.
- Wear thick, long trousers, boots and gloves.
- Wear eye and ear protection when using the unit. If working in a dusty environment, wear a face or dust mask. A long-sleeved shirt is recommended.
- Keep hair, clothing and gloves away from moving parts. Loose clothing, jewellery or long hair may become caught by moving parts. If required, wear a hair net.
- To prevent an electrostatic charge, wear shoes with rubber soles or a similar material.
- Do not stretch too far over the unit. Always have a secure footing and keep your balance.
-
Do not use this unit unless it is fully assembled. Do not use the unit without the blow pipe fitted.
-
Before carrying out any care and maintenance work or installing and removing the blow pipe, switch off the engine and remove the spark-plug terminal.
- Operate the unit in daylight or adequate artificial lighting only.
- Do not touch the engine or muffler. These parts become very hot while the unit is being used. They remain hot for a short time even when the unit is switched off.
- Do not run the engine faster than is required for the work. Do not run the engine at a high speed when you are not working.
- Avoid starting the unit unintentionally. Be ready to operate the unit when you pull the starter rope. User and unit must be in a stable position when the unit is started. Follow the instructions for starting and stopping the engine.
- If the unit hits or becomes ensnared by a foreign object, immediately switch off the engine and check for damage. Never use the unit with loose or damaged parts.
- While the engine is running, never place the unit on dusty or dirty surfaces. Dirt, grass, foliage, etc. may be drawn in and cause injuries and/or damage the unit.
- If unusual vibrations occur, switch off the engine immediately. Check the unit for damage. If the unit is damaged, contact a specialist company.
- Keep hands, face and feet away from all rotating parts. Do not touch the rotor while it is rotating and do not try to stop it either.
- Never use this unit to spread chemical products, fertilisers or other substances which contain toxic substances.
- Never point the unit at persons, pets or windows. Always blow in a direction in which there are no persons, animals or fragile, solid surfaces (e.g. windows, walls, cars).
Other safety instructions
- Before storing or transporting the unit, leave the engine to cool down.
- Protect your unit while it is being transported.
- Empty the fuel tank before transporting the unit.
- Store the unit in a dry, closed room to prevent unauthorised use or damage. Keep the unit away from children.
- Never douse or splash the unit with water or other liquids. Keep the unit dry, clean and free of dust. Clean the unit after each use and follow the instructions for cleaning and storage.
- Dispose of waste petrol/oil or any packaging remnants in accordance with local regulations.
- Use only original spare parts for repairs. These parts can be purchased from your authorised dealer.
- Never use parts, accessories or attachments which are not authorised for this unit. Otherwise, the user may be seriously injured and the unit damaged. In addition, your warranty may be deemed null and void.
- Have all repairs carried out by a repair shop only.
- Keep this manual. Read it frequently and use it to instruct other users. If you lend this unit to somebody else, also include this manual.
Operating times
Observe the national/municipal regulations concerning times of use (if required, ask your local authority).
Symbols on the appliance
This operating manual describes safety and international symbols and pictograms which may be displayed on this unit. Read this user handbook in order to familiarise yourself with all safety, installation, operating and repair instructions.

Safety and warning symbol
Indicates danger, warning or a reason to be cautious. Can be used together with other symbols or pictograms.

Read operating manual!
Failing to follow these rules and precautionary measures may cause grievous injury. Read the operating manual before starting or operating the unit.
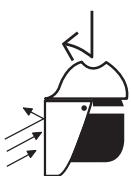
Wear eye and ear protection.
Ejected objects may cause serious eye injuries and excess noise may cause loss of hearing. When operating the unit, wear eye and ear protection.

Keep bystanders away!
All bystanders, especially children and pets, must be kept at least 15m from the working area.

Intake pump/primer
Slowly press 10x on the intake pump as far as it will go.
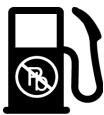
Petrol!
Always use clean and fresh lead-free petrol.

Oil!
Use only permitted oil in accordance with the operating instructions.
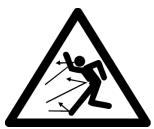
Ejected objects and rotating parts may cause serious injuries!
Keep away from the blow outlet opening. Never point the unit at persons, animals or objects. Do not operate the unit without the blow pipe completely fitted.

Beware of hot surfaces!
Do not touch hot muffler cover, gearbox or cylinder. You could burn yourself. These parts become extremely hot while the unit is being used. They remain hot for a short time even when the unit is switched off.

Ignition switch ON/START/RUN

Ignition switch OFF or STOP

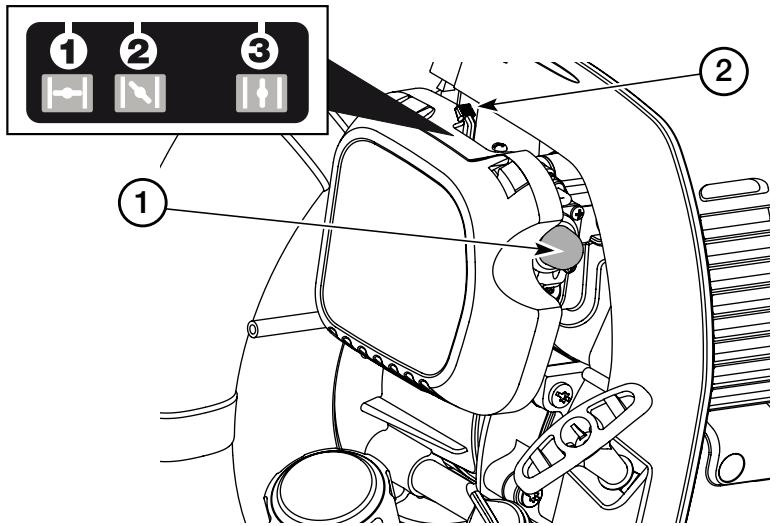
Choke settings
1 Full choke - start position
2 Half choke - intermediate position
3 Operating position
Ensure that these symbols on the unit are always in a legible state.
Symbols used in this manual
The following symbols are used in this manual:
Danger
They refer to dangers which are connected with the described activity and which may result in injury.
Caution
They refer to dangers which are connected with the described activity and which may result in damage to property.
i Note
Indicates important information and application tips.
Operating and display elements
Caution.
Damage to the appliance
This first describes the control and display functions. Do not execute any of these functions yet!
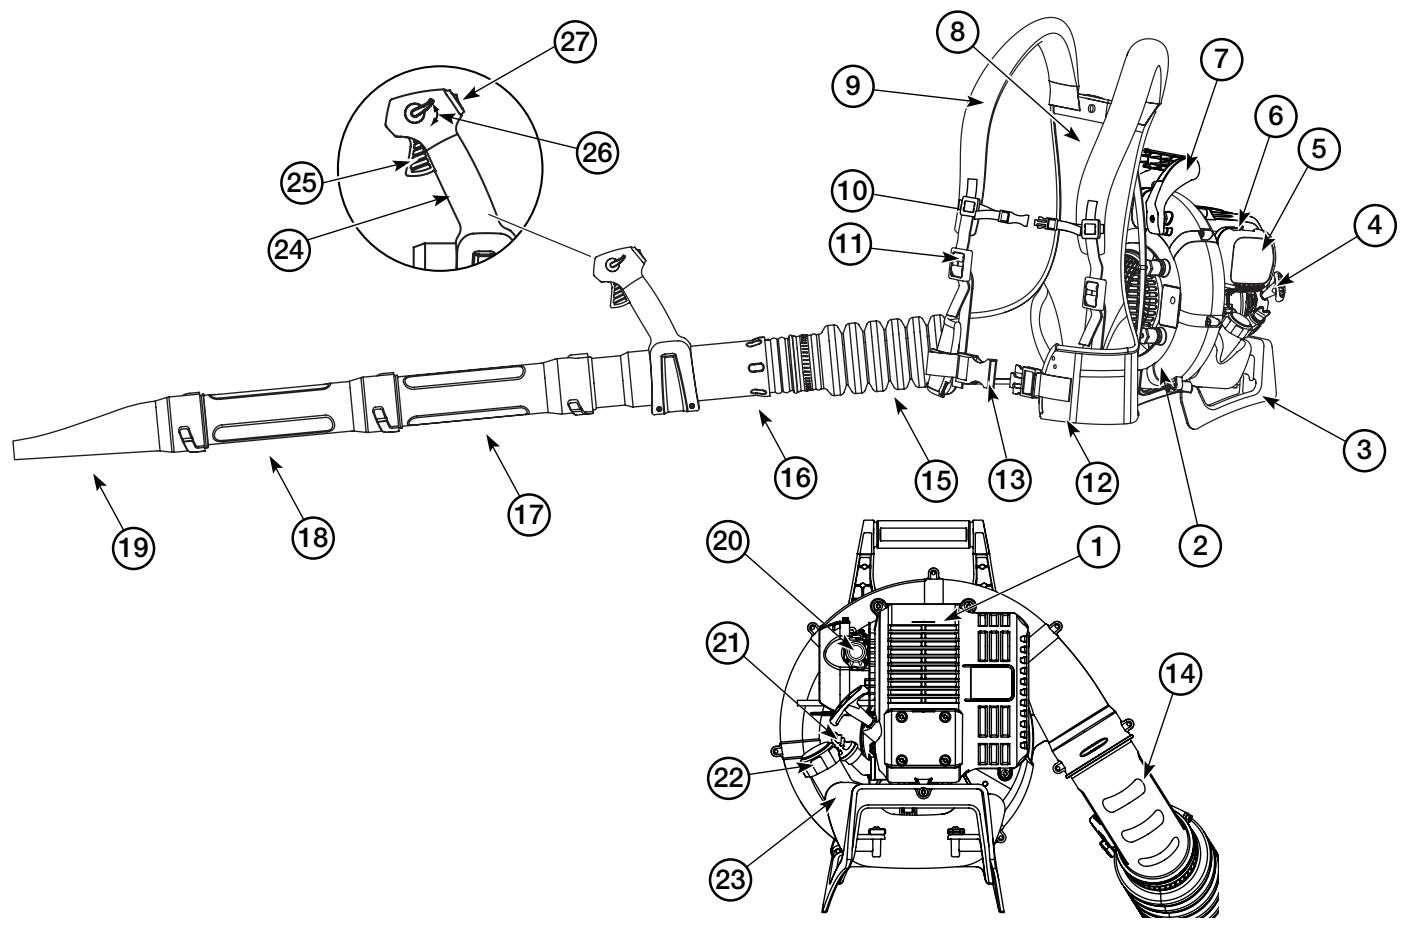
Fig. 1
1 Engine
2 Blower
3 Stand
4 Starter rope
5 Air filter cover
6 Choke lever
7 Carrying handle (depending on model)
8 Carrying system
9 Shoulder belt
10 Chest belt (depending on model)
11 Shoulder belt length adjustment
12 Abdominal belt
13 Abdominal belt catch
14 Engine unit connector
15 Flexible pipe
16 Control unit
17 Pipe extension
18 Pipe extension
19 Blow nozzle (depending on model)
20 Intake pump/primer
21 Oil plug
22 Tank cap
23 Fuel tank
24 Control handle
25 Throttle
26 Cruise control
27 Ignition switch
Installation manual
Danger
Risk of injury from engine being started unintentionally. Protect yourself from injury. Before working on the engine:
- Switch off the engine,
- Wait until all moving parts have come to stand still; the engine must have cooled down.
- Remove spark-plugin terminal.
Disposal instructions
Dispose of packaging remnants, old units, etc., in accordance with local regulations.
Installing and removing the blow pipe
Installation
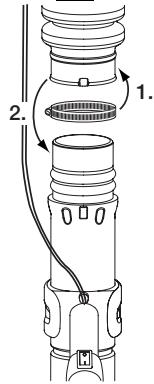
Fig. 2a
- Push hose clip over the end of the flexible pipe.
- Push the flexible pipe over the connector on the engine unit until the lug on the flexible pipe is inserted into the recess.
- Tighten the screw on the hose clip.
Fig. 2b
Push hose clip over the other end of the flexible pipe.
- Push the flexible pipe over the control unit until the lug on the flexible pipe is inserted into the recess.
- Tighten the screw on the hose clip.
Fig. 2c
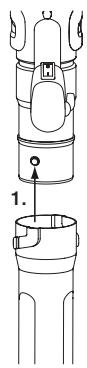
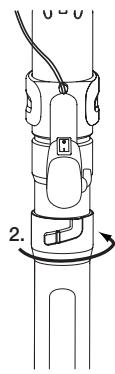
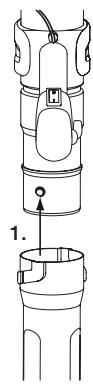
Push the pipe extension onto the control unit and attach by turning it one quarter rotation anticlockwise (bayonet catch).
Repeat process with the second pipe extension.
Depending on model:
Fig. 2d
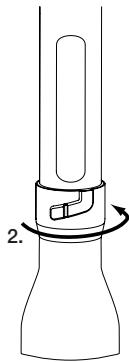
- Push the blow nozzle onto the pipe extension and attach by turning it one quarter rotation anti-clockwise (bayonet catch).
Removal
■ Proceed in reverse sequence to installation.
Aligning the control handle
The control handle can be set to a position which is best suited to the user.

Caution
When performing adjustment work, ensure that you do not snag the cables and throttle cable. Risk of damage to unit!
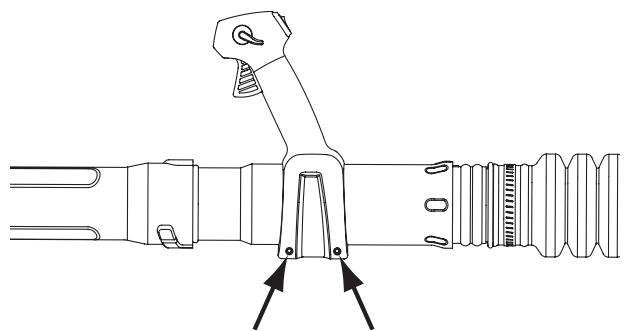
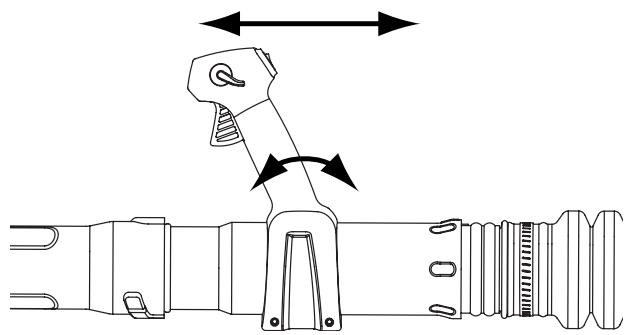
Fig. 3
- Loosen the two screws at the bottom of the throttle grip.
- Push control handle forwards or backwards to set the optimum distance to the engine unit.
- Tighten the two screws at the bottom of the throttle grip.
Oil and petrol
Oil

Caution
- For reasons of transportation the unit is delivered without engine oil.
- Before switching on the unit for the first time, fill the engine with engine oil.
- Before switching on the unit, always check the oil level. Use only 4-stroke oils SAE 30 belonging to classification SF, SG, SH.
Topping up the engine oil

Caution
Never pour oil into the petrol tank and never mix oil with petrol.

Note
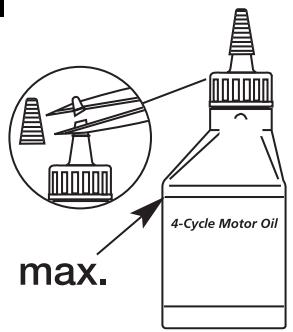
Depending on the model, oil (90 ml) for the initial filling is enclosed with the unit (fig. 10). Keep the bottle to ensure that the correct amount is used for a subsequent oil change.
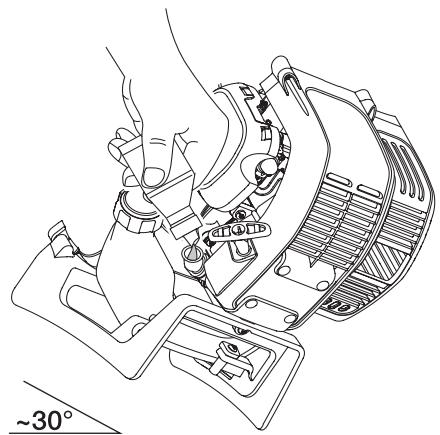
Fig. 11
Unscrew the oil plug.
- Incline engine unit until the oil-filling orifice is in an upright position.
Pour in 90ml of oil.
Clean oil-filling orifice if oil has run over.
Screw in the oil plug again.
Petrol
Danger
Under certain conditions petrol is extremely flammable and explosive.
- Refuel only in a well ventilated area and with the engine switched off. Do not smoke and switch off all ignition sources in the vicinity of the tank or at the fuel storage depot.
- Do not overfill the fuel tank (there must be no fuel in the inlet nozzle). After filling up the petrol tank, ensure that the tank cap is closed and secured.
- When filling up the petrol tank, do not spill any fuel. Spilled fuel or petrol vapours may ignite. If fuel has been spilled, ensure that the area is dried before the engine is restarted.
- Prevent repeated or prolonged skin contact or inhalation of the vapours.
Always use clean, fresh lead-free petrol (maximum 60 days old).
Fill the tank with petrol.
Fig. 1
Remove the tank cap (22).
- Fill fuel tank (23). Never overfill! Immediately remove any fuel which has run over.
Close fuel tank tightly.
- Move the unit approx. 10 ~m from the filling station/fuel container before starting the engine.
Operation

Caution
- Before starting the engine, adjust the carrying system to the body measurements of the user.
- When starting the engine, ensure that the unit is not pointing at persons, animals, objects or litter.
While using the unit, wear eye and hearing protection.
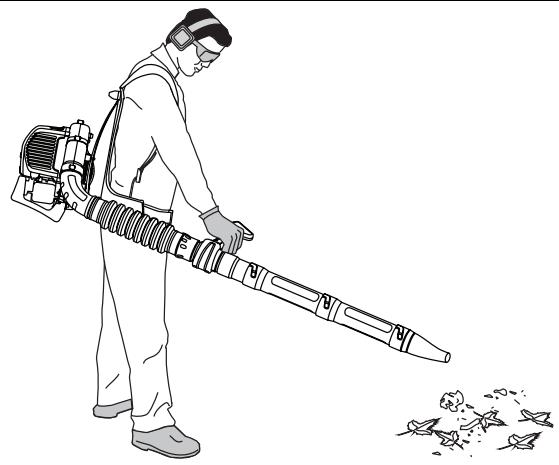
While using the unit, hold it correctly (fig. 8). - Check that the unit is in good working order and that the blow pipe is attached.
-
After use:
-
Clean the unit.
- Dispose of refuse in accordance with local regulations.
Adjusting the carrying system
The unit is in the optimum carrying position when the abdominal belt of the carrying system is situated on your hips.
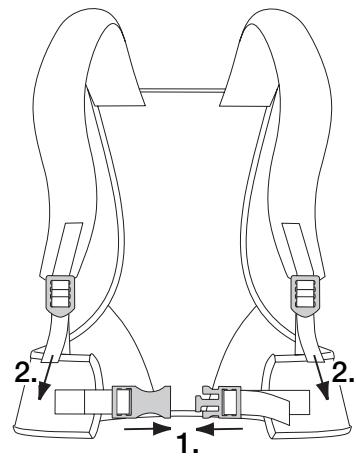
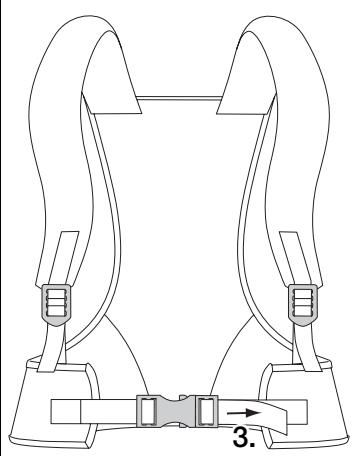
Fig. 4
- Place carrying system over your shoulders so that the engine unit is situated on your back.
- Close the catches on the abdominal belt (1.). If required, readjust.
- Adjust shoulder belt to the correct length (2.). The abdominal belt should be situated on your hips.
- Adjust catches on the abdominal belt to the correct width (3.).
- Close and adjust chest belt (depending on model).
Starting the engine

Danger
Start engine when the unit is on the ground. Do not put on the carrying system until the engine has started.

Note
When starting the engine, do not press the throttle. Check that the cruise control is in the topmost position.
Fill the tank with petrol. See oil and petrol.
- Check oil level and, if required, top up the oil.
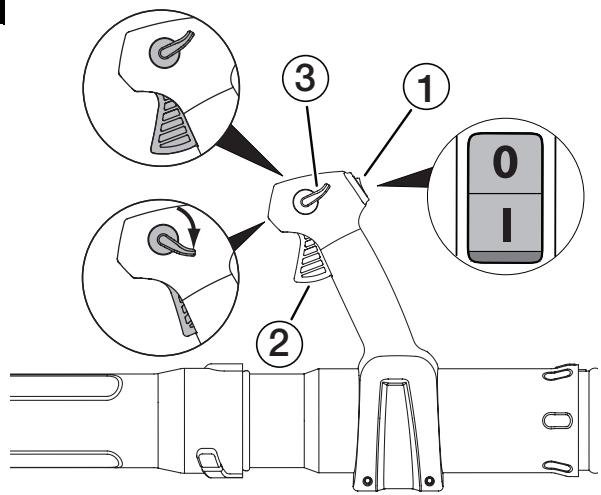
- Move the ignition switch (1/fig. 5) to the On [I] position.
- Slowly and fully press intake pump/primer (1/fig. 6) 10 × . The fuel must be visible in the pump. If this is not the case, keep pressing until fuel is visible.

Note
The unit should be started in idle. Do not squeeze the trigger while starting.
- Move choke lever (2/fig. 6) to position 1 / .
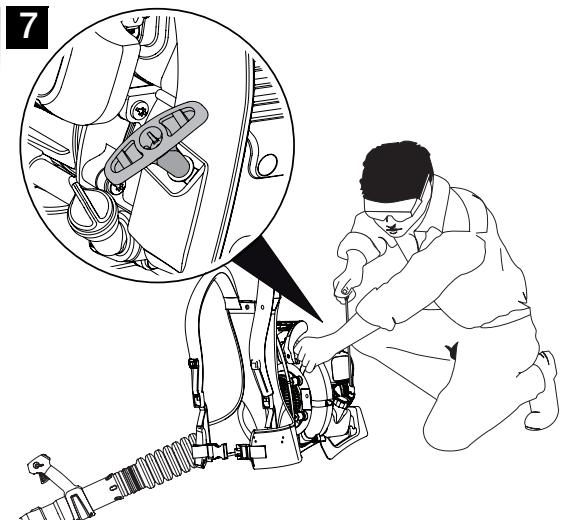
- With the unit on the ground, pull out the starter cable by approx. 10 ~cm . Then pull the starter cable 4 ~x in a controlled and quick movement (fig. 7).
Move choke lever (2/fig. 6) to position 2/1.
Pull the starter rope briskly 1 to 4 times to start the engine. - Squeeze the trigger or press down the cruise control and allow the engine to warm up for 30-60 sec..
- Place the choke lever in position 3 / 14 . The unit is now ready to use.
If the engine does not start:
Move choke lever (2/fig. 6) to position 1/1.
- With the unit on the ground, pull out the starter cable by approx. 10cm . Then pull the starter cable 4x in a controlled and quick movement (fig. 7).
Pull the starter rope briskly 1 to 4 times to start the engine.
- Squeeze the trigger or press down the cruise control and allow the engine to warm up for 30-60 sec..
If the engine fails to start after a few attempts:
- Place the choke lever in position 3 / | | (fig. 6).
Pull the starter rope 3 to 8 times in a smooth and rapid manner. The engine should start.
If not, repeat.
Note
At lower temperatures the engine may require longer to warm up and reach maximum speed. The unit has warmed up adequately when the engine accelerates without faltering. If the engine falters, move the choke lever to position 2/1 (fig. 6) and leave the engine to warm up longer.
i Note
If the unit is already hot, place the choke lever in position 2/1. Making sure to NOT squeeze the trigger!
Operating the throttle/cruise control
Figure 5
To accelerate the engine, press the throttle (2).
For longer periods of operation and to eliminate possible finger fatigue use the cruise control (3).
- To lock the throttle (2) in the momentary position, move the cruise control (3) downwards.
- To change the operating position/throttle position, move the cruise control (3) up or down.
- To enable the throttle (2), move the cruise control (3) in the topmost position.
i Note
When the cruise control is pressed, the trigger will recede into the handle.
Stop the engine
Figure 5
- Release throttle (2) or move the cruise control (3) in the topmost position. Leave the idling engine to cool down.
- Move the ignition switch (1) to the Stop [0] position.
Handling the appliance
When you are using the unit:
Start the engine.
- Put on the carrying system and close the catch on the abdominal belt and the chest belt (depending on model).
- Adopt the work position (fig. 8).
User information
Use in areas which are difficult to clean:
- Flowerbeds, bushes, trees
House corners -
Grilles, fences, etc.
-
Hold the unit in the operating position.
Hold the blow pipe several centimetres above the ground and make sweeping movements from side to side.
Walk slowly forwards. - Keep the collected pile of refuse in front of you.
A reduced engine speed is best for light-weight material.
Use a higher engine speed for heavier material and coarse dirt.
Maintenance and cleaning
Caution
Before working on the unit:
- Switch off the engine.
- Wait until all moving parts have come to stand still; the engine must have cooled down.
- Remove spark-plugin terminal from the engine to prevent the engine from starting unintentionally.
Have all repairs carried out by a repair shop only. At the end of the season have the unit inspected and serviced by a specialist company. Observe the maintenance intervals according to the maintenance schedule. Non-observation may result in serious engine damage.
Maintenance schedule
| Maintenance work | before using the unit | every 25 hours | every 50 hours |
| Check fuel and oil level | X | ||
| Change oil | X | ||
| Clean/oil air filter | X | ||
| Check and adjust valve play* | X | ||
| Check spark plug/ spark-plug terminal | X | ||
| Clean spark arrester | X |
- Have this work carried out by a specialist company.
Checking the oil level
- Place unit on its feet on a level, elevated surface.
Clean the area around the oil plug.
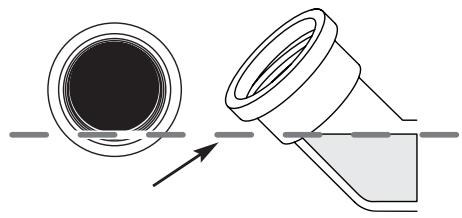
Unscrew the oil plug. - Checking the oil level. The oil should reach the uppermost turn of the thread (fig. 12).
If the oil level is too low, top up the oil in small quantities until the oil level reaches the uppermost turn of the thread.
Screw in the oil plug again.

Note
Do not pour in too much oil! Ensure that the O-ring is seated correctly on the oil plug.
Changing the oil

Notes
- The engine should still be warm (not hot).
- Dispose of waste oil in accordance with local regulations.
Unscrew the oil plug.
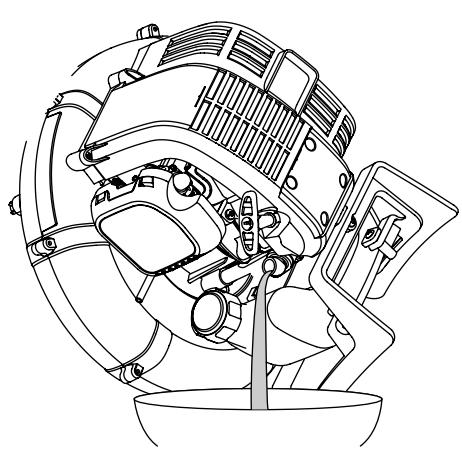
Pour all the oil out of the filling orifice into a container. To do this, position the unit vertically (fig. 9).
Wipe off oil residue/dirt.
■ Fill engine with 90 ml of 4-stroke oil SAE30 belonging to classification SF, SG, SH (fig. 11).
Screw in the oil plug again.
Servicing the air filter
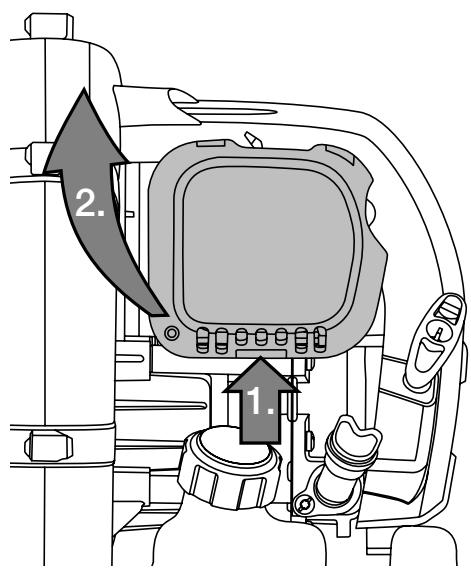
- Open air filter cover. To do this, press the catch and open the cover (fig. 13).
Remove air filter.
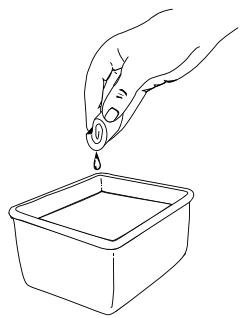
Clean filter with a household detergent and water. Rinse out thoroughly and leave to dry (fig. 14).
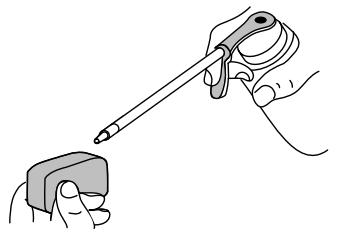
Lightly oil filter with clean oil SAE30 (fig. 15).
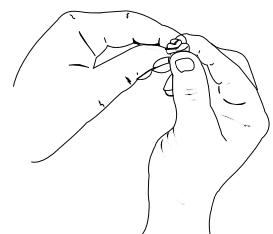
Press filter together to remove excess oil (fig. 16).
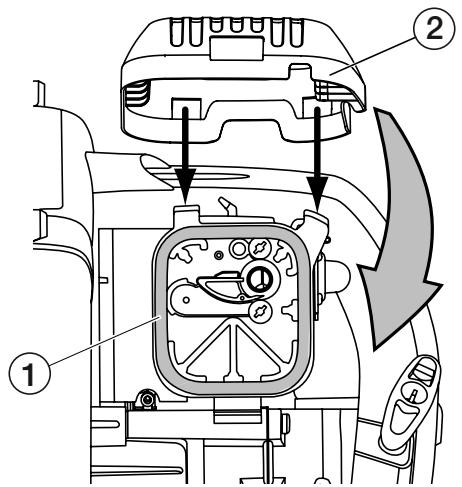
Install filter (1/fig. 17).
i Note
If the unit is operated without a filter, the guarantee/warrant will be deemed null and void.
- Close the air filter cover (2/fig. 17) again, ensuring that it locks into place.
Check/replace spark plug
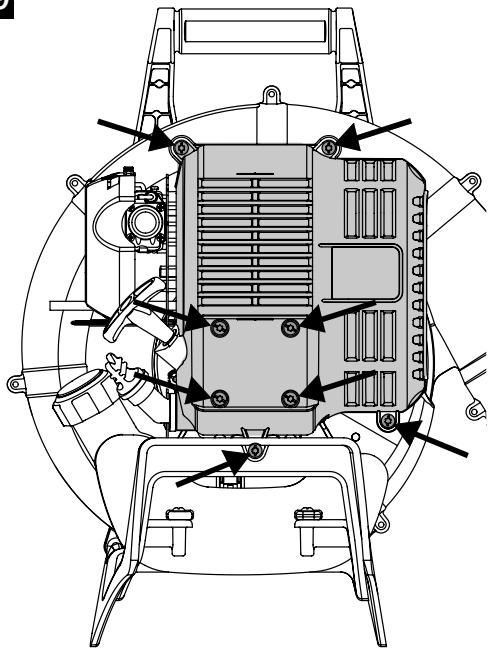
- Loosen the screws on the engine cover and remove the cover (fig. 19).
Remove spark-plug terminal. - Remove dirt from around the spark plug.
- Unscrew spark plug to the left with a spark plug wrench.
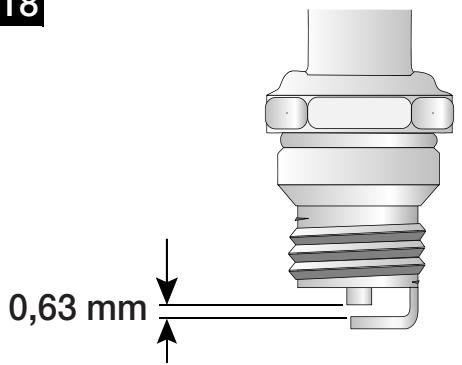
Check/set the electrode gap 0.63 mm (fig. 18).
i Note
Replace a damaged, sooted or dirty spark plug.
- Screw in spark plug and tighten to a torque of 12.3-13.5 Nm. Do not tighten too tightly.
- Reattach the engine cover.
Maintaining the spark arrestor
- Loosen the screws on the engine cover and remove the cover (fig. 19).
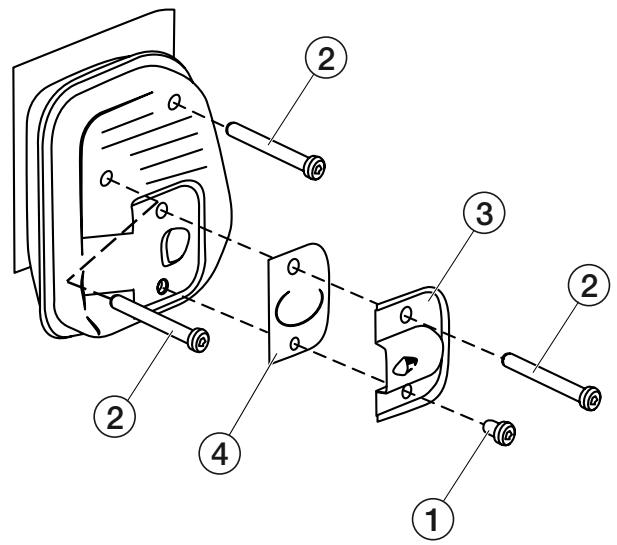
Loosen screws (1 and 2/fig. 20).
Remove spark arrester cover (3/fig. 20).
Clean spark arrestor (4/fig. 20) with a wire brush or replace. - Reattach spark arrestor, spark arrestor cover and engine cover.
Cleaning the unit
Use a small brush for cleaning the outside of the unit. Do not use abrasive detergents. Household cleaners which contain aromatic oils such as pine oil or lemon as well as solvents such as kerosene may damage the plastic housing and handle. Wipe damp areas with a soft cloth.
Storage
- Never store the unit with fuel in the tank or in a location where petrol vapours may be ignited by a spark or naked flame.
Before storing the unit, leave the engine to cool down. - Store the unit in a dry, closed room to prevent unauthorised use or damage. Keep the unit away from children.
Long-term storage
i Note
Engines, which are stored for longer than 30 days, should not have any fuel in the tank to prevent the formation of residue in the fuel system, in particular on important parts of the carburettor.
If the unit is to be stored for a prolonged period, proceed as follows:
- Drain all the fuel out of the tank into a fuel container. Do not use fuel which has been stored for longer than 60 days.
- Start the engine and leave running until it stops. This ensures that all the fuel has been drained out of the carburettor.
- Leave the engine to cool down. Remove the spark plug and fill the cylinder with 15 ml of high-quality engine oil for 4-stroke engines. Slowly pull the starter rope to distribute the oil. Reinsert the spark plug.
i Note
After storing and before reusing the unit, remove the spark plug and drain all the oil out of the cylinder.
-
Change oil. Dispose of waste oil in accordance with local regulations.
Thoroughly clean the unit and check for damaged and loose components. Repair or replace damaged components and, if required, retighten the screws, nuts and bolts. The unit is now ready storage. -
Store the unit in a dry and secure location or at an adequate height to prevent any inadvertent use or damage. Keep out of the reach of children.
Warranty
The warranty regulations issued by our company or the importer are valid in all countries. We shall repair any faults on your unit free of charge in accordance with the warranty, provided the fault was due to defective materials or manufacturing. If claiming under the warranty, please contact your seller or your nearest branch.
Troubleshooting
| Error | Cause | Remedial action |
| Engine does not start. | Ignition switch set to OFF. | Set switch to ON. |
| Fuel tank empty. | Fill fuel tank. | |
| Old fuel. | Empty tank and fill with fresh petrol. | |
| Primer not depressed adequately. | Slowly and fully depress primer 10 x. | |
| Engine flooded. | Start the unit with choke lever in position 3/4. | |
| Dirty spark plug. | Replace or clean spark plug. | |
| Spark arrester dirty. | Clean or replace spark arrester. | |
| Engine does not run constantly at no load. | Air filter blocked. | Clean or replace air filter. |
| Old fuel. | Empty tank and fill with fresh petrol. | |
| Carburettor incorrectly adjusted. | Have the carburettor adjusted by a specialist company. | |
| Engine does not accelerate. | Old fuel. | Empty tank and fill with fresh petrol. |
| Carburettor incorrectly adjusted. | Have the carburettor adjusted by a specialist company. | |
| Air filter blocked. | Clean or replace air filter. | |
| Spark arrester dirty. | Clean or replace spark arrester. | |
| The engine has no power or the unit is not blowing. | Damaged blow turbine. | Have defective parts replaced by a specialist company. |
| Strong vibrations. | Damaged blow turbine or other parts. | Switch off the unit immediately. Have defective parts replaced by a specialist company. |
If you have any further questions, please contact your authorised dealer on site.