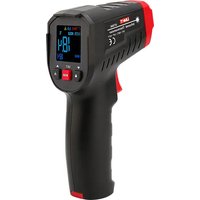
UT306S - Thermomètre Uni-T - Notice d'utilisation et mode d'emploi gratuit
Retrouvez gratuitement la notice de l'appareil UT306S Uni-T au format PDF.


| Type de produit | Thermomètre infrarouge sans contact |
| Marque | Uni-T |
| Modèle | UT306S |
| Plage de mesure | -50°C à 380°C |
| Précision | ±1,5°C ou ±2% (la plus grande valeur) |
| Résolution | 0,1°C |
| Distance spot (D:S) | 12:1 |
| Affichage | LCD rétroéclairé |
| Alimentation | 2 piles AAA (1,5 V) |
| Dimensions | 150 x 38 x 42 mm |
| Poids | 150 g (avec piles) |
| Fonctions principales | Mesure sans contact, verrouillage des données, extinction automatique, indicateur de pile faible, sélecteur °C/°F |
| Température ambiante de fonctionnement | 0°C à 50°C |
| Émissivité | 0,95 fixe |
| Temps de réponse | < 500 ms |
| Laser de visée | Oui, classe II |
| Utilisation | Intérieur et extérieur (sec) |
| Entretien et nettoyage | Nettoyer la lentille optique avec un chiffon doux et non pelucheux ; éviter l'humidité et la poussière |
| Sécurité | Ne pas diriger le laser vers les yeux ; ne pas utiliser sur des surfaces réfléchissantes ; tenir hors de portée des enfants |
| Pièces détachées et réparabilité | Contacter le service après-vente Uni-T ; pièces détachées non disponibles séparément |
| Informations générales | Garantie 1 an ; contenu de l'emballage : thermomètre, 2 piles AAA, notice d'utilisation |
FOIRE AUX QUESTIONS - UT306S Uni-T
Questions des utilisateurs sur UT306S Uni-T
0 question sur cet appareil. Repondez a celles que vous connaissez ou posez la votre.
Poser une nouvelle question sur cet appareil
Téléchargez la notice de votre Thermomètre au format PDF gratuitement ! Retrouvez votre notice UT306S - Uni-T et reprennez votre appareil électronique en main. Sur cette page sont publiés tous les documents nécessaires à l'utilisation de votre appareil UT306S de la marque Uni-T.
MODE D'EMPLOI UT306S Uni-T
UNI-T®

P/N:110401110301X
UT306S
Infrared Thermometer
User Manual
Overview
UT306S infrared thermometer (hereinafter referred to as the thermometer) can quickly and accurately determine the surface temperature of the target by measuring the infrared energy radiated by the target surface, which is suitable for non-contact temperature measurement. UT306S is a thermometer with a D: S ratio of 12:1.
Safety Instructions
Warning:
In order to prevent eye damage or personal injury, please read the following safety instructions before using the product: - Do not point the laser directly at persons or animals or indirectly through reflective surfaces.
- Do not look directly at the laser or with optical tools (binoculars, microscopes, etc.)
LASER RADIATION DO NOT STARE INTO BEAN
DO NOT SHARE INTO BEAM CLASS 2 LASER PRODUCT
λ=630-670nm,<1mW, EN60825-1:2014
Cautions:
- If the laser imadiates the user's eyes, please close the eyes immediately and turn the head away
- Do not disassemble or refit the product and laser without permission.
- To ensure its safety and accuracy, this product should only be repaire
- Replace the batteries when the low battery indicator shows to prevent incorrect measurements
- Please check the product before using it. If it is damaged, cracked on the surface or missing plastic parts, do not
- Please refer to the emissivity information for the actual temperature. Highly reflective objects or transparent materials
will make the actual temperature higher than the measured temperature
- When measuring these objects, pay attention to the risk of burns. - Do not use the product in an environment with flammable and ev
- Do not use the product in an environment with flammable and explosive liquids, gas or dust. - Do not use the product around the environment with steam, dust, or large temperature fluctuation.
- It may bring inaccurate results and risks.
- Put the product in the current environment for more than 30 minutes before using it to ensure measurement accuracy. - Do not leave the thermometer on or near objects of high temperature.
Do not have the information on your subject of high-frequency items.
Technical Indexes
| Model | UT306S |
| Optical resolution | 12.1 (calculated at 95% energy) |
| Measurement range | -50°C~500°C (-58°F ~932°F) |
| LCD size | 25*26mm |
| LCD display | TIN-LCD |
| Accuracy | -50°C~0°C, ±0°C~0.1°C / °C;0°C~500°C ± 2°C or ≥ 2% (whichever is greater)-0.87°~32°F, ±4.0°F (~4.0°F, 1.4°F)32°F~932°F, ± 4.0°F or ≥ 2% (whichever is greater) |
| Temperature index | ±0.1 °C or ±0.15% whichever is greater (±0.1°/°F or ±0.15% whichever is greater) |
| Repeatability | ±0.5°C or ±0.5% whichever is greater (1°F or 0.5% whichever is greater) |
| Emissivity | 0.1–1.0 (adjustable, 0.95 by default) |
| Response time | <250ms (95% of reading) |
| Spectral response | 8μm~14μm |
| Auto power off | 15s |
| Low battery indication | ✓ |
| High/low temperature LED alarm | ✓ |
| High/low temperature sound alarm | ✓ |
| Data hold | ✓ |
| Unit conversion (°C/°F) | ✓ |
| MAX/MIN/4V/GD/F | ✓ |
| Lock measurement | ✓ |
| Laser | Single point laser, wavelength: 630nm~670nm, iodized power: -1°C, type: class 2 |
| Operating temperature | -0°C~50°C (32°F~122°F) |
| Storage temperature | -20°C~60°C (4°F~140°F) |
| Operating humidity | <90%RH (non-condensing) |
| Drop proof | 1m |
| Battery type | 2*AAA (zinc-manganese batteries) |
| Battery life | 9th (continuous measurement mode with laser and backlight on) |
| Product color | Red + grey |
| Product weight | 161.5g |
| Product size | 164×94.5×6mm |
Reference Standard: JJG 856-2015
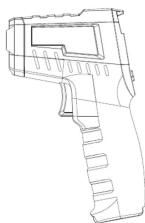
Appearance
| 1 | Laser |
| 2 | Infrared receiving window |
| 3 | Trigger |
| 4 | Battery door |
| 5 | LCD display |
| 6 | LOCK button |
| 7 | MODE button |
| 8 | LASER button |
| 9 | Laser warning label |

Characteristics
1) With single point laser, making the measurement indication area more accurate
2) Bright, easy-to-read and high-contrast color EBTN display
3) MAX/MIN/AVG/DIF hold
4) With buzzer sound alarm, can quickly find abnormalities 5) Trigger leak, suitable for presence that requires temporally
5) Trigger look, suitable for processes that require temperature monitoring 6) Short press fix "B" button in shutdown mode to take a measurement
6) short press the ■
LCD Indicators
| Trigger lock | |
| Buzzer | |
| HOLD | Temperature hold |
| Low battery | |
| C-0.88 | Emissuity |
| MAX MIN VIO DIF | Measurement mode |
| HI LO | Temperature alarm |
| Laser | |
| SCAN | Temperature measurement |
| °C F | Temperature unit |
| 8888 | Temperature main display |
| 8889 | Temperature secondary display |
Operating Instructions
Startup
Short press (less than 0.5s) the trigger to turn on the thermometer, and the measured value before the last
shutdown will be displayed. Pressing MODE button can view MAX/MIN/AVG/DIF.
Shutdown
The thermometer will automatically shut down after 15 seconds without any operation in the HOLD mode, and
save the current measured value
Manual Measurement
1) After aiming at the measured object, press the trigger and hold it. When the SCAN symbol is flashing, it means
that the temperature is being measured, and the measurement result will be updated on the LCD
2) Release the trigger, the SCAN symbol will disappear while the HOLD symbol will be displayed. The thermometer will stop measuring the temperature and keep the last measured value.
The thermometer will stop measuring the temperature and keep the last measured value.
Lock Measurement
1) Short press the LOCK button to enter the lock measurement mode. The symbol will be displayed on the
LCD and the SCAN symbol will be pressing the triaver all the time.
2) Press the trigger or short press the LOCK button again, the 🔒 and SCAN symbols will disappear while the
HOLD symbol will appear. The thermometer will stop measuring and keep the last measured temperature.
3) Short press the LOCK button in the shutdown state to wake up the thermometer and enter the lock measurement;
mode
4) If the LOCK button is pressed and not released for more than 3 seconds, it will be regarded as a misoperation. Note: The measured target should be greater than 2 times the thermometer light spot diameter (S), and then the test distance (D) can be determined according to the D:S relationship diagram. For example: when the user uses UT306S to measure the temperature of an object with a diameter of about 4" (10cm), the most accurate spot diameter (S) of the thermometer is about 2" (5cm), and then it can be estimated based on the D:S relationship diagram that the measuring distance (D) is about 24" (60cm).
MAX/MIN/AVG/DIF Value
Short press the "MODE" button to switch among "MAX→MIN→AVG→DIF" measurement; modes in sequence, and
the temperature of the corresponding mode will be displayed in the secondary display position (as shown below).
HI LOA HI LOA HI LOA HI LOA

Laser Indicator
Pressing the ⚡ button can turn on/off the laser indication function. When it is turned on, the laser symbol ⚡ will
show on the LCD, and the laser will accurately indicate the measured position.
Note: Please follow the cautions when turning on the laser to avoid eyes injury.
High and Low Temperature Alarm
If the measured temperature is higher than the set high alarm limit, the HI symbol on the display will flash. If the
sound alarm is turned on, the buzzer will beep.
If the measured temperature is lower than the set low alarm limit, the LO symbol will hash. If the
Source alarm is turned on, the buzzer will beep. If the measured temperature value is within the range of high and low alarm limit, the HVLO symbol will not show
on the display.
Tecu, C. W.
Function Settings
In the HOLD interface, long press the "MODE" button for more than 2s to enter the high alarm limit→low alarm
limit→emissivity→temperature unit→sound alarm and other function settings. Under these setting interfaces, the
user can return to the HOLD interface by pressing the trigger or no operation for 10s.
High Alarm Limit Setting
In the HOLD interface, long press the "MODE" button to enter the high alarm limit
setting interface. The user can use "▼" or "▲" to adjust. Short pressing will add
or subtract 1 to the value each time, and long pressing will add or subtract 10 each
second.
Low Alarm Limit Setting
Low Alarm Limit Setting In the HOLD interface, long press and then short press the "MODE" button once
to enter the low alarm limit setting interface. The user can use "▼" or "▲" to adjust
Short pressing will add or subtract 1 to the value each time, and long pressing will
add or subtract 10 each second.
Eministry Setting
Emissivity Setting In the HOLD interface, iron press the "MODE" button sense and then short sense.
in the HOLD interface, long press the "MODE" button once and then short press the "MODE" button twice to select the emissivity setting interface. The user are
use "▼" or "▲" to adjust. Short pressing will add or subtract 0.01 to the valve each.
time, and long pressing will add or subtract 0.1 each second.


Temperature Unit Setting
In the HOLD interface, long press the "MODE" button once and then short press the "MODE" button three times to
enter the temperature unit setting interface. The user can use "▼" or "▲" to convert the unit "C/FE
Sound Alarm Setting
In the HOLD interface, long press the "MODE" button once and then short press the "MODE" button four times to
enter the sound alarm setting interface. The user can use "▼" or "▲" to turn on/off this function.
enter the board brain setting inhibitor. The user can use ▼ or ■ to turn off this handout.
Dr. G (Distances to Great Ratio)
D: S (Distance to Spot Ratio) As the distance (D) between the thermometer and the measured torque
As the distance (D) between the sternometer and the measured target increases, the light and derivative (F) of the measured sea also increases
increases, the light spot diameter (5) of the measured area also increases
The relationship between measurement distance and light spot diameter
is shown in the figure below.
广力云智慧零售收银系统
Field of View
When measuring, make sure that the measured target is larger than the
light spot diameter. The smaller the target, the closer the test distance
light spot diameter. The smaller the target, the closer the seat distance should be (refers to Dr. G for the detailed light seat dimeter). It is necessary
should be (refer to D: B for the detailed light spot diameter). It is recommend
that the measured target be larger than twice the light spot diameter of t
thermometer.
[Non-Text]


| Ferrum | |
| Oxide | 0.5-0.9 |
| Rusting | 0.5-0.7 |
| Ferrum (casting) | |
| Oxide | 0.6-0.95 |
| Non-Oxide | 0.2 |
| Casting | 0.2-0.3 |
| Ferrum (forging) | |
| Passivating | 0.9 |
| Plumbum | |
| Crude | 0.4 |
| Oxide | 0.2-0.6 |
| Molybdenum | |
| Oxide | 0.2-0.6 |
| Nickel | |
| Oxide | 0.2-0.5 |
| Platinum | |
| Black | 0.9 |
| Steel | |
| Cold rolling | 0.7-0.9 |
| Burnishing | 0.4-0.6 |
| Polishing | 0.1 |
| Zinc | |
| Oxide | 0.1 |
| Non-Metals | |
| Asbestos | 0.95 |
| Asphalt | 0.95 |
| Basalt | 0.7 |
| Carbon | |
| Non-Oxide | 0.8-0.9 |
| Graphite | 0.7-0.8 |
| Carborundum | 0.9 |
| Ceramic | 0.95 |
| Clay | 0.95 |
| Concrete | 0.95 |
| Coth | 0.9 |
| Glass | |
| Convex glass | 0.76-0.8 |
| Smooth glass | 0.92-0.94 |
| Nonex | 0.78-0.82 |
| Sheet material | 0.96 |
| Gypsum | 0.8-0.95 |
| Ice | 0.98 |
| Limestone | 0.98 |
| Paper | 0.95 |
| Plastic | 0.95 |
| Water | 0.93 |
| Soil | 0.9-0.98 |
| Wood | 0.9-0.95 |
Maintenance
Glancing
Cleaning
Blow away the fallen particles with clean compressed air, carefully
wipe the lens surface with a moist swab, and clean the shell with
a moist sponge or soft cloth. Be careful not to rinse with water or
immojo it in water
Intrahorse it in Wall
Table 1.2.1
Replace Batteries
Install or replace two 1.5V batteries according to the following steps:
-
Remove the battery door
-
Install the batteries (pay attention to the polarity)
-
Close the battery door
(No text)

Battery demand
Batteries → battery door
(8)
©
Troubleshooting
| Phenomenon | Cause | Measure |
| Display OL | Measured value>maximum range | Stop measuring |
| Display -OL | Measured value<Coronium range | Stop measuring |
| Display Err (startup) | Exceed the minimum or maximum operating temperature | Place the thermometer at 0°C - 50°C ( 32°C - 122°F ) for 30 minutes |
| Battery symbol flashes | Low battery | Replace batteries |
| Laser is not working or dark | Low battery | Replace batteries |
| Inaccurate measurement | Unmatched emissivity, too far measurement distance, diameter of the measurement target<20mm | Refer to Field of View, D.S and other instructions in this manual |
UNI-T.
UNI-TREND TECHNOLOGY (CHINA) CO., LTD.
(1) 2017年1月1日(星期二)上午9:30-15:00
No.6. Gong Ye Bei 1st Road.
Songshan Lake National High Tech Industrial
Songshan Lake National High-Tech
Development Zone, Dongguan City
Guangdong Province, China
Guangdong Province, China
- UNI-T®
- OVERVIEW
- SAFETY INSTRUCTIONS
- WARNING
- CHARACTERISTICS
- OPERATING INSTRUCTIONS
- STARTUP
- SHUTDOWN
- SAVE THE CURRENT MEASURED VALUE
- MANUAL MEASUREMENT
- LOCK MEASUREMENT
- LCD AND THE SCAN SYMBOL WILL BE PRESSING THE TRIAVER ALL THE TIME
- MAX/MIN/AVG/DIF VALUE
- LASER INDICATOR
- TECU, C. W
- HIGH ALARM LIMIT SETTING
- LOW ALARM LIMIT SETTING
- EMINISTRY SETTING
- TEMPERATURE UNIT SETTING
- SOUND ALARM SETTING
- DR. G (DISTANCES TO GREAT RATIO)
- 广力云智慧零售收银系统
- FIELD OF VIEW
- MAINTENANCE
- GLANCING
- TABLE 1.2.1
- REPLACE BATTERIES
- UNI-T
Marque : Uni-T
Modèle : UT306S
Catégorie : Thermomètre