
99-8216 - Autoradio Metra - Notice d'utilisation et mode d'emploi gratuit
Retrouvez gratuitement la notice de l'appareil 99-8216 Metra au format PDF.


| Type de produit | Kit d'installation pour autoradio |
| Marque | Metra |
| Modèle | 99-8216 |
| Compatibilité | Véhicules sélectionnés (consulter la notice) |
| Matériau | Plastique ABS moulé |
| Couleur | Noir |
| Dimensions (approx.) | 18 × 10 × 2 cm |
| Poids (approx.) | 150 g |
| Contenu du kit | Support de montage, cadre, vis, instructions |
| Type d'installation | Encastrement DIN simple |
| Fonction principale | Adapter le tableau de bord pour un autoradio après-marché |
| Entretien | Nettoyer avec un chiffon doux et sec |
| Sécurité | Ne pas utiliser de solvants ou produits abrasifs |
| Réparabilité | Pièces non réparables, remplacement du kit conseillé |
| Garantie | 1 an |
| Origine | Fabriqué en Chine |
FOIRE AUX QUESTIONS - 99-8216 Metra
Questions des utilisateurs sur 99-8216 Metra
0 question sur cet appareil. Repondez a celles que vous connaissez ou posez la votre.
Poser une nouvelle question sur cet appareil
Téléchargez la notice de votre Autoradio au format PDF gratuitement ! Retrouvez votre notice 99-8216 - Metra et reprennez votre appareil électronique en main. Sur cette page sont publiés tous les documents nécessaires à l'utilisation de votre appareil 99-8216 de la marque Metra.
MODE D'EMPLOI 99-8216 Metra

INSTALLATION INSTRUCTIONS FOR PART 99-8216
APPLICATIONS
Toyota Yaris 2007-2011
(Excludes models equipped with power package)
99-8216

KIT FEATURES
• DIN radio provision with pocket
• ISO DIN radio provision with pocket
KIT COMPONENTS
• A) Radio housing • B) Housing brackets-3 door • C) Housing brackets-4 door • D) ISO Snap in brackets
• E) Trim plate
ABCD
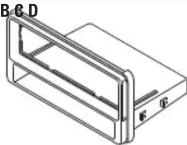
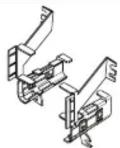
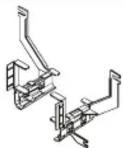
E


WIRING & ANTENNA CONNECTIONS (sold separately)
Wiring Harness: • 70-1761 Toyota harness 1987-up • TYTO-01 Toyota amp interface 2003-up
Antenna Adapter: • Not required
TOOLS REQUIRED
- Panel removal tool • Phillips screwdriver • Small flat blade screwdriver • Socket wrench
Table of Contents
Dash Disassembly
— Toyota Yaris 2007-2011 ...... 2
Kit Assembly
– DIN radio provision with pocket .....2-3
– ISO DIN radio provision with pocket ...... 3
CAUTION: Metra recommends disconnecting the negative battery terminal before beginning any installation. All accessories, switches, and especially air bag indicator lights must be plugged in before reconnecting the battery or cycling the ignition.
NOTE: Refer to the instructions included with the aftermarket radio.
METRA. The World's best kits. TM
metraonline.com1-800-221-0932 METRA ELECTRONICS CORPORATION
99-8216
Dash Disassembly
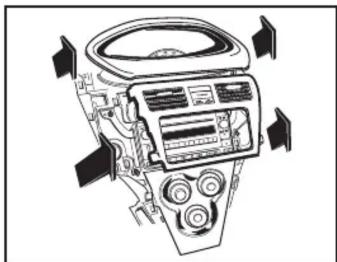
- Unclip the bottom trim panel located underneath the A/C Controls. (Figure A)
- Unclip the two side trim panels that surround the A/C controls and radio. (Figure A)
- Unclip the Instrument trim panel surrounding the speedometer and gauges. (Figure B)
- Unclip the Radio/AC vents trim panel. (Figure B)
- Remove (4) Phillips screws securing radio. (Figure C)
- Unplug and remove radio. Continue to kit assembly

(Figure A)
(Figure B)

(Figure C)
Kit Assembly
DIN radio provision with pocket
- Locate the factory wiring harness in the dash. Metra recommends using the proper mating adapter from Metra or AXXESS. Re-connect the negative battery terminal and test the unit for proper operation.
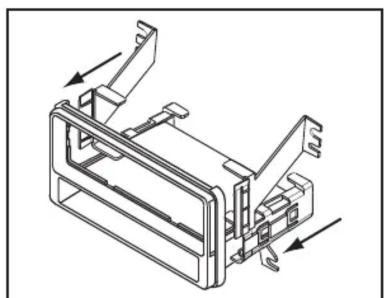
- Slide the mounting brackets onto the sides of the radio housing until the side clips engage.
Note: Tabs are marked 8216-3L and R for the 3 door Yaris and 8216-4L and R for the 4 door Yaris. (Figure A)
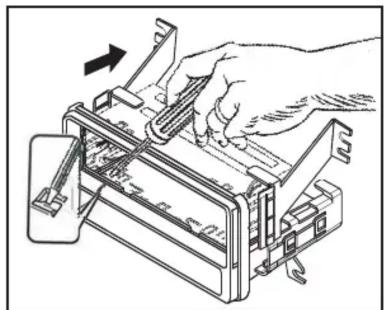
- Slide the DIN cage into the radio housing and secure by bending the metal locking tabs outward. (Figure B)
(Figure A)
(Figure B)

99-8216
Kit Assembly
DIN radio provision with pocket (Continued)
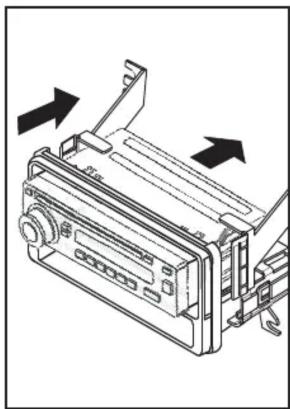
- Slide the aftermarket radio into the cage until it snaps into place. (Figure C)
- Reassemble dash in reverse order of disassembly.
(Figure C)
ISO DIN radio provision with pocket
- Locate the factory wiring harness in the dash. Metra recommends using the proper mating adapter from Metra or AXXESS. Re-connect the negative battery terminal and test the unit for proper operation.
- Slide the mounting brackets onto the sides of the radio housing until the side clips engage.
Note: Tabs are marked 8216-3L and R for the 3 door Yaris and 8216-4L and R for the 4 door Yaris. (Figure A)
- Mount the ISO brackets to the aftermarket radio using the screws supplied with the radio. (Figure B)
- Slide the radio into the radio opening until the side clips snap into place. (Figure C)
- Snap the trim plate onto the front the radio housing assembly. (Figure C)
- Reassemble dash in reverse order of disassembly.

(Figure A)
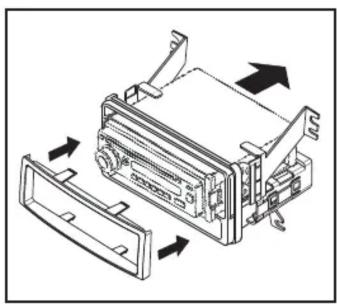
(Figure C)
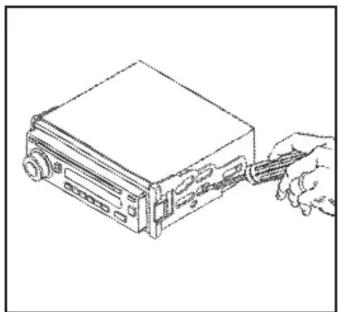
(Figure B)

INSTALLATION INSTRUCTIONS FOR PART 99-8216


KNOWLEDGE IS POWER
Enhance your installation and fabrication skills by enrolling in the most recognized and respected
mobile electronics school in our industry.
Log onto www.installerinstitute.com or call 000-054-6709 for more information and take steps
600-634-6762 for more information and take steps toward a better tomorrow.

Metra recommends MECP
certified technicians
Marque : Metra
Modèle : 99-8216
Catégorie : Autoradio