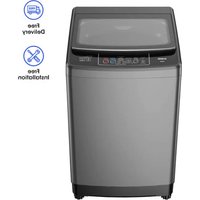
WM120B - Lave-linge Khind - Notice d'utilisation et mode d'emploi gratuit
Retrouvez gratuitement la notice de l'appareil WM120B Khind au format PDF.


| Type de produit | Lave-linge |
| Marque | Khind |
| Modèle | WM120B |
| Capacité de lavage | 6 kg |
| Dimensions (H x L x P) | 85 x 60 x 55 cm |
| Poids net | 55 kg |
| Alimentation électrique | 220-240 V ~ 50 Hz |
| Puissance absorbée | 2000 W |
| Type de charge | Frontale |
| Vitesse d'essorage maximale | 1200 tr/min |
| Programmes de lavage | Coton, Synthétique, Délicat, Rapide, Laine, Rinçage + Essorage |
| Options supplémentaires | Prélavage, Arrêt cuve pleine, Départ différé (jusqu'à 24 h), Sécurité enfants |
| Classe énergétique | A+ (selon ancienne étiquette) |
| Consommation d'eau par cycle | 55 L (cycle coton 60°C) |
| Niveau sonore (lavage/essorage) | 58 dB / 76 dB |
| Entretien et nettoyage | Nettoyage régulier du filtre à peluches, tiroir à lessive, joint de porte et pompe de vidange |
| Sécurité | Dispositif anti-débordement, verrouillage hublot, protection contre la surchauffe |
| Pièces détachées et réparabilité | Disponible : courroie, filtre, pompe, carte électronique, résistance, hublot |
| Informations générales | Notice d'utilisation en français incluse, assistance technique disponible |
FOIRE AUX QUESTIONS - WM120B Khind
Questions des utilisateurs sur WM120B Khind
0 question sur cet appareil. Repondez a celles que vous connaissez ou posez la votre.
Poser une nouvelle question sur cet appareil
Téléchargez la notice de votre Lave-linge au format PDF gratuitement ! Retrouvez votre notice WM120B - Khind et reprennez votre appareil électronique en main. Sur cette page sont publiés tous les documents nécessaires à l'utilisation de votre appareil WM120B de la marque Khind.
MODE D'EMPLOI WM120B Khind

USER MANUAL
KHIND®
Experience More
FULLY AUTO WASHING MACHINE
WM85B
WM100B
WM120B

KHIND CARE Mobile App

Mobile App

Download to register for
E-warranty & enjoy mussie-free after-sales services
1-800-88-0032
khind.com.my

*Valid for e-warranty registration within 3 months of purchase
* Covers only one (1) repair during the warranty period
* Covers parts only: excludes labor and transportation
IMPORTANT
Please read this manual carefully before operating this product,
keep this manual hand cry for turnover reference,
P/N: 40-51974-00
1

Safety Precaution Information
Please read the notice carefully in order to prevent hazard and extend the lifespan.
☑ DENOTING IT SHOULD BE PROHIBITED ① DENOTING IT SHOULD BE PAID ATTENTION
• Do not expose the washing machine under direct sunlight or rain. | • Do not put the washing machine at a damp humid plume. | • Do not sprinkle water directly onto the unit around control panel. |
• Please use a separate electrical outlet with right voltage.• The unit must be earthed properly to prevent electric shock. When it is not used, unplug the plug top. | • Please do not haul the cord while cut off electrical power.• Please do not insert and pull out of the plug with wet hands.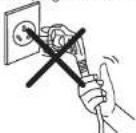 | • Keep children away from the washing machine. |
• Keep the washing machine away from fire or heat source. Do not put flammable materials or clothes stained with such things attached in the tub.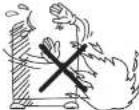 | • Do not wipe the washer with volatile material, gasoline etc. | • Do not pour over 50°C water into the tub.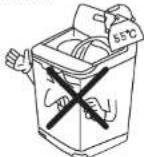 |
• Do not open the cover while washing. | • Do not touch the clothes in the tub when the tub does not stop working.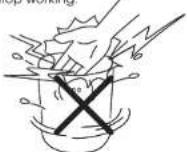 | • Do not switch on when the water pressure isn't within 0.03MPa-0.85MPa, so as to protect the inlet valve.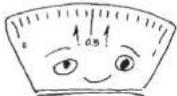 |
- This appliance is not intended for use by persons (including children) with reduced physical, sensory or mental capabilities, or lack of experience and knowledge, unless they have been given supervision or instruction concerning use of the appliance by a person responsible for their safety. Children should be supervised to ensure that they do not play with the appliance.
- If the supply cord is damaged, it must be replaced by the manufacturer, its service agent or similarly qualified persons in order to avoid a hazard.
- This appliance is for indoor household use only, do not use at outdoor. Commercial use will void warranty.
- Do not obstruct the ventilation openings in the base of the washing machine with carpets etc.
- Please do not overload the appliance
- If the tub does not stop within 15 seconds when the lid is opened during spinning process, switch off the appliance immediately and call a service technician.
- Must let the outer drain hose down before washing clothes.
- Please do not dismantle the unit. Installation and maintenance can only be done by a qualified technician. Refer "Installation" on page 6-8 for guideline.
- Do not climb or put heavy objects on top of the appliance
- Do not insert your hands or feet under the main unit.
- Do not wash, rinse or spin waterproof sheets or clothes.
Cleaning & Maintenance
Filter Box
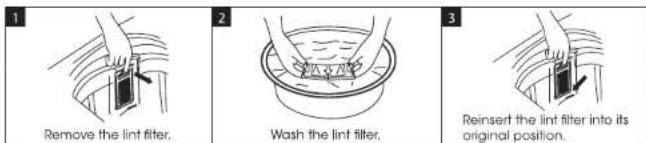
The Unit
- Please make sure that all the water is drained from the tub after being used.
- Switch off the power at the wall socket and remove from the plug.
- Wipe off any moisture or liquid on the unit with a dry or wet cloth.
- Do not spray water direct onto the unit.
- Do no use any flammable liquid cleaner to clean the unit, as this will spoil the appearance
- Allow the lid to be opened to keep the internal area dry after cleaning
2
Water Inlet Filter Net
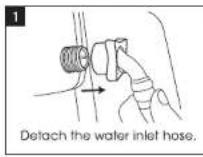
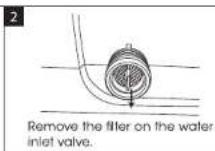

Step to Detach The Water Inlet Hose


Attention:
It is recommended that you to follow the Step 1 - Step 4 to prevent the water remained in the machine from flowing on the ground. If no water inside the machine, follow step 1 and then step 4.
Parts Identification

- Water Inlet Valve
- Frame
- Handle
- Power Cord
-
Cabinet
-
Back Plate
- Base
- Wash Lid
- Detergent Box
-
Inner Tub
-
Filter
- Outer Drain Hose
- Control Panel
- Pulsator
- Adjustable Foot
(WM85B/WM100B: 1 pc; WM120B: 2 pcs)
Accessories

*Pictures are for illustration purposes only.
Control Panel

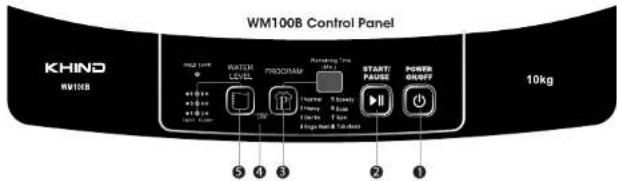

- Power ON/OFF Button
Use this button to turn the washing machine on and off. If a set program is not start within 5 minutes of turning the machine on, it will switch off automatically.
2 START/PAUSE Button
Press this button to begin a wash program, or to pause/resume a program that is currently in progress.
3. PROGRAM Selection
Press this button repeatedly to set the desired wash program. You can choose from the following options.
Normal/Fuzzy to wash according to the weight of clothes adjusting the water level.
Heavy to wash the coverlet, jeans and other big clothes.
Gentle for washing of wool or underwear.
Single Wash to wash the clothes. (WM100B & EM120B)
Speedy to wash the slight dirty clothes.
Soak soak for some time before washing
Spin to spin the clothes.
Tub Clean clean the inner tub automatically. (WM100B & EM120B)
Rinse to rinse the clothes one additional time. (WM120B)
Air Dry Quick tub drying after washing & removing clothes. (WM120B)
4. CHILD LOCK Function
Press and hold the two buttons (Water level & Program) simultaneously for 1.5 second to activate and deactivate the safety lock.
5. WATER LEVEL Selection
Use this button to select the appropriate water level according to the volume of laundry.
Under Normal/Fuzzy, Heavy, Gentle, Soak programs, the water level is adjustable.
Its default washing water level is 3; rising water level is 4.
Under Speedy program, the user can not adjust water level.
Its default washing water level is 2; rising water level is 3.
Under Spin program, water level button is not workable and no display.
Under any wash program, a long pressing on WATER LEVEL will re-supply water until the
water level reaches warning level.
Note: If the indicator light on water level keeps lighting means odd number water level, and keeps blinking means even number water level.
Specifications
| Model | WM85B | WM100B | WM120B |
| Voltage | 220-240V ~ 50Hz | 220-240V ~ 50Hz | 220-240V ~ 50Hz |
| Rated Power | 420W | 600W | 600W |
| Water Proof Class | IPX4 | IPX4 | IPX4 |
| Wash / Spin Capacity | 8.5kg | 10kg | 12kg |
| Water Pressure | 0.03MPa~0.85MPa | 0.03MPa~0.85MPa | 0.03MPa~0.85MPa |
| Water Level Volume: | High: 56L; Low: 20L | High: 66L; Low: 23L | High: 85L; Low: 27L |
| Spin Speed | 660RPM | 720RPM | 720RPM |
| Net Weight | 28.5kg | 33kg | 37kg |
| Gross Weight | 32.5kg | 37kg | 42kg |
| Product Dimension (LxWxH) | 545 x 555 x 900mm | 600 x 595 x 955mm | 630 x 640 x 960mm |
| Box Dimension (LxWxH) | 580 x 600 x 965mm | 650 x 650 x 1000mm | 680 x 680 x 1010mm |
*Specifications are subject to change without prior notice.
Installation
Place The Washing Machine on The Flat and Solid Ground
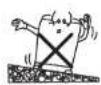
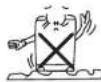
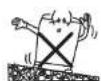
- Please do not put the package base (plastic support) under the washing machine, because it will produce noise and damage the washing machine.
- Place the washing machine on the flat and solid ground.
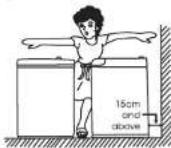
- Please keep the distance of more than 15cm from surroundings wall, for proper ventilation avoid noise during spin function.
① Do not obstruct the openings of the bottom face with carpet etc.

Horizontal Adjustment
Shake the washing machine, make sure it is fastened.
- Loosen the locknut and turn the adjustor to avoid shaking.
- If there is no shaking, please turn the locknut into tight.
• The inclination angle of the washing machine should not be more than 2 degrees.


• Confirming horizontal level as the picture showing.
Anti-rat Bottom Board Installation
- After installing the washing machine, take out the anti-rat bottom board. Turn upwards the board showing "up" and insert it from the back side of washing machine. If the anti-rat bottom board does not insert completely, it will produce noise when spinning.
• Install the fixed screw in the screw intake.


Outer Drain Hose Installation

- Insert the outer drain hose into the intake on side of washing machine.
- Push the outer drain hose into the washing machine, and then fix it by spring ring. Insert the outer drain hose properly to avoid water leakage.
- When the washing machine is running, please lay down the outer drain hose and make sure it does not entangle. The height of drain hose should be lower than 6cm, in order for the washing machine to spin properly.
Outlet

- Select the appropriate type of outlet as shown in the figure.
- End of outlet spout should be more than 10mm, or the connector cannot be assembled.
- Water leakage is possible from here.
The Installation of Water Inlet Hose

- Unscrewing the part "a" from the water faucet.
- Respectively attach the water inlet hose to the water faucet.
Note: Do not over tighten. Damage to the valve can result. - Run water through both faucet and inlet hose, into a bucket or laundry tub, to get rid of particles in the water line that might clog the inlet valve screen.
- Attach the hose connected with the water faucet to the water inlet valve. Note: Do not overtighten. Damage to the valve can result.
- Check for leak
- Swing the water inlet hose gently to confirm if it's suitable.
- Turn on the water faucet and check for leak. A small amount of water might enter the washer. You will drain this later.
Connection of The Power Cord

- The earthing which is indicated by yellow and green colour must be firmly connected to a special Earthing. Please call the technician to assemble.
• The socket should have assembled the 3A fuse.
Note:
- Never try to connect the earthing of the washing machine together with that of gas pipe or water pipe, telephone cord or lightening rod.
- Do not use the damaged cord because it could cause electricity leakage and fire.
- In case cord is damaged, please contact the local service company, because it is removed and replaced with special tools.


- Install the water inlet hose.
- Turn on the tap.
- Plug in the power cord.
- Insert the end of the outer drain hose into the hook shelf, and hang the outer drain hose over a drain outlet.
- Before washing, please take out coins or other hard goods, and pull to close the zip fastener to prevent clothes and barrel from damage.
- Put suitable detergent and wash load into the tub.
How to Use
WM85B / WM100B / WM120B

Power Switch
Press the power switch to turn on the washing machine. The default indicator will light on.

Washing Program Selector
The model has multiple programs to fit for different clothes quality. The default program is "Normal". If other program is needed, you can press Program button to choose.

Start/Pause Button
• After pressing Start/Pause button, the washing machine start to work.
- If it is needed to change Program or Water Level, please press Start/Pause button to pause the washing machine and reset the model. After the setting, press this button again, the washing machine will start according to the new setting.
• To avoid danger, do not open the wash lid during the running of washing machine, especially in spinning process.

Wash Over
• The Buzzer will alarm finish, and it will power off automatically.
- Unplug the power cord.
Troubleshooting
| Malfunction Phenomenon | Reason |
| Start the washing machine from Rinse Process, the washing machine does not input the water | The washing machine will start from the spin process in order to spin out the water and detergent from the clothes, then input the water (if there is water in the tub it will drain out the water first) |
| The wash process changes from Spin to Rinse | When the clothes are not even or are on a single side of the tub, the washing machine will input the water and make the clothes balance and even |
| The control button is unable to touch | If want to change the Process after the washing machine started, please touch the Start/Pause button to reset the process |
| Spin delay | The washing machine will delay 15 to 60 seconds to enter spin process after drain or after select spin process only |
Before maintenance
| Problem | Checklist |
| Does not work | • is electricity present?• is the tap opened?• is the plug loose, or fuse broken?• Tum on the power or start button? |
| Fail to fill water | • is the tap opened?• is the drain hose frozen?• is the water supply cut?• is the water inlet valve blocked? |
For some troubles, the machine buzzer will ring and alarm, and the indicator will flash
WM85B / WM100B / WM120B
| Troubles | Display | Checklist | Solution |
| Breakdown | No display | The plug is badly connected to the socket or the switch is not activated | Connect the plug properly activate the switch |
| No display | The socket is dead or the fuse is broken | Contact the authorized technician | |
| No display | The current process is lost for power failure | Reuse only when power failure is eliminated | |
| No display | The voltage is too low or too high | Remove the plug and reuse it when the voltage comes to normality | |
| Standing drain | E1 | The drain hose is hung up over 90cm or is blocked | Check the drain hose, open the lid and then close it to continue drain process |
| A conflict between the tub and the cabinet during spinning | E3 | The clothes are not laid evenly in the tub. The machine will try to make an automatic check and adjustment for 2 times, or if nothing available, an alarm will be given | Open the lid, distribute the clothes evenly in the tub and then cover it |
| Insufficient water supply | E4 | The tap is closed, water supply is cut off or water pressure is too low, so the water fails to reach to the desired level for quite a long time | Open the tap or use the machine after the water pressure comes to normal. Open the wash lid, close it and restart to input water |
| Abnormal water level sensor | E6 | The sensor fails for short or open current, etc, and an alarm will be given | Contact the authorized technician |
| Unstoppable inlet or automatic drain | E7 | Abnormalities occur in computer sequencer, inlet valve or water level sensor | Cut off the power after draining, and try to contact the authorized technician |
| Fail to power off or power on | No display | Computer sequencer is broken | Contact the authorized technician |

Maklumat Langkah Keselamatan
Sila baca notis dengan teliti untuk mengelakkan bahaya dan memperpanjang jangka hayat.
MENANDAKAN ITU HARUS DILARANG ① MENANDAKAN ITU HARUS DIBERI PERHATIAN
- Jangan dedahkan mesin basuh di tempat bawah cahaya malahari atau hujan.

• Jangan letakkan mesin basuh di tempat yang lembap.

- Jangan curahkan air terus ke unit di sekitar panel kawalan.

- Sila gunakan soket elektrik yang berasingan dengan voltan yang betul.
- Unit mesti dilbumikan dengan betul untuk mengelakkan kejutan elektrik. Apabila tidak digunakan, cabut pian bahagian atas

- Jangan tarik kabel untuk memutuskan bekalan elektrik.
• Jangan masukkan dan cabut palam dengan tangan yang

• Jauhkan kanak-kanak dari mesin basuh.

- Jauhkan mesin basuh dari sumber api atau sumber panas. Jangan letakkan bahan mudah terbakar atau pakaian yang dicat dengan benda seperti itu di dalam mesin basuh.

• Jangan lap mesin basuh dengan bahan yang mudah meruap, petrol dan lain-lain.

• Jangan fuangkan air lebih dari 50°C ke dalam mesin basuh.

• Jangan buka penutup semasa mencuci.
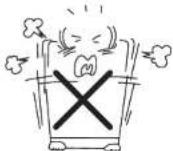
- Jangan sentuh pakaian di dalam tab mesin basuh apabila tab mesin basuh sedang berfungsi.
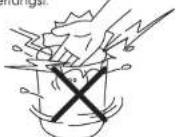
- Jangan hidupkan mesin basuh jika tahap tekanan air tidak diantara 0.03MPa-0.85MPa, ini adalah untuk melindungi injap masuk.
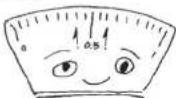
- Perkakas ini bukan untuk digunakan oleh orang ( termasuk kanak-kanak ) yang kurang upaya fizikal, deria atau kecacatan mental, atau kurang pengalaman dan pengetahuan, melainkan mereka diberi perhatian atau tunjuk ajar berkaitan penggunaan perkakas oleh orang yang bertanggungjawab untuk keselamatan mereka. Kanak-kanak haruslah diperhatikan untuk memastikan mereka tidak bermain dengan perkakas ini.
- Sekiranya kabel bekalan rosak, ia mesti diganti oleh pengilang, ejen perkhidmatan atau pihak yang berkelayakan bagi mengelakkan bahaya.
- Perkakas ini adalah untuk kegunaan dalam rumah sahaja, jangan gunakan diluar rumah. Penggunaan komersial akan membatalkan jaminan.
- Jangan menghalang pengudaraan di dasar mesin basuh dengan karpet dan lain-lain.
• Jangan memuatkan perkakas secara berlebihan. - Jika tab mesin basuh tidak berhenti dalam 15 saat ketika penutup dibuka semasa proses putar, matikan perkakas dengan segera dan menghubungi perkhidmatan juruteknik.
- Pastikan hos saluran pembuangan diturunkan sebelum mencuci pakaian.
- Jangan menyelenggara perkakas. Pemasangan dan penyelenggaraan hanya dapat dilakukan oleh juruteknik yang berkelayakan. Rujuk "Pemasangan" di halaman 16-19 untuk panduan.
- Jangan memanjat atau meletakkan benda berat di atas perkakas.
- Jangan masukkan tangan atau kaki anda di bawah perkakas.
• Jangan mencuci, bilas atau memutar cadar atau pakaian yang kalis air.
Penjagaan & Penyelenggaraan
Kotak Penapis


Keluarkan penapis seral

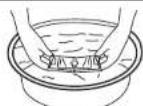
Basuh penapis serat.


Masukkan semula penapis serat ke kedudukan asalnya
Unit
- Pastikan semua air disalur keluar dari tab setelah digunakan.
- Matikan kuasa di soket dinding dan cabutkan palamnya.
- Lap sebarang cecair pada unit dengan menggunakan kain kering atau kain basah.
- Jangan mencurahkan air terus ke unit.
- Jangan menggunakan pembersih cair yang mudah terbakar untuk membersihkan unit, kerana ini akan merosakkan penampilan.
- Biarkan penutup dibuka untuk memastikan kawasan dalaman kering selepas pembersihan.
Penapis Air Masuk
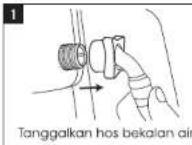
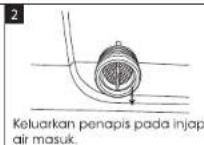

Langkah Menanggalkan Hos Bekalan Air
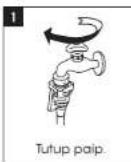
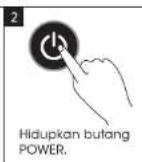

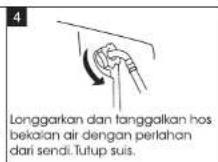
Perhatian:
Anda dicadangkan bahawa mengikuti Langkah 1 - Langkah 4 untuk mengelakkan air yang tersisa di mesin akan mengalir di atas tanah. Sekiranya tiada air di dalam mesin, ikuti langkah 1 dan kemudian langkah 4.
Pengenalan Bahagian

- Injap Air Masuk
- Kerangka
- Pemegang
- Talikod Kuasa
-
Kabinet
-
Plat Belakang
- Tapak
- Penutup
- Bekas Bahan Pencuci
- Tab Dalaman
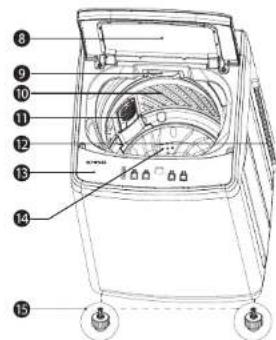
- Penapis
- Paip Saluran Pembuangan
- Panel Kawalan
- Pemutar "Pulsator"
- Kaki Pengimbang (WM85B/WM100B: 1 pc; WM120B: 2 pcs)
Aksesori

*Gambar adalah untuk tujuan ilustrasi sahaja
Panel Kawalan
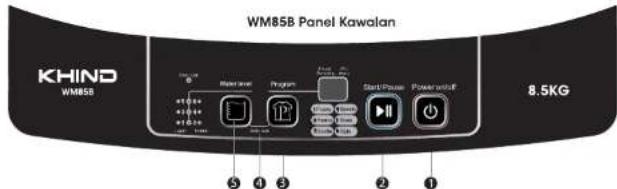


1. Butang Kuasa ON/OFF
Gunakan butang ini untuk menghidupkan dan mematikan mesin basuh. Sekiranya program yang ditetapkan tidak dimulakan dalam 5 minit setelah menghidupkan mesin, ia akan dimatikan secara automatik.
2. Butang START/PAUSE
Tekan butang ini untuk memulakan program pencucian, atau untuk berhenti/ bersambung semula program yang sedang dijalankan.
3. Pemilihan Program
Tekan butang ini berulang kali untuk memilih program pencucian yang dikehenkaki. Anda boleh memilih dari pilihan berikut.
| Normal/Fuzzy | untuk mencuci mengikut berat pakaian dengan menyesuaikan paras air. |
| Heavy | untuk mencuci selimut, seluar jeans dan pakaian bersaiz besar |
| Gentle | untuk mencuci baju berbulu atau seluar dalam. |
| Single Wash | untuk mencuci pakaian. (WM100B & WM120B) |
| Speedy | mencuci pakaian dengan sedikit kotoran. |
| Soak | rendam sebentar sebelum mencuci. |
| Spin | untuk memutar pakaian. |
| Tub Clean | bersihkan tab dalaman secara automatik. (WM100B & WM120B) |
| Rinse | membilas pakaian sekali lagi. (WM120B) |
| Air Dry | keringkan selepas tab secara pantas selepas selesai mencuci dan pakaian dikeluarkan. (WM120B) |
4. Fungsi "CHILD LOCK"
Tekan dan tahan dua butang (WATER LEVEL & PROGRAM) secara serentak selama 1.5 saat untuk mengaktifkan dan membantalkan kunci keselamatan.
5. Pemilihan WATER LEVEL
Gunakan butang ini untuk memilih paras air yang sesuai mengikut jumlah cucian.
• Di bawah program Normal/Fuzzy, Heavy, Gentle, Soak, paras air dapat dilaraskan. Paras air basuh lalai adalah 3; kenaikan paras air adalah 4.
- Di bawah program Speedy, pengguna tidak dapat melaraskan paras air. Paras air basuh lolai adalah 2; kenaikan paras air adalah 3.
- Di bawah program spin, butang paras air tidak dapat digunakan dan tidak ada paparan.
- Di bawah proses wash, tekan lama pada WATER LEVEL akan melaraskan semula air sehingga paras air mencapai tahap amaran.
Catatan: Jika penunjuk lampu di paras air tetap menyalakan bermaksud paras air untuk nombor ganji, dan jika lampu tetap berkelip bermaksud paras air untuk nombor genap.
Spesifikasi
| Model | WM85B | WM100B | WM120B |
| Voltan | 220-240V ~ 50Hz | 220-240V ~ 50Hz | 220-240V ~ 50Hz |
| Kadar Kuasa | 420W | 600W | 600W |
| Piawai KalisAir | IPX4 | IPX4 | IPX4 |
| Kapasiti Cuci / Putar | 8.5kg | 10kg | 12kg |
| Tekawan Air | 0.03MPa-0.85MPa | 0.03MPa-0.85MPa | 0.03MPa-0.85MPa |
| Isipadu Air: | High: 56L; Low: 20L | High: 66L; Low: 23L | High: 85L; Low: 27L |
| Kelajuan Putaran | 660RPM | 720RPM | 720RPM |
| Berat Bersih | 28.5kg | 33kg | 37kg |
| Berat Kasar | 32.5kg | 37kg | 42kg |
| Dimensi Produk (PxlxT) | 545 x 555 x 900mm | 600 x 595 x 955mm | 630 x 640 x 960mm |
| Dimensi kotak (PxlxT) | 580 x 600 x 965mm | 650 x 650 x 1000mm | 680 x 680 x 1010mm |
*Spesifikasi tertakluk kepada perubahan tanpa notis terlebih dahulu.
Pemasangan
Letakkan Mesin Basuh di Tanah Rata dan Padat
- Jangan meletakkan tapak bungkusan (sokongan plastik) di bawah mesin basuh, kerana akan mengeluarkan bunyi dan merosakkan mesin basuh.
- Letakkan mesin basuh di tanah rata dan padat.
- Sila menjaga jarak lebih dari 15cm dari dinding sekelling, dan pastikan pengudaraan yang baik untuk mengelakkan bunyi semasa fungsi putar.
① Jangan halang bukaan bawah muka dengan karpet dan lain-lain.
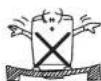


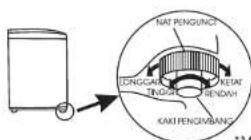
Pelarasan Mendatar
Goncangkan mesin basuh untuk memastikannya selamat.
- Longgarkan nat pengunci dan putar pelaras untuk mengelakkan goyangan.
- Sekiranya tidak ada goyangan, putar pelaras menjadi ketat.
- Sudut kecondongan mesin basuh tidak boleh lebih dari 2 darjah.
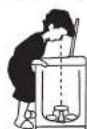


*Mengesahkan tahap mendatar seperti gambar yang ditunjukkan.
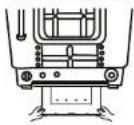
Pemasangan Papan Bawah Anti-Tikus
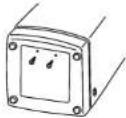
- Setelah memasang mesin basuh, keluarkan papan bawah anti tikus. Pusing ke atas papan yang menunjukkan 'up' dan masukkan dari bahaglan belakang mesin basuh. Jika papan bawah anti tikus tidak dimasukkan sepenuhnya, ia akan mengeluarkan bunyi semasa berputar.
- Pasang skru pada pemasukan skru.
Pemasangan Hos Saluran Pembuangan Luar

- Masukkan hos saluran pembuangan luar ke lubang masuk di sebelah mesin basuh.
- Tolak hos saluran pembuangan luar ke dalam mesin basuh, dan kemudian pasangkan dengan gelang spring. Masukkan hos saluran pembuangan luar dengan betul untuk mengelakkan kebocoran air.
- Semasa mesin basuh sedang berjalan, letakkan hos saluran pembuangan luar dan pastikan ia tidak terjerat. Ketinggian hos saluran pembuangan luar harus lebih rendah dari 6cm, supaya mesin basuh berputar dengan betul.
Paip

- Pilih jenis paip yang sesuai seperti yang ditunjukkan dalam gambar.
- Paip saluran keluar hendaklah lebih dari 10mm, atau penyambung tidak dapat dipasang
- Kebocoran air mungkin berlaku dari sini.
Pemasangan Hos Air Masuk

- Tanggalkan bahagian "a" dari paip air
- Pasang hos masuk air dengan tepat ke paip air. Catatan: Jangan terlalu ketat. Kerosakan pada injap boleh berlaku.
- Alirkan air melalui paip kedua dan hos air masuk ke dalam baldi atau tab, untuk membuang zarah-zarah asing di hos saluran air yang mungkin menyumbat skrin injap masuk.
- Pasang hos yang disambungkan dengan paip air ke injap air masuk. Catatan: Jangan terlalu ketat Kerosakan pada injap boleh berlaku.
- Pemeriksaan kebocoran • Goyangkan hos air masuk dengan lembut untuk memastikan kesesuaian. • Bukakan paip air dan periksa kebocoran. Sebilangan kecil air mungkin memasuki mesin basuh. Anda akan salur keluar ini kemudian.
Sambungan Talikod Kuasa

- Pembumian yang ditunjukkan oleh warna kuning dan hijau mesti disambungkan dengan betul ke Pembumian khas. Sila hubungi juruteknik untuk memasang.
- Soket sepatutnya dipasang fius 3A.
Nota:
- Jangan sekali-kali cuba menyambungkan pembumian mesin basuh dengan paip gas atau paip air, tali telefon atau penangkap petir.
• Jangan gunakan kabel yang rosak kerana boleh menyebabkan kebocoran elektrik dan kebakaran. - Sekiranya kabel rosak, hubungi syarikat perkhidmatan tempatan, kerana ia dikeluarkan dan diganti dengan alat khas.
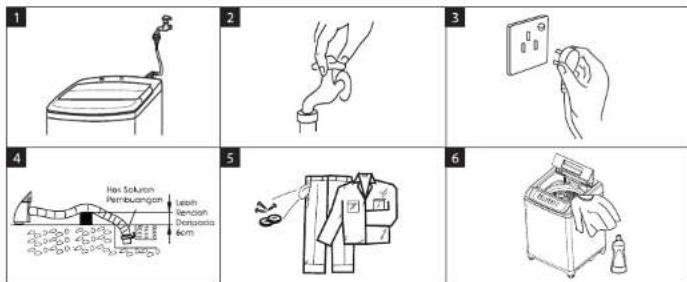
- Pasang hos air masuk.
- Bukakan paip
- Pasangkan talikod kuasa.
- Masukkan hujung hos saluran pembuangan ke rak cangkuk, dan gantungkan hos saluran pembuangan di atas saluran pembuangan.
- Sebelum mulakan cucian, keluarkan duit syiling atau barang keras yang lain, dan tarik zip untuk mengelakkan kerosakan pakaian dan tong dalaman mesin.
- Masukkan bahan pencuci yang sesuai dan basuh muatan ke dalam tab.
Cara-cara Penggunaan
WM85B / WM100B / WM120B

Suis Kuasa
Tekan suis kuasa untuk menghidupkan mesin basuh. Penunjuk lalai akan menyala.

Pemilih Program Membasuh
Model ini mempunyai pelbagai program untuk kualiti pakaian yang berbeza. Program lalai adalah "Normal". Sekiranya program lain diperlukan, anda boleh menekan butang Program untuk memilih.

Butang START/PAUSE
- Dengan menekan butang START/PUASE, mesin basuh akan mula beroperasi.
- Jika diperlukan untuk mengubah PROGRAM atau WATER LEVEL, tekan butang START/PAUSE untuk berhentikan mesin basuh dan menetapkan semula. Setelah pengaturan, tekan butang ini sekali lagi, mesin basuh akan mula mengikut dengan pengaturan baru.
- Untuk mengelakkan bahaya, jangan buka penutup mesin basuh semasa menjalankan mesin basuh, terutama dalam proses putar.
Stand by ▶ Start ▶ Pause
Basuh Bersih
- Buzzer akan berdering dan berikan amaran selepas selesai, dan ia akan mematikan kuasa secara automatik.
• Cabut talikod kuasa.
Penyelesaian Masalah
| Fenomena Kerosakan | Sebab |
| Mulakan mesin basuh dari bilas process, mesin basuh tidak memasukkan air | • Mesin basuh akan bermula dari proses berputar untuk mengeluarkan air dan bahan pencuci dari pakaian, kemudian masukkan air (jika terdapat air di dalam tab, ia akan mengalirkan air keluar terlebih dahulu) |
| Proses mencuci berubah dari putar ke bilas | • Apabila pakaian tidak sekata atau berada di satu bahagian tab, mesin basuh akan mengisi air dan menjadikan pakaian seimbang dan sekata |
| Butang kawalan tidak dapat ditekan | • Sekiranya ingin mengubah PROSES setelah mesin basuh dimulakan, tekan butang Start/Puase untuk menetapkan semula proses |
| Keiewatan putaran | • Mesin basuh akan menunda 15 hingga 60 saat untuk memasuki proses putaran setelah pembuangan air atau setelah memilih proses putaran tertentu sahaja |
Sebelum penyelenggaraan
| Masalah | Senarai Semak |
| Tidak berfungsi | • Adakah terdapat bekalan elektrik? • Adakah paip dibuka? • Adakah plag longgar, atau fius rosak? • Adakah sudah menghidupkan bulang kuasa atau bulang mula? |
| Gagal mengisi air | • Adakah paip dibuka? • Adakah hos saluran pembuangan dibekukan? • Adakah bekalan air terputus? • Adakah injap air masuk tersebut? |
Untuk beberapa masalah, buzzer akan berdering dan berikan amaran, dan penunjuk lampu akan menyala.
WM85B / WM100B / WM120B
| Masalah | Paparan | Senarai Semak | Penyelesaian |
| Rosak | Tiada paparan | Palam tidak bersambung dengan betul ke soket atau suis tidak dikatlikan | Sambungkan palam dengan betul dan aktifkan suis |
| Tiada paparan | Soket mati atau fius rosak | Sila hubungi juruteknik yang sah | |
| Tiada paparan | Proses semasa hilang kerana kegagalan kuasa | Guna semula hanya apabila kegagalan kuasa dihapuskan | |
| Tiada paparan | Voltan terlalu rendah atau terlalu tinggi | Cabutkan palam dan gunakan semula semasa voltan normal | |
| Saluran buruk | E1 | Hos saluran pembuangan digantung lebih dari 90cm atau tersumbat | Periksa hos saluran pembuangan, buka penutup mesin dan kemudian futup untuk meneruskan proses pembuangan |
| Konfik antara tab dan kabinet semasa berputar | E3 | Pakaian tidak diletakkan secara merata di dalam tab, Mesin akan membuat pemeriksaan dan penyesuaian automatik sebanyak 2 kali, atau jika tiada, penggera akan diberikan | Buka penutup, mesin, susun pakalian secara merata di dalam tab dan kemudian futupkannya |
| Bekalan air tidak mencukupi | E4 | Paip ditutup, bekalan air terputus atau tekanan air terlalu rendah, sehingga air gagal mencapai tahap yang dikehendaki untuk masa yang agak lama | Bukakan paip atau gunakan mesin selepas tekanan air menjadi normal. Buka penutup basuh, futupkan dan mulakan semula untuk memasukkan air |
| Sensor paras air tidak normal | E6 | Sensor gagal mungkin sebab arus pendek atau terbuka dan lain-lain, dan penggera akan dibunyikan | Sila hubungi juruteknik yang disahkan |
| Saluran masuk tidak dapat dihentikan atau automatik pembuangan air | E7 | Keabnormalan berlaku pada pengatur komputer, injap masuk atau sensor paras air | Matikan kuasa setelah pembuangan air, dan cuba hubungi pihak juruteknik yang sah |
| Gagal mematikan atau menghidupkan mesin | Tiada paparan | Pengatur komputer rosak | Sila hubungi juruteknik yang disahkan |

- FULLY AUTO WASHING MACHINE
- IMPORTANT
- SAFETY PRECAUTION INFORMATION
- CLEANING & MAINTENANCE
- FILTER BOX
- THE UNIT
- WATER INLET FILTER NET
- STEP TO DETACH THE WATER INLET HOSE
- ATTENTION
- PARTS IDENTIFICATION
- ACCESSORIES
- CONTROL PANEL
- PROGRAM SELECTION
- CHILD LOCK FUNCTION
- WATER LEVEL SELECTION
- INSTALLATION
- PLACE THE WASHING MACHINE ON THE FLAT AND SOLID GROUND
- HORIZONTAL ADJUSTMENT
- ANTI-RAT BOTTOM BOARD INSTALLATION
- OUTER DRAIN HOSE INSTALLATION
- OUTLET
- THE INSTALLATION OF WATER INLET HOSE
- CONNECTION OF THE POWER CORD
- NOTE
- HOW TO USE
- WM85B / WM100B / WM120B
- POWER SWITCH
- WASHING PROGRAM SELECTOR
- START/PAUSE BUTTON
- WASH OVER
- MAKLUMAT LANGKAH KESELAMATAN
- PENJAGAAN & PENYELENGGARAAN
- KOTAK PENAPIS
- UNIT
- PENAPIS AIR MASUK
- LANGKAH MENANGGALKAN HOS BEKALAN AIR
- PERHATIAN
- PENGENALAN BAHAGIAN
- AKSESORI
- PANEL KAWALAN
- BUTANG KUASA ON/OFF
- BUTANG START/PAUSE
- PEMILIHAN PROGRAM
- FUNGSI "CHILD LOCK
- PEMILIHAN WATER LEVEL
- PEMASANGAN
- LETAKKAN MESIN BASUH DI TANAH RATA DAN PADAT
- ① JANGAN HALANG BUKAAN BAWAH MUKA DENGAN KARPET DAN LAIN-LAIN
- PELARASAN MENDATAR
- PEMASANGAN PAPAN BAWAH ANTI-TIKUS
- PEMASANGAN HOS SALURAN PEMBUANGAN LUAR
- PAIP
- PEMASANGAN HOS AIR MASUK
- SAMBUNGAN TALIKOD KUASA
- NOTA
- CARA-CARA PENGGUNAAN
- SUIS KUASA
- PEMILIH PROGRAM MEMBASUH
- BASUH BERSIH
Marque : Khind
Modèle : WM120B
Catégorie : Lave-linge