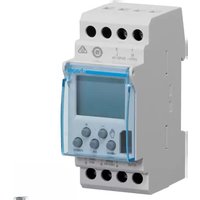
EGN103 - Interrupteur HAGER - Notice d'utilisation et mode d'emploi gratuit
Retrouvez gratuitement la notice de l'appareil EGN103 HAGER au format PDF.


| Type de produit | Interrupteur |
| Marque | Hager |
| Modèle | EGN103 |
| Catégorie | Interrupteur mural |
| Dimensions (L x H x P) | 45 x 45 x 18 mm |
| Poids | Environ 50 g |
| Alimentation | 230 V ~ 50 Hz |
| Courant nominal | 10 A |
| Matériau | Plastique auto-extinguible |
| Fonctions principales | Commande marche/arrêt |
| Type de montage | Encastré ou saillie |
| Indice de protection | IP20 |
| Nombre de pôles | 1 pôle |
| Température de fonctionnement | -5°C à +40°C |
| Entretien | Nettoyer avec un chiffon doux et sec. Ne pas utiliser de produits abrasifs. |
| Sécurité | Conforme aux normes CE, NF |
| Réparabilité | Module remplaçable (pièce détachée Hager) |
| Garantie | Garantie constructeur standard |
FOIRE AUX QUESTIONS - EGN103 HAGER
Questions des utilisateurs sur EGN103 HAGER
0 question sur cet appareil. Repondez a celles que vous connaissez ou posez la votre.
Poser une nouvelle question sur cet appareil
Téléchargez la notice de votre Interrupteur au format PDF gratuitement ! Retrouvez votre notice EGN103 - HAGER et reprennez votre appareil électronique en main. Sur cette page sont publiés tous les documents nécessaires à l'utilisation de votre appareil EGN103 de la marque HAGER.
MODE D'EMPLOI EGN103 HAGER

natural_image
Technical line drawing of a mechanical device with mounting holes and a control panel (no text or symbols)EGN103
EN

Electronic Time Switch 1 Channel 7 Days

Additional information is available by scanning the displayed QR code with your mobile terminal.
Product Presentation
The EGN103 time switch is a clock with weekly electronic programming that automatically controls different loads.
Examples of applications: street lighting, neon signs, shop windows, monuments, facades etc. Wireless programming by mobile terminal is recommended via Bluetooth® technology by connecting the EGN003 key and using the configuration application (iOS and Android) available as a free download.
Main features
- Product delivered with updated time and day.
- Automatic daylight savings time change 📋/✿.
- Bluetooth® programming key
- Programming key
- for permanent exceptions;
- for copying or saving the program.
- Programming by day or group of days.
- 56 program steps On or Off.
- Permanent overrides On or Off (fixed 📋).
- Temporary overrides On or Off (flashing 📋).
- Possibility of locking they keypad 🔒.
- Programmable when off.

Figure 1: Presentation of the screen and keys
Program reset
The program can be completely deleted by simultaneously pressing the following 3 keys: menu, ok, ←; the time and date are preserved.
Restart
Restart the product by simultaneously pressing the -, +, ok, menu keys.
The keys
| 1 | menu selection of the established operating mode. | |
| new prog. for programming. | ||
| change prog. | to change an existing program | |
| program verification | ||
| change of time, date and mode choice switch to or from daylight savings time ⚙️/⌘ | ||
| 2 | + and - value | navigation or setting |
| in auto mode, selection of overrides or exceptions. | ||
| 3 | ok to confirm the flashing information | |
| 4 | to return to the previous step | |
| You can return to auto mode at any time with the menu.If no action is taken for 1 minute, the switch returns to auto mode. | ||
Technical specifications
Electrical specifications
• Supply voltage:
- 230 V\~ +10%/-15% 50/60 Hz
- 240 V\~ +/-6% 50/60 Hz
• Frequency: 50/60 Hz
• Consumption: max. 0.25 W to 50 Hz
- Output: 1 changeover contact with a voltage measurement of < 1 V for zero-crossing switching.
• Max. breaking capacity
- AC1:
- AC1: μ 16 A 230 V\~
- Incandescent light bulbs:
Power relay with normally open contact/2300 W
Power relay with normally closed
contact/1500 W
- Halogen lamps 230 V\~: 2300 W
- Fluorescent tubes, compensated // (max. 45 μF):
Power relay with normally open contact/400 W
Power relay with normally closed contact/300 W
- Fluorescent tubes, uncompensated, series compensated: 1000 W
- Compact fluorescent lamps and LED lamps:
Power relay with normally open contact/400 W Power relay with normally closed contact/300 W
- Min. breaking capacity: AC1: 100 mA 230 V\~
- Maximum switching speed at full load: 6 switching cycles/minute
• Rated shock voltage: 4 kV
- Upstream protection: 16 A circuit breaker
• Dimensions: 2 modules (17.5 mm x 2)
• Max. altitude: < 2000 m
• Insulation class: 2
• Ball test temperature: 75°C
- Stated voltage and current for EMC emissions testing: 230 V\~ / 0.5 A
• DIN rail mounted independent control device according to EN 60715
Functional features
- Programming capacity: 56 steps
• Min. time between 2 steps: 1 minute
• Precision of operation: ± 1.5 s / 24 h - Power reserve: Lithium battery with 5-year battery life for power failure
- The product switches to the standby state (display off) after 1 minute of no voltage. It returns to auto mode when power is restored or when a key is pressed.
• Protection class (case): IP 20 / IK03 - Protection class (case under faceplate): IP 30 / IK03
- Action type: 2B
- Pollution category: 2
- Software structure: Class A
Environment
- Operating T°: -5 °C to + 45 °C
• Storage T°: -25°C to + +70°C
• Relative humidity: 95 % to 20°C
Connection by spring terminals
- Flexible capacity: 1 to 6 ~mm^2
• Rigid capacity: 1.5 to 10 mm ^4
Connection diagram

Image 2: EGN103 connection diagram (1 output)
Programming: new prog.
Programming can be performed by day or group of days. In this case the setpoints are common to several days. Days: 1 = Monday, 2 = Tuesday, 3 = Wednesday . . . 7 = Sunday.

Figure 3: Presentation of the programming screen
- Select the prog. mode using menu and then ok. The number of free program steps is displayed for a few seconds.
- Select the day(s) using + or -. Confirm with ok.
- ok flashes. Confirm the group of days with ok.
- or ← can be used to reset the group of days if necessary.
- Choose the setpoint status with + or -: On or Off. ok to confirm the status.
- Enter the switch time using + or -. Confirm with ok.
- Enter the minutes using + or -. Confirm with ok.
Program the other setpoints for the group of days by repeating steps 3 to 6.
The day or group of days can be changed during phase 3 by pressing +, - or ←.
After programming, return to auto mode with the menu. In this mode, it is also possible to add a setpoint to the set program.
Proceed as described above.
Display
To check the daily profile set up without the risk of modification or deletion.
Select the < mode using menu and ok.
The first step on Monday is displayed as well as the daily profile.
Two possibilities for display:
-
By pressing + or -: switch from one day to another. In this case, only the first step of the day is displayed as well as the daily profile.
-
By pressing ok: all of the steps for each day are displayed one after the other.
Editing or deleting a program step: change prog.
Select the prog. mode with menu and ok.
Select the change mode with + or -. Confirm with ok.
The number of remaining program steps is displayed for a few seconds.
The first step of the first day or group of days is displayed.
By pressing ok repeatedly, view all of the programmed steps, one by one.
Any flashing field (status, time, minutes) can be changed using + or - and then confirming with ok.
When the cursor is set to ok behind the day group, you can view the days or groups of days to go directly to the one to be changed, with + or -.
To delete a program step: select the channel status (On or Off) and press + and - at the same time.
Clear is displayed on the screen. Confirm with ok.
Bluetooth® programming key
If you use the application to set the clock, perform the installation as described below.
- Connect the EGN003 key to the clock (230 V power supply). Once the key is on the switch, is displayed on the screen.
- During initial set-up:
- directly access the download link of the application by scanning the QR code printed on the time switch with a mobile terminal;
- download and install the configuration application.
- Pair your mobile terminal and your clock with the
Bluetooth ^® programming key.
- Configure your product via the application. To do this, follow the application instructions for programming your time switch.
- When the configuration is complete, perform the following steps locally (using the switch keys):
- copy (load) the key program into the time switch;
- confirm your choice by pressing ok;
- confirm again by pressing ok.

The EGN003 key behaves like an EG005 programming key when it is not connected to Bluetooth®.
Programming key
Once the key (EG005 or EGN003 without Bluetooth® connection) is on the switch, 🔍 is displayed on the screen.
Two types of operations:
A. Permanent exception:
- insert the key into the switch;
- after 10 seconds, the program contained in the key will run without deleting the one in the device;
- once the key is removed, the time switch program will be valid again.
B. Copy (load) / Save:
- the key saves a program contained in the time switch;
- It is also possible to copy the contents of the key to the clock.
- Insert the key; wait 2 seconds.
- Using the menu, select the mode:
- save to save a program contained in the product;
- load to load the key program into the time switch;
- to confirm the program contained in the key.
- Confirm your choice with ok.
- To save and load reconfirm with ok.
The following error messages may be displayed on the screen:
- no prog.: the key is blank, it does not contain any program;
- Error: the key is for a 2 channel switch. In both cases:
- only the save mode is possible;
- the error message remains displayed as long as the key is used, but the switch program is run.
Setting time and day Ⓤ
Daylight savings time change ✉/※
Select the Ⓤ mode with the menu, then ok.
Change the day, month, year, hour and minutes using + or - and ok.
The time switch then proposes the daylight savings time changes ✉/✿.
Select the desired type of change using + or -. Confirm with ok.
The type of change depends on the geographical area.
Types available:
| Type | Start of summer time | Start of winter time | Application area |
| Euro * | Last Sunday of March | Last Sunday of October | European Union |
| USA | Second Sunday of March | First Sunday of November | North America |
| AUS | First Sunday of October | First Sunday of April | Australia |
| USER | Freely scheduled date | Freely scheduled date | |
| No No change | No change |
* default type
The change always occurs between 2:00 a.m. and 3:00 a.m.
When the USER type is chosen:
-
Enter the day and then the month of the summer time change (+1 h) with + or - and ok.
-
Enter the day and then the month of the winter time change (-1 h) with + or - and ok.
The time switch will check which days of which weeks correspond to these dates and will apply the changes to the same periods in subsequent years regardless of the date.
Override - Exception
By repeatedly pressing 🔒 -.
If the output status is On:
1 ^st press: temporary exception. Off and ✅ flash.
The return to automatic mode will occur at the next program step.
2^nd press: permanent override. On and 📋 are fixed. This override must be canceled manually.
3^rd press: permanent override. Off and 📋 are fixed. This override must be canceled manually.
4^th press: return to automatic mode.
Locking
To prevent accidental tampering, the keypad of the time switch can be locked using an EG004 key. Unlocking is performed in the same way.
Warranty
24 months against any defects in materials or workmanship from the date of production. In the event of a defect, the product must be returned to the usual wholesaler. The warranty only applies if the return procedure via the installer and the wholesaler has been observed and if, after our examination, our quality control department does not detect a defect due to an implementation or use that is not compliant with the rules of good practice. Any remarks explaining the defect must be provided with the product.
The Bluetooth ^® word mark and logos are registered trademarks owned by Bluetooth SIG, Inc. and any use of such marks by Hager is under license. Other trademarks and trade names are those of their respective owners.

- Device to be installed only by a qualified electrician according to the installation standards applicable in the country.
- Not suitable for controlling SELV loads.

How to dispose of this product (electrical and electronic equipment waste). (Applicable in the countries of the European Union and other European countries with selective collection systems). This symbol on the product or its
documentation indicates that it should not be disposed of at the end of its life with other household waste. Since uncontrolled disposal of waste may be harmful to the environment or to human health, please separate it from other types of waste and recycle it responsibly. This allows sustainable reuse of material resources. Individuals may contact the distributor who sold the product or inquire with their city hall about where and how they can dispose of this product so that it is recycled in an environmentally friendly manner. Companies may contact their suppliers and consult the conditions of their sales contract. This product should not be disposed of with other commercial waste.
Usable anywhere in Europe (€) and Switzerland
- Electronic Time Switch 1 Channel 7 Days
- Product Presentation
- Main features
- Program reset
- Restart
- Technical specifications
- Electrical specifications
- contact/1500 W
- Functional features
- Environment
- Connection by spring terminals
- Programming: new prog.
- Display
- Editing or deleting a program step: change prog.
- Bluetooth® programming key
- Programming key
- Setting time and day Ⓤ
- Daylight savings time change ✉/※
- Override - Exception
- Locking
- Warranty
Marque : HAGER
Modèle : EGN103
Catégorie : Interrupteur