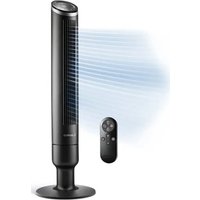
Summit RST200 - Ventilateur Lasko - Notice d'utilisation et mode d'emploi gratuit
Retrouvez gratuitement la notice de l'appareil Summit RST200 Lasko au format PDF.


| Type de produit | Ventilateur sur pied |
| Marque | Lasko |
| Modèle | Summit RST200 |
| Dimensions (H x L x P) | 120 cm x 35 cm x 35 cm |
| Poids | 5,2 kg |
| Alimentation | 220-240 V, 50 Hz |
| Puissance maximale | 60 W |
| Nombre de vitesses | 3 vitesses |
| Oscillation | Oscillation automatique sur 90° |
| Minuterie | Minuterie intégrée jusqu'à 7 heures |
| Télécommande | Télécommande incluse |
| Réglage en hauteur | Tige télescopique réglable |
| Grille de protection | Grille métallique amovible |
| Niveau sonore | 55 dB (max) |
| Entretien et nettoyage | Débrancher avant nettoyage. Nettoyer la grille et les pales avec un chiffon humide. Ne pas immerger. |
| Sécurité | Base antidérapante, arrêt automatique en cas de basculement, protection thermique du moteur |
| Pièces détachées | Pales de rechange disponibles, contacter le service client Lasko |
| Réparabilité | Indice de réparabilité : 6/10 |
| Garantie | 2 ans |
| Couleur | Blanc et noir |
FOIRE AUX QUESTIONS - Summit RST200 Lasko
Questions des utilisateurs sur Summit RST200 Lasko
0 question sur cet appareil. Repondez a celles que vous connaissez ou posez la votre.
Poser une nouvelle question sur cet appareil
Téléchargez la notice de votre Ventilateur au format PDF gratuitement ! Retrouvez votre notice Summit RST200 - Lasko et reprennez votre appareil électronique en main. Sur cette page sont publiés tous les documents nécessaires à l'utilisation de votre appareil Summit RST200 de la marque Lasko.
MODE D'EMPLOI Summit RST200 Lasko
42" Tower Fan
Models: RST200/RST205/RST215

Model RST200 Shown
Have a Question? Need a Part?
Please Do Not Return Product to Store!
Chat with us at www.lasko.com
Monday-Friday 8am - 9pm EST
(Valid in U.S. and Canada only)
Register Your Product Today
Here is what you will receive:
• Extended warranty to 3-years
• Special offers on other Lasko Products
• Streamlined Customer Support
*Register within the first year to be eligible for the extended warranty

WARNINGS
IMPORTANT SAFETY INSTRUCTIONS
When using electrical appliances, these instructions and warnings should always be followed to reduce the risk of fire, electrical shock and injury to persons:

TO REDUCE THE RISK OF FIRE, ELECTRICAL SHOCK OR PERSONAL INJURY, ALWAYS FOLLOW THESE IMPORTANT SAFETY INSTRUCTIONS AND WARNINGS:
- Do not use this Fan to ventilate areas where flammable liquids or vapors are used, stored or are present, including paints, gasoline, varnishes, floor refinishing products or solvents. ALWAYS read and follow all warnings and instructions on the containers for these products!
• Always be sure the plug fits tightly into the outlet. When plugs fit loosely into outlets, they may slip partially out of the outlet and create a poor connection. This may cause outlets to overheat and create a potential fire hazard. Outlets in this condition should be replaced by a qualified electrician.
- Always unplug the power cord when servicing, cleaning or moving the Fan. Do not use the ON/OFF switch as the sole means of disconnecting power. Never leave children unattended when the Fan is on or plugged in. Always turn off and unplug the fan when not in use.
- Be certain that the power source for the Fan is 120V AC. Do not plug the Fan into 240V or other power source.
- The Blue Plug™ on your Lasko Fan is a safety feature. It contains a non-replaceable safety device (fuse) that should not be removed or tampered with. To reduce the risk of fire, electric shock and personal injury, do not attempt to remove, replace, repair or tamper with the originally supplied plug. If the Fan has stopped functioning, it may be due to the safety device incorporated in this plug.
- This fan has a polarized plug (one blade is wider than the other). This plug is designed to fit into the outlet only one way. Match the wide blade to wide slot in outlet and fully insert. Do not attempt to bypass or defeat this safety feature. If the plug does not fit in the outlet, consult a qualified electrician. The outlet may need to be replaced.
- This fan shall not be modified by users, such as by adding supplemental filters to fans not intended to be used for air cleaning purposes.
- WARNING: To reduce the risk of fire, electric shock, or injury to persons, do not use replacement parts that have not been recommended by the manufacturer (e.g. parts made at home using a 3D printer).
- Avoid the use of extension cords, power strips, power taps, outlet style air fresheners or other cord connected device, as these devices may overheat and cause a fire hazard.
- Do not operate any fan with a damaged cord or plug. Discard fan or return to an authorized service facility for examination and/or repair.
- Do not route power cord under rugs, carpets, runners or furniture. This may damage the cord or cause it to overheat creating a fire hazard.
- Always place the fan on a stable, flat, level surface while in operation to prevent the fan from overturning.
- Never insert or allow fingers or objects to enter grille openings while fan is in operation or injury and/or damage to the fan may occur.
- Do not block, cover or obstruct air flow to or from the fan while in operation.
- Do not run cord under carpeting. Do not cover cord with throw rugs, runners, or similar coverings.
- Do not route cord under furniture or appliances. Arrange cord away from traffic area and where it will not be tripped over.
- Never use a single extension cord to operate more than one fan or other electrical device.
- Do not use this fan if it has been damaged or is not functioning properly.
- Remote controls for other appliances or electronic equipment can sometimes interfere with the operation of this fan. If this occurs, move the fan to another location.
- Keep fan remote control unit away from chairs and your bed where it may be sat or laid upon and inadvertently turn on the fan.
- THIS FAN DOES NOT MEET THE REQUIREMENTS OF NEC ARTICLE 547-7 (2008). This fan is not suitable for use in agricultural facilities including areas where livestock, poultry or other animals are confined. Please refer to national electric code (NEC) Article 547-7 (2008), or applicable state or local codes or standards relating to electrical requirements for agricultural buildings.
- THIS FAN DOES NOT MEET THE REQUIREMENTS OF NEC ARTICLE 500 (2008). This fan is not suitable for use in hazardous locations. Please refer to national electric code (NEC) article 500 or applicable state or local codes or standards relating to electrical requirements for hazardous locations.
SAVE THESE INSTRUCTIONS
▲WARNING
- INGESTION HAZARD: This product contains a button cell or coin battery.
• DEATH or serious injury can occur if ingested. - A swallowed button cell or coin battery can cause Internal Chemical Burns in as little as 2 hours.
- KEEP new and used batteries OUT OF REACH of CHILDREN
- Seek immediate medical attention if a battery is suspected to be swallowed or inserted inside any part of the body.
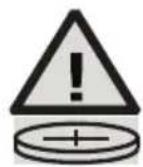
- Remove and immediately recycle or dispose of used batteries according to local regulations and keep away from children. Do NOT dispose of batteries in household trash or incinerate.
• Even used batteries may cause severe injury or death. - Call a local poison control center for treatment information.
- Uses 1 - 3V CR2025 battery.
• Non-rechargeable batteries are not to be recharged. - Do not force discharge, recharge, disassemble, heat above (manufacturer's specified temperature rating) or incinerate. Doing so may result in injury due to venting, leakage or explosion resulting in chemical burns.
- Ensure the batteries are installed correctly according to polarity (+ and -).
- Do not mix old and new batteries, different brands or types of batteries, such as alkaline, carbon-zinc, or rechargeable batteries.
- Remove and immediately recycle or dispose of batteries from equipment not used for an extended period of time according to local regulations.
• Always completely secure the battery compartment. If the battery compartment does not close securely, stop using the product, remove the batteries, and keep them away from children.
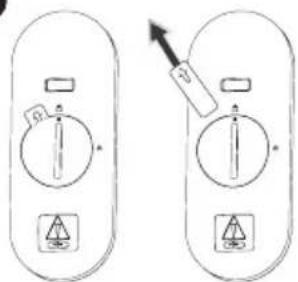
How to Remove the Plastic Tab from the Back of your Remote Control
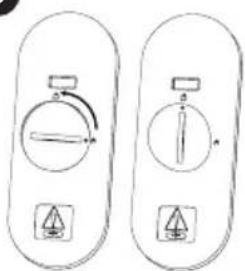
- Remove the plastic battery tab before using the remote. Grab and pull the tab out. (Refer to the illustration of step one below.)
- To remove the battery cover, use a coin similar to a quarter to unlock the remote control battery door. Turn clockwise to unlock.
- To reinstall the cover, align the dot with the unlock icon on the remote. Use a coin, such as a quarter, to lock the battery door by turning it counterclockwise.
When it's time to replace the battery, follow the steps above to remove the battery cover. Replace with one CR2025 Lithium battery.
1
New 9/25
2

3
3
natural_image
Two identical diagrams showing a circular object with a pointer and two triangular symbols below, no text or labels present.RST200/RST205/RST215
Getting to Know your Tower Fan
A. Control Panel/Display
B. Body
C. Support Base Front
D. Support Base Rear
E. Exhaust Grille
F. EZ Grip Carry Handle
G. Filter
H. Air Intake Grille
I. Safety Screw
J. Remote Control
K. Remote Control Storage


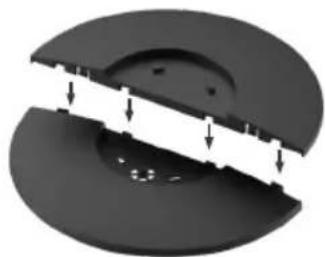
Easy 1-2-3 Assembly

D- Support Base Rear
natural_image
Cross-sectional view of a mechanical component with internal channels and mounting holes (no text or symbols)C- Support Base Front
Align the slots on part D with tabs on part C. Snap Together.


natural_image
Close-up of a mechanical component labeled 'B - Body' with no visible text or symbols on the object itself.Lay product down on a flat surface. Attach base to the body, using alignment pin as a reference.
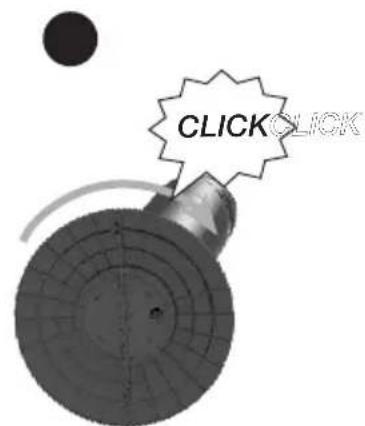
Twist until base clicks into place.
How To Use Your Tower Fan
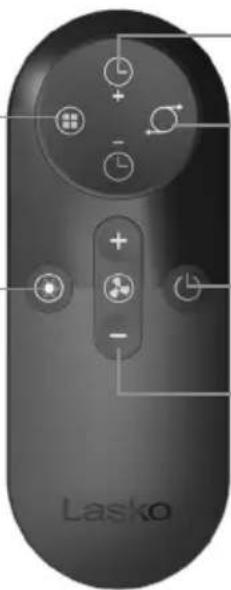
Remote Control
Mode Button
You can choose between Night, Auto, Nature, Custom Mode
Display Dimmer Button Press to dim or turn off the display.
natural_image
Close-up of a Lasko remote control with labeled buttons and ports (no readable text beyond brand name)Timer Button
Press the +/- to change the timer (up to 12 hours)
Oscillation Button
Press to START and STOP Oscillation
Power Button
Press to turn fan ON/OFF
Speed Button
Press the +/- to change speeds
Display
Lasko AirSense™ - Using sensor technology integrated with smart AI capabilities, AirSense tracks your patterns and preferences to create the ideal environment.

Nature Mode - The fan replicates natural wind by varying the fan speed randomly.

Night Mode - The display will shut off and the speed will gradually decrease as you sleep.

Auto Mode - Fan speed adapts to the ambient air temperature of the room.

Timer - Choose a timer up to 12 hours. Your fan will shut off when the timer expires.

Custom Mode - Choose your desired speed, oscillation, and display settings

Child Lock - Press and hold the power button for three seconds to activate child lock. Hold for an additional three seconds to deactivate or simply unplug the fan.
Numerical Display - The two digits will display the ambient temperature, fan speed, and timer settings.

Temperature Units - Press and hold the Mode button for 10 seconds to change between °C and °F. Selection will be stored in memory.
Controls

Power Button - Press to Turn Fan ON/OFF.

Oscillation Button - Press to START and STOP Oscillation.

Timer Button - Set timer up to 12 hours. Continue pressing the button until desired time setting is reached.

Fan Speed Button - Set speed from 1-6. Continue pressing the button until desired speed is reached. Remote has (+) (-) button which will allow you to increase and decrease speed.

Mode Button - You can choose between Night, Auto, Nature, Custom Mode.

Display Dimmer Button - Press to dim or turn off the display. Choose between 4 brightness settings. High • Medium • Low • Off.

natural_image
Close-up of a circular digital climate control panel with a 72-degree display and control buttons (no readable text or symbols beyond basic icons)Filter Installation Guide (Filter Optional)
NOTE: The face velocity of the fan will be reduced when filter medium is added.
A very dirty or clogged filter will result in a decrease in air performance and an increase in noise level of your fan. Check and service your filter regularly to maintain optimal fan performance.
Filter Installation / Replacement Instructions
Pre-installation note: it is recommended that the fan is laid down on a flat surface while placing or replacing your fan filter.
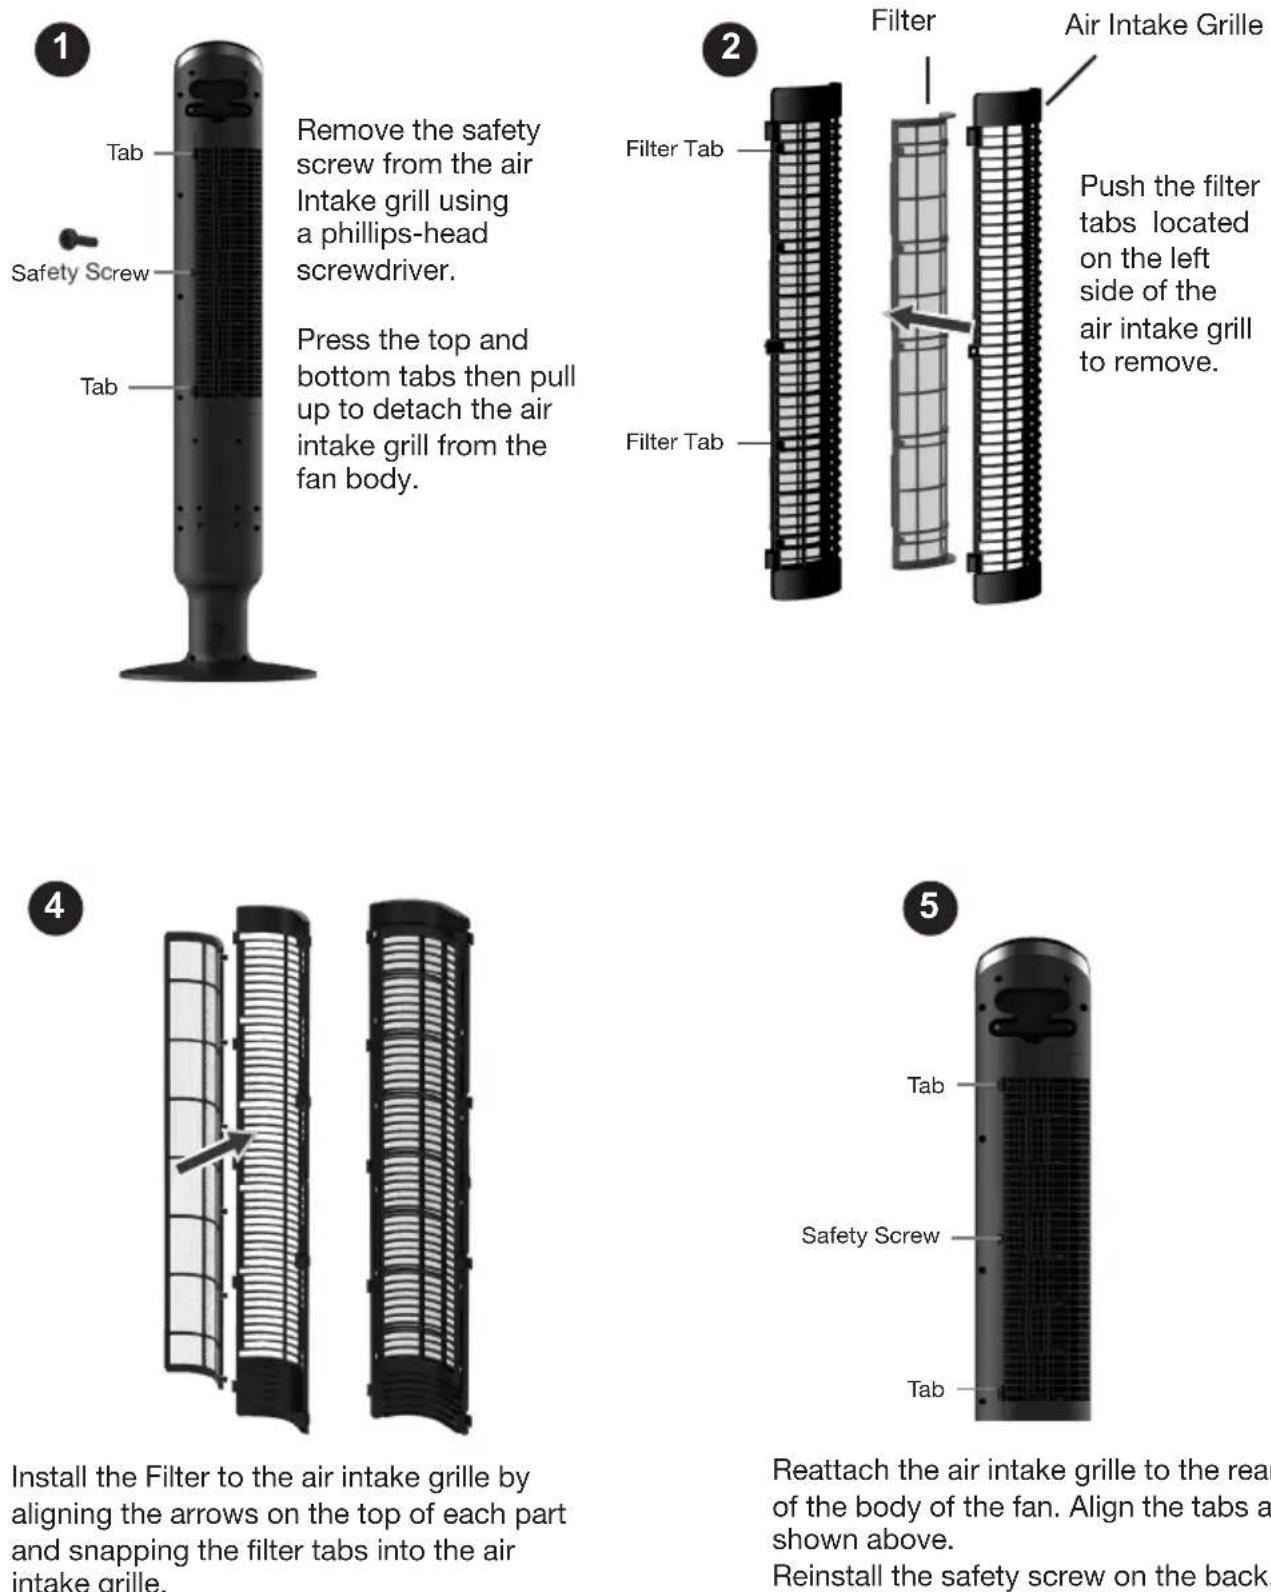
Install the Filter to the air intake grille by aligning the arrows on the top of each part and snapping the filter tabs into the air intake grille.
Reattach the air intake grille to the rear of the body of the fan. Align the tabs as shown above.
Reinstall the safety screw on the back.
MAINTENANCE
Please reference and follow filter installation guide on page 6 for disassembly and resassembly instructions.
A very dirty or clogged filter will result in a decrease in air performance and an increase in noise level of your fan. Check and service your filter regularly to maintain optimal fan performance.
Air Intake Grille

natural_image
Three-panel image showing a filter structure, its grid pattern, and a hand holding a tool near a black panel (no text or symbols visible)Cleaning the fan:
- Make sure the fan is unplugged.
- Never place the fan in or near water.
- Remove the air intake grille.
- Clean the Air intake grille using microfiber cloth, duster, or vacuum.
- To help remove lint and dirt from inside the fan, use a vacuum equipped with a brush attachment.
- Clean filter with microfiber cloth.
- Never use alcohol or solvents such as gasoline, benzene, paint thinner, or other harsh cleaners.
TROUBLE SHOOTING TIPS
If your Fan fails to operate, see below for a list of probable causes and solutions:
- Try powering the fan off and unplugging it from the wall outlet. Allow the fan to sit for 10-15 minutes and try plugging it in again.
- When plugging the fan in, be sure it is plugged directly into a working outlet.
- Remote not working? Be sure you are using brand new batteries, and they are installed correctly.
STORAGE: Store the fan with these instructions, in the original carton in a cool, dry place.
LUBRICATION: Motor is permanently lubricated. No maintenance is required.
DISPOSITION: Corrugated packaging materials are recyclable. For environmentally responsible disposal of this product, contact your local waste service provider or visit www.1800recycling.com.
LIMITED WARRANTY
LASKO PRODUCTS, LLC LIMITED WARRANTY (VALID IN U.S. AND CANADA ONLY)
What this warranty covers: This product is warranted against defects in workmanship and/or materials.
How long this warranty lasts: This warranty extends solely to the original purchaser of the product and lasts for (1) one year from the date of the original purchase or until the original purchaser sells or transfers the product, whichever occurs first. Additionally, the warranty period can be extended to (3) three years from the original date of purchase by successfully registering the product within the first year of purchase.
What Lasko will do: During the warranty period, Lasko will, at its sole option, repair or replace any part or parts that prove to be defective or replace the whole product with the same or comparable model. For all warranty claims, the product must be returned to Lasko Products, LLC at customer's expense with proof of purchase within the warranty period. Contact the Lasko customer service department to obtain a Return Authorization ("RA") Do not return products without an RA or the warranty claim will not be processed.
What this warranty does not cover: This warranty does not apply if the product was damaged or failed because of accident, improper handling or operation, shipping damage, abuse, misuse, or unauthorized repairs made or attempted. This warranty does not cover shipping costs for the return of products to Lasko for repair or replacement. Lasko will pay return shipping charges from Lasko following warranty repairs or replacement.
Any and all warranties, expressed or implied (including, without limitation, any implied warranty of merchantability), last one year from the date of original purchase or until the original purchaser of the product sells or transfers the product, whichever first occurs and in no event shall lasko's liability under any express or implied warranty include (i) incidental or consequential damages from any cause whatsoever, or (ii) replacement or repair of any house fuses, circuit breakers or receptacles. Notwithstanding anything to the contrary, in no event shall lasko's liability under any express or implied warranty exceed the purchase price of the product and any such liability shall terminate upon the expiration of the warranty period.
Some states and provinces do not allow limitations on how long an implied warranty lasts, or the exclusion or limitation of incidental or consequential damages, so these exclusions or limitations may not apply to you. This warranty gives you specific legal rights. You may also have other rights which vary from state to state and province to province.
Proof of purchase is required before a warranty claim will be accepted.
CUSTOMER SERVICE:
Email: producthelp@lasko.com
Web: www.lasko.com
Our Customer Service team is available to assist you with product service questions and replacement parts. Chat with us at www.lasko.com Monday-Friday 8am - 9pm EST (Valid in U.S. and Canada only). Please have your model number available, as well as the type and style located on the underside of your product.
Customer Service Dept.,
820 Lincoln Ave., West Chester, PA 19380
(Please do not send product to this location)
- 42" Tower Fan
- WARNINGS
- IMPORTANT SAFETY INSTRUCTIONS
- SAVE THESE INSTRUCTIONS
- ▲WARNING
- How to Remove the Plastic Tab from the Back of your Remote Control
- Getting to Know your Tower Fan
- Easy 1-2-3 Assembly
- How To Use Your Tower Fan
- Remote Control
- Mode Button
- Timer Button
- Oscillation Button
- Power Button
- Speed Button
- Display
- Controls
- Filter Installation Guide (Filter Optional)
- Filter Installation / Replacement Instructions
- MAINTENANCE
- Cleaning the fan:
- TROUBLE SHOOTING TIPS
- LIMITED WARRANTY
- CUSTOMER SERVICE:
Marque : Lasko
Modèle : Summit RST200
Catégorie : Ventilateur