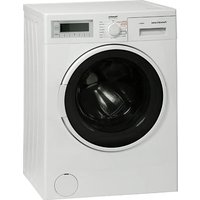
COMBI9‐6 - Lave-linge Porter & Charles - Notice d'utilisation et mode d'emploi gratuit
Retrouvez gratuitement la notice de l'appareil COMBI9‐6 Porter & Charles au format PDF.


| Type de produit | Lave-linge frontal |
| Marque | Porter & Charles |
| Modèle | COMBI9‐6 |
| Capacité de lavage | 7 kg |
| Vitesse d'essorage maximale | 1200 tr/min |
| Classe énergétique | A (échelle A à G) |
| Dimensions (H x L x P) | 85 x 60 x 55 cm |
| Poids net | 68 kg |
| Niveau sonore (lavage/essorage) | 75 dB / 85 dB |
| Consommation d'eau par cycle | 50 L |
| Nombre de programmes | 15 |
| Type d'affichage | LED |
| Fonctions spéciales | Départ différé, prélavage, rinçage plus, sécurite enfants |
| Type de chargement | Frontal |
| Alimentation électrique | 220-240 V, 50 Hz, 10 A |
| Matériau de la cuve | Inox |
| Pièces détachées disponibles | Filtre, courroie, résistance, programmeur, joints |
| Indice de réparabilité | 7,8/10 |
| Nettoyage du filtre | Tous les 3 mois |
| Garantie constructeur | 2 ans |
FOIRE AUX QUESTIONS - COMBI9‐6 Porter & Charles
Questions des utilisateurs sur COMBI9‐6 Porter & Charles
0 question sur cet appareil. Repondez a celles que vous connaissez ou posez la votre.
Poser une nouvelle question sur cet appareil
Téléchargez la notice de votre Lave-linge au format PDF gratuitement ! Retrouvez votre notice COMBI9‐6 - Porter & Charles et reprennez votre appareil électronique en main. Sur cette page sont publiés tous les documents nécessaires à l'utilisation de votre appareil COMBI9‐6 de la marque Porter & Charles.
MODE D'EMPLOI COMBI9‐6 Porter & Charles
WASHER - DRYER
USER MANUAL
CONTENTS
BEFORE USING YOUR MACHINE 5
- Correct use 5
- General warnings 6
- Safety warnings 9
Burn risk 9
Electrocution risk 10
- Flooding risk 10
- Explosion risk 12
- Fire risk 12
- Fall and injury risk 14
Child safety 15
THE ENVIRONMENT 16
- Disposing of packaging and your old machine responsibly 16
SAVINGS & EFFICIENCY INFORMATION 17
OVERVIEW OF YOUR DEVICE 18
- General Appearance 18
• Technical specifications 20
SETTING UP THE MACHINE 21
- Removing the transportation safety screws 21
- Placing the machine and adjusting the adjustable foot 23
- Electrical connection 25
• Water inlet connection 26
• Water draining connection 27
CONTROL PANEL 28
• Detergent drawer general view 29
• Detergent drawer compartments 30
- Programme button 31
ADJUSTING MACHINE SETTINGS 32
• Language selection setting 32
- Eco time settings 36
- Current time setting 38
- Sound adjustment 40
- Screen brightness setting 41
- Screen contrast setting 41
- Revert to factory settings 42
WASHING OPERATION 43
- Sorting laundry 43
- Explanation of washing machine symbols 44
- Placing laundry into the machine 45
- Adding detergent and other chemicals 48
- Program selection 50
• If you want your laundry dried at the end of washing 51 - Cupboard dry 51
- Hanger dry 52
- Iron dry 53
• Drying with duration 54
• Additional functions 55 - Pre-wash additional function 56
- Extra rinse function 57
- Anti-allergic additional function 58
- Easy ironing additional function 59
• Economic time interval additional function 60 - Delay Time / Finish time adjustment additional function 63
• Memory record function button (memory) 65
- Start/Pause button 71
- Starting the a programme 71
- Pausing a programme / adding laundry 74
- Cancelling a programme 74
- Finishing programme 75
-Childlock 76
- Programme table 78
- Cotton 78
- Cotton Eco 78
- Eco 20° 79
- Synthetics 80
- Delicates 81
- Wools / Silk 81
- Duvet 82
- Extras 83
- Cotton dry 83
- Gentle dry 83
- Rinse / Spin 84
-Drain/Drum clean 85
- Super rapid 12 min 86
- Daily Fast 60° 60 min 86
- Refresh 87
- Wash & Dry 29 min 88
- Synthetics Wash & Dry 88
- Cotton 60° Wash & Dry 89
- Cotton 90° Wash & Dry 89
- Selecting sub-programmes (Synthetics) 90
- Selecting sub-programmes (Delicates) 92
- Selecting sub-programmes (Extras) 94
MAINTENANCE AND CLEANING OF YOUR MACHINE 97
• Water inlet filters 98
• Detergent drawer maintenance and cleaning 99
- Liquid detergent apparatus 99
- Siphon cover 100
- Drum cleaning 100
- Body cleaning 100
- Pump filter maintenance and cleaning 101
TROUBLESHOOTING 103
AUTOMATIC FAULT WARNINGS AND WHAT NEEDS TO BE DONE 108
INDEX 113
BEFORE USING YOUR MACHINE Correct Use
- Read this user's manual.
- Your machine is designed to be used in domestic environments. Using it for commercial purposes shall cause your warranty to be void.
- Do not let your pets near the machine.
- Please check the packaging of your machine before installation, and the outer surface of the machine after the packaging has been removed. Do not operate damaged machines or machines with opened packaging.
- Have your machine installed only by an authorised service company. Any interference to your machine by anyone other than authorized services shall cause your warranty to be void.
- This appliance is not intended for use by people (including children) with reduced physical, sensory or mental capabilities, or lack of experience or knowledge, unless they have been given supervision or instruction concerning use of the appliance by a person responsible for their safety.
- Please use your machine for laundry that is specified as washable and dryable after washing by their manufacturer on their label.
- You must remove the transportation safety screws before your machine's first use. The machine will malfunction if it is operated with the transport safety screws still in place and this will void your warranty.
- Your machine warranty does not cover damage caused by external factors (floods, fire, rodents etc.) - Please do not throw away this user manual. Store it in a safe place. It might be needed by you or the next user.
General warnings
- The necessary ambient temperature for your machine's ideal operation is 15-25°.
- Frozen hoses can tear and explode. In regions where the temperature is below zero, the electronic card may not operate safely.
- Please ensure that the clothes you will load into your machine do not have foreign substances (nails, needles, coins, lighters, matches, clips etc.) in their pockets. These foreign substances can damage your machine.
- Before starting to use your machine, you may call the nearest authorized service company and request help for installation, operation and use of your machine.
- It is advised that the first washing operation is conducted by putting 1/2 scale detergent in compartment number 2 of the detergent drawer and run the machine without any clothes in on the “DRUM CLEANING” program. (Please see program table page 85)
- As detergent or softener exposed to air for a long time may cause residues, only put your detergent or softener in the detergent drawer at the beginning of each wash.
- It is advised that you unplug your machine and close the water inlet tap if you will not use your machine for a long time. You should also leave the door of your machine open to prevent bad odours forming due to humidity.
- Some water might be left in your machine due to trials and tests conducted for Quality Control procedures during production. This causes no harm to your machine.
- Keep the document bag that came inside your machine that contains the user manual out of the reach of children and babies to prevent the risk of suffocation.
- Keep small parts found in the document part away from the reach of children and babies.
- Use pre-wash programs only for very dirty laundry.
- You should not load your machine with the amount of laundry that will exceed the maximum laundry amount specified in the washing or drying program you have chosen.
- In case of any malfunction, unplug the machine and close the tap first. Do not attempt to repair by yourself and consult the nearest authorized service company.
- Never open the detergent compartment when the appliance is running.
- Never force the door open when the machine is running.
- Please adhere to the manufacturers' advice regarding the use of fabric conditioner or similar products you will use in your machine.
- While your machine is in the drying process, please do not stop your machine before the program ends.
If you have to do this, remove all your laundry fast and spread them on an appropriate place immediately to allow them to cool down.
- Set up your machine in a place where its door can be completely opened. (Do not set up your machine in places where its door cannot be fully opened.)
- Set up your machine in locations that can be ventilated and might have constant air circulation.

Safety warnings
You must read these warnings. Ignoring these warnings may put you or your loved ones at risk of fatal injuries.

Burn risk!
- Do not touch the discharge hose or the water discharged during the discharging process as the appliance may reach high temperatures when running.
- Open the door of the machine all the way after the drying process. Do not touch the door glass. Burn hazard may occur due to high temperature.

Electrocution risk!
- Do not use multiple plugs or extension cords.

natural_image
Simple line drawing of a cable being inserted into a housing, with no text or symbols present.- Do not plug in damaged plugs or plugs with torn cables.
- Never pull from the cable when unplugging.
• Grab the plug when unplugging.
- Do not plug-in or out the plug from the receptacle with wet hands to prevent electric shock.
- Never touch the machine with a wet or damp hand or foot.
- Call the nearest authorized service company for assistance if the power cord malfunctions.

Flooding risk!
- Check whether the water flows fast or not before hanging the discharge hose on the sink.
• Take necessary measures to prevent the hose you hung from slipping. - The backfiring force of a hose that is not places appropriately can move the hose from the place it is hung on the sink. Take measures to prevent the plug in your sink from plugging the sink hole.
! Explosion risk!
- As there is a drying function on your machine, make sure that materials like stain removing chemicals or washing gas that you might have applied on your laundry earlier are properly rinsed and purged. There might be a risk of explosion when you run your machine with the drying function otherwise.
Fire risk!
- Unwashed dry laundry must not be dried in your machine.
- Do not keep flammable or explosive liquids near your machine.
- Materials stained with food oil, acetone, alcohol, petrol, kerosene, stain remover, turpentine, beeswax and beeswax remover must first be washed with an extra amount of detergent and hot water before being put through the drying process. There might be a risk of fire when you run your machine with the drying function otherwise.
- If you're going to choose a washing and drying program, do not place a detergent dose adjustment device/ball into your machine. They might pose a fire risk.
- Laundry must not be dried in the machine under the conditions specified below due to the risk of fire:
- If laundry is not washed.
- If oil stains and other stains on the laundry (food oils, balms and cosmetic remains, kitchen swab etc.) are not cleaned enough.
- Laundry cleaned with industrial chemicals.
- Laundry that has high amount of foam-sponge-rubber or rubber-like parts and accessories on.
-Rubber, sponge(latex), shower bonnet, watertight textile products, rubber based objects and clothes or pillows filled with rubber sponge must not be dried in the washing machine with the drying function.
- Stuffed and damaged parts (pillows or jackets). The sponge parts dangling outside these stuffings might catch fire during the drying process.
- The sulphur in paint-removing materials might cause corrosion. Thus, never use paint-removing materials in your machine.
- Please ensure that detergent cups are not left inside the laundry. These plastic cups might melt during drying and damage your machine and laundry.
- Laundry that has had a stain removal process applied must be rinsed thoroughly before washing.
- Never use products that contain solvent material (like washing gas) in your machine.
- Remove all the objects in the pockets of your laundry (needles, paperclips, lighters, matches etc.) when loading your machine. Fire and Explosion risk may occur.

Fall and injury risk!
- Do not climb on your machine. The upper table of your machine may break and you might get injured.
- Tidy the hose, cable and packaging of your machine during installation. You might trip over and fall.
- Do not turn your machine upside down, or on its side.
- Do not lift your machine by holding it from extruding parts (detergent drawer, door). These parts might break and cause you injury.
- There's a risk of tripping and injury if the materials like hoses and cables are not property stored after your machine is installed.

natural_image
Illustration of two workers in uniform standing beside a washing machine (no text or symbols)
Machine must be carried by 2 people or more.

Child safety!
- Do not allow your children to play with the machine. It is an electrically driven appliance.
- Do not leave children unattended near the machine. Children might lock themselves into the machine.
- The door glass and machine surface might be extremely hot during your machine's operation.
- It is therefore especially important that children do not touch the machine as it may damage their skin.

natural_image
Line drawing of a hand holding a piece of tissue or material, no text or symbols present- Keep packaging material away from children.
- Poisoning might occur if the detergent and other washing aids are consumed, and eye or skin irritation might occur if they come into contact with the skin. Keep the cleaning materials where children cannot reach them.
PACKAGING AND THE ENVIRONMENT
DISPOSING OF PACKAGING AND YOUR OLD MACHINE RESPONSIBLY
Removal of packaging materials
Packaging materials protect your machine from the damage that might occur during transportation. Please recycle you packaging materials.
Recycled material provides both raw material savings and decreases waste production
Removal of old machine
Old electrical devices might still contain salvageable parts. So, never throw your old devices that you do not use into the waste.

natural_image
Symbol of a trash bin crossed with two crossed lines, no text or labels presentEnsure the parts of your old electronic or electrical devices are reused by giving them to your local recycling centre.
Please ensure your old appliances are kept in an appropriate place for the safety of children until they are taken outside the house.
SAVINGS & EFFICIENCY INFORMATION
Some important information to get more efficiency out of your machine:
- The amount of laundry you put in your washing machine should not exceed the maximum amount indicated. By avoiding overloading, your machine shall run more efficiently.
- Not using pre-wash feature for normal and lightly soiled laundry shall save electricity and water.
OVERVIEW OF YOUR DEVICE
General Appearance
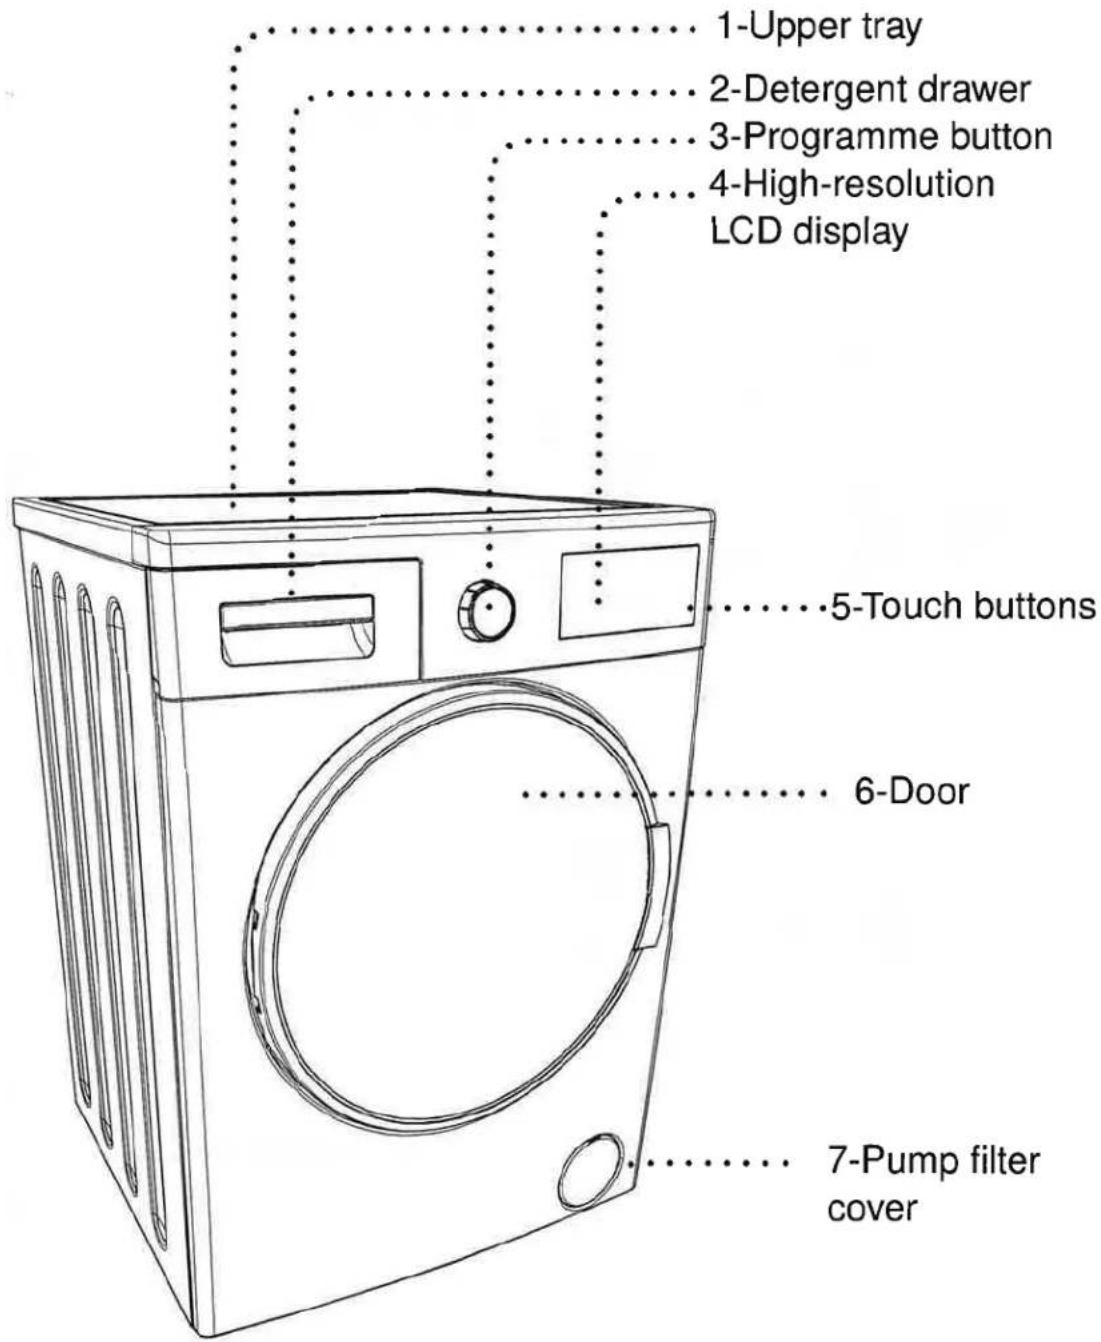
General Appearance

12-Drain hose holding plastic:
(The operation of the machine will be affected if this plastic part is removed. So please don't remove this plastic part under any condition.)
Technical Specifications
| Maximum washing capacity (dry laundry) (kg) | 9.0 |
| * Maximum drying capacity (kg) | 6.0 |
| Spin speed (rev / min) | 1400 |
| Number of programs | 15 |
| Operating voltage / frequency (V/Hz) | 220-240 / 60 |
| Water pressure (Mpa) | Maximum:1Minimum:0.1 |
| Dimensions (hxwxl) (mm) | 845x597x582 |
| * Unwashed dry laundry must not be dried in your machine. | |
| Energy consumption (washing, spinning, drying) (kWh/cycle) | 6,12 |
| Energy consumption (washing and spinning only) (kWh/cycle) | 0,90 |
| Water consumption (washing, spinning, drying) (L/cycle) | 112 |
| Water consumption (washing and spinning only) (L/cycle) | 48 |
| Control programs in accordance with EN 50229 standart |
| Program will be used for Washing cycle : |
| Program: Cotton Eco, Load: 9 kg, Temperature: 60°C, Spin Speed: Max – 1400 rpm, Option: No option will be selected. |
| Programs will be used for Drying cycle: |
| Drying of 1st part: |
| Program : 7th Program Extras sub-program “cotton dry”, Load: ~4.5 kg (1 sheet +16 pillowcases)Option: Dry: hanger (2) |
| Drying of 2nd part: |
| Program : 7th Program Extras sub-program “cotton dry”, Load: ~4.5 kg (2 sheets + 2 pillowcases + all towels)Option: Dry: hanger (2) |
SETTING UP THE MACHINE

natural_image
Simple line drawing of a gear and wrench icon (no text or symbols)Have your machine installed only by an authorized service company.
Removing transportation safety screws
natural_image
Technical line drawing of a mechanical component with symmetrical cutouts and mounting holes (no text or symbols)
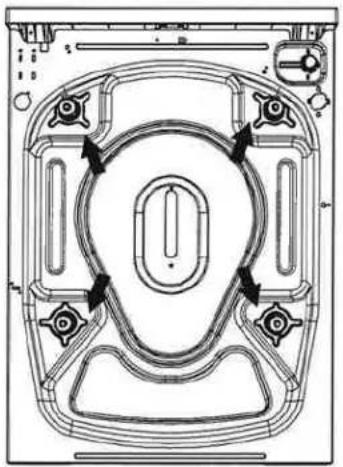
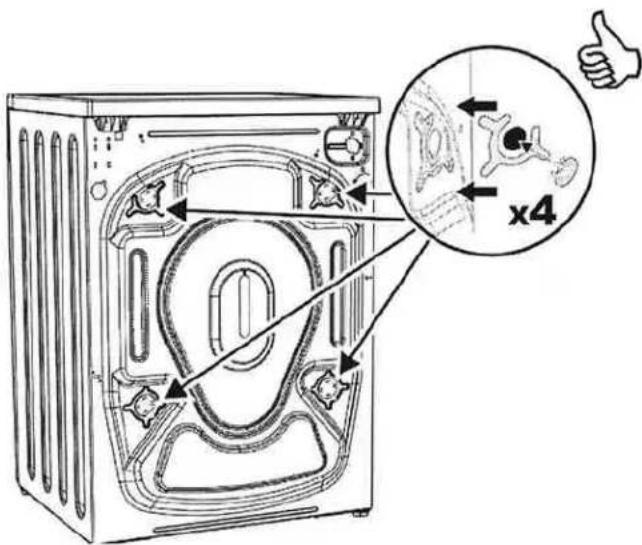
Before operating your machine, you must remove the transport safety screws on the backside of the machine.

The transport safety screws should be loosened by rotating them counter clockwise with an appropriate wrench.

Transport screws should then be removed by pulling them out. The removed transport safety screws should be stored to be used again in case the machine needs to be transported again, e.g. if moving house.
NOTE: You must remove the transportation screws from your machine before first use. Faults occurring in machines operated with transport screws still fitted shall be out of the scope of the warranty.
Place the plastic transportation screw caps found in the accessory bag in the gaps left by the transportation screws.
Placing the machine and adjusting the adjustable foot
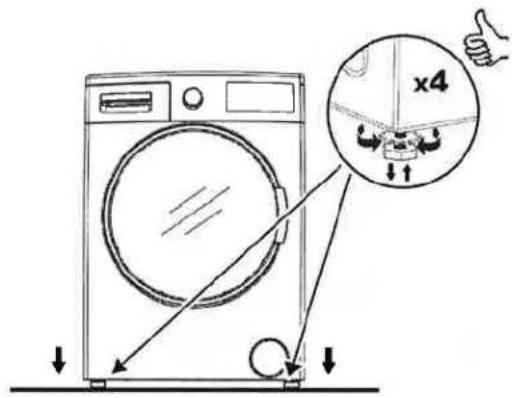
Do not install your machine on a carpet or such ground that will block ventilation from the base.
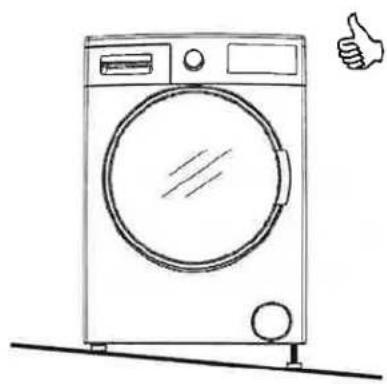
To ensure silent and vibration-free operation of your machine, it should be deployed on a non-sliding and firm ground.
natural_image
Line drawing of a front-loading washing machine with a thumbs-up gesture (no text or symbols)You can adjust the balance of your machine by a gauge from the top.

natural_image
Mechanical gear assembly diagram with rotational arrow indicating motion (no text or symbols)You can adjust the balance of your machine by the adjustable foot.
- Loosen the plastic adjustment nut.
- Adjust the feet upward and downward by rotating them.

natural_image
Mechanical diagram showing a gear assembly with a rotating shaft and base, no text or symbols present- Tighten the plastic adjustment nut after balance is achieved.

natural_image
Simple line drawing of a washing machine with a black X symbol crossed out, no text or labels present.
- Never put cardboard, wood or suchlike materials under your machine if you are intending to stabilize the distortions on the ground. - When cleaning the ground, on which your machine rests, be careful not to disrupt the machine's stability.

Electrical connection
- Your washer-dryer is adjusted for 220-240V and 60Hz.
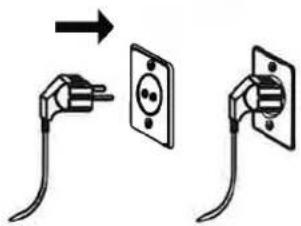
• The mains cord of your machine is equipped with a specific grounded plug.
- The mains plug should always be inserted to a grounded receptacle of 10 amperes. The fuse
current value of the power line connected to this plug should also be 10 amperes.
- If you don't have such a receptacle and fuse conforming with this, please have it done by a qualified electrician.
- We do not take responsibility for damages that occur due to ungrounded usage.
Note: Operating your machine under low voltage will cause the life cycle of your machine to be reduced and its performance to be restricted.
Water inlet connection
- Operate your machine with cold water only.
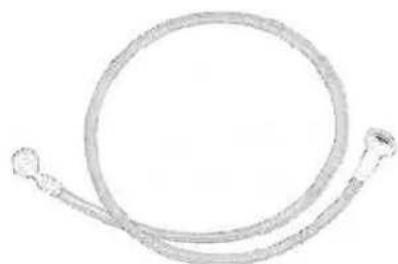
- Use only the new water inlet hoses given with your machine or purchased through authorized dealers.
natural_image
Coiled cable or hose with two connectors (no text or symbols visible)- 1 gasket is included in the hose packaging to prevent water leaks in connections. Fit this gasket to the end of new water inlet hose on the side of faucet.
- Connect the white end of the water inlet hose to the water entrance valve on the back of the machine. Tighten plastic parts on the hose using your hand.

- Connect the other end of the water inlet hose to a 3/4" water tap with threads. Tighten plastic parts on the hose using your hand.
• In uncertain conditions, have the connection works done by a qualified plumber.

- Ensure that points of contact do not leak after you have made the connections.
- Flow of water with pressure of 0.1-1 Mpa will allow your machine to operate more efficiently (0.1 Mpa pressure means that more than 8 litres of water will flow through a fully-opened faucet per minute).
- Ensure that the new water inlet hoses are not bent, broken, crushed or resized.
Note: Use only the new water inlet hose coming with your machine when making the water inlet connections. Never use old, used or damaged water inlet hoses.
Water draining connection
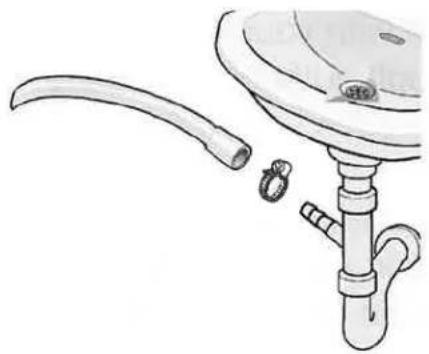
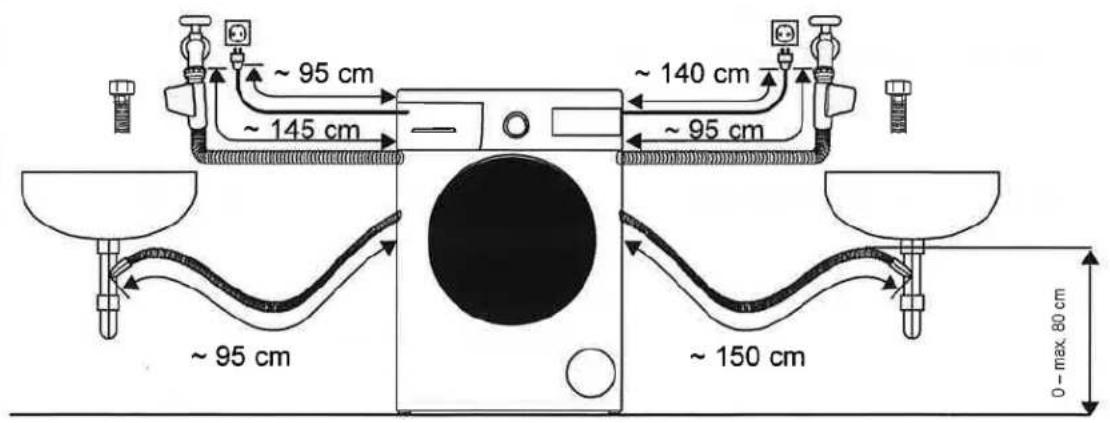
- Connect the water drain hose to a waste water drain hole or a special apparatus connected to the outlet elbow of the sink placed at a maximum height of 80 cm.
natural_image
Line drawing of a kitchen sink with a curved pipe and faucet (no text or symbols)- Never attempt to extend the water discharge hose by jointing.
- Do not put your machine's water discharge hose into any container, bucket or bathtub.
- Make sure that the water discharge hose does not bend, buckle, get crushed or extended.

1- Detergent drawer
5-Start/Pause button: You can start your machine
2- Program knob: You may select the programme you wish to
use via the program knob. You may set the program selection op-
eration by rotating the programme knob in both directions. Ensure
that the programme knob is exactly on the programme you want to
select.
3- Info Screen: In this screen, you can see the features of the
washing or drying program you selected and also get information
about the machine's status.
4-Adjustment and additional function buttons: The buttons
on your machine are touch buttons. You only have to touch them
lightly to make a selection.
CONTROL PANEL
Detergent drawer general view
natural_image
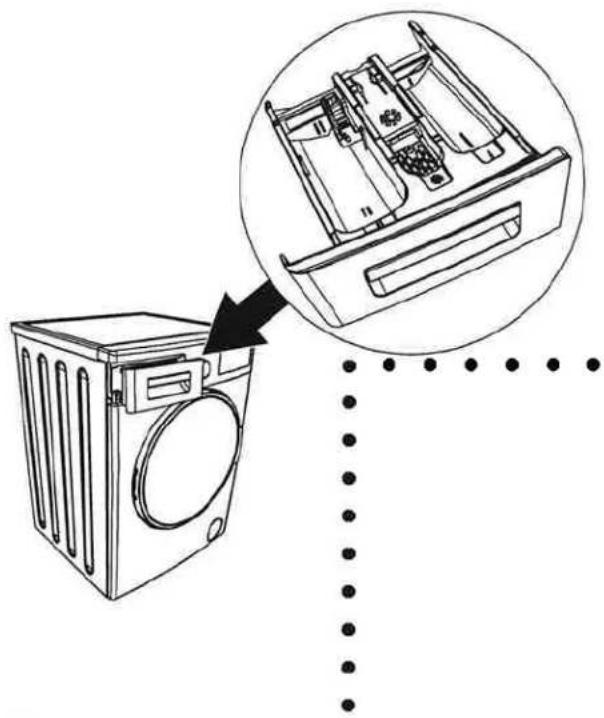
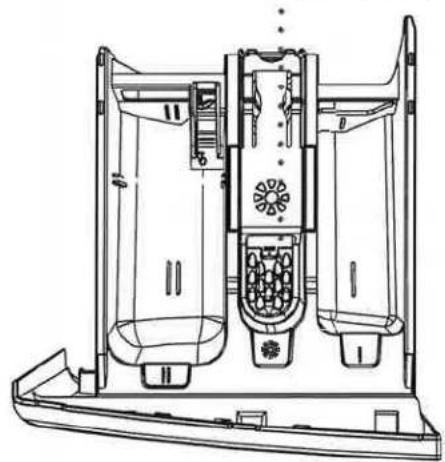
Line drawing of a washing machine with an inset close-up showing internal components (no text or symbols)When you want to wash your laundry with liquid detergent, you can use the liquid detergent apparatus. You can use your liquid detergent in all programs without pre-wash. For this, plug the liquid detergent apparatus to second compartment of the detergent drawer (present in your machine) and adjust the liquid detergent amount (use liquid detergent in the amounts the detergent manufacturers foresee). Do not exceed the part that is labeled Max., use only for liquid detergent, remove this from its place during powder detergent use.)

Main Wash
Detergent Compartment
Softener
Compartment
Pre-Wash
Detergent Compartment
Powder detergent level steps

natural_image
Line drawing of a boat hull with no text or symbols
Powder detergent scoop
(1_2) Model dependant
Detergent drawer compartments
Main wash detergent compartment:

natural_image
Technical line drawing of a mechanical device with internal components and mounting base (no text or symbols)In this compartment, only materials like detergent (liquid or powder) or anti-lime. You can find the liquid detergent apparatus for your liquid detergent inside your machine during the first set up. (*)
natural_image
Technical line drawing of a mechanical device with internal components and housing (no text or symbols)Softener, starching, detergent compartment:
In this compartment, materials like softener for your laundry can be used (it is advised that you use the amount and type the manufacturer recommends). The softeners you use for your may sometimes remain in this compartment. The reason for this is that softener is not fluidal. To prevent this, it is recommended to use liquid softeners that are more fluidal or use the softener by diluting.

natural_image
Technical line drawing of a mechanical device with internal components and housing (no text or symbols)Pre-Wash detergent compartment:
This compartment should be used only when pre-wash feature is selected. It is recommended that pre-wash feature used only for very dirty laundry. Please refer to page 99 for the maintenance of detergent drawer.
Programme Knob

You can select the programme you want to wash your laundry in with the programme knob. You may set the programme selection operation by rotating the programme knob in both directions. Ensure that the programme button is exactly on the programme you want to select.
- You can see page (78) programme table for programme features.
Adjusting machine settings
To make the first settings of your washer-dryer:
- Plug in your machine.
- Open the water tap.
- Turn the programme knob.

Language selection setting
- The first thing that will be displayed on the main screen is the language selection setting.
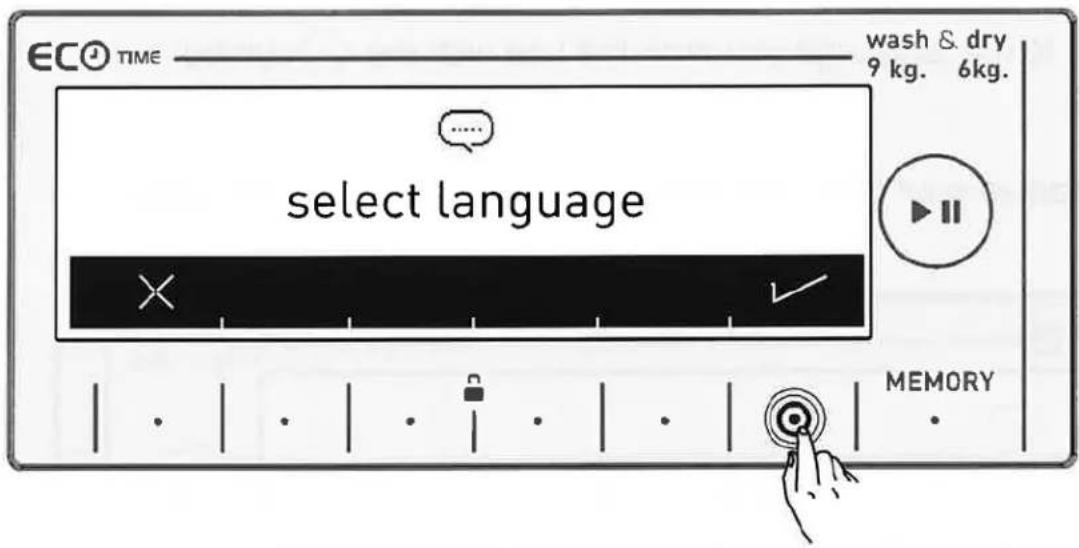
- Go to the language you wish the use with the √ symbol button.
- You can exit the language selection screen without making a selection with the ✗ symbol button.

- Go to the language you wish the use with the <>symbol buttons.
- Approve your language selection with the √ symbol button.

- When you want to change your language selection again, you can make the language selection by going into the language selection page and using the <> symbol buttons.
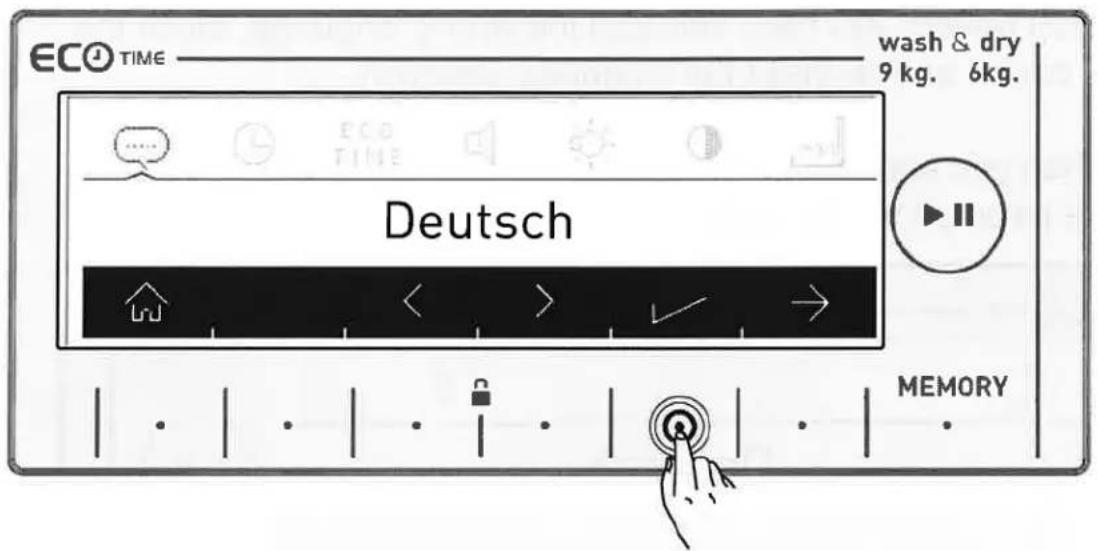
- Touch the √ button to save the language you selected.
- You will be asked to confirm the language selection on screen.

- Touch the √ button to approve the selection.

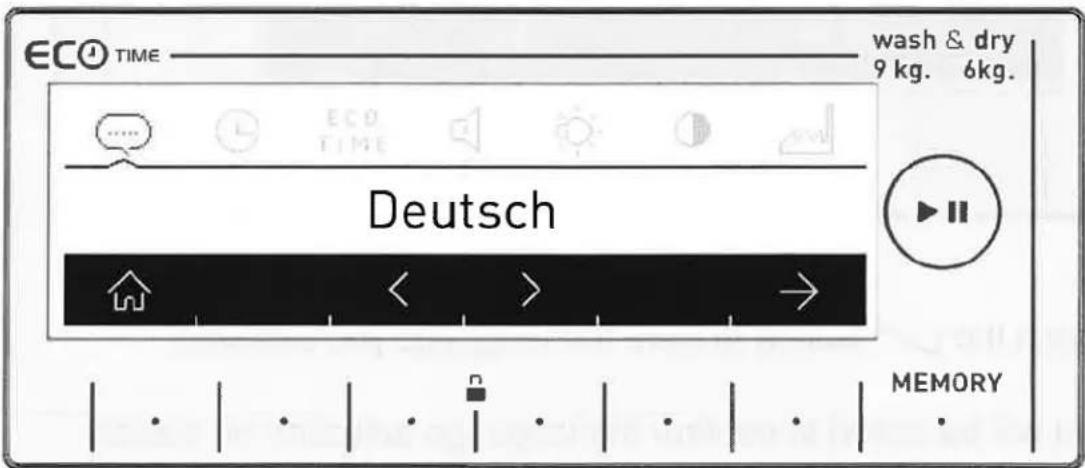
• If you believe you have selected the wrong language, touch the
button and re-make the language selection.
- When you approve the language change, the language you have selected will be active.
ECO Eco Time Setting TIME (Economic time interval)
- The electrical energy consumption cost changes during the day according to the time intervals set by electricity providers. You can learn these intervals from electricity providers and set your eco time running hours, and have your machine run between these hours you determined.
Note: Your mains electricity must be connected to a counter with a smart-counter feature to be able to provide this energy saving.
- Touch the √ symbol button to make this adjustment.
- If you want to do it later, touch the ✗ symbol button.
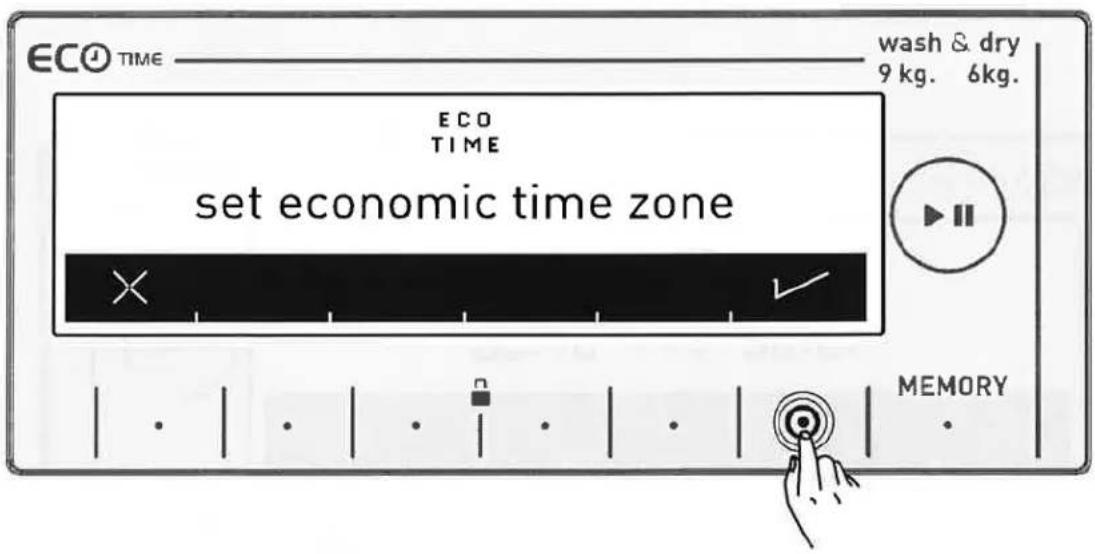

- You can adjust the Eco Time interval by touching the buttons of symbols See page 60 to activate the Eco Time interval additional function.

- Approve your selection by touching the √ symbol button.

Current time setting
- We advise that you set the correct time at the point of installation.

- Your machine will ask your approval for setting the current time. Go to the setting menu by touching the √ symbol button. ✗ symbol button allows you to exit without setting.
Note: You must set the current time correctly. Otherwise, operation of other related functions will be affected.
Note: Recorded time information will be reset if you keep your machine unplugged for longer than 15 days. In such a case your machine will ask you again for the time setting when you next turn it on.
- Please make the current hour and minute settings by touching the >> symbol buttons.

• After setting the current time, approve by pressing the √ symbol button.

- Your machine will automatically go to the main screen of the programme you have selected. Go to the appliance settings menu by touching the button of ⏱ symbol on this screen.

Sound Adjustment
- You can make the sound adjustment of your appliance by pressing the <> symbol buttons.

Symbol denotes that the warning sounds of your appliance is on.

☐ symbol denotes that the warning sounds of your appliance are off.

Screen brightness setting
- You can adjust the screen brightness of your appliance by touching the symbols.
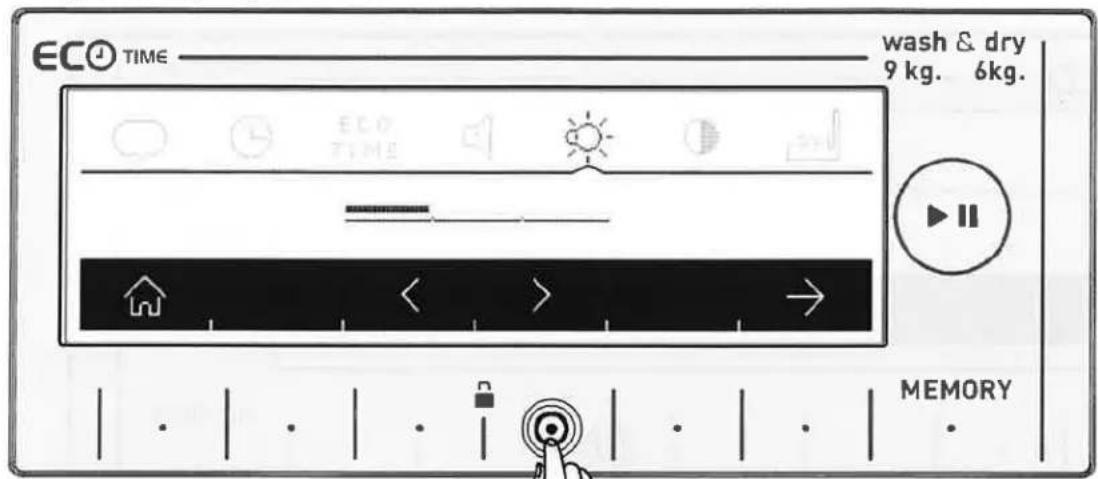
- Adjust the screen contract of your appliance by touching the symbol button.

Screen contrast setting
- You can adjust the screen contrast your appliance by touching the <> symbol buttons.

- You can go to the 'revert to factory settings' screen by touching the → symbol.
- WASHER - DRYER
- USER MANUAL
- CONTENTS
- BEFORE USING YOUR MACHINE 5
- THE ENVIRONMENT 16
- SAVINGS & EFFICIENCY INFORMATION 17
- OVERVIEW OF YOUR DEVICE 18
- SETTING UP THE MACHINE 21
- CONTROL PANEL 28
- ADJUSTING MACHINE SETTINGS 32
- WASHING OPERATION 43
- MAINTENANCE AND CLEANING OF YOUR MACHINE 97
- TROUBLESHOOTING 103
- AUTOMATIC FAULT WARNINGS AND WHAT NEEDS TO BE DONE 108
- INDEX 113
- BEFORE USING YOUR MACHINE Correct Use
- General warnings
- Safety warnings
- Burn risk!
- Electrocution risk!
- Flooding risk!
- ! Explosion risk!
- Fire risk!
- Fall and injury risk!
- Child safety!
- PACKAGING AND THE ENVIRONMENT
- DISPOSING OF PACKAGING AND YOUR OLD MACHINE RESPONSIBLY
- Removal of packaging materials
- Removal of old machine
- SAVINGS & EFFICIENCY INFORMATION
- OVERVIEW OF YOUR DEVICE
- General Appearance
- SETTING UP THE MACHINE
- Removing transportation safety screws
- Placing the machine and adjusting the adjustable foot
- Electrical connection
- Water inlet connection
- Water draining connection
- CONTROL PANEL
- Detergent drawer general view
- Detergent drawer compartments
- Main wash detergent compartment:
- Softener, starching, detergent compartment:
- Pre-Wash detergent compartment:
- Adjusting machine settings
- Language selection setting
- ECO Eco Time Setting TIME (Economic time interval)
- Current time setting
- Sound Adjustment
- Screen brightness setting
- Screen contrast setting
Marque : Porter & Charles
Modèle : COMBI9‐6
Catégorie : Lave-linge