35U3-RAID-2 - NAS LC-Power - Notice d'utilisation et mode d'emploi gratuit
Retrouvez gratuitement la notice de l'appareil 35U3-RAID-2 LC-Power au format PDF.


| Type de produit | NAS (Network Attached Storage) |
| Marque | LC-Power |
| Modèle | 35U3-RAID-2 |
| Nombre de baies | 2 |
| Interfaces | 1x USB 3.0, 1x Gigabit Ethernet |
| Formats de disque supportés | 2.5" et 3.5" SATA |
| Capacité maximale | 36 To (2 x 18 To) |
| RAID supporté | RAID 0, RAID 1, JBOD |
| Système de fichiers | NTFS, FAT32, exFAT, EXT4 |
| Alimentation | Adaptateur secteur 12V/3A |
| Dimensions (L x P x H) | 13,5 x 8,5 x 22,5 cm |
| Poids | 0,8 kg (sans disques) |
| Matériau du boîtier | Aluminium et plastique |
| Ventilation | Ventilateur silencieux de 40 mm |
| Température de fonctionnement | 5°C à 35°C |
| Humidité de fonctionnement | 20% à 80% HR |
| Entretien et nettoyage | Débrancher avant nettoyage ; utiliser un chiffon doux et sec. Ne pas utiliser de solvants. |
| Sécurité | Ne pas exposer à l'humidité ou aux températures extrêmes. Utiliser une prise secteur avec mise à la terre. |
| Pièces détachées et réparabilité | Adaptateur secteur et câble USB fournis. Réparation par professionnel recommandée. |
| Informations générales | Compatible Windows, Mac, Linux. Fonctionnalité de sauvegarde automatique via logiciel tiers. |
FOIRE AUX QUESTIONS - 35U3-RAID-2 LC-Power
Questions des utilisateurs sur 35U3-RAID-2 LC-Power
0 question sur cet appareil. Repondez a celles que vous connaissez ou posez la votre.
Poser une nouvelle question sur cet appareil
Téléchargez la notice de votre NAS au format PDF gratuitement ! Retrouvez votre notice 35U3-RAID-2 - LC-Power et reprennez votre appareil électronique en main. Sur cette page sont publiés tous les documents nécessaires à l'utilisation de votre appareil 35U3-RAID-2 de la marque LC-Power.
MODE D'EMPLOI 35U3-RAID-2 LC-Power
LCPOWER™
User manual Bedienungsanleitung

natural_image
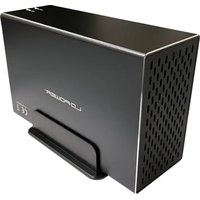
Line drawing of a rectangular electronic device with a perforated grille and a small base (no text or symbols)LC-35U3-RAID-2 Enclosure / Gehäuse
Features / Eigenschaften
Description / Beschreibung
LC-35U3-RAID-2
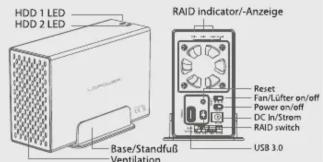
| Model: | Dual bay HDD RAID enclosure |
| Interface int.: | SATA |
| Interface ext.: | USB 3.0 |
| HDD size: | 3,5" |
| Speed: | 5 Gb/s |
| Material: | Aluminium alloy/plastic, Aluminiumlegierung/Plastik |
| Dim./Maße: | 179 x 113 x 65 mm |
| OS: | Windows 7/8/10, Mac OS 10.0 or higher |
| RAID: | RAID 0, 1, Large, Normal |
Installation
-
Slide the middle bracket out of the aluminium housing. Mount HDD 1 (45 degrees angle) (1) and fix it with two screws (2). Repeat the same for HDD 2 (3, 4). Slide the middle bracket back into the housing (5) and fix it with three screws (6).
-
Schieben Sie den mittleren Rahmen aus dem Aluminiumgehäuse heraus. Installieren Sie HDD 1 (im 45-Grad-Winkel) (1) und befestigen Sie sie mit zwei Schrauben (2). Wiederholen Sie den Vorgang für HDD 2 (3, 4). Schieben Sie den mittleren Rahmen wieder in das Gehäuse (5) und befestigen Sie ihn mit drei Schrauben (6).

- Connect the power adapter. When the HDD LEDs are illuminated, you can set the desired RAID mode. Connect the enclosure to your PC.
- Schließen Sie das Netzteil an. Wenn die HDD-LEDs erleuchtet sind, können Sie den gewünschten RAID-Modus einstellen. Verbinden Sie das Gehäuse mit Ihrem PC.
Note: If you use new HDDs, please initialize and format them in the disk management area of your operating system.
Hinweis: Wenn Sie neue Festplatten benutzen, initialisieren und formatieren Sie diese bitte in der Datenträgerverwaltung Ihres Betriebssystems.


RAID Setting / Einstellungen
Note: Please use a thin tool to carefully change the RAID switch settings. Hinweis: Bitte benutzen Sie ein dünnes Werkzeug, um die RAID-Schalter-Einstellungen vorsichtig zu ändern.
Normal: The default mode is "Normal". If you can't find the disk in your computer, press the "Reset" button for a few seconds until the "Normal" LED is illuminated. Normal: Die Voreinstellung ist "Normal". Wenn Sie Ihre Festplatte nicht am Computer finden können, drücken Sie die "Reset"-Taste für ein paar Sekunden, bis die "Normal"-LED leuchtet.
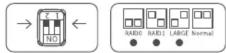
RAID 0: Change the RAID switch according to the sketch below. Press the "Reset" button for a few seconds until the "RAID0" LED is illuminated. RAID 0: Wechseln Sie den RAID-Schalter gemäß der unteren Skizze. Drücken Sie die "Reset"-Taste für ein paar Sekunden, bis die "RAID0"-LED leuchtet.

Note: If one HDD is damaged and needs to be replaced, make sure that the HDD is new or has not been formatted in a RAID mode before. Hinweis: Wenn eine HDD defekt ist und ersetzt werden muss, vergewissern Sie sich, dass die HDD neu ist oder vorher noch nicht in einem RAID-Modus formatiert wurde.
RAID Setting / Einstellungen
RAID 1: Change the RAID switch according to the sketch below. Press the "Reset" button for a few seconds until the "RAID1" LED is illuminated. RAID 1: Wechseln Sie den RAID-Schalter gemäß der unteren Skizze. Drücken Sie die "Reset"-Taste für ein paar Sekunden, bis die "RAID1"-LED leuchtet.

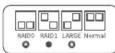
LARGE: Change the RAID switch according to the sketch below. Press the "Reset" button for a few seconds until the "LARGE" LED is illuminated. LARGE: Wechsel Sie den RAID-Schalter gemäß der unteren Skizze. Drücken Sie die "Reset"-Taste für ein paar Sekunden, bis die "LARGE"-LED leuchtet.


Note: Use the fan switch on the back of the enclosure to change the fan speed: Fast/Slow/Off. We recommend to use the fan to improve the heat dissipation of the HDDs. This will increase the lifespan of your HDDs. Hinweis: Nutzen Sie den Lüfterschalter auf der Rückseite des Gehäuses, um die Geschwindigkeit des Lüfters zu ändern: Schnell/Langsam/Aus. Wir empfehlen die Nutzung des Lüfters, um die Wärmeabfuhr der Festplatten zu verbessern. Dies erhöht die Lebensdauer der Festplatten.
New HDD formatting / Formatieren einer neuen HDD
- Go to "Computer - Manage - Disk management".
- Gehen Sie zu "Computer - Verwalten - Datenträgerverwaltung".


| Computer Management (Local) | Volume | Layout |
| System Tools | (C): | Simple |
| Task Scheduler | SMART BACK (G): | Simple |
| Event Viewer | New Volume(H): | Simple |
| Shared Folders | Local Disk(D): | Simple |
| Local Users and Groups | Local Disk(E): | Simple |
| Performance | ||
| Device Manager | ||
| Storage | ||
| Disk Management | ||
| Services and Applications |
New HDD formatting / Formatieren einer neuen HDD
- Right-click the unallocated disk, then click "New Simple Volume".
- Rechtsklicken Sie auf die nicht zugeordnete Disk, dann klicken Sie auf "Neues Volume".

New HDD formatting / Formatieren einer neuen HDD
- Choose the size of the new partition and click "Next" to finish.
- Wählen Sie die Größe der neuen Partition und klicken Sie auf "Weiter", um den Vorgang abzuschließen.

New HDD formatting / Formatieren einer neuen HDD
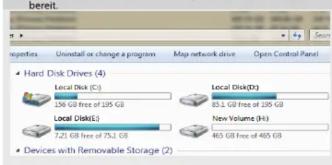
- Now you can find the new M.2 in the "Explorer", it's ready to use.
- Nun können Sie die neue M.2 im "Explorer" finden, sie ist einsatz-


Marque : LC-Power
Modèle : 35U3-RAID-2
Catégorie : NAS