
EWS850-FIT - Point d'accès ENGENIUS - Notice d'utilisation et mode d'emploi gratuit
Retrouvez gratuitement la notice de l'appareil EWS850-FIT ENGENIUS au format PDF.


| Type de produit | Point d'accès sans fil |
| Marque | EnGenius |
| Modèle | EWS850-FIT |
| Dimensions (L x l x H) | 200 x 200 x 40 mm |
| Poids | 350 g |
| Alimentation | PoE 802.3af/at, adaptateur secteur 12V 1A (non inclus) |
| Consommation électrique | 12 W maximum |
| Normes sans fil | 802.11a/b/g/n/ac (Wave 2) |
| Fréquences | 2,4 GHz et 5 GHz |
| Débit maximal | Jusqu'à 867 Mbps (5 GHz) + 300 Mbps (2,4 GHz) |
| Antennes | 4 antennes internes MIMO 2x2 |
| Ports | 1 x port Gigabit Ethernet avec PoE |
| Gestion | Interface web, SNMP, cloud EnGenius |
| Sécurité | WPA2-Enterprise, WPA3, filtrage MAC, VLAN |
| Montage | Plafond ou mural, kit de montage inclus |
| Température de fonctionnement | 0 °C à 50 °C |
| Humidité de fonctionnement | 10% à 90% sans condensation |
| Entretien et nettoyage | Nettoyer avec un chiffon sec et doux. Ne pas utiliser de produits chimiques. |
| Pièces détachées et réparabilité | Non réparable par l'utilisateur. Contacter le support technique EnGenius. |
| Certifications | CE, FCC |
FOIRE AUX QUESTIONS - EWS850-FIT ENGENIUS
Questions des utilisateurs sur EWS850-FIT ENGENIUS
0 question sur cet appareil. Repondez a celles que vous connaissez ou posez la votre.
Poser une nouvelle question sur cet appareil
Téléchargez la notice de votre Point d'accès au format PDF gratuitement ! Retrouvez votre notice EWS850-FIT - ENGENIUS et reprennez votre appareil électronique en main. Sur cette page sont publiés tous les documents nécessaires à l'utilisation de votre appareil EWS850-FIT de la marque ENGENIUS.
MODE D'EMPLOI EWS850-FIT ENGENIUS
EnGenius®
Using EnGenius Cloud Services
ECW Series
Version1.1
Cloud Managed Outdoor Access Point
Minimum Requirements
Power source option - An ECW device can be powered up by an 802.3af/at-compliant PoE device.
Ethernet port:
* LAN (PoE): Uplink port accepts an 802.3af/at power source.
Pre-Installation Preparation
Please confirm that your device has established a connection to the Internet before proceeding.
Registering a device and configuring on EnGenius Cloud should be completed before performing an on-site installation.
Notice: The browser version for Cloud GUI supported list as following.
(1) Google Chrome: 57.0.2987.110 and later
(2) Apple Safaris: 10.0.3(12602.4.8) and later
(3) Microsoft Edge: 80.0.361.103 and later
(4) Mozilla Firefox: 52.0 and later
A) Register an account to sign in EnGenius Cloud
(https://cloud.engenius.ai) if you use this service first time.
B) When logging on, you can use the existed default Network or create a personalized Network under the Org. and provide a configuration to enable push operations to cloud devices.
C-2. Register devices through the mobile app
On the Cloud APP
i) Download the EnGenius Cloud App via your smartphone

ii) Log in with your cloud account (if you do not have an account, please sign up on https://cloud.engenius.ai)
Package Contents
-ECW160

AP / Bridge

Quick Installation Guide

Adhesive Label

Detachable Antennas
2 x 2.4GHz Antennas
2 x 5GHz Antennas

Pole Mounting Strap x1

Wall Mount Screw Kit
C) Register device to your cloud account
C-1. Register device through EnGenius Cloud
On the Cloud GUI
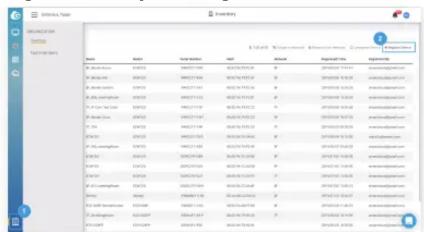
i) Follow this path to add the serial no. of this device:
Org -> 1 Inventory -> 2 Register Device
Locate the serial no. on the back of the device.
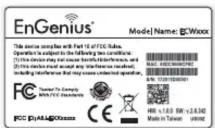
← Device Label
iii) Select an organization and then click “+” on the down-right corner to add the device.
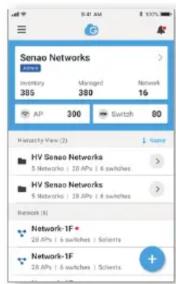
iv) Scan the QR code on the device label for adding the device to Inventory of this organization. You also can manually add S/N to Inventory of this organization.

Device Label
-ECW260

AP / Bridge Quick Installation
Guide

Mounting Bracket


Screw Kit x 2
Ground Wire & Screw Set Mounting Screw
Kit x 2

Pole Mounting
Strap x 2

Detachable Antennas
2 x 2.4GHz Antennas
2 x 5GHz Antennas
ii) Input the serial no. from the device label, and then click "Register"

iii) In the "1 Inventory" page, using "Assign to Network" (Assign to Network) to assign the device to your personalized network.
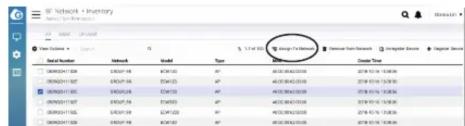
v) Add the device to your network, slide the device to left and then click "Add to Network" by using EnGenius Cloud App.

D) This device is now added into your network.
E) Check your firewall settings to prevent any issues. Make sure that your firewall allows 80/443 port outbound access.
Automatically Firmware upgradeF)
Once the device is connected to Cloud, it will be upgraded to the most up-to-date firmware version automatically. While the firmware is upgrading, the LED light will blink for few minutes till the process has been finished.
Troubleshooting the Cloud Connection
Usually it will take 2-3 minutes to power up the AP and connect to the Cloud. If firmware upgrade is required, it might take even longer to 8-10 minutes for firmware upgrade done. If you still see power LED light blinking after three more minutes, there might have the problem about connecting to EnGenius Cloud.
To troubleshoot the connection issue, you may login to Local page:
i) Use your client device (e.g., a laptop, mobile device, or tablet) to find the SSID: "EnMGMTxxxx" (xxxx is the last four digits of LAN MAC which can be found on the back of the device) and connect to it.
Wall Mounting the Outdoor Device ECW160
A) Determine where the Access Point to placed and stick the Adhesive label on the surface.
B) Use the appropriate drill bit to drill two 8.1 mm diagram and 26mm depth holes on the markings of the label.
C) Remove the label and Screw the anchors unto the holes until they are flush with the wall.
D) Screw the included screws into the anchors. Place the Access Point against wall with the mounting screw heads.

ECW260
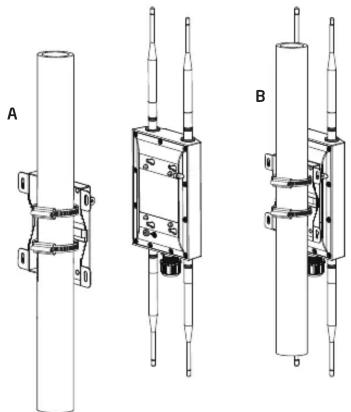
A) Thread the open end of the pole strap through the two tabs on the pole mount bracket.
B) Lock and tighten pole strap to secure pole mount bracket to pole.
natural_image
Three technical line drawings of cylindrical mechanical components labeled A, B, and C (no text or symbols present)ii) Enter the URL in web browser: http://EnGenius.local or the IP 192.168.1.1 to access the device's user interface. You can review device status after logging into the AP with the default account/password (default admin account/ password : admin/ admin.)

iii) By default, EnGenius cloud access point (ECW series) is assigned an IP address dynamically by the DHCP server. If you encounter issues with IP address assignment, please double check the IP settings including IP address, subnet mask, gateway, proxy, and management VLAN. If the issue is still existed, you may change your IP assignment from "DHCP mode" to "Static IP" via the following procedure.
ECW260
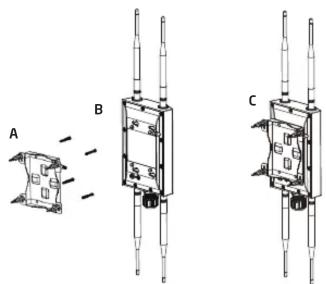
A) Determine where the Access Point to be placed and mark location on the surface for the four mounting holes of wall mount base. Use the appropriate drill bit to drill two 8.1mm diagram and 26mm depth holes in the markings and hammer the bolts into the openings. Screw the anchors into the holes until they are flush with the wall.
B) Screw the included screws into the anchors.
C) Slide the mount bracket into the slot of the Access Point.
Technical Support
Country of Purchase Service Center Service Information
| North Americawww.engeniustech.com | Los Angeles, USA | support@engeniustech.comLocal (+1)714 432 8668Press 1 - Tech support |
| www.engeniuscanada.com | Canada | rma@engeniuscanada.comLocal(+1) 905 940 8181and then follow the prompts press 3- RMA and Tech Support |
| Europewww.engeniusnetworks.eu | Netherlands | support@engeniusnetworks.eu |
| Africa / CIS / Middle Eastwww.engenius-rme.com | Dubai, UAE | support@engenius-me.comLocal (+971) 4 339 1227 |
| Asia / Oceaniawww.engeniustech.com.sg | Singapore | support@engeniustech.comLocal (+65) 6227 1088 |
| Taiwanwww.engeniustech.com.tw | Taiwan, R.O.C. | twsupport@engeniusteworks.comToll Free: 0800-003-885 |
a) Select "Local Setting" on this page.
b) Change IPv4 setting from "AS DHCP client" to "Use Static IP".
c) Configure the IP address, gateway, net mask, and proxy policy as required.
d) Reconnect this device to the LAN again if necessary.

Pole Mounting the Outdoor Device ECW160
A) Thread the open end of the Pole Strap through the two tabs on the Pole Mount Bracket.
B) Lock and tighten Pole Strap to secure Pole Mount Bracket to the Pole.

natural_image
Diagram showing two mechanical components labeled A and B, with a red arrow indicating rotation or change in the latter (no text or symbols present)NOTE
EnGenius®
Maximum data rates are based on the IEEE standards. Actual throughput and range may vary depending on many factors including environmental conditions, distance between devices, radio interference in the operating environment, and mix of devices in the network. Features and specifications subject to change without notice. This device complies with Part 15 of the FCC Rules. Operation is subject to the following two conditions: (1) this device may not cause harmful interference, and (2) this device must accept any interference received, including interference that may cause undesired operation. Trademarks and registered trademarks are the property of their respective owners. For United States of America: Copyright © 2020 EnGenius Technologies, Inc. All rights reserved.

Marque : ENGENIUS
Modèle : EWS850-FIT
Catégorie : Point d'accès