
U222AA - Appareil photo Lorex - Notice d'utilisation et mode d'emploi gratuit
Retrouvez gratuitement la notice de l'appareil U222AA Lorex au format PDF.


| Type de produit | Appareil photo de surveillance |
| Marque | Lorex |
| Modèle | U222AA |
| Dimensions (approx.) | 7 x 7 x 15 cm |
| Poids (approx.) | 300 g |
| Alimentation | Adaptateur secteur 12V CC inclus |
| Résolution vidéo | HD 1080p |
| Vision nocturne | LED infrarouge intégrées (portée jusqu'à 15 m) |
| Détection de mouvement | Oui, avec notifications push |
| Connectivité | Wi-Fi 2,4 GHz |
| Angle de vue | 110° diagonale |
| Indice de protection | IP65 (résistant aux intempéries) |
| Stockage | Carte microSD jusqu'à 128 Go (non incluse) |
| Compatibilité | Application Lorex pour iOS et Android |
| Entretien et nettoyage | Nettoyer avec un chiffon doux et sec. Ne pas utiliser de produits abrasifs. |
| Sécurité | Installation hors de portée des enfants. Ne pas exposer à l'eau directement. |
| Pièces détachées et réparabilité | Pièces disponibles auprès du service après-vente Lorex. |
| Informations générales | Garantie 2 ans. Fabrication : Chine. |
FOIRE AUX QUESTIONS - U222AA Lorex
Questions des utilisateurs sur U222AA Lorex
0 question sur cet appareil. Repondez a celles que vous connaissez ou posez la votre.
Poser une nouvelle question sur cet appareil
Téléchargez la notice de votre Appareil photo au format PDF gratuitement ! Retrouvez votre notice U222AA - Lorex et reprennez votre appareil électronique en main. Sur cette page sont publiés tous les documents nécessaires à l'utilisation de votre appareil U222AA de la marque Lorex.
MODE D'EMPLOI U222AA Lorex
Package Contents
\* Per camera in multi-camera packs
• HD Wire-Free Security Camera(s)
- Camera Mounting Kit*
• Rechargeable Power Pack*
- Camera Antenna*
- Allen Key
• Power Pack Adapter
Safety Precautions
- Read this guide carefully and keep it for future reference.
- Follow all instructions for safe use of the product and handle with care.
- Use the camera within given temperature, humidity and voltage levels noted in the camera's specifications.
- Do not disassemble the camera.
- Do not point the camera directly towards the sun or a source of intense light.
- Use only the supplied regulated power supply provided with the product or compatible accessories. Use of a non-regulated, non-conforming power supply can damage the product and void the warranty.
- Periodic cleaning may be required. Use a damp cloth only. Do not use any harsh, chemical-based cleaners.
Available Accessories
The following accessories are available for purchase. Visit lorex.com and search for the model numbers below for details:
| COLOR | Extra Power Pack Power Adapters | 2-cell Accessory Power Pack | 3-cell Accessory Power Pack PLUS | Solar Panel |
| WHITE ACPWF1 | ACBATTR2 | ACBATTR3 | ACSOL1B |
Copyright © 2020 Lorex Corporation
As our products are subject to continuous improvement, Lorex reserves the right to modify product design, specifications and prices, without notice and without incurring any obligation. E&OE. All rights reserved.
U222A_QSG_EN_R2
Optimizing Motion Detection
Customize motion detection settings to ensure motion events are being recorded and reduce false alarms.
To optimize motion detection:
-
Launch the Lorex Cirrus app.
-
Tap a channel in Live View to select it.
- Tap 🎨, then tap Motion.
- Configure the following as needed:
a. Sensitivity: The amount of motion needed to trigger recording (e.g., higher sensitivity requires less motion to trigger recording).
b. Detection: Enable/disable motion detection or person detection per channel.
c. Area Selection: Configure the active area for motion detection so that only areas of interest are selected and detected.
d. Distance Setting: Configure distance setting for motion detection. While watching the camera's video on your mobile device, recreate a motion event in front of your camera. The icon will change from 📁 to when motion is detected by the camera. Change the distance setting if motion detection is being triggered by unwanted events.
NOTE: Distance will be affected by temperature.
e. Buzzer: Set the recorder to sound an alarm when motion is detected.
5. Tap Save. Repeat for other cameras on the system.
Installation Tips
Follow the tips below for more accurate motion detection and to optimize battery life:
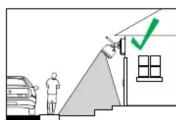
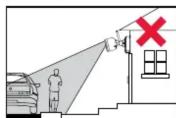
• See images to the right for ideal setup. It is
recommended to place your camera at least 7ft (2.1m) above the ground and angle it slightly downward toward the monitoring area, excluding any busy areas (e.g., sidewalks or roadways).
- Ensure the camera image is free of obstructions (e.g., tree branches).
- Position the camera no more than 20ft (6.1m) away from the area you wish to monitor.
- See the "Optimizing Motion Detection" section to customize motion settings for each camera on your system.
- For best performance, position the camera so that objects of interest will move from side-to-side across the camera image, rather than moving towards or away from the camera.
- Install the camera within range of the recorder (noted in the camera's specifications).
- Test your camera's connection to the recorder prior to selecting a permanent mounting location.
- This camera is weather resistant for outdoor use (IP66 rated). Installation in a sheltered location is recommended.
- Battery life will vary based on temperature, settings and number of events.
Disclaimers
- For a full list of compatible recorders, visit lorex.com/compatibility. - Not intended for submersion in water. Installation in a sheltered location recommended.

HD Wire-Free Add-On Camera
Quick Start Guide
English Version 2.0

natural_image
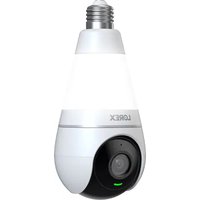
White LOREX camera with visible lens and antenna (no text or symbols on body)U222A SERIES
lorex.com
STEP 1: Initial Setup
Before you begin, you will need to prepare the Wire-Free cameras and Power Packs.
NOTE: Power Packs come fully charged.
To prepare the cameras:
-
Twist the adjustment ring counterclockwise to reposition each camera as shown to the right. Connect one of the white antennas to each camera. Twist clockwise to tighten when finished.
-
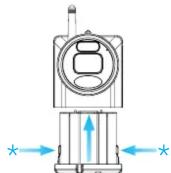
Peel off the PLEASE REMOVE label covering the contacts on each Power Pack. Insert the charged Power Packs into each camera base. Push up until the Power Pack 'clicks' into place.
NOTE: The camera will 'beep' when the Power Pack is properly inserted. If you do hear this alert, remove the Power Pack by pushing on the release tabs then re-insert.

STEP 2: Pairing with Lorex Cirrus
Next, you must pair your add-on camera to your recorder using the Lorex Cirrus app for smartphones and tablets (iOS and Android).
NOTE: Make sure the camera is within 3ft (1m) of the recorder.
To pair the camera with Lorex Cirrus:
- From Live view, tap any free channel you would like to pair a camera to (marked with a 📋 icon).

- Tap PAIR. A timer for 30 seconds appears.
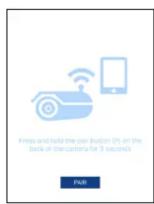
- Press and hold the pair button on the back of the camera for 3 seconds.

NOTE: A "pairing successful" message should appear on screen. If you do not see this message, repeat the steps above.
STEP 3: Installing the Cameras
Follow the instructions below to mount the cameras. It is recommended that you refer to the "Installation Tips" section to help you select good mounting locations.
To install your cameras:
Set the mounting bracket in the desired mounting position. Mark holes through the mounting bracket (shown as blue X's on the right).
- Drill holes where marked for the mounting screws using the included drill bit (item C provided in the toolkit with your wire-free system).
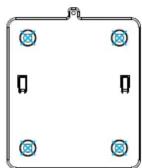
- Insert the security screw through the fasteners on the top of the camera base and mounting bracket to secure the camera to the mounting bracket. Tighten using the included screwdriver (item A+B provided in the toolkit with your wire-free system).

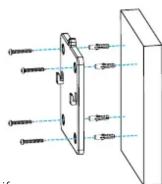
- Secure the bracket to the mounting surface with the included mounting screws ( ×4 ). Make sure all screws are fastened tightly using the included screwdriver (item A+B provided in the toolkit with your wire-free system).
NOTES:
- Insert the included drywall anchors if you are mounting the camera onto drywall. - The hole at the top of the mounting bracket will be used in step 5, once the camera is attached to the mounting plate.
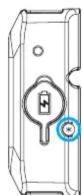
- OPTIONAL: To prevent the pre-installed locking screw from being easily removed, tighten it on the base of the Power Pack using the included screwdriver (item A+B in toolkit).
NOTE: You will need to loosen the locking screw to remove the Power Pack in the future.
- Lower the camera base onto the mounting bracket so the 2 tabs in the mounting bracket lock into the 2 slots in the camera base.

- Adjust the angle of the camera. Twist the adjustment ring counterclockwise to reposition the camera. Tighten the adjustment ring when finished.

- OPTIONAL: Use the included cable clips to complete the installation. Remove the protective strip to uncover the adhesive on the cable clip to attach to the mounting surface.
Power cable
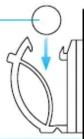
Mounting surface


- Package Contents
- \* Per camera in multi-camera packs
- Safety Precautions
- Available Accessories
- Copyright © 2020 Lorex Corporation
- Optimizing Motion Detection
- To optimize motion detection:
- Installation Tips
- Disclaimers
- STEP 1: Initial Setup
- To prepare the cameras:
- STEP 2: Pairing with Lorex Cirrus
- To pair the camera with Lorex Cirrus:
- STEP 3: Installing the Cameras
- To install your cameras:
Marque : Lorex
Modèle : U222AA
Catégorie : Appareil photo