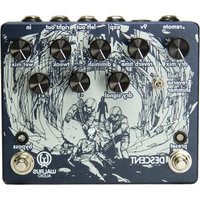
Descent - Pédale d'effet audio Walrus Audio - Notice d'utilisation et mode d'emploi gratuit
Retrouvez gratuitement la notice de l'appareil Descent Walrus Audio au format PDF.


| Type de produit | Pédale de réverbération et delay |
| Marque | Walrus Audio |
| Modèle | Descent |
| Dimensions | 12,7 x 6,6 x 3,2 cm |
| Poids | 340 g |
| Alimentation | 9 V DC, centre négatif, 100 mA minimum |
| Consommation électrique | 100 mA |
| Fonctions principales | Réverbération, delay, contrôle de modulation, présélections |
| Commandes | Départ, Mix, Ton, Decay, Mod, Présélections |
| Entrées | 1 x Jack 6,35 mm (instrument) |
| Sorties | 1 x Jack 6,35 mm (ampli) |
| Matériau du boîtier | Aluminium |
| Entretien et nettoyage | Essuyer avec un chiffon sec. Ne pas utiliser de produits chimiques. |
| Sécurité | Utiliser uniquement l'adaptateur recommandé. Éviter l'humidité. |
| Pièces détachées et réparabilité | Contacter le service client pour les réparations. Pièces non disponibles au détail. |
| Informations générales | Fabriqué aux États-Unis. Garantie limitée d'un an. |
FOIRE AUX QUESTIONS - Descent Walrus Audio
Questions des utilisateurs sur Descent Walrus Audio
0 question sur cet appareil. Repondez a celles que vous connaissez ou posez la votre.
Poser une nouvelle question sur cet appareil
Téléchargez la notice de votre Pédale d'effet audio au format PDF gratuitement ! Retrouvez votre notice Descent - Walrus Audio et reprennez votre appareil électronique en main. Sur cette page sont publiés tous les documents nécessaires à l'utilisation de votre appareil Descent de la marque Walrus Audio.
MODE D'EMPLOI Descent Walrus Audio
HALL MODE
Dry Mix – Controls how much of the Actual Instrument volume is running through the effect. Set to zero to hear only the effected signal; set to full to bring in your instrument signal.
Reverb Time – This will control the time length of your effected signal. Set to zero for no effect; set to full to add a long trail to your signal.
Diminish – This controls your reverb diffusion. Turn clockwise to diffuse your reverb signal. Reverb mimics the size of a room but diffusion mimics the walls of the room. Set to zero to get a flat wall sound and set to full to get a rough or rocky wall sound (diffused).
Tweak – Here you can control your reverb damping. Turn clockwise to lower the threshold of higher frequencies allowed in the reverberated signal.
Dry Signal – Your instrument signal is running through the octave controls first; Dry Signal, -1 Octave and, +1 Octave. Your Dry signal is controlling how much pure instrument is heading to the top row reverb controls. At zero, only octaves send to the top reverb controls. Dimed – your whole dry signal goes to the top reverb controls along with whatever you have your octaves set to.
-1 Octave – Tracks and plays back one octave below the note you are playing. Set to zero for none; set to full for maximum sub octave reverberation.
+1 Octave - Tracks and plays back one octave above the note you are playing. Set to zero for none; set to full for maximum octave up reverberation.
Wet Mix – This control mixes your ratio between how much dry signal and how much wet signal is in your output. Set to 12:00, you will get 50% dry and 50% Wet. Turn clockwise to get less dry and more wet, turn counter-clockwise to hear more of your instrument without the effected signal.
REVERSE MODE
Dry Mix – Controls how much of the Actual Instrument volume is running through the effect. Set to zero to hear only the effected signal; set to full to bring in your instrument signal.
Reverb Time – This is your Pre-delay controller. Set to zero for a quick return and turn clockwise to delay your reversed return signal.
Diminish – In Reverse setting, this will act as your Reverb Time and will control how long your signal draws out. Set to zero for no effect; set to full for a long trail to your signal.
Note that your Pre-delay and your Reverb time are playing off of each other in the Reverse mode. The Pre-delay captures a defined segment of what is played into the Descent. Then, the reverb time (controlled by Diminish control) lets you choose how much reverb goes on to that captured segment when it is played back.
Tweak – This controls your signal's tone. To get a dark, warm tone, set control to zero; to get a brighter, chimey tone, set control to full. Your tone will move from dim to bright as you move the control clockwise.
Dry Signal – Your instrument signal is running through the octave controls first; Dry Signal, -1 Octave and, +1 Octave. Your Dry signal is controlling how much pure (dry) instrument is heading to the top row reverb controls. At zero, only octaves send to the top reverb controls. At maximum – your whole dry signal goes to the top reverb controls along with whatever you have your octaves set to.
-1 Octave – Tracks and plays back one octave below the note you are playing. Set to zero for none; set to full for maximum sub octave reverberation.
+1 Octave - Tracks and plays back one octave above the note you are playing. Set to zero for none; set to full for maximum octave up reverberation.
Wet Mix – This control mixes your ratio between how much dry signal and how much wet signal is in your output. Set to 12:00, you will get 50% dry and 50% Wet. Turn clockwise to get less dry and more wet, turn counter-clockwise to hear more of your instrument without the effected signal.
SHIMMER MODE
Dry Mix – Controls how much of the Actual Instrument volume is running through the effect. Set to zero to hear only the effected signal; set to full to bring in your instrument signal.
Reverb Time – In shimmer, this will act as your reverb time. This will control how long your signal draws out. Set to zero for no effect; set to full to add a long trail to your signal.
Diminish – This will control your reverb feedback; how many times your copied signal is stacking on top of itself. You will get a small amount set at zero and a large amount when the control is at full.
Tweak – This controls your reverb diffusion. Turn clockwise to diffuse your reverb signal. Reverb mimics the size of a room but diffusion mimics the walls of the room. Set to zero to get a flat wall sound and set to full to get a rough or rocky wall sound.
Dry Signal - Your instrument signal is running through the octave controls first; Dry signal, -1 octave and, +1 octave. Your Dry Signal is controlling how unaffected instrument signal is heading to the top row reverb controls. At zero, only octaves send to the top reverb controls. Dimed - your whole dry signal goes to the top reverb controls along with whatever you have your octaves set to.
-1 Octave - Traccks and plays back one octave below the note you are playing. Set to zero for none; set to full for maximum sub octave reverberation
+1 Octave - Tracks and plays back one octave above the note oyu are playing. Set to zero for none; set to full for maximum octave up reverberation.
Wet Mix - This control mixes your ratio between how much dry signal and how much wet signal is in your output. Set to 12:00, you will get 50% dry and 50% wet. Turn clockwise to get less dry and more wet, turn counter-clockwise to hear more of your instrument without the effected signal.
STEREO INPUT MODE
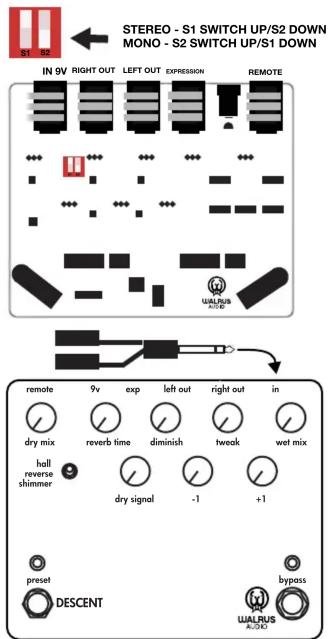
The Descent Reverb has stereo input functionality as well as stereo output. To use this capability you'll need an existing stereo signal and a 1/4 " TRS splitter cable. To activate the stereo input mode, remove the backplate and locate the red DIP switches on the left hand side of the circuitry. The switches will be just under the input and right output jacks. The Descent will come ready with the S1 switch down and the S2 switch up – activating the mono input mode. To switch the pedal to stereo input, toggle S to the up position and S2 to the down position. Once this is complete, replace the backplate. Using the 1/4 " TRS splitter cable, plug your two incoming stereo signals into the female ends of the splitter cable and the TRS male end of the splitter cable int the input of the Descent Reverb.
![graph LR A["RIGHT 1/4TH INPUT (RING)"] --> B["SLEEVE"] C["LEFT 1/4TH INPUT (TIP)"] --> B B --> D["TIP"] style A fill:#000,stroke:#fff,color:#fff style C fill:#000,stroke:#fff,color:#fff style D fill:#000,stroke:#fff,color:#fff note right of A: RIGHT 1/4TH INPUT (RING) note left of C: LEFT 1/4TH INPU…](/content/2026/06/1398571/images/f291dc947e0195911d568f8e20f822582ff198537f827b068228981a91d5f63c.jpg)

WALRUS AUDIO
DESCENT
The Descent offers you eight controls to precisely hone in your perfect reverb. In addition, the user can use an auxiliary momentary switch in the fav input to switch the pedal on/off and/or save presets. If you have an already crowded pedal board, you can set your Descent at the back of the board and run a small SPST switch to the front of the board so you don't lose valuable real estate. The Fav input requires a TRS cable to be used. The expression pedal control works with most on-the-shelf expression pedals. This feature allows the user to set the high and low parameters of each control and then fade in and out the those controls by moving your foot up or down on the expression pedal.
FOOT SWITCHES
Preset Footswitch – Changes between presets
Bypass Footswitch / Preset Save – Push down Bypass to turn the pedal on and off. To save a setting and add the setting to your bank of presets, hold the Bypass footswitch down until the 'Preset' LED flashes.
SETTING PRESETS
To save a preset, move the controls into the desired position. Hold down the Bypass button. Bypass button will blink and when the blinking ceases, your preset has been saved. There are 3 available presets, indicated by the blue, green and red LED above the 'preset' footswitch. You can toggle between those presets by pressing the Preset footswitch.
EXPRESSION PEDAL
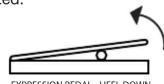
Using the expression pedal adds a completely new dynamic to the Descent reverb, allowing you to roll in/out a single parameter or multiple parameters with your foot. To program the foot controller with the Descent, plug the foot controller into the 'expression pedal' input. Set the expression pedal to toe down and set the Descent controls to the highest parameter desired. Then put the expression pedal heel down and set the controls to the lowest parameter desired. Move the expression pedal up and down to glide between the two settings you created.

DESCENT REVERB INSTRUCTION MANUAL
Thank you for purchasing the Walrus Audio Descent. The Descent was designed to create ambient textures of sound, from thick and endless hall reverbs to symphonic shimmers. The Descent is a three mode reverb system; hall, reverse, and shimmer. In each mode, the user has the ability to feed +1 and -1 octaves into the reverberated signal. The Hall mode will feature a classic reverb sound that can move your signal from a small-room-echo to a haunting long hall- echo. The Reverse mode smoothly flips your signal to playback unique responses and can be manipulated with pre-delay time controls. Shimmer mode highlights the octave features, dry signal, -1, and +1 to mix in your signal and creates a symphony of sound.
Cont.
INPUTS AND OUTPUTS
Power – Power supply is activated by plugging in an external 9VDC power supply. The Descent requires 140 mA current draw. (Note: The Walrus Audio Aetos Isolated Power supply will power this pedal from the higher current 250mA outputs)
In - This is the main input for your instrument into the unit and requires a 1/4 inch plug.
Left Out (Mono)– Use instrument cable to run to amplification and run in Mono
Right Out (For Stereo) – Use instrument cable to run to second amplifier for stereo.
Exp - Use Expression pedal to switch between settings.
REMOTE - Use a 2-channel remote switch to control the Descent's two foot switches. This Feature allows you to place the Descent at the back of your pedal board and run a small remoate control switch to the front of your board; freeing up real estate on your boards front row. To use the Fav option with a 2-channel remote switch, a TRS cable is required (2-channel switch is available for purchase separately).



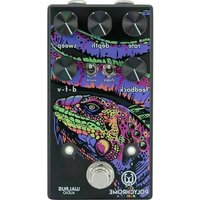
Marque : Walrus Audio
Modèle : Descent
Catégorie : Pédale d'effet audio