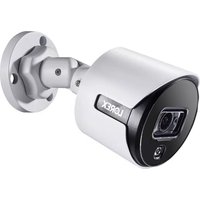
C881DA - Caméra de surveillance Lorex - Notice d'utilisation et mode d'emploi gratuit
Retrouvez gratuitement la notice de l'appareil C881DA Lorex au format PDF.


| Type de produit | Caméra de surveillance extérieure |
| Marque | Lorex |
| Modèle | C881DA |
| Résolution | Full HD 1080p |
| Type de capteur | CMOS |
| Vision nocturne | Infrarouge jusqu'à 30 mètres |
| Angle de vue | 90° |
| Alimentation | Adaptateur secteur 12V DC inclus |
| Consommation | 6 Watts |
| Dimensions (L x l x H) | 7 x 7 x 12 cm |
| Poids | 350 g |
| Indice de protection | IP66 |
| Connectivité | Câble BNC et alimentation |
| Fonctionnalités | Détection de mouvement, vision nocturne, montage mural |
| Compatibilité | Enregistreurs DVR Lorex |
| Température de fonctionnement | -20°C à 50°C |
| Entretien et nettoyage | Nettoyer la lentille avec un chiffon doux sec, éviter les solvants |
| Sécurité | Installation en hauteur, respecter les normes électriques en vigueur |
| Pièces détachées et réparabilité | Câble d'alimentation, support de montage, vis ; réparation par un professionnel agréé |
| Informations générales | Notice d'utilisation disponible en téléchargement gratuit sur notice-facile.com |
FOIRE AUX QUESTIONS - C881DA Lorex
Questions des utilisateurs sur C881DA Lorex
0 question sur cet appareil. Repondez a celles que vous connaissez ou posez la votre.
Poser une nouvelle question sur cet appareil
Téléchargez la notice de votre Caméra de surveillance au format PDF gratuitement ! Retrouvez votre notice C881DA - Lorex et reprennez votre appareil électronique en main. Sur cette page sont publiés tous les documents nécessaires à l'utilisation de votre appareil C881DA de la marque Lorex.
MODE D'EMPLOI C881DA Lorex
Package Contents
• 4K Ultra HD Active Deterrence Security Camera
- Mounting Kit*
- BNC / Power Extension Cable*
- Power Adapter**
* Per camera in multi-camera packs.
** A multi-camera power adapter that provides power to multiple cameras or individual power adapters may be provided depending on product configuration.
ATTENTION:
A REGULATED UL / CSA APPROVED power supply is REQUIRED for use with this camera (included). Use of a non-regulated, non-conforming power supply can damage this product and voids the warranty.
Using Deterrence Features
Use your Lorex app to manually activate the camera's white light and siren features when connected to a compatible Lorex recorder.

PREREQUISITE: Connect to your Lorex system using the app specified in your recorder documentation.
To activate deterrence features manually:
- Launch the app and tap your recorder to view connected channels.
- Tap a connected deterrence camera to open it in single-channel view.
- Tap ⚡ [A] to activate the white light, or tap Ⓑ to activate the siren.
Lorex Home

Lorex Cloud

natural_image
Live View app interface showing a forest scene with wooden benches and trees, no readable text or symbols in the main image area.NOTE: You can also set schedules and active areas of the camera image where the white light will be triggered automatically when motion is detected. For full instructions, refer to the app manual on your product page at lorex.com.
Resources
Need Help?
Visit us online for up-to-date software and complete instruction manuals
1
Visit lorex.com
2
Search for the model number of your product
3
Click on your product in the search results
4
Click on the Downloads tab

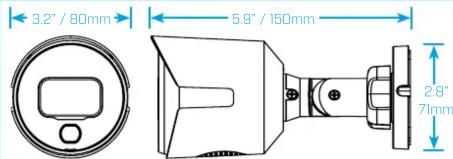
Dimensions
Safety Precautions
- Read this guide carefully and keep it for future reference.
- Follow all instructions for safe use of the product and handle with care.
- Use the camera within given temperature, humidity and voltage levels noted in
the camera's specifications. - Do not disassemble the camera.
- Do not point the camera directly towards the sun or a source of intense light.
- Use only the supplied regulated power supply provided with the product. Use of
a non-regulated, non-conforming power supply can damage the product and void
the warranty. - Periodic cleaning may be required. Use a damp cloth only. Do not use any harsh, chemical based cleaners
chemical-based cleaners - The supplied cable is rated for surface and in-wall mounting only. Cables for floor-
to-floor installations are sold separately (CMR type). These and other cables are available at lorex.com.
Disclaimers
- For a full list of compatible recorders, visit lorex.com/compatibility.
- To ensure that you are viewing camera video in full 4K resolution (4K monitor required), check the video output resolution of your recorder. For full instructions, see your recorder's documentation at lorex.com.
- Not intended for submersion in water. Installation in a sheltered location
recommended.
• This camera includes an Auto Mechanical IR Cut Filter. When the camera changes
between Day/Night viewing modes, an audible clicking noise may be heard from the camera. This clicking is normal, and indicates that the camera filter is working
Copyright © 2019 Lorex Corporation
As our products are subject to continuous improvement, Lorex reserves the right to modify product design, specifications and prices, without notice and without incurring any obligation. E&OE. All rights reserved.
C881DA_QSG_EN_R2

4K Ultra HD Active Deterrence Security Camera
Quick Start Guide
English Version 2.0

natural_image
Exterior view of a modern security camera (no visible text or symbols on body)C881DA SERIES
www.lorex.com
Installing the Camera
ATTENTION:
Test your camera prior to selecting a permanent mounting location by temporarily connecting the camera and cable to your recorder.
Before Installing the Camera
- Decide whether to run the cables through the wall / ceiling (drilling required) or along the wall / ceiling.
- If you run the cables along the wall / ceiling, you must run the cable through the cable notch on the base. This will keep the camera base flush to the surface when mounted.

To install your camera:
- Set the camera in the desired mounting position and mark holes for screws through the camera base.
- Drill the holes, then feed the cable through the mounting surface or cable notch.
NOTE: Insert the included drywall anchors if you are mounting the camera onto drywall. - Mount the camera stand to the mounting surface using the provided screws. Make sure all screws are fastened tightly.
- Adjust the camera as shown below:

A. ROTATING THE ARM: Loosen the adjustment ring by turning it counter-clockwise. Rotate the arm of the camera up to 360°, then tighten the adjustment ring.
B. BENDING THE ARM: Use a Phillips head screwdriver (not included) to loosen the adjustment screw. Bend the arm of the camera up to 90°, then tighten the screw.
C. LEVELING THE CAMERA: Use the screwdriver to loosen the adjustment screw. Rotate the camera until it is level with the viewing area, then tighten the screw.
- Remove the vinyl film from the camera lens when your installation is complete.
Connecting the Camera

DVR
Camera

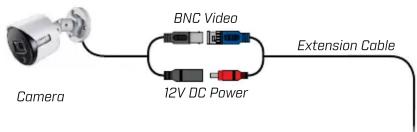
Connect the male power head and the BNC connector to the camera.
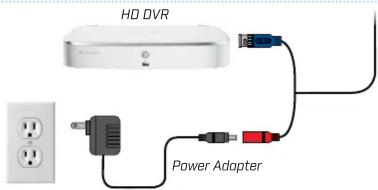
Connect the BNC connector to a video input on your DVR.


Connect the female power head to the included power adapter.


Power Adapter Types
A multi-camera power adapter that provides power to multiple cameras or individual power adapters may be provided, depending on product configuration.
Individual Power Adapter* Mul
Camera Power


* Images for representation only.
Setup Diagram
Cable Extension Options
Extend the cable run for your camera depending on the cable type used. Additional extension cables sold separately. See table below:
Option Model Number Cable Length
| 1 | CB120URB | 120ft (37m) |
| 2 | CB250URB | 250ft (76m) |
NOTES:
-
The extension cable must be a single stretch of cable between the DVR and camera. You cannot connect multiple extension cables to each other.
-
Indicators that your cable run may be too long:
- Camera loses video when switching to night vision.
• Video is permanently black & white (even during day time)
• Video is unclear, soft, or distorted
- For more information on extension cables, visit lorex.com.
Troubleshooting
| Problem Solution | |
| Picture does not appear to be 4K | • To ensure that you are viewing camera video in full 4K resolution (4K monitor required), check the video output resolution of your DVR. For full instructions, see your DVR's documentation at lorex.com. |
| No picture / signal | • The camera is only compatible with certain Lorex DVRs. For full compatibility, visit lorex.com/compatibility.• Ensure your monitor is on the correct input channel. Common terms for input channels: INPUT, AV CHANNEL, LINE1, LINE2, AUX.• Ensure connections are properly connected.• Ensure the camera power supply is plugged in. |
| Picture is too bright • Ensure your camera isn't pointed directly at a source of light (e.g., sun or spot light).• Check the brightness settings of your DVR and monitor.• Move your camera to a different location. | |
| Picture is too dark • Check the brightness and contrast settings of your DVR and monitor. | |
| Night vision is not working • The night vision activates when light levels drop. The area may have too much light. | |
| Picture is not clear • Check the camera lens for dirt, dust, spiderwebs.Clean the lens with a soft, clean cloth.• Make sure that the cable run is within the limitations specified in the section 'Cable Extension Options'. | |
| Bright spot in video when viewing camera at night | • Night vision reflects when pointing a camera through a window. Move the camera to a different location. |
| The camera warning light is not switching on automatically | • Ensure that you have enabled and configured white light deterrence using a compatible DVR. See your DVR's documentation for full instructions.• Ensure the active areas and schedule for white light deterrence are set properly. The default schedule for the warning light is night times (between 5PM and 7AM). |
| The camera siren is not switching on automatically | • The camera siren cannot switch on automatically. You can control the camera siren manually using a compatible Lorex DVR or app. Refer to your DVR's documentation for full instructions. |
| Person and vehicle detection is not working. | • Support for person and vehicle detection is determined by your recorder. See your recorder's documentation to confirm support for this feature. |
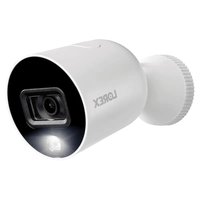
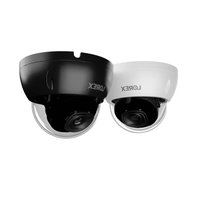
Marque : Lorex
Modèle : C881DA
Catégorie : Caméra de surveillance