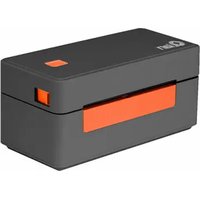
QOP-T18UB-LE - Imprimante d'étiquettes Qian - Notice d'utilisation et mode d'emploi gratuit
Retrouvez gratuitement la notice de l'appareil QOP-T18UB-LE Qian au format PDF.


| Type de produit | Imprimante d'étiquettes thermique |
| Marque | Qian |
| Modèle | QOP-T18UB-LE |
| Dimensions (L x l x H) | Environ 200 x 150 x 120 mm |
| Poids | Environ 0.8 kg |
| Alimentation | Adaptateur secteur 12V/2A |
| Connectivité | USB (câble inclus), Bluetooth (option) |
| Résolution d'impression | 203 dpi |
| Vitesse d'impression | Jusqu'à 60 mm/s |
| Largeur d'étiquette maximale | 58 mm |
| Type d'impression | Thermique direct |
| Méthode de chargement | Chargement facile par le dessus |
| Fonctions principales | Impression d'étiquettes codes-barres, textes, logos, date |
| Entretien et nettoyage | Nettoyer la tête d'impression avec un coton-tige imbibé d'alcool isopropylique |
| Sécurité | Utiliser uniquement l'adaptateur fourni ; ne pas exposer à l'humidité |
| Pièces détachées et réparabilité | Tête d'impression et rouleau disponibles en ligne |
| Informations générales | Compatible Windows, Mac, Linux ; logiciel fourni |
FOIRE AUX QUESTIONS - QOP-T18UB-LE Qian
Questions des utilisateurs sur QOP-T18UB-LE Qian
0 question sur cet appareil. Repondez a celles que vous connaissez ou posez la votre.
Poser une nouvelle question sur cet appareil
Téléchargez la notice de votre Imprimante d'étiquettes au format PDF gratuitement ! Retrouvez votre notice QOP-T18UB-LE - Qian et reprennez votre appareil électronique en main. Sur cette page sont publiés tous les documents nécessaires à l'utilisation de votre appareil QOP-T18UB-LE de la marque Qian.
MODE D'EMPLOI QOP-T18UB-LE Qian
THERMAL LABEL PRINTER 108MM USB+BT IMPRESORA TÉRMICA DE ETIQUETAS 108MM USB+BT

natural_image
Black and white photo of a handheld electronic device with orange buttons and a white sheet, no visible text or symbols.MODEL QOP-T18UB-LE

SUPPORT SHIPPING LABEL ETIQUETA DE ENVÍO DE SOPORTE

USB + BT

FOR FANFOLD & ROLL LABELS PARA FANFOLD Y ETIQUETAS EN ROLLO

RESOLUTION / RESOLUCIÓN 8dots/mm, 203dpi

4.25 in 108mm

PRINT SPEED / VELOCIDAD DE IMPRESIÓN 152mm/s
Please read carefully before using your equipment and save it for future reference.
Por favor lea cuidadosamente antes de usar su equipo y guárdelo para uso de futuras consultas.
USER MANUAL / MANUAL DE USUARIO
WARRANTY AND PRODUCT INFORMATION
These terms shall be governed and construed under laws of the jurisdiction in which the product was purchased, if any term here is held to be invalid or unenforceable, such term (in so far as it is invalid or unenforceable) shall be given no effect and deemed to be excluded without invalidating any of the remaining terms. Qian reserves the right to amend any term at any time without notice.

GARANTÍA E INFORMACIÓN DEL PRODUCTO
Estos términos se regirán e interpretarán de acuerdo con las leyes de la jurisdicción en la que se compró el producto, si alguno de los términos en este documento se considera inválido o inaplicable, dicho término (en la medida en que sea inválido o inaplicable) no tendrá efecto y se considerará excluido sin invalidar ninguno de los términos restantes. Qian se reserva el derecho de modificar cualquier término en cualquier momento sin previo aviso.

In case of fire or lightning, please don't put product in damp and raining place, operate or maintain according to the user manual.
Be careful when you see an attachment with a Dangerous Voltage which might cause serious electric accident.
Notice:
- Ensure your equity, please read the user manual carefully before you use the product.
- Please contact professional people if you need to install and maintain the product.
- Working Environment: Operating temperature 0^ C \~ 45^ C, Operating humidity 10% \~ 80%.
- Please don't exceed the user manual's standard range of temperature, humidity, and voltage.
ADVERTENCIA
En caso de incendio o relámpago, no coloque el producto en un lugar húmedo y lluvioso, ni lo opere ni mantenga de acuerdo con el manual del usuario.
Tenga cuidado cuando vea un accesorio con un voltaje peligroso que pueda causar un accidente eléctrico grave.
Aviso:
- Asegúrese de su equidad, lea atentamente el manual del usuario antes de usar el producto.
- Póngase en contacto con profesionales si necesita instalar y mantener el producto.
- Ambiente de trabajo: Temperatura de funcionamiento 0°C \~ 45°C, Humedad de funcionamiento 10% \~ 80%.
- No exceda el rango estándar de temperatura, humedad y voltaje del manual del usuario.
PRODUCTION VIEW VISTA DE PRODUCCIÓN

Side view / Vista lateral
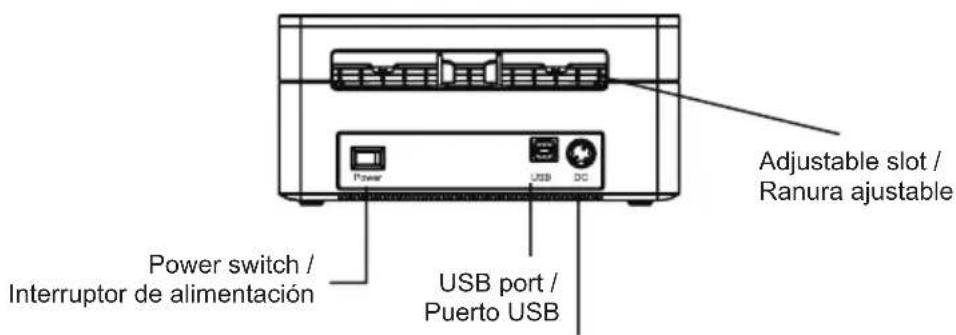
Power socket / Toma de corriente
Back view / Vista trasera
PACKING LIST LISTA DE EMBALAJE

Printer*1 / Impresora*1

Adapter*1 / Adaptador*1

Power cord*1 / Cable de alimentación*1

CD*1
Manual*1

USB Cable*1 / Cable USB*1
INSTALLATION INSTALACIÓN
(1) Place the printer on a steady surface and ensure that the power is turned off.
(2) Connect one end of the USB data cable to the printer and the other end to the host computer.
(3) Insert the power cord into both the printer and the power outlet.
(1) Coloque la impresora sobre una superficie firme y asegúrese de que la energía está apagada.
(2) Conecte un extremo del cable de datos USB al impresora y el otro extremo a la computadora host.
(3) Inserte el cable de alimentación tanto en la impresora como en el Toma de corriente.

Note: Please make sure to turn off the printer before connecting it to the power.
Nota: Asegúrese de apagar la impresora antes de conectarla a la corriente.
LOADING MEDIA CARGANDO MEDIOS
(1) Push the open button to open the cover.
(2) Put in the folding paper.
(3) Pull out the paper roll, guide and fasten the paper with the paper guide.
(4) Close the cover carefully.
(1) Pulse el botón de apertura para abrir la tapa.
(2) Coloque el papel plegable.
(3) Saque el rollo de papel, guíe y sujete el papel con la guía de papel.
(4) Cierre la cubierta con cuidado.

natural_image
Technical line drawings of two printer printing machines, showing front and side views (no text or symbols)Note: Please make sure the cover is firmly closed. Nota: asegúrese de que la cubierta esté bien cerrada.
FEED KEY & AUTO PAPER DETECTION TECLA DE ALIMENTACIÓN Y DETECCIÓN AUTOMÁTICA DE PAPEL
1. The functions of the feed key
1. Las funciones de la tecla de avance
(1) Feed paper
When the printer is ready, press the feed key, will feed the paper to the next label.
(2) Pause the printing job
When the printer is printing, press the feed key, the printing job will be paused and the LED is blue blinking. Press the feed key again, the printing job will be resumed.
(1) Papel de alimentación
Cuando la impresora esté lista, presione la tecla de alimentación, el papel pasará a la siguiente etiqueta.
(2) Pausar el trabajo de impresión
Cuando la impresora esté imprimiendo, presione la tecla de alimentación, el trabajo de impresión se detendrá y el LED parpadeará en azul. Presione la tecla de avance nuevamente, se reanudará el trabajo de impresión.
2. Auto Paper Detection
2. Detección automática de papel
This printer can automatically detect the size of the media when it is changed. When loading the first label or sheet and closing the printer's cover, the printer will run the paper detection and be ready for printing.
Esta impresora puede detectar automáticamente el tamaño del papel cuando se cambia. Al cargar la primera etiqueta u hoja y cerrar la tapa de la impresora, la impresora ejecutará la detección de papel y estará lista para imprimir.
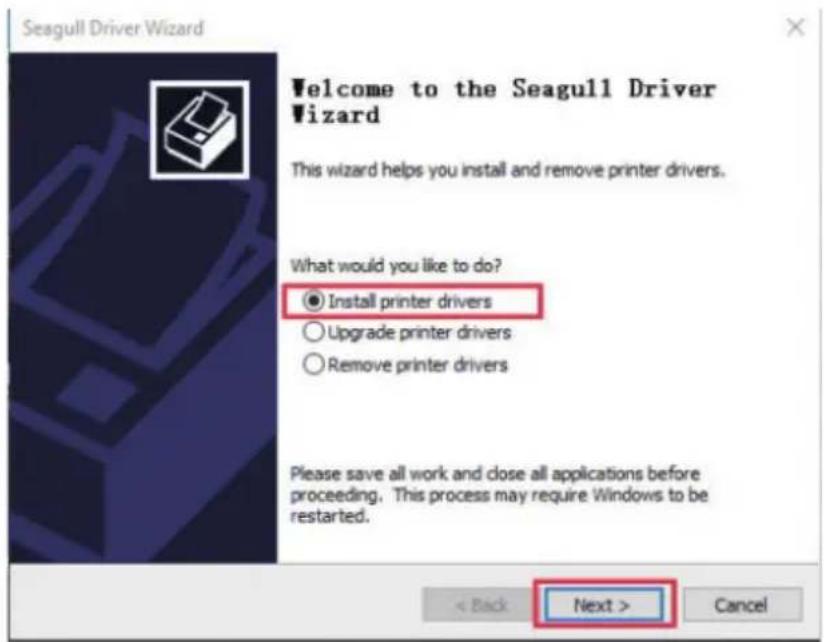
DRIVER INSTALLATION INSTALACIÓN DEL CONTROLADOR
Open the location then double-click the driver icon, and accept the license agreement.
Abra la ubicación y luego haga doble clic en el icono del controlador, y acepte el contrato de licencia.

Select the installation path and click Next.
Seleccione la ruta de instalación y haga clic en Siguiente.

Please ensure that the printer is turned on and connect it to the computer using the provided USB cable. Click Finish to enter the interface for installing drivers.
Asegúrese de que la impresora esté encendida y conéctela a la computadora con el cable USB proporcionado. Haga clic en Finalizar para ingresar a la interfaz para instalar controladores.

Select the printer driver you want to install and click Next.
Seleccione el controlador de impresora que desea instalar y haga clic en Próximo.
Plug and Play Printer Detection, New Plug and Play printers are automatically detected for installation.
Detección de impresoras Plug and Play, nuevo Plug and Play las impresoras se detectan automáticamente para su instalación.

After confirming the model is 4B-2054N, click on the next page.
Después de confirmar que el modelo es 4B-2054N, haga clic en el siguiente página.

Finally, click Finish to start the installation of the driver.
Finalmente, haga clic en Finalizar para iniciar la instalación del controlador.

This step is the driver installation progress. Click Finish after the installation is completed.
Este paso es el progreso de la instalación del controlador. Haga clic en Finalizar una vez completada la instalación.

Click Close after installation.
Haga clic en Cerrar después de la instalación.

View the installed driver, click on the computer to start opening the settings, and then click on the device. The words Bluetooth, printers, and mouse are displayed as below.
Vea el controlador instalado, haga clic en la computadora para comience a abrir la configuración y luego haga clic en el dispositivo. Las palabras Bluetooth, impresoras y mouse se muestran a continuación.

After entering from the device, click on the printer and scanner to see the downloaded driver.
Después de ingresar desde el dispositivo, haga clic en la impresora y el escáner para ver el controlador descargado.

COMPUTER BLUETOOTH CONNECTION CONEXIÓN BLUETOOTH DE LA COMPUTADORA
Click on the computer to enter the setup interface. Now the device opens.
Haga clic en la computadora para ingresar a la interfaz de configuración.
Ahora el dispositivo se abre.
(1) Click Bluetooth and other devices.
(2) Click on Bluetooth.
(3) Click on adding Bluetooth or other devices.
(4) Select the corresponding model of the printer.
(1) Haga clic en Bluetooth y otros dispositivos.
(2) Haga clic en Bluetooth.
(3) Haga clic en agregar Bluetooth u otros dispositivos.
(4) Seleccione el modelo correspondiente de la impresora.

Enter the PIN password "0000" for the corresponding model.
Ingrese la contraseña PIN "0000" para el modelo correspondiente.

Tap the keyboard window key+R to open the run window, and enter “devmgmt.msc” to enter the device manager.
Toque la tecla de la ventana del teclado + R para abrir la ventana de ejecución, e ingrese “devmgmt.msc” para ingresar al administrador de dispositivos.

After opening the device manager, click on the port, select the corresponding Bluetooth standard serial interface, and select COM3.
Después de abrir el administrador de dispositivos, haga clic en el puerto, seleccione la interfaz serial estándar de Bluetooth correspondiente y seleccione COM3.

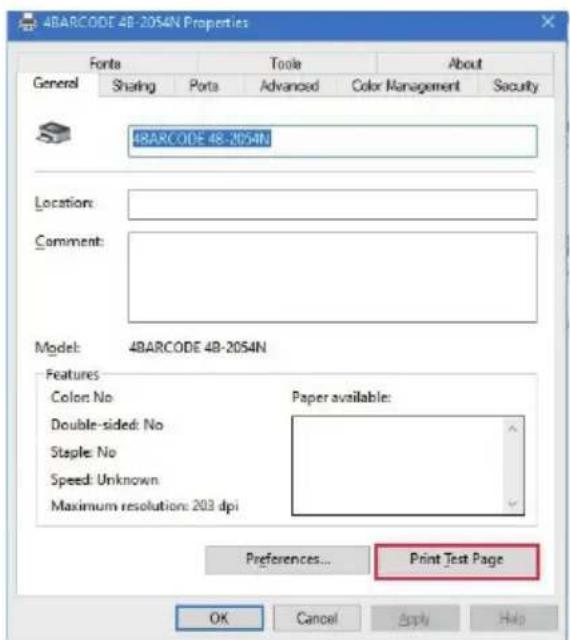
Return to the printer configuration interface, and check the port number of the Bluetooth device you just queried in the port list box (if there are two or more, you can try them separately). Click Apply to return to the regular device interface, and click Test Print. If printing is not possible, please follow the previous steps to change the port number.
Regrese a la interfaz de configuración de la impresora y verifique el número de puerto del dispositivo Bluetooth que acaba de consultar en el cuadro de lista de puertos (si hay dos o más, puede probar ellos por separado). Haga clic en Aplicar para volver a la normalidad interfaz del dispositivo y haga clic en Impresión de prueba. Si la impresión no es posible, siga los pasos anteriores para cambiar el número de puerto.

Finally, unplug the printer USB connection cable and print the test page through Bluetooth connection on the driver.
If the test page is printed, the connection is successful.
Finalmente, desconecte el cable de conexión USB de la impresora e imprima la página de prueba a través de la conexión Bluetooth en el controlador.
Si se imprime la página de prueba, la conexión es exitosa.
BLUETOOTH CONNECTIVITY CONECTIVIDAD BLUETOOTH
(1) Scan QR code to download printing and editing software.
(1) Escanee el código QR para descargar el software de impresión y edición.
(2) Click disconnect.
(2) Haga clic en desconectar.
(3) Select Bluetooth connection.
(3) Seleccione la conexión Bluetooth.
(4) Select the model corresponding to the printer.
(4) Seleccione el modelo correspondiente a la impresora.

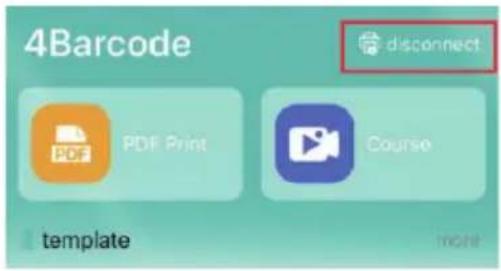


(5) The upper right corner of the APP main page displays "connect" means a successful connection.
(5) La esquina superior derecha de la página
principal de la aplicación muestra “conectar” significa una conexión exitosa.

LED STATUS ESTADO DE LED
| LED statusEstado de LED | ExplanationExplicación |
| Red blinkParpadeo rojo | Out of paperSin papel |
| Red & blue blinkParpadeo rojo y azul | Header overheatSobrecalentamiento del encabezado |
| Blue blinkParpadeo azul | Printer pausePausa de la impresora |
| Blue light onuz azul encendida | Printer standbyImpresora en espera |
| Red light onLuz roja encendida | Cover openedCubierta abierta |
| ParametersParámetros | ValuesValores |
| Printing SpeedVelocidad de impresión | 152 mm/s |
| ResolutionResolución | 203 DPI |
| DensityDensidad | 12 |
| Paper widthAncho del papel | Max 108mm (4.09") (Default 4inch) |
| Paper lengthLongitud del papel | Max 1778mm (70") (Default 6inch) |
| Paper thicknessGrosor del papel | 0.06 ~ 0.20 mm |
| Power adapterAdaptador de corriente | Input: AC 100V-240V, 50-60HzOutput: DC 24V/2.5AEntrada: CA 100V-240V, 50-60HzSalida: CC 24V/2.5A |
CLEANING AND MAINTENANCE LIMPIEZA Y MANTENIMIENTO
By following these simple maintenance guidelines, you can ensure a longer lifespan and maintain high-quality printing performance.
Si sigue estas sencillas pautas de mantenimiento, puede garantizar una vida útil más larga y mantener un rendimiento de impresión de alta calidad.
General Cleaning - Keep the outside of your printer clean by wiping it periodically with a soft cloth dampened with water.
Do not use abrasive cleaners as they may damage the surfaces.
Limpieza general: mantenga limpia la parte exterior de la impresora limpiándola periódicamente con un paño suave humedecido con agua.
No utilice limpiadores abrasivos ya que pueden dañar las superficies.
Cleaning the printer head - After installing a new printer head or using a roll of media, rub the cleaning pen across the dark area of the printer head. Allow the printer head to dry for one minute before loading labels.
Limpieza del cabezal de la impresora: después de instalar un nuevo cabezal de impresora o usar un rollo de material, frote el lápiz de limpieza en el área oscura del cabezal de la impresora. Deje que el cabezal de la impresora se seque durante un minuto antes de cargar las etiquetas.

Shock HAZARD -
Always turn off the printer before cleaning.
PELIGRO de descarga -
Apague siempre la impresora antes de limpiar.

Try to avoid touching the printer head whenever possible. If you need to remove dirt or dust, always gently clean the printer head with a cleaning pen or a cotton swab moistened with 100% isopropyl alcohol.
Trate de evitar tocar el cabezal de la impresora siempre que sea posible. Si necesita eliminar la suciedad o el polvo, limpie siempre suavemente el cabeza de la impresora con una pluma de limpieza o un bastoncillo de algodón humedecido con alcohol isopropílico al 100%.
- THERMAL LABEL PRINTER 108MM USB+BT IMPRESORA TÉRMICA DE ETIQUETAS 108MM USB+BT
- MODEL QOP-T18UB-LE
- USER MANUAL / MANUAL DE USUARIO
- WARRANTY AND PRODUCT INFORMATION
- GARANTÍA E INFORMACIÓN DEL PRODUCTO
- Notice:
- ADVERTENCIA
- Aviso:
- PRODUCTION VIEW VISTA DE PRODUCCIÓN
- PACKING LIST LISTA DE EMBALAJE
- INSTALLATION INSTALACIÓN
- LOADING MEDIA CARGANDO MEDIOS
- FEED KEY & AUTO PAPER DETECTION TECLA DE ALIMENTACIÓN Y DETECCIÓN AUTOMÁTICA DE PAPEL
- The functions of the feed key
- Las funciones de la tecla de avance
- Feed paper
- Pause the printing job
- Papel de alimentación
- Pausar el trabajo de impresión
- Auto Paper Detection
- Detección automática de papel
- DRIVER INSTALLATION INSTALACIÓN DEL CONTROLADOR
- COMPUTER BLUETOOTH CONNECTION CONEXIÓN BLUETOOTH DE LA COMPUTADORA
- BLUETOOTH CONNECTIVITY CONECTIVIDAD BLUETOOTH
- LED STATUS ESTADO DE LED
- CLEANING AND MAINTENANCE LIMPIEZA Y MANTENIMIENTO
- Shock HAZARD -
- PELIGRO de descarga -
Marque : Qian
Modèle : QOP-T18UB-LE
Catégorie : Imprimante d'étiquettes