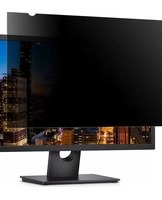
PRIVACY-SCREEN-22MB - Filtre d'écran StarTech.com - Notice d'utilisation et mode d'emploi gratuit
Retrouvez gratuitement la notice de l'appareil PRIVACY-SCREEN-22MB StarTech.com au format PDF.


| Type de produit | Filtre d'écran de confidentialité |
| Marque | StarTech.com |
| Modèle | PRIVACY-SCREEN-22MB |
| Compatibilité écran | Écrans 22 pouces (diagonale), format 16:9 |
| Dimensions (approx.) | Largeur : 50 cm, Hauteur : 31 cm |
| Poids | Environ 150 g |
| Matériau | Polycarbonate traité anti-rayures |
| Angle de confidentialité | 30° (vue privée de part et d'autre) |
| Fonction anti-lumière bleue | Oui, filtre jusqu'à 30% de la lumière bleue nocive |
| Montage | Fixation par bandes adhésives réutilisables (incluses) |
| Réversibilité | Amovible et repositionnable sans résidu |
| Nettoyage | Chiffon microfibre doux et sec |
| Réduction reflets | Traitement antireflet mat |
| Sécurité | Matériau anti-éclat en cas de bris |
| Certifications | Conforme RoHS |
| Contenu de l'emballage | 1 filtre de confidentialité, bandes adhésives, chiffon de nettoyage |
| Garantie | 2 ans |
FOIRE AUX QUESTIONS - PRIVACY-SCREEN-22MB StarTech.com
Questions des utilisateurs sur PRIVACY-SCREEN-22MB StarTech.com
0 question sur cet appareil. Repondez a celles que vous connaissez ou posez la votre.
Poser une nouvelle question sur cet appareil
Téléchargez la notice de votre Filtre d'écran au format PDF gratuitement ! Retrouvez votre notice PRIVACY-SCREEN-22MB - StarTech.com et reprennez votre appareil électronique en main. Sur cette page sont publiés tous les documents nécessaires à l'utilisation de votre appareil PRIVACY-SCREEN-22MB de la marque StarTech.com.
MODE D'EMPLOI PRIVACY-SCREEN-22MB StarTech.com
Universal Privacy Filter
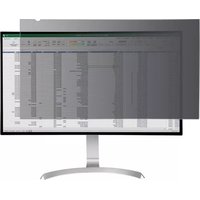
Product Diagram (PRIVSCNMONxx and PRIVACY-SCREEN-xx)
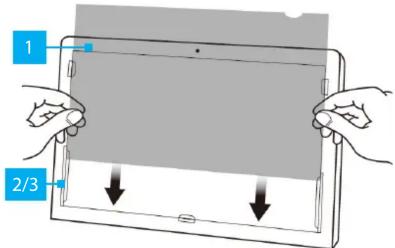
| Component Function | ||
| 1 | Privacy Filter | · Privacy comes into effect when viewing anywhere past 30 degrees from the left and right of center· Total field of view of 60 degrees |
| 2 | Mounting Tabs (x 5) | · Secure the Privacy Filter to the Monitor's surface· The adhesive on the Mounting Tabs becomes less effective with frequent removal/reapplication |
| 3 | Adhesive Strips (not displayed) | · Secure the Privacy Filter to the Monitor's surface· The Adhesive Strips become less effective with frequent removal/reapplication |
Package Contents
- Privacy Screen x 1
- Set of Adhesive Strips x 1 (screens up to 27") or x 2 (screens larger than 27")
- Set of Mounting Tabs x 1
- Wiping Cloth x 1
- Quick Start Guide x 1
Requirements
For the latest requirements, please visit the following link and replace "xx" with the desired privacy filter size / SKU:
www.startech.com/PRIVSCNMONxx
www.startech.com/PRIVACY-SCREEN-xx
Install the Privacy Filter -- Adhesive Strips
For installations that are intended to be permanent, or if the Monitor does not feature large Bezels, please use the Adhesive Strips.
- Clean the Laptop Display and Bezels, using the Wiping Cloth.
-
Select the side of the Privacy Filter that is intended to face outward (i.e. matte or glossy side) and place the Privacy Filter on a clean and flat surface with the selected side facing down.
-
Remove all the Adhesive Strips from the Transparent Lining.
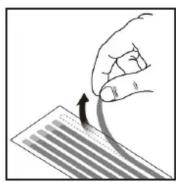
Removing the Adhesive Strips
- Carefully align the Adhesive Strips along the edges (top, bottom, left, and right) of the Privacy Filter and affix to the Privacy Filter by applying firm pressure to all the Adhesive Strips.
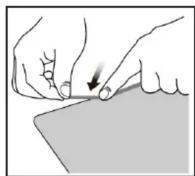
Applying the Adhesive Strips
- Carefully remove the Protective Backing from the Adhesive Strips, exposing the screen side adhesive.

Remove the Protective Backing from the Adhesive Strips
- Apply the Privacy Filter to the Monitor Screen, adhesive side toward the Screen. Start at the bottom edge of the Screen and work your way to the top.

Applying the Privacy Filter
- Carefully apply gentle pressure to locations on the Privacy Filter where the Adhesive Strips were placed.
- Clean any fingerprints on the Privacy Filter, using the Wiping Cloth.
Installing the Privacy Filter -- Mounting Tabs
It is recommended to use the Mounting Tabs to install the Privacy Screen if you intend on frequently removing the Privacy Screen from the Monitor.
- Clean the Laptop Display and Bezels, using the Wiping Cloth.
- Separate the Mounting Tabs.

Separating Mounting Tabs
Use of Trademarks, Registered Trademarks, and other Protected Names and Symbols
This manual may make reference to trademarks, registered trademarks, and other protected names and/or symbols of third-party companies not related in any way to StarTech.com. Where they occur these references are for illustrative purposes only and do not represent an endorsement of a product or service by StarTech.com, or an endorsement of the product(s) to which this manual applies by the third-party company in question. StarTech.com hereby acknowledges that all trademarks, registered trademarks, service marks, and other protected names and/or symbols contained in this manual and related documents are the property of their respective holders.
Warranty Information
This product is backed by a two-year warranty.
For further information on product warranty terms and conditions, please refer to www.startech.com/warranty.
Limitation of Liability
In no event shall the liability of StarTech.com Ltd. and StarTech.com USA LLP (or their officers, directors, employees or agents) for any damages (whether direct or indirect, special, punitive, incidental, consequential, or otherwise), loss of profits, loss of business, or any pecuniary loss, arising out of or related to the use of the product exceed the actual price paid for the product. Some states do not allow the exclusion or limitation of incidental or consequential damages. If such laws apply, the limitations or exclusions contained in this statement may not apply to you.
StarTech.com Ltd.
45 Artisans Crescent
London, Ontario
N5V 5E9
Canada
StarTech.com LLP
4490 South Hamilton
Road
Groveport, Ohio
43125
U.S.A.
StarTech.com Ltd.
Unit B, Pinnacle 15
Gowerton Roac
Brackmills,
Northampton
NN4 7BW
United Kingdom
StarTech.com Ltd.
Siriusdreef 17-27
2132 WT Hoofddorp
The Netherlands
FR: startech.com/fr
DE: startech.com/de
ES: startech.com/es
NL: startech.com/nl
II: startech.com/it
JP: startech.com/jp
- Remove the Protective Backing from the Mounting Tabs, exposing the adhesive.

Removing Protective Backing
- Apply the Mounting Tabs to the Bezels. We recommended applying two Mounting Tabs to the Left Bezel, two Mounting Tabs to the Right Bezel, and one Mounting Tab on the Bottom Bezel.
Note: Ensure the Long Mounting Tabs are applied to the lower portion of the Left and Right Bezels.

Installing Mounting Tabs
- Slide the Privacy Filter in-between the Mounting Tabs and Monitor Screen.

Installing the Privacy Filter
- Clean any fingerprints on the Privacy Filter, using the Wiping Cloth.
Marque : StarTech.com
Modèle : PRIVACY-SCREEN-22MB
Catégorie : Filtre d'écran