Romeo - Thermostat FERROLI - Notice d'utilisation et mode d'emploi gratuit
Retrouvez gratuitement la notice de l'appareil Romeo FERROLI au format PDF.


| Type de produit | Thermostat d'ambiance programmable |
| Marque | Ferroli |
| Modèle | Romeo |
| Dimensions (L x H x P) | 80 x 80 x 25 mm |
| Poids | 150 g (sans piles) |
| Alimentation | 2 piles AAA 1,5 V (non fournies) |
| Autonomie des piles | Environ 1 an |
| Fonctions principales | Régulation de température, programmation hebdomadaire, mode vacances, antigel, détection d'ouverture de fenêtre |
| Type de programmation | 5/2 ou 7 jours, jusqu'à 4 périodes par jour |
| Plage de température | 5 °C à 35 °C |
| Précision de mesure | ±0,5 °C |
| Compatibilité | Chaudières gaz, pompes à chaleur, systèmes de chauffage central (contact sec) |
| Type de contact | NO/NC, sans potentiel, 230 V, 5 A max |
| Affichage | Écran LCD rétroéclairé |
| Température de fonctionnement | 0 °C à 40 °C |
| Indice de protection | IP20 |
| Classe de protection électrique | Classe II (double isolation) |
| Entretien et nettoyage | Nettoyer avec un chiffon doux et sec. Ne pas utiliser de solvants ni de produits abrasifs. |
| Pièces détachées et réparabilité | Piles (type AAA), support mural. Aucune pièce interne réparable par l'utilisateur. |
| Installation | Montage mural, à environ 1,5 m du sol, à l'abri des sources de chaleur et du soleil direct. |
| Garantie | 2 ans (hors piles) |
FOIRE AUX QUESTIONS - Romeo FERROLI
Questions des utilisateurs sur Romeo FERROLI
0 question sur cet appareil. Repondez a celles que vous connaissez ou posez la votre.
Poser une nouvelle question sur cet appareil
Téléchargez la notice de votre Thermostat au format PDF gratuitement ! Retrouvez votre notice Romeo - FERROLI et reprennez votre appareil électronique en main. Sur cette page sont publiés tous les documents nécessaires à l'utilisation de votre appareil Romeo de la marque FERROLI.
MODE D'EMPLOI Romeo FERROLI
OVERVIEW OF THE REMOTE CONTROL

1 Mode selection key: OFF, summer winter/reset faults
2 Automatic/manual heating mode key
3 Heating - domestic hot water programming key
4 Time and day programming key
5 Heating temperature adjustment key
6 Hot water temperature adjustment key
7 User information/settings key
8 Holiday function key / copy heating - hot water program day
9 Manual room temperature decrease key
10 Manual room temperature increase key
11 Heating program time bands
12 Day of the week
13 Hour and minutes
14 OFF mode
15 Manual heating symbol
16 Automatic heating symbol
17 Holiday function symbol
18 Burner On symbol and current output level
19 Summer mode symbol
20 Domestic hot water symbol
21 Winter mode symbol
22 Heating operation symbol
23 Fault symbol
24 Room temperature reading
25 Antifreeze operation symbol
26 Ambient temperature (only with ambient temperature probe connected)
CONFIGURE AND ACTIVATE THE REMOTE CONTROL IN 4 EASY STEPS
Phase 1. Set the time and day of the week
- Press the DAY key. The day starts flashing: use the / keys to set the correct day of the week considering that DAY 1 corresponds to Monday and DAY 7 to Sunday.
- Press the DAY key. The hours value starts flashing: use the▲key to set the hour from 00 to 23.
- Press the ^DAY key. The minutes value starts flashing: use the keys to set the minutes from 00 to 59.
- Press the DAY key.
Phase 2. Setting the automatic weekly program
Once the time and day of the week have been set, the remote control will follow the factory-set automatic program. The heating program has 6 daily time bands for temperature levels, numbered from 1 to 6. The time bands can be set between 00:00 and 24:00 in steps of 10 minutes. Each temperature level can be set between 7^ and 32.5^ in steps of 0.1^ . You can therefore program any combination of time and temperature during each 24-hour period; the settings can be different for each day of the week. The factory-set automatic program is as follows:
| From Monday to Friday | Band 1 | Band 2 | Band 3 | Band 4 | Band 5 | Band 6 |
| Start time | 06:30 | 08:00 | 12:00 | 14:00 | 18:00 | 22:30 |
| Temperature level | 21°C | 18°C | 21°C | 18°C | 21°C | 16°C |
| From Saturday to Sunday | Band 1 | Band 2 | Band 3 | Band 4 | Band 5 | Band 6 |
| Start time | 08:00 | 10:00 | 12:00 | 14:00 | 18:00 | 22:30 |
| Temperature level | 21°C | 21°C | 21°C | 21°C | 21°C | 16°C |
Follow the instructions given below to change the factory-set automatic program.
- Press the Ⓟ key. If domestic hot water programming is enabled, select the radiator symbol using the ▲/▼ keys and confirm with the Ⓟ key. The 6 daily time bands start flashing and number 1 of DAY 1 is shown in a box to indicate that time band 1 of DAY 1 (Monday) can be modified.
- Press the key. The hours and minutes display starts flashing: use the ▲/▼ keys to change the start time of the time band in steps of 10 minutes. To change the hour and minutes values rapidly keep the key pressed.
- Press the key. The room temperature value starts flashing: use the keys to change the temperature value in steps of 0.1^ . To change the temperature value rapidly keep the key pressed.
- Press the key. The 6 daily bands start fl ashing.
- Now press the ▲ key to display time band 2 of DAY 1 (Monday) and personalise it by repeating steps 2 to 4.
- The remaining bands can be displayed by selecting bands 3, 4, 5 or 6 using the ▲/▼ keys and repeating the operation described in step 5.
- You can now set the program for the following day:
a. Press the key to display DAY 2. The Tuesday program can be personalised by repeating steps 2 to 6.
b. To copy the Monday program to Tuesday, press the COPY key. To copy the same program also to the other days of the week, press the COPY key repeatedly.
Caution! When setting the program make sure that the start time of each band is different
| Personal program notes | ||||||
| Monday | Band 1 | Band 2 | Band 3 | Band 4 | Band 5 | Band 6 |
| Start time | ||||||
| Temperature level | ||||||
| Tuesday | Band 1 | Band 2 | Band 3 | Band 4 | Band 5 | Band 6 |
| Start time | ||||||
| Temperature level | ||||||
| Wednesday | Band 1 | Band 2 | Band 3 | Band 4 | Band 5 | Band 6 |
| Start time | ||||||
| Temperature level | ||||||
| Thursday | Band 1 | Band 2 | Band 3 | Band 4 | Band 5 | Band 6 |
| Start time | ||||||
| Temperature level | ||||||
| Friday | Band 1 | Band 2 | Band 3 | Band 4 | Band 5 | Band 6 |
| Start time | ||||||
| Temperature level | ||||||
| Saturday | Band 1 | Band 2 | Band 3 | Band 4 | Band 5 | Band 6 |
| Start time | ||||||
| Temperature level | ||||||
| Sunday | Band 1 | Band 2 | Band 3 | Band 4 | Band 5 | Band 6 |
| Start time | ||||||
| Temperature level | ||||||
Phase 3. Operation mode selection
OFF mode selection - If the house is to be unoccupied for prolonged periods (see also Holiday Function) or if you simply want to switch off the heating, press the ⏻️ ➕ ➔ key to display the ⏻ symbol. The heating system will be switched off and will only switch on again if the room temperature falls below 5°C: protection function to safeguard against freezing. If equipped with a storage tank, the boiler will not deliver domestic hot water; Instant hot water boilers, however, will continue to produce hot water.
Summer mode selection - If you want to switch off the heating while maintaining the domestic hot water function, press the ⏻ F—key to display the symbol. The heating system is switched off and reactivated only if the room temperature falls below 5°C: protection function to safeguard against freezing. Irrespective of the boiler type, it will continue to produce hot water.
Winter mode selection - To reactivate the heating system and restore the previously set operating mode, press the ⏻️ ➕ ➕ key again to display the ➕ ➕ symbol. Irrespective of the boiler type, it will continue to produce hot water.
Heating system automatic operation (in winter mode) - Press the 🔊 key to display the Ⓧ symbol. The remote control will function in accordance with the automatic weekly program, displaying the 6 time bands: the currently active time band is displayed in a box. If the box is not shown on the display, this indicates that the current time is between 00:00 hours and the start time of time band 1.
Preset temperature level override - In automatic mode the room temperature can be temporarily changed by pressing the ▲/▼ keys to change the value in 0.1°C steps. To change the temperature value rapidly keep the key pressed. The override function, shown on the display with a flashing symbol, will be cancelled the at the time of the next time band change.
Heating system manual operation (in winter mode) - To use the remote control at a fixed room temperature, press the 🔊 key to display the 🔊 symbol (the 6 time bands are no longer displayed). Now set the room temperature value by means of the ▲/▼ keys, in 0.1°C steps. To change the temperature value rapidly keep the key pressed. Manual mode operation will proceed until a different mode is selected.
Phase 4. Heating system - domestic hot water temperature adjustment
Heating - Press the key: the display shows the current value of the heating circuit water temperature; use the ▲▼ keys to change the value in 1°C steps. Press any key to quit the menu.
Domestic hot water - Press the F^ key: the display shows the current value of the domestic hot water temperature value; use the keys to change the value in 1°C steps. Press any key to quit the menu.
SPECIAL FUNCTIONS
Holiday Function
The Holiday Function is used to switch off the heating system (and production of domestic hot water for boilers with a storage tank) for a specific period of time, which can be from 1 hour to 45 days, adjustable in 1 hour steps. This makes it possible to save energy consumption when you're away from home, reactivating the previously programmed operating mode as soon as the Holiday function ends. The heating system is activated only if the room temperature falls below 5^ : protection function to safeguard against freezing.
Follow the instructions given below to activate and program the Holiday function.
- Press the COPY key. The symbol starts flashing and the hours/minutes display switches to -00:01, representing the time remaining before the end of the Holiday function.
- Use the ▲▼ keys to extend the time remaining until the end of the Holiday function in 1 hour steps (-00:01 means 1 hour; -45:00 means 45 days). To change the hours and days rapidly keep the key pressed.
- During the Holiday function the display will continue to show the time remaining until the end of the function.
To cancel the Holiday function press the COPY key or any other key associated with a different operating mode.
USER PARAMETER EDITING
Sliding Temperature - Compensation curve
By installing the external probe (optional), the control system can work with a Sliding Temperature. The outdoor temperature sensor must be connected to the boiler control card: refer to the boiler manual for details. In this mode, the heating system temperature is controlled in relation to weather conditions in such a way as to ensure the maximum comfort and energy efficiency throughout the year. Specifically, as the ambient temperature increases the temperature at the outlet to the heating circuit decreases in accordance with a specific compensation curve. With the Sliding Temperature control the temperature corresponding to the "Heating temperature control" setting becomes the maximum heating circuit delivery temperature. It is advisable to set the heating temperature control to maximum in order to allow the system to perform sliding temperature control functions over the entire operating range of the boiler. The compensation curve can be set from 1 to 10 according to the following diagram.

line
| Temperature estema (°C) | Temperature di manutenza imposto (°C) | |---|---| | -20 | 30 | | -10 | 40 | | 0 | 50 | | 10 | 60 | | 20 | 70 | | 30 | 80 | | 40 | 90 | The chart displays a single line graph with 12 labeled data points (1 to 10), likely representing a series of measurements or variables. The x-axis is labeled 'Temperature estema (°C)' and the y-axis is labeled 'Temperature di manutenza imposto (°C)'. No trend lines are present; only one data series is plotted.- Hold down the key for 3 seconds.
- The display shows parameter CU.
Use the ▲▼ keys to change the compensation curve one step at a time. To change the value rapidly keep the key pressed.
- Press any of the other keys to quit the menu.
Set the compensation curve to 0 to disable Sliding Temperature control.
The system must be adjusted at the time of installation by qualified personnel. However, the user can make any further adjustments necessary to optimise comfort levels. If room temperature is too low, set a compensation curve with a higher number, and vice versa. Increase or decrease the compensation curve setting one step at a time and check the result in terms of room temperature.
Sliding Temperature - Curve parallel offset
Once the Compensation curve has been set, adjust the parallel offset from 20 to 40 as shown in the following diagrams:

line
| Temperature esterna (°C) | Temperature di mandita impasto (°C) | |---|---| | -20 | 90 | | -10 | 85 | | 0 | 80 | | 10 | 75 | | 20 | 70 | | 30 | 65 | | 40 | 60 | | 50 | 55 | | 60 | 50 | | 70 | 45 | | 80 | 40 | | 90 | 35 | | 100 | 30 | The chart displays a single line graph with 11 data points labeled 1 through 10. The x-axis is labeled 'Temperature esterna' and the y-axis is labeled 'Temperature di mandita impasto'. The values for each point are explicitly labeled.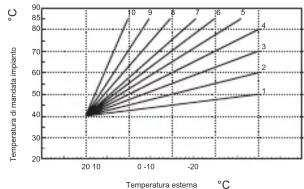
line
| Temperature esterna (°C) | Temperature di manziale imposto (°C) | | :--- | :--- | | 20 | 40 | | -10 | 50 | | -20 | 60 | | -30 | 70 | | -40 | 80 | | -50 | 90 | The chart displays a single line representing a series of measurements across different temperature ranges. The x-axis is labeled 'Temperature esterna' and the y-axis is labeled 'Temperature di manziale imposto'. The legend is labeled with numbers 1 through 10, likely corresponding to each data point in the legend.-
Hold down the key for 3 seconds. 2. The display shows parameter CU.
-
Press the ⚠ key.
- The display shows parameter OF.
Use the ▲/▼ keys to adjust the curve parallel offset in 1°C steps. To change the value rapidly keep the key pressed.
- Press any of the other keys to quit the menu.
Enabling domestic hot water programming
Follow the instructions given below to enable domestic hot water programming.
-
Hold down the P key for 3 seconds. 2. The display shows parameter CU.
-
Press the P key twice. 4. The display shows parameter P1.
Set to 0 using the ▲/▼ keys to disable domestic hot water programming. Set to 1 using the ▲/▼
keys to enable domestic hot water programming.
- Press any of the other keys to quit the menu.
To set the weekly automatic program proceed as described in the heading "Phase 2. Setting the automatic weekly program", selecting the tap symbol at step "1" and setting EC (Economy) or CO (Comfort) at step "3" rather than a temperature value. The remote control incorporates an 7-day hourly programmer based on two levels: with the COMFORT level, the boiler maintains the storage cylinder at the programmed temperature; with the ECO level, the boiler does not produce domestic hot water. Refer to the boiler documentation for information on the type of storage cylinder.
Caution: Make sure the remote control is set to Winter mode with automatic operation.
Pre-Heating Function
The function is active only if the automatic heating operation has been selected.
When set to Automatic, the function anticipates the start time of the heating system (no earlier than 00:00 hours on the day in question) so that the room temperature set by the user is reached at the start of the programmed time band. The remote control calculates an initial hypothetical Pre-Start time: if the programmed room temperature is reached in a shorter time than the calculated time, the Pre-heating time will be reduced, and vice-versa. This constitutes a self-teaching process that identifies the indispensable minimum pre-heating time.
The remote control also provides the facility to set a fixed Pre-heating ramp: In this case, room temperature will be increased by 3 °C an hour.
It is therefore important that the automatic heating program is set in relation to the time at which the chosen room temperature is required rather than the time at which the heating system is to be set into operation. Follow the instructions given below to select or deselect this function.
-
Hold down the P key for 3 seconds. 2. The display shows parameter CU.
-
Press the P key 3 times. 4. The display shows parameter P2.
Set to 0 using the ▲/▼ keys to disable the Pre-heating function. Set to 1 using the keys to enable the Automatic Pre-heating function. Set to 2 using the ▲/▼ keys to enable the Pre-heating function with a fixed ramp of 3 °C per hour.
- Press any of the other keys to quit the menu.
During the pre-heating function the room temperature °C symbol fl ashes.
The pre-heating function terminates when the difference between the programmed room temperature and the actual room temperature is less than 0.5^ .
Maximum number of daily time bands
The heating program has 6 daily time bands for temperature levels, numbered from 1 to 6. If necessary, the time bands can be reduced to a minimum of two.
-
Hold down the key for 3 seconds. 2. The display shows parameter CU.
-
Press the ⌘ key 4 times. 4. The display shows parameter P3.
Use the ▲/▼ keys to change the number of daily time bands from 2 to 6.
- Press any of the other keys to quit the menu.
Minimum heating temperature
Follow the instructions given below to set the minimum heating circuit water temperature in 1°C steps.
-
Hold down the key for 3 seconds. 2. The display shows parameter CU.
-
Press the Ⓞ key 5 times. 4. The display shows parameter P4.
Use the ▲/▼ keys to change the temperature value in 1°C steps. To change the temperature value rapidly keep the key pressed.
- Press any of the other keys to quit the menu.
Filling the heating circuit
This function manages the operating mode of the electrical device for fi lling the water circuit depending on the boiler model.
-
Hold down the ⚠ key for 3 seconds. 2. The display shows parameter CU.
-
Press the Ⓞ key 6 times. 4. The display shows parameter P5.
Set to 0 using the ▲/▼ keys to disable the electronic Filling device. Set to 1 using the keys to set Manual circuit fi lling. Set to 2 using the ▲/▼ keys to set Automatic circuit fi lling.
- Press any of the other keys to quit the menu.
Caution: Set the boiler control card to manual filling. In manual mode, if the sensor installed in the boiler detects insufficient pressure, the pressure icon will flash on the display; press RESET to activate the specific solenoid valve. During manual or automatic fi lling the pressure icon will be steadily illuminated. Once nominal pressure has been restored, the remote control reverts to the normal display.
Temperature unit selection
Follow the instructions given below to use theremote control in °C or in °F.
-
Hold down the P key for 3 seconds. 2. The display shows parameter CU.
-
Press the P key 7 times. 4. The display shows parameter P6.
Set to 0 using the ▲▼ keys to select °C.
Set to 1 using the ▲/▼ keys to select °F.
- Press any of the other keys to quit the menu.
Correcting the room temperature reading
Follow the instructions given below to correct the room temperature reading between - 2°C and + 2°C in 0.1°C steps.
-
Hold down the key for 3 seconds. 2. The display shows parameter CU.
-
Press the Ⓟ key 8 times. 4. The display shows parameter P7.
Use the ▲/▼ keys to change the reading in 0.1°C steps.
- Press any of the other keys to quit the menu.
Phone contact input
Normal operation of the remote control is ensured as long as the phone contact remains open. This contact can be closed - shown on the display with the symbols () - in order to force the remote control to switch off the heating system or set the room temperature to a preset fixed value.
Follow the instructions given below to program the two functions.
-
Hold down the key for 3 seconds. 2. The display shows parameter CU.
-
Press the key 9 times. 4. The display shows parameter P8.
Set to 0 using the ▲/▼ keys to switch off the heating system when the contact is closed.
Set to 1 using buttons ▲/▼ to set room temperature to a pre-programmed fixed value (by means of next parameter P9) when the contact is closed.
- Press the P key.
- The display shows parameter P9.
Set the room temperature value that the remote control will set when the contact is closed (if parameter P8 is set to 1) using the ▲/▼ keys to change the value in 0.1°C steps. To change the temperature value rapidly keep the key pressed.
- Press any of the other keys to quit the menu.
The procedure of changing the operating mode of the remote control in relation to opening or closing of the telephone contact must be performed in a maximum of 60 seconds.
OTHER FUNCTIONS
Information menu
The remote control can provide the user with information on boiler status. Each time the P key is pressed the display shows the following data in sequence:
T1 - Water outlet temperature to heating circuit
T2 - Domestic hot water temperature
T3 - Water return temperature from heating circuit (boilers with sensor only)
T4 - Water outlet temperature set-point calculated by the remote control
P5 - Current burner output
F6 - Current fan current (condensing boilers only)
F7 - Current flow rate of domestic hot water (instant hot water boilers with flowmeter only)
P8 - Current system pressure (boilers with pressure sensor only)
v - Remote control software version
Press any of the other keys to quit the menu.
Power failures
The remote control stores the operating mode and backs up the calendar and clock (day, hours and minutes) in the event of an electrical power failure. This information is retained in the memory for at least 5 hours without mains power (guaranteed only if the remote control was previously powered for at least 1 hour). If the data are lost, the day, hour and minutes must be re-entered when power is restored.
Fault Diagnosis
The remote control constantly monitors boiler status and signals possible faults by displaying an alarm icon and a specific error code: for a detailed description of the fault, refer to the documentation supplied with your boiler.
Certain faults cause the boiler to lock out (marked with the letter "A"): to restart the boiler simply press the RESET button; other faults (indicated with the letter "F") cause temporary shutdowns that are automatically reset as soon as the value in question returns to within the boiler's normal working range.
Room temperature sensor fault
If a fault of the remote control room sensor is detected, the display shows error code E92 and the ▲ symbol. The heating system is switched off.
External temperature probe fault
In Sliding Temperature operation and in the case of a fault of the external temperature sensor (optional), the display shows error code E93 and the ▲ symbol. The control temperature become fi xed at the "heating temperature control" value. To solve the fault, reconnect/replace the external sensor or disable sliding temperature control.
Restoring default settings
Caution! This function resets all remote control parameters to their default values, except for the time and day settings. If you use this function you will have to repeat all the steps required to set up the automatic weekly program and input the user parameters again.
Hold down the ▲/▼ keys simultaneously for 10 seconds: the display shows exclusively letters RE in fl ashing mode. The procedure can be interrupted at any time releasing the keys before 10 seconds have elapsed. Once the parameters have been reset to their default values, all the display symbols will be reactivated on the remote control.
INSTALLATION
The remote control must be mounted to a wall at a height of 1.5 m from the floor, in a position that is well away from doors, windows or heat sources that could affect room temperature. Disconnect the mains power supply from the boiler line before proceeding with the installation operations. Remove the front cover of the remote control by prising with screwdriver at points A and B. Now fi x the back of the remote control to the wall with the supplied screws, routing the two connection wires through the central hole: make the electrical connection to terminals "COM". If you need to connect the telephone contact (voltage free contact) use terminals "GSM". Refi t the remote control front cover

Use a two core cable (2x0.75mm2, max 2x2.5mm2). Make sure the cable is routed separately from the mains power cable. The maximum cable length must not exceed 50 metres.
TECHNICAL CHARACTERISTICS AND DEFAULT SETTINGS
| Time setting | 12:00 | |
| Day setting | Day 1=Monday | |
| Operation mode | Automatic | |
| Manual heating temperature | 20°C | |
| Room antifreeze temperature | 5°C | |
| CU | Compensation curve | 0=Disabled |
| OF | Curve parallel offset | 30°C |
| P1 Enable domestic hot water programming | 0=Disabled | |
| P2 Pre-Heating Function | 0=Disabled | |
| P3 Maximum number of daily time bands | 6 | |
| P4 Minimum heating temperature | - | |
| P5 Filling the system | 0=Disabled | |
| P6 Temperature unit selection | 0=°C | |
| P7 Room temperature reading correction | 0 | |
| P8 Telephone contact input operation selection | 0=Heating switched off | |
| P9 Manual temperature on closing the telephone contact input | 20°C | |

- CONFIGURE AND ACTIVATE THE REMOTE CONTROL IN 4 EASY STEPS
- Phase 1. Set the time and day of the week
- Phase 2. Setting the automatic weekly program
- Follow the instructions given below to change the factory-set automatic program.
- Phase 3. Operation mode selection
- Phase 4. Heating system - domestic hot water temperature adjustment
- SPECIAL FUNCTIONS
- Holiday Function
- USER PARAMETER EDITING
- Sliding Temperature - Compensation curve
- Sliding Temperature - Curve parallel offset
- Enabling domestic hot water programming
- Pre-Heating Function
- Maximum number of daily time bands
- Minimum heating temperature
- Filling the heating circuit
- Temperature unit selection
- Correcting the room temperature reading
- Phone contact input
- OTHER FUNCTIONS
- Information menu
- Power failures
- Fault Diagnosis
- Room temperature sensor fault
- External temperature probe fault
- Restoring default settings
- INSTALLATION
Marque : FERROLI
Modèle : Romeo
Catégorie : Thermostat