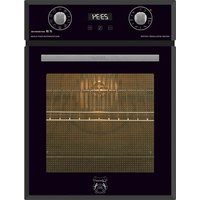
EH 4747 - Four Kaiser - Notice d'utilisation et mode d'emploi gratuit
Retrouvez gratuitement la notice de l'appareil EH 4747 Kaiser au format PDF.


| Type de produit | Four électrique encastrable multifonction |
| Capacité | 77 litres |
| Dimensions (L x H x P) | 595 x 595 x 575 mm |
| Alimentation | 230 V / 50 Hz, puissance totale 3,5 kW |
| Poids net | 35 kg |
| Fonctions de cuisson | Chaleur tournante, convection naturelle, gril, pyrolyse, décongélation |
| Plage de température | 50 °C à 275 °C |
| Nettoyage | Pyrolyse (auto-nettoyant) avec verrouillage de porte |
| Porte | Porte froide à double vitrage amovible |
| Éclairage | Éclairage halogène intérieur |
| Commandes | Manettes encastrées, affichage numérique, minuteur |
| Classe énergétique | A+ |
| Indice de réparabilité | 8,2 / 10 |
| Accessoires fournis | Grille, lèchefrite, tournebroche (selon modèle) |
| Sécurité | Verrouillage enfant, arrêt automatique, protection thermique |
| Garantie | 2 ans (pièces et main-d'œuvre) |
FOIRE AUX QUESTIONS - EH 4747 Kaiser
Questions des utilisateurs sur EH 4747 Kaiser
0 question sur cet appareil. Repondez a celles que vous connaissez ou posez la votre.
Poser une nouvelle question sur cet appareil
Téléchargez la notice de votre Four au format PDF gratuitement ! Retrouvez votre notice EH 4747 - Kaiser et reprennez votre appareil électronique en main. Sur cette page sont publiés tous les documents nécessaires à l'utilisation de votre appareil EH 4747 de la marque Kaiser.
MODE D'EMPLOI EH 4747 Kaiser
Kaiser®
natural_image
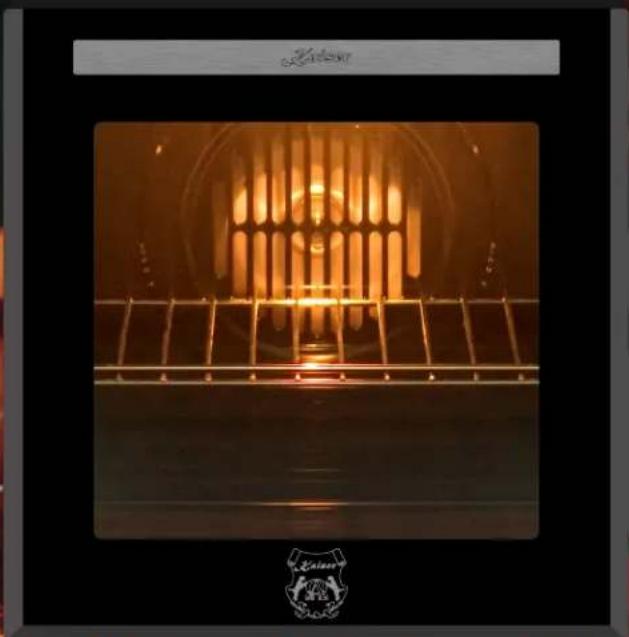
Interior view of a vintage electric stove with illuminated grating and metal grid (no visible text or symbols)EN
DEAR CUSTOMERS,
we thank to you for the acquisition of our technology.
We are convinced that you have made a right choice. This product which satisfies the high quality demands and corresponds to world comprehensive standards realizes your cookeries, and his modern appearance which has been developed by the best European designers will decorate your kitchen splendidly.
We ask you to read the operating instructions before usage thoroughly. The consideration of recommendations protects you from possible inconveniences which can appear as a result of the wrong use of the oven, and allows you to reduce the consumption of electric energy. If the use corresponds to the present operating instructions, the oven will bring you a lot of pleasure for a long time.
Our ovens correspond to the main demands of the security, hygiene and environment protection, according to the directives of the EU which is confirmed with certificates DIN ISO 9001, ISO 1400, according to the norms counting within the frames of the EU, they also correspond to the Gosstandart of Russia, standards of the CIS, which is confirmed with the corresponding certificates.
With the thoughts of a constant improvement of the quality of our ovens the changes in design and equipment which lead only to positive changes of the technical qualities are reserved by the manufacturer.
We wish you an effective use of our oven.
Yours faithfully
Kaiser
OLAN-Haushaltsgeräte Berlin Germany
We Inform you that our devices which are the object of the present operating instructions are precertain exclusively for the domestic use.
LIEBE KUNDIN, LIEBER KUNDE,
wir danken Ihnen für den Erwerb unserer Technik.
Wir sind überzeug, dass Sie eine richtige Wahl getroffen haben. Dieses Produkt, das die hohen Forderungen zur Qualität befriedigt und weltumfassenden Standards entspricht, verwirklicht Ihre Kochkünste, und sein modernes Aussehen, das von besten europäischen Designer entwickelt worden ist, wird Ihre Küche prächtig schmücken.
Wir bitten Sie die Bedienungsanleitung vor der Nutzung aufmerksam zu lesen. Die Beachtung von Empfehlungen schützt Sie von eventuellen Unannehmlichkeiten, die als Folge der falschen Nutzung des Backofens auftreten können, und ermöglicht Ihnen den Verbrauch von Elektroenergie zu reduzieren. Der Backofen bringt Ihnen viel Vergnügen auf lange Zeit, wenn der Gebrauch der vorliegenden Bedienungsanleitung entsprechen wird.
Unsere Backöfen entsprechen den Hauptforderungen der Sicherheit, der Hygiene und des Umweltschutzes, laut den Direktiven der EU, was mit Zertifikaten DIN ISO 9001, ISO 1400, entsprechend den im Rahmen der EU geltenden Normen, bestätigt ist, und genauso auch den Anforderungen von Gosstandart in Russland und Standards anderer GUS Länder, was durch die Identifikationszertifikate bestätigt ist.
Mit den Gedanken der ständigen Verbesserung der Qualität unserer Backöfen sind Änderungen bei Design und Einrichtung, die nur zu positiven Veränderungen der technischen Eigenschaften führen, vom Hersteller vorbehalten.
Wir wünschen Ihnen die effektive Nutzung unseres Backofens.
Hochachtungsvoll
Kaiser OLAN-Haushaltsgeräte Berlin Germany
УВАЖАЕМЫЙ ПОКУПАТЕЛЬ,
благодарим Вас за приобретение нашей техники.
Мы уверены, что Вы сделали правильный выбор. Данный продукт, удовлетворяющий самым высоким требованиям и отвечающий мировым стандартам, позволит Вам легко воплотить все Ваши кулинарные способности, а его современный вид, разработанный лучшими европейскими дизанерами, великоленно украсит Вашу кухню.
Просим Вас внимательно прочитать инструкцию по обслуживанию и эксплуатации до пуска устройства. Соблюдение содержащихся в ней рекомендаций защитит Вас от возможных неприятностей при неправильной эксплуатации духового шкафа, а также позволит Вам уменьшить расход электроэнергии. Если эксплуатация духового шкафа будет соответствовать настоящей инструкции, наш духовой шкаф будет радовать Вас долгое время.
Наши духовые шкафы полностью соответствуют основным требованиям безопасности, гигиены и защиты окружающей среды, согласно директивам Европейского Союза, что подтверждено сертификатами DIN ISO 9001, ISO 1400, в соответствии с настоящими нормами, действующими на территории Европейского сообщества, а также полностью отвечают всем требованиям Госстандарта России и стандартов других стран СНГ, что подтверждается сертификатами соответствия.
С мыслью о дальнейшем повышении технических и эксплуатационных характеристик наших бытовых приборов мы оставляем за собой право на внесение изменений в дизайн и устройство, влияющих только положительно на потребительские качества и свойства продукта.
Желаем Вам эффективного пользования духовым шкафом нашей фирмы.
Уважающий Вас
Kaiser OLAN-Haushaltsgeräte Berlin Germany
Wir Informieren Sie, dass unsere Geräte, die der Gegenstand der vorliegenden Bedienungsanleitung sind, sind ausschließlich für den häuslichen Gebrauch vorbestimmt.
Информируем, что наши приборы, являющиеся предметом настоящей Инструкции, предназначены исключительно для домашнего пользования.
EN
CONTENTS
SAFETY INSTRUCTIONS 6
INSTALLATION INSTRUCTIONS 14
Electrical connection 14
Installation of the oven 16
Preparation 16
BRIEF DESCRIPTION 18
Location drawing 18
Control panel 20
EQUIPMENT 22
Multifunction oven control 22
Operation functions of the oven 24
USAGE 28
Digital clock timer with sensor 30
Touch control
PRACTICAL ADVICES 42
CARE AND ATTENDANCE 50
RESPECT FOR THE ENVIROMENT 60
DE
INHALTSVERZEICHNIS
SICHERHEITSHINWEISE 7
FÜR DEN INSTALLATEUR 15
Stromanschluss 15
Einbau des Backofen 17
Vorbereitung 17
KURZBESCHREIBUNG 19
Gesamtansicht 19
Bedienblende 21
AUSSTATUNG 23
Steuerung von Multifunktionsbackofen 23
Betriebsfunktion des Backofens 25
BENUTZUNG 29
Elektronische Zeitschaltuhr mit Sensor 31
Touch control
PRAKTISCHE EMPFEHLUNGEN 43
PFLEGE UND WARTUNG 51
UMWELTVERTRÄGLICHKEIT
RU
ОГЛАВЛЕНИЕ
ТЕХНИКА БЕЗОПАСНОСТИ 7
ИНСТРУКЦИЯ ПО МОНТАЖУ 15
Подключение к электросети 15
Установка 17
Подготовка 17
КРАТКОЕ ОПИСАНИЕ 19
Внешний вид 19
Панель управления 21
ОБОРУДОВАНИЕ 23
Управление работой 23 многофункционального духового шкафа
Рабочие функции духового шкафа 25
ИСПОЛЬЗОВАНИЕ 29
Сенсорное электронное программирующее 31 устройство Touch control
ПРАКТИЧЕСКИЕ СОВЕТЫ 43
ОБСЛУЖИВАНИЕ И УХОД 51
61 ОХРАНА ОКРУЖАЮЩЕЙ СРЕДЫ 61
EN
SAFETY INSTRUCTIONS
This appliance complies with statutory safety requirements.
Inappropriate use can, however, lead to personal injury and damage to property.
Please read this instruction carefully before using the appliance for the first time, to avoid the risk of accidents and damage of the appliance. The instruction contains important notes about installation, safety, use and maintenance of the appliance.
The manufacturer cannot be held liable for damage caused by non-compliance of this instruction.
Keep this instruction in a safe place. Pass it on to any future owner of the appliance.
SICHERHEITSHINWEISE
Dieses Gerät entspricht den vorgeschriebenen Sicherheitsbestimmungen.
Ein unsachgemäßer Gebrauch kann jedoch zu Schäden an Personen und Sachen führen.
Lesen Sie bitte diese Gebrauchs- und Montageanweisung aufmerksam durch, bevor Sie das Gerät in Betrieb nehmen. Sie enthält wichtige Hinweise für den Einbau, die Sicherheit, den Gebrauch und die Wartung. Dadurch schützen Sie sich und vermeiden Schäden am Gerät.
Der Hersteller kann keine Verantwortung für die Schäden übernehmen, die infolge von Nichtbeachtung dieser Sicherheitshinweise und Warnungen verursacht werden.
Bewahren Sie die Gebrauchs- und Montageanweisung auf, und geben Sie sie einem eventuellen Nachbesitzer weiter.
ТЕХНИКА БЕЗОПАСНОСТИ
Данный прибор соответствUNT всем действующим нормам безопасности.
Неправильное использование прибора и несоблюдение данной инструкции могут привести к ущербуб как человеческому тав и к материальному.
Пожалуйста, внимательно прочтите данную инструкцию по эксплуатации и монтажу перед установкой и использованием данного устройства. Она содержит важную информацию, касающуюся установки, безопасности, использования и обслуживания данной техники. Таким образом Вы защитите себя от возможных травм и предохраните своё устройство от возможных повреждений.
Производитель не может нести ответственность за повреждения, которые возникли из-за несоблюдения данной инструкции.
Пожалуйста, сохраните эту инструкцию и передайте её, в случае передачи устройства другому лицу.
EN
TECHNICAL SAFETY
- Installation of this appliance must be performed only by a licensed specialist The installer is responsible for connecting the appliance to the mains power supply in observance of the relevant safety recommendations.
- Check the appliance for visible signs of damage before using it. If the appliance has been damaged in transport, do not connect it. Never use a damaged appliance! It could be dangerous!
- Repairs should be performed by a licensed technician only. Improper repair may result in considerable danger to you and others. If your appliance needs repair, contact a Service Centre or your dealer.
- If the supply cord is damaged, it must be replaced by the manufacturer, its service agent or similarly qualified persons in order to avoid a hazard.
- Electrical leads and cables must not be touching the appliance.
- The appliance should be connected to the mains power supply by means of an approved circuit breaker or fuse. Never use multiple plug adapters or extension leads to connect appliance to the mains electricity supply.
- The power supply of the appliance should be turned off before repair or clean.
- This appliance must not be used in a non-stationary location (for example on a ship).

Attention! To avoid the possibility of electric shock, the appliance should be powered down before replacing the lamp.
DE
TECHNISCHE SICHERHEIT
- Das Gerät darf nur von einer qualifizierten Fachperson eingebaut und angeschlossen werden.
- Kontrollieren Sie das Gerät auf sichtbare Schäden. Beschädigungen der Technik können Ihre Sicherheit gefährden. Nehmen Sie niemals ein beschädigtes Gerät in Betrieb.
- Reparaturen dürfen nur von einer qualifizierten Fachperson durchgeführt werden. Bei einer nicht fachgerechten Reparatur bringen Sie sich oder andere in Gefahr. Wenn Ihr Gerät eine Reparatur benötigt, wenden Sie sich bitte an unseren Service.
- Wenn das Netzkabel defekt ist, muss es durch einen Servicefachmann ersetzt werden.
- Elektrische Leitungen dürfen das Gerät nicht berühren.
- Das Gerät soll mit Hilfe eines zugelassenen Schutzschalters oder Sicherung an die Stromversorgung angeschlossen werden. Verwenden Sie niemals mehrere Steckdosenadapter oder Verlängerungskabel um das Gerät an das Stromnetz anzuschließen.
- Die Stromversorgung des Gerätes soll vor der Reparatur oder Reinigung ausgeschaltet werden.
- Dieses Gerät darf nicht an nichtstationären Aufstellungsorten (z. B. Schiffen) installiert werden.
RU
ТЕХНИЧЕСКАЯ БЕЗОПАСНОСТЬ
- Подключение и установка устройства должно быть выполнено квалифицированным специалистом.
- Проверьте устройство на предмет видимых повреждений. Такие повреждения могут представлять угрозу Вашей безопасности. Никогда не подключайте повреждённое устройство!
- Ремонт устройства должен осуществляться только квалифицированным специалистом. Неквалифицированный ремонт может представлять опасность Вам и Вашему окружению. При необходимости ремонта обратитесь в нашу сервисную службую.
- Убедитесь, что шнур питания не поврежден. Во избежании опасности повреждения, неисправный шнур питания должен быть заменен производителем, его агентом по сервису или аналогичным квалифицированным персоналом.
- Электрические провода не должны касаться устройства.
- Аппарат должен подсоединяться непосредственно к электросети, имеющей разрешённый к применению специальный автоматический выключатель. Из соображений безопасности не подключайте устройство к тройнику или удлинителю.
- Питание устройства должно быть выключено перед его ремонтом или чисткой.
- Данное устройство не может быть установленно в нестационарных подвижных помещениях (например, на борту судов).

Achtung! Vor dem Auswechseln der Lampe schalten Sie das Gerät ab, um einen möglichen elektrischen Schlag zu vermeiden.

Внимание! Отключите устройство от электропитания перед заменой лампы, чтобы избежать удара током.
EN
TERMS OF USE
- This appliance is intended for use in domestic households and it is not intended for outdoor use.
- Danger of burning. During use, the appliance interior surface becomes hot enough to cause burns. There is danger to burn yourself on the heating elements, appliance interior, cooked food, appliance accessories or hot steam. Wear oven gloves while placing food in the appliance or removing it and while adjusting the appliance shelves etc.
- Never store the flammable materials in the appliance.
- Take care while putting cooking containers into the appliance or removing them. Do not spill the contents.
- Take care by opening the appliance door while cooking. Hot air and steam can escape rapidly.
- Take care while cooking dishes that contain alcohol. The alcohol may evaporate due to the high temperatures and its vapour can catch fire if it comes into contact with a hot part of the appliance.
- Frozen foods such as pizzas should be cooked on the wire grill. If the baking tray is used, it may become deformed due to the great variation in temperatures.
- The appliance door must be closed during cooking.
- Do not place an aluminium foil or any trays on the appliance bottom. The aluminium foil blocks the heat, which may cause a damage to the surfaces and cause the bad cooking results.
- Fruit juices can leave stains, which will become indelible from the surfaces of the appliance. Use the deep pan while cooking of very moist cakes.
- Do not put bakeware on the opened door of the appliance.
- If a cooking time is not entered, the appliance will shut itself off after a while.
- Plastic dishes which are not heat- and steam resistant melt at high temperatures and can damage the appliance.
NUTZUNGSBEDINGUNGEN
- Dieses Gerät ist nur für den privaten Haushalt und das häusliche Umfeld bestimmt.
- Verbrennungsgefahr. Das Gerät wird im Betrieb heiß. Sie können sich an den Heizkörpern, dem Garraum, dem Gargut, dem Zubehör und dem heißen Dampf verbrennen. Ziehen Sie die Topfhandschuhe beim Einschieben oder Herausnehmen von dem heißen Gargut sowie bei Arbeiten im heißen Garraum an.
- Stellen Sie niemals entflammbare Materialien in das Gerät.
- Achten Sie beim Einschieben und Entnehmen von Garbehältern darauf, dass der Inhalt nicht überschwappt wird.
- Achten Sie beim Öffnen der Tür darauf, dass die Heißluft und der Dampf schnell verdunsten können.
- Wenn für die Zubereitung von Lebensmitteln alkoholische Getränke verwendet werden, dann beachten Sie, dass der Alkohol bei hohen Temperaturen verdampft. Dieser Dampf kann sich an den heißen Heizkörpern entzünden.
- Tiefkühlkost wie Pizza soll auf dem Grill gegart werden. Wenn dafür das Backblech benutzt wird, dann kann es sich bei großen Temperaturunterschieden verformen.
- Während das Gerät in Betrieb ist, soll die Tür geschlossen bleiben.
- Legen Sie keine Aluminiumfolie und stellen Sie keine Pfannen, Töpfe usw. direkt auf den Garraumboden, da die Oberfläche beschädigt werden kann.
- Fruchtsäfte können die Flecken hinterlassen, die sich von der Oberfläche nicht mehr beseitigen lassen. Wenn Sie sehr feuchte Gerichte zubereiten, verwenden Sie dafür die tiefen Gefäße.
- Stellen Sie kein Geschirr auf die geöffnete Tür des Gerätes.
- Wenn keine Kochzeit angegeben wird, schaltet sich das Gerät nach einer Weile selbst aus.
- Nicht gerättaugliches Kunststoffgeschirr schmilzt bei hohen Temperaturen und kann das Gerät beschädigen oder das Brennen verursachen.
ПРАВИЛА ЭКСПЛУАТАЦИИ
- Данное устройство предназначено исключительно для домашнего использования.
- Опасность пожара! При эксплуатации устройство нагревается. Вы можете обжечься при прикосновении к нагревательному элементу, сторонам внутренней поверхности, нагретым подносам или при воздействии пара. Надевайте специальные перчатки, извлекая и располагая Ваше блюдо внутри устройства.
- Не ставьте воспламеняемые материалы во внутреннюю часть устройства.
- Во время готовки старайтесь аккуратно размещать и извлекать Ваши блюда, не расплескивая их на поверхность устройства.
- Помните, что открытие двери, работающего устройства, может повлечь быстрое испарение горячего воздуха и пара.
- При использовании алкоголя для приготовления Ваших блюд помните, что алкоголь испаряется при высоких температурах. Его пары могут загореться при контакте с нагревательным элементом.
- Замороженные продукты, такие как пицца, должны готовиться на на решётке. Использование противней может привести к их деформации при больших перепадах температур.
- Когда устройство находится в рабочем состоянии, дверь должна оставаться закрытой.
- Не кладите алюминиевую фольгу и не ставьте кастрюли, сковороды и т.п. непосредственно на дно устройства, так как его поверхность может быть повреждена.
- Фруктовые соки могут оставить пятна, которые не смогут быть удалены с поверхности. Если Вы готовите блюда с возможностью выкипания, используйте глубокую посуду.
- Не ставьте посуду на открытую дверь устройства.
- Если время приготовления не было задано, устройство выключится через некоторое время само по себе.
- Применение неспециализированной пластиковой посуды приведёт к её плавлению при высоких температурах, а также может повредить устройство и вызвать возгорание.
EN
CHILD SAFETY
- This appliance is not intended for use by persons (including children) with reduced physical, sensory or mental capabilities, or lack of experience and knowledge, unless they have been given supervision or instruction concerning use of the appliance by a person slide for their safety.
- Children should be supervised to ensure, that they do not play with the appliance.
- This appliance can be used by children aged from 8 years and above and persons with reduced physical, sensory or mental capabilities or lack of experience and knowledge if they have been given supervision or instruction concerning use of the appliance in a safe way and understand the hazards involved.

Attention! Appliance interior will become hot during of use. Your children must be kept away from it.
- It is not allowed to climb, stand, lean, sit, or hang on any part of the appliance. This can damage the appliance, and the device may tip over, potentially causing severe injury.
- Children and pets should not be left alone or unattended in the area where the appliance is in use. They should never be allowed to play in its vicinity, whether or not the appliance is in use.
KINDERSICHERHEIT
- Die Kinder oder Personen, die wegen geistigen, physischen und motorischen Fähigkeiten oder wegen des Fehlens der notwendigen Erfahrungen oder Kenntnisse nicht in der Lage sind, das Gerät sicher zu benutzen, dürfen das Gerät nicht ohne Aufsicht oder Anweisungen durch eine verantwortliche Person benutzen.
- Die Kinder müssen unter Aufsicht bleiben, um sicherzustellen, dass sie mit dem Gerät nicht spielen.
- Die Kinder ab 8 Jahren oder Personen mit begrenzten geistigen, physischen oder motorischen Fähigkeiten oder Personen ohne notwendige Erfahrungen und Kenntnisse können das Gerät unter Aufsicht oder mit Anweisungen durch eine verantwortliche Person benutzen. Die verantwortliche Person muss für die Betriebssicherheit und die Vermeidung möglicher Gefahren sorgen.

Achtung! Innere Geräteteile können während der Verwendung heiß werden. Kleine Kinder sollen vom Gerät fern gehalten werden.
- Es ist untersagt, auf den verschiedenen Teilen des Geräts zu stehen, zu sitzen, auf sie zu klettern oder an sie zu lehnen. Das kann das Gerät beschädigen und möglicherweise schwere Verletzungen verursachen.
- Kinder und Haustiere sollen in der Nähe des angeschalteten Gerätes nicht alleine oder unbeaufsichtigt bleiben. Den Kindern ist es nicht erlaubt, in der Nähe des Gerätes zu spielen, unabhängig davon, ob das Gerät in Betrieb oder außer Betrieb ist.
БЕЗОПАСНОСТЬ ДЕТЕЙ
- Данный прибор не предназначен для использования детьми или лицами чьи физические, сенсорные или ментальные способности, либо отсутствие необходимого опыта и знаний не позволяют им обеспечить безопасную эксплуатацию прибора без присмотра или указаний со стороны ответственного лица, которое должно обеспечить осуществление безовасной эксплуатации с их стороны.
- Дети должны находиться под наблюдением, чтобы гарантировать, что они не играют с прибором.
- Данный прибор предназначен для использования детьми от 8 лет или лицами с ограниченными физическими, сенсорными или ментальными способностями либо отсутствием необходимого опыта и знаний под присмотром или с указаний ответственного лица, которое должно обеспечить осуществление безопасной эксплуатации с их стороны и предотвращение возможных опасностей.

Внимание: Внутренние части могут нагреваться во время использования. Маленькие дети должны находиться подальше от устройства.
- Стоять, сидеть, подниматься или опираться на разные части устройства запрещается. Это может привести к повреждению устройства а также стать причиной серьезных травм.
- Дети и домашние животные не должны оставаться без присмотра рядом с включенным устройством. Дети не должны играть в непосредственной близости от устройства, независимо от того, является ли устройство включённым или выключенным.
EN
INSTALLATION INSTRUCTIONS
ELECTRICAL CONNECTION
Before connecting the oven to the mains power supply, make sure that:
- The supply voltage corresponds to the specifications on the data plate on the front of the oven.
- The mains supply has an efficient ground connection complying with all applicable laws and regulations.
Correct grounding is a legal requirement. If the appliance is not pre-fitted with a power cable and/or plug, use only suitable cables and plugs capable of handling the power specified on the appliance's data plate and capable of resisting heat. The power cable should never reach a temperature 50 °C above ambient temperature at any point along its length.


natural_image
Pure electrical connector diagram without any text, numbers, or symbolsIf the appliance is to be connected directly to mains terminals, fit a switch with minimum aperture of 3 mm between the contacts. Make sure that the switch is of sufficient capacity for the power specified on the appliance's data plate, and compliant with applicable regulations. The switch must not break the yellow-green earth wire. The socket or switch must be easily reachable with the oven fully installed.

Attention! Installation and electrical connection must be made by a qualified expert only.

Attention! The manufacturer declines all responsibility for damage or injury if the above instructions and normal safety precautions are not respected.
FÜR DEN INSTALLATEUR
STROMANSCHLUSS
Vor der Durchführung des Stromanschlusses muss sichergestellt werden, dass:
- die Eigenschaften des Stromnetzes mit den Werten auf dem angebrachten Typenschild auf der hinteren Wand des Backofens übereinstimmen;
- das Stromnetz gemäß den geltenden Bestimmungen und Rechtsvorschriften geerdet ist.
Die Erdung ist eine notwendige Voraussetzung der Nutzung des Gerätes. Falls der Backofen nicht mit Kabel und/oder Netzstecker ausgestattet ist, muss geeignetes Material verwendet werden, das der Stromaufnahme und der Betriebstemperatur entspricht, der auf dem Typenschild auf der hinteren Wand des Gerätes angegeben ist. Das Kabel darf an keiner Stelle eine Temperatur vor über 50 °C erreichen.
Wenn ein direkter Netzanschluss gewünscht wird, muss ein allpoliger Schalter mit Kontaktöffnung von min. 3mm vorgesehen werden, der erlaubt das Gerät von dem Netz zu trennen. Der Schalter muss den technischen Daten der geltenden Vorschriften entsprechen (das gelb-grüne Erdungskabel darf nicht vom genannten Schalter unterbrochen werden). Der Stecker bzw. der allpolige Schalter müssen bei dem installierten Gerät problemlos zugänglich sein.
ИНСТРУКЦИЯ ПО МОНТАЖУ
ПОДКЛЮЧЕНИЕ К ЭЛЕКТРОСЕТИ
Перед подключением духового шкафа к эл. сети, необходимо убедиться, что:
- параметры сети соответствуют данным в табличке на задней стенке духового шкафа,
- эл. сеть заземлена в соответствии с действующими предписаниями.
Заземление является необходимым условием правильной эксплуатации. Если духовой шкаф не оснащен кабелем и/ или штекером, применяйте только материалы, соответствующие данным, указанным в табличке на задней стенке прибора, которые могут функционировать в рабочем режиме температур. Кабель ни в коем случае не должен нагреваться выше температуры более 50 °C.
В случае подсоединения непосредственно к эл. сети, необходимо использовать специальный автоматический выключатель с зазором между контактами не менее 3 мм, позволяющий отсоединять прибор от сети, соответственно техническим данным действующих предписаний (желто-зеленый кабель заземления не должен прерываться данным выключателем). Штекер или автоматический выключатель на правильно установленном приборе должен быть всегда легко досягаем.

Achtung! Die Montage und der Stromnetzanschluss sollen nur von einem qualifizierten Fachmann durchgeführt werden.

Внимание! Монтаж и подключение духового шкафа должны проводиться только квалифицированным специалистом.

Achtung! Der Hersteller ist nicht haftbar, wenn bei der Installation des Gerätes alle obenangeführten Anweisungen nicht befolgt werden.

Внимание! Изготовитель не несет никакой ответственности, если при установке прибора не соблюдаются все вышеприведенные предписания.
EN
INSTALLATION OF THE OVEN
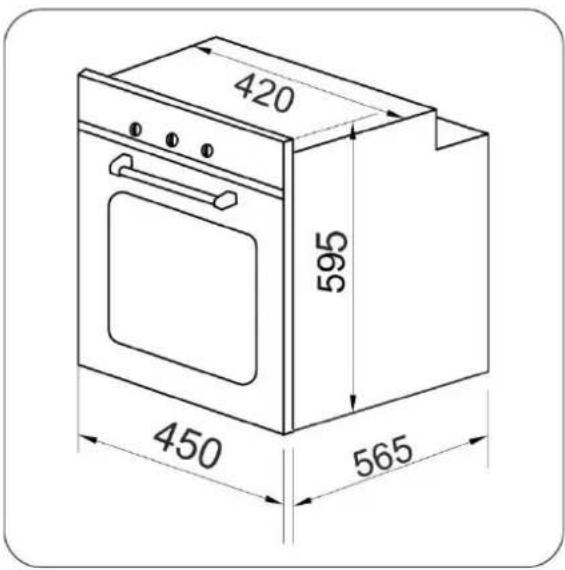
The oven can be installed under a work top or in a cooking column. Figure shows the installation dimensions. Make sure that surrounding materials are heat resistant. Align the oven centrally with respect to the side walls of the units surrounding it and fix it in place with the screws and Allen screws provided.
See the accompanying instructions for combining the oven with multi-functional gas or gas-electric cookers.
PREPARATION

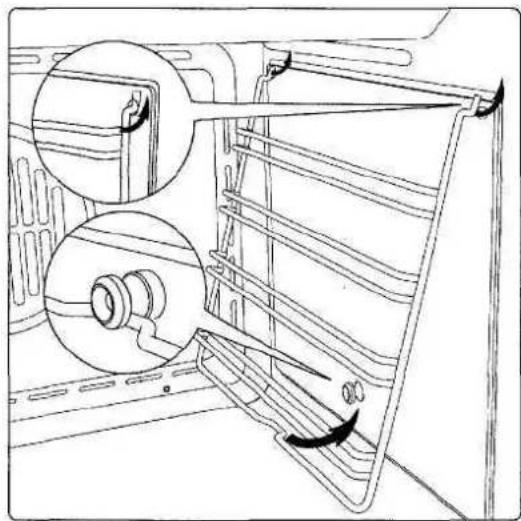
Clean the oven thoroughly with soapy water and rinse well. To remove the lateral frames from smooth-walled ovens, proceed as shown in the figure.
Operate the oven for about 30 minutes at maximum temperature to burn off all traces of grease which might otherwise create unpleasant smells when cooking.
natural_image
Technical line drawing of a refrigerator interior showing structural components and airflow direction (no text or symbols)Important!!!
As a safety precaution, before cleaning the oven, always disconnect the plug from the power socket or the power cable from the oven. Do not use acid or alkaline substances to clean the oven (lemon juice, vinegar, salt, tomatoes etc.). Do not use chlorine based products, acids or abrasive products to clean the painted surfaces of the oven.
Attention! You must set the time on the clock before you can use the oven.
(See chapter Digital clock timer with sensor).
If the time is not set, the oven will not work!
EINBAU DES BACKOFENS
Der Backofen kann unter eine Arbeitsplatte oder in einen Schrank eingebaut werden. Die Einbaumaße müssen den auf der Abbildung dargestellten Maßen entsprechen. Das Möbelmaterial muss hitzebeständig sein. Der Backofen muss zu den Möbelwänden zentriert und mit den mitgelieferten Schrauben und Buchsen befestigt werden.
Für die Kombination des Backofens mit den Gas- oder Gas-Elektrokombikochfeldern siehe die beiliegenden Anleitungen.
VORBEREITUNG
Vor dem ersten Gebrauch soll der Backofen gründlich mit dem Seifenwasser gesäubert und anschließend mit dem klaren Wasser abgewaschen werden. Die mitgelieferten Einhängegitter sollen auf die Seitenwände eingebaut und auf die Gitter und Bleche aufgestellt werden. Den Backofen soll man für etwa 30 Minuten auf Höchsttemperatur aufheizen. Auf diese Weise werden alle fetthaltigen Bearbeitungsrückstände eliminiert, die beim Backen unangenehme Gerüche verursachen könnten.
Wichtig!!!
Als Sicherheitsvorkehrung soll vor jeder Reinigung des Backofens immer das Stromnetz abgeschaltet werden. Zum Reinigen dürfen keine sauren oder alkalischen Substanzen verwendet werden (Zitronensaft, Essig, Salz, usw.). Chlorhaltige Produkte (Bleichmittel u. s. w.) sind ebenfalls zu vermeiden, dies gilt vor allem für die Reinigung der emaillierten Oberflächen.

Achtung! Vor dem ersten Gebrauch des Backofens soll die aktuelle Tageszeit eingestellt werden. (siehe Kapitel Elektronische Zeitschaltuhr mit Sensor). Ohne eingestellte Uhr funktioniert der Backofen nicht!
УСТАНОВКА
Духовой шкаф предназначен для встройки либо под рабочую поверхность стола, либо в шкаф. Размеры, которыми необходимо руководствоваться при встройке, указаны на рисунке. Мебель должна быть изготовлена из нагревостойкого материала. Устройство должно быть отцентровано по отношению к стенкам мебели и надежно закреплено при помощи поставляемых в комплекте крепежных материалов.
Для комбинации духового шкафа с газовой или газо-электрической поверхностью используйте прикладываемую документацию.
ПОДГОТОВКА
Перед первым пользованием тщательно очистить духовой шкаф мыльным раствором и хорошо промыть достаточным количеством водь Навесить на боковые стенки поставляемые в комплекте лестнички и установить на них решетки и противни. В течение примерно 30 минут прогреть духовой шкаф до максимальной температуры, при этом нейтрализуются все жиросодержащие вещества, используемые при производственной обработке изделия, которые могут обусловить появление неприятных запахов при первом приготовлении блюд.
Важно!!!
В качестве меры предосторожности необходимо перед каждой чисткой духового шкафа отключать его от сети. Не применяйте для чистки кислото- или щелочесодержащих веществ (уксус, сок лимона, соль и т.д.). Ни коем случае не применяйте также хлоросодержашие средства (отбеливающие и т.д.). Особенно это нужно иметь в виду причистке эмалированных поверхностей духовых шкафов.

Внимание! Перед первым использованием духового шкафа необходимо выставить текущее время на часах (см. раздел Сенсорное электронное программирующее устройство). В противном случае устройство не будет работать!
EN
BRIEF DESCRIPTION
LOCATION DRAWING
BUILT-IN OVENS

Arrangement of functional assemblies
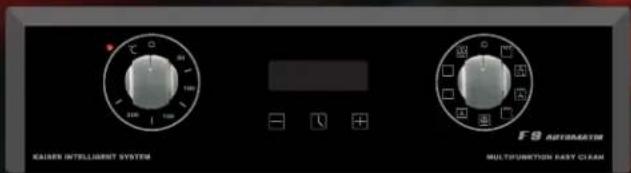
- Rotary knob of the oven temperature regulator
- Rotary knob of the oven operating functions
- Control panel
- Oven door
- Digital clock timer
DE
KURZBESCHREIBUNG
GESAMTANSICHT
EINBAU-BACKÖFEN
RU
КРАТКОЕ ОПИСАНИЕ
ВНЕШНИЙ ВИД
ВСТРАИВАЕМЫЕ ДУХОВЫЕ ШКАФЫ
Anordnung von Funktionsbaugruppen
- Drehknebel des Backofentemperaturreglers
- Drehknebel der Backofenbetriebsfunktionen
- Bedienblende
- Backofentür
- Elektronische Zeitschaltuhr
Размещение функциональных узлов
- Ручка терморегулятора духовки
- Ручка режима работы духовки
- Панель управления
- Дверь духового шкафа
- Электронное программирующее устройство
EN
CONTROL PANEL
BUILT-IN OVENS
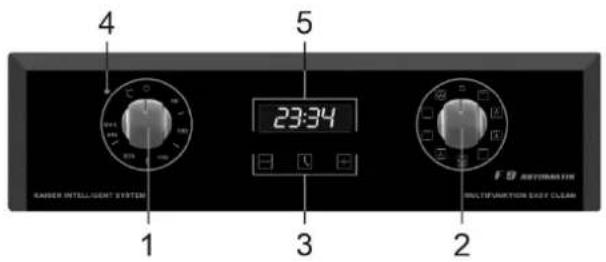
Model range with sensor control Touch control
- Rotary knob of the oven temperature regulator
- Rotary knob of the oven oven operating functions
- Digital time switch clock
- Control lamp ON/OFF (red)
- Oven function indicator
Different control panels are put on different models according to their technical equipment on which the operating elements are arranged sensibly.
Electronic time switch clock can be executed differently according to the model. See a precise description in the suitable chapter.
BEDIENBLENDE
EINBAU-BACKÖFEN
ПАНЕЛЬ УПРАВЛЕНИЯ
ВСТРАИВАЕМЫЕ ДУХОВЫЕ ШКАФЫ
Modellreihe mit Sensorbedienung Touch control
- Drehknebel des Backofentemperaturreglers
- Drehknebel der Backofenbetriebsfunktionen
- Elektronische Zeitschaltuhr
- Kontrollleuchte ON/ OFF (rot)
- Backofenfunktionsanzeige
Модельный ряд с электронным сенсорным управлением Touch control
- Ручка терморегулятора духовки
- Ручка режима работы духовки
- Электронное программирующее устройство
- Контрольная лампа Вкл/ Выкл (красн.)
- Дисплей
Verschiedene Modelle, je nach ihrer technischen Ausrüstung, sind mit verschiedenen Bedienblenden versehen, an denen die Bedienelemente sinnvoll angeordnet sind.
Elektronische Zeitschaltuhr kann je nach Modell unterschiedlich ausgeführt werden. Genaue Beschreibung siehe im entsprechenden Kapitel.
Отдельные модели, в зависимости от их технического оборудования, имеют различные панели управления с соответственно размещенными на них элементами управления.
Электронное программирующее устройство, в зависимости от модели, может быть различным. Точное описание смотрите в соответствующем разделе.
EN
EQUIPMENT
MULTIFUNCTION OVEN CONTROL

natural_image
Circular device with multiple camera icons and a pointer, labeled '2' (no text or symbols on the device itself)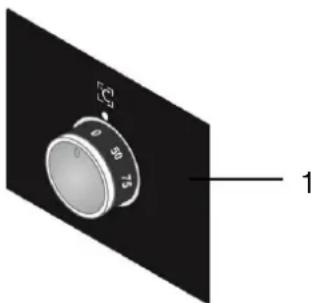

natural_image
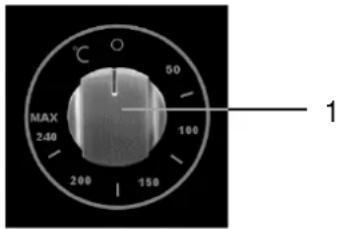
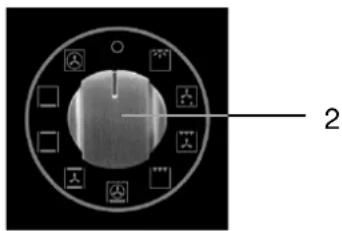
Diagram of a device knob with labeled parts, no readable text or symbols presentOven operation functions are steered through turning of the rotary knob temperature regulator 1 and rotary knob mode of operation 2 on the control panel 3.
The graphic symbols next to / on the rotary knobs show the chosen operation modes.
To turn off the oven bring the rotary knob temperature regulator 1 and the rotary knob operating mode 2 to position «0».
For more comfort you can use the digital clock timer 5. It enables you to run the oven in an automatical, half automatical or manuel cycle.
Important! The activation of the oven is signalizes by the flashing up of the red controlling light on the front panel.
Since your oven has reached the set temperature, the red indication lamp goes out. Also the backlight of the push-pull knobs is turned off.
If a cooking recipe advices you to put the meal in a preheated oven, o this after the lapse of the red controlling light.
The red controlling light can also glow when the rotary handle is in the oven inner illumination position, but in this rotary handle position the heating element is always off.
AUSSTATUNG
STEUERUNG VON MULTIFUNKTIONS- BACKOFEN
Backofenbetriebsfunktionen werden durch Drehen von Drehknebel Temperaturregler 1 und Drehknebel Betriebsart 2 auf der Bedienblende 3 gesteuert.
Die graphischen Symbole neben / auf den Drehknebeln zeigen die gewählten Backofenbetriebarten.
Zum Abschalten des Backofens den Drehknebel Temperaturregler 1 und den Drehknebel Betriebsart 2 in die Position «0» bringen.
Für mehr Komfort können Sie die Elektronische Zeitschaltuhr* 5 benutzen, die ermöglicht den Backofen im automatischen, halbautomatischen und manuellen Zyklus zu betreiben.
ОБОРУДОВАНИЕ
УПРАВЛЕНИЕ РАБОТОЙ МНОГОФУНКЦИОНАЛЬНОГО ДУХОВОГО ШКАФА
Управление режимом работы духового шкафа осуществляется поворотом ручек выбора терморегулятора 1 и 2 режима работы духовки, установленных на панели управления духового шкафа 3.
Графические обозначения, установленные рядом с ручками / на ручках управления показывают выбранные параметры работы духовки.
Для отключения духовки установить ручки терморегулятора 1 и выбора режима работы 2 в положении «0».
Для большего комфорта Вы также можете использовать электронное программирующее устройство* 5, дающее возможность управлять работой духовки в автоматическом, полуавтоматическом и ручном режимах.

Wichtig! Die Einschaltung von dem Backofen wird durch das Aufleuchten von roter Kontrolllampe signalisiert.

Важно! Включение духовки сигнализируется включением красной контрольной лампочки на панеле управления.
Wenn die rote Kontrollleuchte erlischt, dann signalisiert es, dass die voreingestellte Backofentemperatur erreicht worden ist. Außerdem schaltet der Beleuchtung des versenkbaren Knebel aus.
Wenn es laut einem Kochrezept empfohlen ist, die Speise in den vorgewärmten Backofen hineinzulegen, so soll es nach dem Erlöschen der roten Kontrollleuchte gemacht werden.
Die rote Kontrollleuchte kann auch bei der Einstellung des Drehknebels in der Position Innenbeleuchtung des Backofens leuchten, jedoch sind die Heizkörper bei dieser Drehknebelposition immer ausgeschaltet.
После того, как Ваша духовка достигнет установленной температуры, красная лампочка индикации погаснет. Также отключается подсветка утапливаемых ручкек.
Если кулинарные рецепты рекомендуют ставить блюдо в прогретую духовку, делайте это после выключения красной контрольной лампочки.
Контрольная лампочка может также светиться в положении ручки Освещение духового шкафа, но в этом положении нагревательные элементы всегда выключены.
EN
OPERATION FUNCTIONS OF THE OVEN
CONVENTIONAL COOKING

A classical system in which top and bottom heat are used to cook a single dish.
Place the food in the oven only once cooking temperature has been reached, i.e. when the heating indicator goes out.
If you want to increase top or bottom temperature towards the end of the cooking cycle, set the temperature control to the right position. It is advisable to open the oven door as little as possible during cooking.
natural_image
Diagram of airflow or heat transfer through a rectangular chamber with circular vent and fan (no text or labels)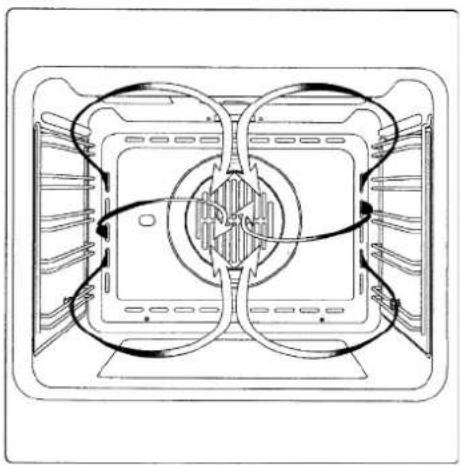
natural_image
Technical line drawing of a mechanical or electrical component with symmetrical internal structure and curved arrows indicating flow or movement (no text or symbols)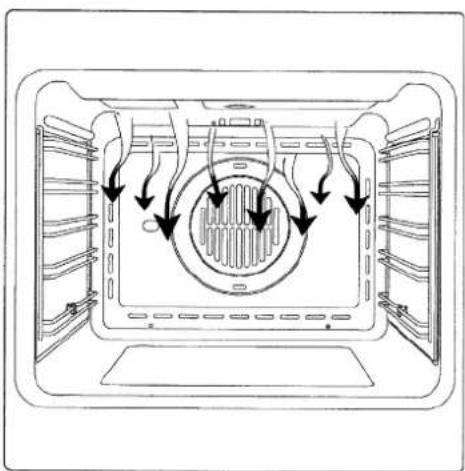
natural_image
Diagram of a microwave oven interior showing airflow direction arrows (no text or labels)FAN COOKING

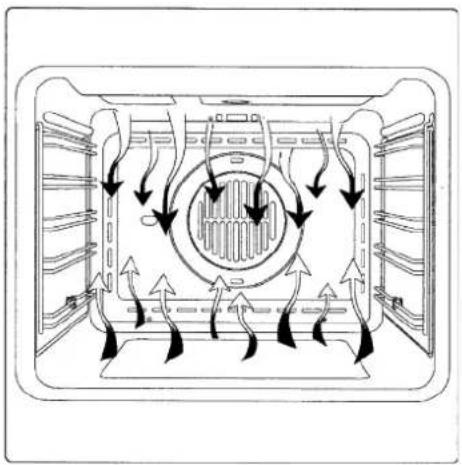
For this type of cooking a fan positioned at the back allows the circulation of hot air inside the oven creating uniform heat. In this way cooking is more rapid than conventional cooking. It is a suitable method for cooking dishes on more than one shelf, especially when the food is of different types (fish, meat etc.)
DEFROSTING

By selecting one of the fan cooking functions and setting the temperature regulator to zero, the fan allows cold air to circulate inside the oven. In this way frozen food can be rapidly defrosted. It is not essential to pre-heat the oven, but you are advised to do so when cooking pastries.
GRILL COOKING
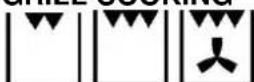
This function is used to grill or brown foods. Place the shelf with the food to be cooked in the 1st or 2nd position from the top.
Pre-heat the oven for 5 minutes. Set the
temperature regulator to a temperature between 50 °C and 200 °C.
BETRIEBSFUNKTIONEN DES BACKOFENS
KONVENTIONELLES BACKEN

Ein klassisches System, das in der Verwendung der Unter- oder Oberhitze besteht. Das System ist nur für die Zubereitung eines Gerichts geeignet.
Die Speisen sollen möglichst eingeschoben werden, wenn der Backofen bereits die vorgegebene Temperatur erreicht hat, d.h. nach dem Erlöschen der Kontrolllampe.
Wenn die Unter- oder Oberhitze gegen das Ende des Backvorgangs erhöht werden muss, ist der Schalter in die jeweilige gewünschte Position zu bringen. Während des Backvorgangs solle die Backofentür möglichst wenig geöffnet werden.
UMLUFTBACKEN

Bei dieser Backofenfunktion bringt der Ventilator, der sich im hinteren Backofenteil befindet, heiße Umluft in den Backofen und verteilt diese gleichmäßig, wobei die Zubereitungszeit geringer als beim konventionellen Backen ist. Diese Methode eignet sich zum Garen auf den mehreren Einschubhöhen auch von Speisen unterschiedlicher Art (Fisch, Fleisch usw.).
AUFTAUEN

Falls eine der Umluftfunktionen ausgewählt und der
Temperaturregler auf Null gestellt wird, führt der Ventilator Kaltluft in den Backofen und fördert das schnelle Auftauen der Tiefkühlkost.
Ein Vorheizen des Backofens ist eigentlich nicht notwendig, aber für die Patisserie dennoch empfehlenswert.
GRILLEN

Diese Funktionen werden zum Grillen oder Bräunen von Speisen benutzt.
Der Rost mit der Speise wird in der 1. oder 2. Schiene von oben eingeschoben.
Den Backofen 5 Minuten vorheizen. Den
Temperaturregler auf die Temperaturen von 50°C bis 200 °C einstellen.
РАБОЧИЕ ФУНКЦИИ ДУХОВОГО ШКАФА
ОБЫЧНОЕ ПРИГОТОВЛЕНИЕ

Классическая система, при которой применяется верхний или нижний нагрев, пригодна для приготовления только одного блюда. Блюда должны помещаться в духовку, по возможности, лишь после достижения заданной температуры, т.е. когда погаснет контрольная лампочка.
Если к концу процесса приготовления блюда Вы желаете повысить температуру верхнего или нижнего нагревателя, установите переключатель на соответствующую желаемую функцию. В течение выпекания дверцу духовки рекомендуется открывать как можно реже.
ПРИГОТОВЛЕНИЕ С ОБДУВОМ

При этом режиме приготовления, находящийся в дальней части духовки вентилятор, осуществляет циркуляцию горячего воздуха, равномерно его распределяя, тем самым сокращая время приготовления по сравнению с обычным приготовлением. Этот метод подходит для одновременного приготовления разных видов блюд (рыба и мясо и т.д.) при разных высотах положения противня.
ОТТАИВАНИЕ

При включенном обдуве и установленном на ноль терморегуляторе, вентилятор осуществляет циркуляцию холодного воздуха, обеспечивая тем самым быстрое оттаивание замороженных продуктов.
Предварительный прогрев духовки необязателен, однако при выпечке кондитерских изделий рекомендован.
ГРИЛЬ

Этот режим используется для приготовления на гриле или подрумянивания блюд.
Решетка с приготавливаемым блюдом устанавливается на 1-й или 2-й уровень сверху. Прогреть духовку в течение 5 минут.
Терморегулятор установить на температуру от 50 °C до 200 °C.
EN
ROTISSERIE (if available)
Some ovens are completely equipped with stick engine and rotary spit for spit roast. The rotisserie* allows to roast food in the oven rotary. It serves primarily for the roasting of shashliks, fowl, small sausages and similar dishes. The switch on and off of the rotisserie actuation occurs simultaneously with the switch on and off of the Grill functions.


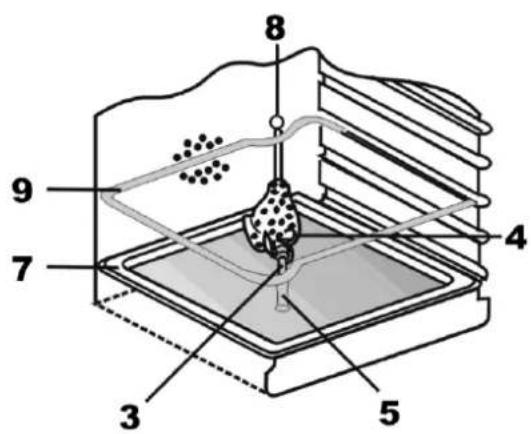
PREPARING OF THE FOOD ON THE SPIT
To do this you have to proceed the following:
- Spear the food on the handle of the spit 3 and fix it on it with the help of forks 4,
- Screw on handle 5, when required, arrange the rotisserie frame 9 in height "II" in the oven.
- Shift the end piece of the spit 3 into the drive coupling 8; besides, is to be noted that the rotisserie frame hook intervenes in the groove of the spit clutch metal part,
- Unscrew the handle 5.
- Shift the metal tray 7 in the oven space by the lowest height and abut the oven door.
To take out food of the oven use the handle 5 implicitly to avoid burns.
COOLING FAN
The cooling fan* is positioned on the upper part of the oven and creates a circle of cooling air on the inside of the furniture and through the door of the oven. It is turned on automatically when the temperature of the outer shell of the oven exceeds 60 °C.
By switching on the oven with the thermostat at 200 °C the fan starts working after approx.10 min. It is turned off when the temperature of the outer shell of the oven descends under 60 °C.
By switching off the oven with the thermostat at 200 °C the fan stops working after approx. 30 min.
DREHSPIEß (wenn verfügbar)
Einige Backöfen sind komplett mit Stabmotor und Drehspieß für das Spießbraten ausgestattet. Der Spieß* erlaubt es, die Speisen im Backofen rotierend zu rösten. Er dient hauptsächlich zum Rösten von Schaschliks, Geflügel, Würstchen u.ä. Speisen. Die Ein- und Ausschaltung von dem Spießantrieb erfolgt gleichzeitig mit dem Ein- und Ausschalten von Grillfunktionen

GRILLEN AM DREHSPIEB
Um dies zu tun ist wie folgt vorzugehen:
- die Speise auf den Stiel vom Spieß 3 aufspießen und sie darauf mit Hilfe von Gabeln 4 fixieren,
- bei Bedarf den Handgriff 5 aufschrauben, den Spießrahmen 9 an der Höhe „II“ im Backofen einordnen,
- Das Endstück vom Spieß 3 in die Antriebskupplung 8 hineinschieben, dabei ist zu beachten, dass der Spießrahmenhaken in die Rille des Spießgriffmetallteils eingreift,
• den Handgriff 5 herausschrauben, - das Blechtablett 7 in den Backofenraum auf die niedrigste Höhe hineinschieben und die Backofentür anlehnen.
Beim Herausnehmen von Speisen benutzen Sie unbedingt den Handgriff 5, um eine Verbrennung zu vermeiden.
KÜHLVENTILATOR
Der Kühlventilator* befindet sich auf der oberen Seite des Backofens und dient zur Kühlung sowohl des Einbaumöbels als auch der Backofentüre. Der Ventilator schaltet sich selbsttätig ein, wenn das äußere Gehäuse des Backofens eine Temperatur von 60 °C überschreitet.
Wird der Backofen z.B. auf 200 °C eingestellt, dann schaltet sich die Kühlung nach etwa 10 Min. ein. Der Ventilator schaltet sich selbstständig aus, wenn das äußere Gehäuse des Backofens eine Temperatur von 60 °C unterschreitet, z.B. wenn der Backofen nach Betrieb bei 200 °C ausgeschaltet ist, dann schaltet sich die Kühlung nach etwa 30 Min. aus.
ВЕРТЕЛ (если доступно)
Некоторые духовки оборудованы вертелом, приводимым во вращение эл. мотором, Благодаря вертелу* возможна вращательная обжарка блюд в духовке. Служит главным образом для обжарки домашней птицы, шашлыков, колбасок и других блюд. Включение и выключение привода вертела происходит одновременно со включением и выключением функций гриля

ПРИГОТОВЛЕНИЕ НА ВЕРТЕЛЕ
Для этого необходимо следующее:
- нанизать блюдо на пруток вертела 3 и закрепить его при помощи вилок 4,
- при необходимости надеть ручку 5 на вертел, рамку 9 поставить в духовку на уровень „II“,
- конец прутка вертела 3 вставьте в муфту привода 8, обращая внимание на то, чтобы выемка рамки попала в канавку металлической части держателя вертела,
• выверните ручку 5, - вставьте противень 7 на самый низкий уровень духового шкафа и прикройте дверцу.
При вынимании блюда во избежание ожега обязательно использовать ручку 5.
ОХЛАЖДАЮЩИЙ ВЕНТИЛЯТОР
Охлаждающий вентилятор* находится на верхней части духовки и служит для охлаждения как встроенной мебели, так и самой дверцы духовки. Вентилятор включается автоматически при достижении температуры внешней поверхности духовки 60 °C.
Например, при установке духовки на 200 °C вентилятор включится приблизительно через 10 мин. При понижении температуры внешней поверхности духовки ниже 60 °C вентилятор автоматически отключается. Например, после выключения духовки, установленной на 200 °C, вентилятор выключится приблизительно через 30 мин.
EN
OVEN LIGHT
The oven is equipped with an oven light. The oven light stays active during oven operations. If you want to control your food after preparing it, bring the rotary handle oven operating mode in the light position.

USAGE
You can start the process of baking with a few easy handels.
- Choose the wanted baking function with the rotary handle 1 oven operating mode.
- Set the wanted temperature with rotary handle 2 temperature regulator.
The activation of the oven is signalizes by the flashing up of controlling light on the front panel.

Attention! To stop the oven operation turn the rotary handles 1 and 2 in the zero position.
INNENBELEUCHTUNG
Der Backofen ist mit der Innenbeleuchtung ausgestattet. Die Innenbeleuchtung bleibt während des Betriebes von dem Backofen aktiv. Wenn Sie nach Zubereitung Ihr Gericht kontrollieren möchten, dann stellen Sie den Drehknebel Backofenbetriebsart in die Position Licht.
ОСВЕЩЕНИЕ ДУХОВКИ
Духовой шкаф оснащен системой освещения. Свет остается включенным во время. Если вы хотите проконтролировать состояние блюда после его приготовления установите ручку выбора режимов духовки в положение Свет.
BENUTZUNG
Zum Backen genügen wenige einfache Handgriffe.
- Gewünschte Backfunktion mit dem Drehknebel 1 Backofenbetriebsart wählen.
- Gewünschte Temperatur mit dem Drehknebel 2 Temperaturregler wählen.
Die Einschaltung von dem Backofen wird durch das Aufleuchten von roter Kontrolllampe auf der Bedienblende signalisiert.
ИСПОЛЬЗОВАНИЕ
В несколько простых движений Вы можете начать процесс приготовления.
- Ручкой 1 режима работы духового шкафа, выберите желаемый режим приготовления.
- Ручкой 2 терморегулятора, выберите желаемую температуру приготовления.
Включение духового шкафа сигнализируется включением контрольной лампочки на панели управления.

Achtung! Um den Backofen auszuschalten, bringen Sie die Drehknebel 1 und 2 wieder in die Null-Stellung.
Внимание! Чтобы выключить духовой шкаф, верните ручки 1 и 2 в нулевое положение.
EN
DIGITAL CLOCK TIMER WITH SENSOR Touch control

The symbols 12.00, 1 appears when the appliance is switched on for the first time. The key 2 flashes. The oven is not operating.
Setting the clock
To set the current day time:
- By touching the keys 3 or 4 (− or +) you can set the time.
After five seconds the controller sets the time currently displayed and the symbol 2 goes out.

The set time can be also set afterwards. Therefore you have to:
- Press the middle key 4 repeatedly till the symbol 1 will start flashing.
- Set the time as described.

Important! If you change the time setting, you reset the timer and cancel former set programs.
* - if available
DE
ELEKTRONISCHE ZEITSCHALUHR MIT SENSOR-BEDIENUNG Touch control
Wird die Uhr zum ersten Mal eingeschaltet, blinkt das Symbol 1.
Auf dem Display erscheint 12.00.
Uhrzeiteinstellung
Zur Einstellung der aktuellen Uhrzeit:
- Mit den Wahltasten 2 oder 3 (− oder +) die gewünschte Uhrzeit einstellen.
Nach einigen Sekunden wird die aktuelle Uhrzeit automatisch übernommen und das Symbol 1 erlischt.
Die eingestellte Uhrzeit kann auch anschließend verändert werden. Dafür muss man:
- Die mittlere Taste 4 mehrmals solange drücken bis das Symbol 1 anfängt zu blinken.
• Die gewünschte Uhrzeit wie oben beschrieben einstellen.
Wichtig! Bei der Änderung der eingestellten Uhrzeit werden alle vorher gewählten Programme gelöscht.
RU
СЕНСОРНОЕ ЭЛЕКТРОННОЕ ПРОГРАММИРУЮЩЕЕ УСТРОЙСТВО Touch control
При первом включении часов мигает символ 1.
На дисплее появится 12.00.
Установка текущего времени
Чтобы установить текущее время:
- С помощью кнопок выбора 2 или 3 (— или +) установите желаемое время.
Через несколько секунд на дисплее появится индикация текущего времени и символ 1 погаснет.
Установленное время можно изменить. Для этого:
- Нажимайте на среднюю кнопку 4 пока не начнёт мигать символ 1.
- Установите время, как описано выше.
Важно! При изменении установленного времени таймер будет установлен заново, а все выбранные режимы приготовления будут отменены.
EN
Electronical countdown timer
The countdown timer works independently of all other timer functions, and can be used even when the oven is switched off.
To switch on the countdown timer
- Press the middle key 1 repeatedly till the symbol 2 will start flashing.
The symbols 0.00 appear on the display.
- Press the choice keys 3 or 4 (− or +) to set the duration and wait a few seconds.


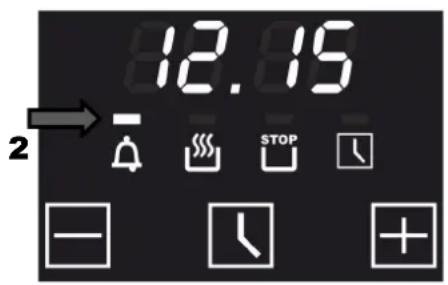
After a few seconds the timer starts the countdown, the display shows the countdown time, the symbol countdown timer 2 appears. By pressing the button 1 you can call up the current time indication for 5 seconds.
After the end of the countdown the oven emits the double sound signals with interval of 2 seconds during two minutes. The symbol countdown timer 2 will continue to flash after the end of emitting the sound signals.
- Press any key to turn off the sound signals and the symbol countdown timer 2.
The symbol countdown timer 2 goes out. The display shows the current time.
DE
RU
Elektronischer Kurzzeitwecker
Der Gebrauch vom elektronischen Kurzzeitwecker ist von anderen Funktionen unabhängig und kann auch bei dem ausgeschalteten Backofen verwendet werden.
Zum Einschalten des Kurzzeitweckers:
- Die mittlere Taste 1 mehrmals solange drücken bis das Symbol 2 anfängt zu blinken.
Auf dem Display erscheint 0.00.
- Mit den Wahltasten 3 oder 4 (− oder +) die gewünschte Zeit einstellen.
Электронный минутник
Электронный минутник работает независимо от других функций. Им можно пользоваться даже если духовой шкаф выключен.
Чтобы включить минутник:
- Нажимайте на среднюю кнопку 1 пока не начнёт мигать символ 2.
На дисплее появится 0.00.
- С помощью кнопок выбора 3 или 4 (— или +) установите желаемое время.
Nach wenigen Sekunden startet das Rückwertszählen, was auf dem Display angezeigt wird, und erscheint das Symbol Kurzzeitwecker 2. Durch Betätigen der Taste 1 können Sie die Anzeige der aktuellen Uhrzeit für 5 Sekunden aufrufen.
Nach dem das Rückwertszählen beendet ist, ertönen doppelte Signaltöne mit dem Interval von 2 Sekunden zwei Minuten lang. Nachdem Aufhören des Signaltons blinkt das Symbol
Kurzzeitwecker 2 weiter.
- Drücken Sie eine beliebige Taste, um das Symbol Kurzzeitwecker 2 und den Signalton auszuschalten.
Das Symbol Kurzzeitwecker 2 erlischt. Auf dem Display erscheint die aktuell Uhrzeit.
Через несколько секунд начнётся обратный счет, отображаемый на дисплее, загорается символ минутника 2. Нажатием на кнопку 1 Вы можете вызвать показание текущего времени на 5 секунд.
По окончании обратного счета духовка подает двойные звуковые сигналы с интервалом в 2 секунды в течении двух минут. Символ
минутника 2 продолжает мигать после прекращения подачи звуковых сигналов.
- Для прекращения подачи звуковых сигналов и для отключения символа минутника 2 нажмите любую кнопку.
Символ минутника 2 гаснет. На дисплее отображается текущее время.
EN
Setting the cooking time
The process in the oven should switch off after a wanted duration automatically.

Before setting the duration you have to set the oven operating function and the temperature (see chapter Usage)
- Press the middle key 1 repeatedly till the symbol 2 will start flashing.
The symbols 0.00 appear on the display.

- By using the choose keys 3 or 4 (− or +) you set the wanted duration of the preparation. After a few seconds the countdown of the duration starts.
The display shows the countdown time, symbol 2 appears on the display to confirm the successful setting and the current time appears again.

After the end of the countdown the oven emits the triple sound signals with the interval of 2 seconds during two minutes to inform you that all processes in the oven are switched off. The symbol 2 will continue to flash after the end of emitting the sound signals.
- Turn the rotary handles of oven operating functions and of temperature regulator in the zero position.
- Press any key to turn off the timer and the sound signals.
The symbol 2 goes out. The display shows the current time.

Attention! If you don't turn the rotary handles in the zero position after the switch off of the timer, the oven will continue to operate.
DE
Einstellen der Betriebsdauer
Der Vorgang im Backofen soll nach einer gewünschten Dauer automatisch abgeschaltet werden.
Bevor die Dauer der Gerichtszubereitung eingegeben wird, müssen Sie die Backofenfunktion und die Temperatur der Zubereitung einstellen (siehe Kapitel Benutzung).
- Die mittlere Taste 1 mehrmals solange drücken bis das Symbol 2 anfängt zu blinken.
Auf dem Display erscheint 0.00.
- Mit den Wahltasten 3 oder 4 (− oder +) stellen Sie die gewünschte Dauer der Gerichtzubereitung ein. Nach einigen Sekunden beginnt die Rückzählung der Zeitdauer.
Auf dem Display erscheint das Symbol 2, was die erfolgreiche Einstellung bestätigt und die aktuelle Uhrzeit wird wieder angezeigt.
Nachdem das Rückwertszählen beendet ist, ertönen doppelte Signaltöne mit dem Interval von 2 Sekunden 2 Minuten lang, um Sie zu informieren, dass alle Vorgänge im Backofen abgeschaltet sind. Nach dem Aufhören des Signaltons blinkt das Symbol 2 weiter.
- Bringen Sie die Drehknebel der Backofenfunktion und des Thermostates in die Nullstellung.
- Drücken Sei eine beliebige Taste, um die Signaltöne und das blinkende Symbol 2 auszuschalten.
Das Symbol 2 erlischt. Auf dem Display erscheint die aktuell Uhrzeit.

Achtung! Wenn Sie nach dem Ausschalten des Kurzzeitweckers die Drehknebel nicht in die Nullstellung bringen, dann setzt der Backofen seinen Betrieb fort.
RU
Установка продолжительности приготовления
Духовой шкаф должен автоматически отключиться по истечении желаемого промежутка времени.
Прежде чем задать продолжительность приготовления, Вы должны установить режим работы духового шкафа и температуру приготовления. (см. раздел Использование).
- Нажимайте на среднюю кнопку 1 пока не начнёт мигать символ 2.
На дисплее появится 0.00.
- С помощью кнопок выбора 3 или 4 (— или +) установите желаемое время. Через несколько секунд начнется отсчет времени приготовления.
На дисплее отображается время обратного отсчета, появится символ 2, подтверждающий успешное программирование, а также вернётся показание текущего времени.
По окончании обратного счета духовка подает двойные звуковые сигналы с интервалом в 2 секунды в течении двух минут, информируя, что все функции работы духовки отключены. Символ 2 продолжает мигать после прекращения подачи звуковых сигналов.
- Переведете вращающиеся ручки режима работы и терморегулятора духового шкафа в нулевое положение.
- Нажав любую кнопку, отключите звуковые сигналы и мигающий символ 2.
Символ 2 гаснет. На дисплее отображается текущее время.

Внимание! Если по отключению таймера Вы не переведете вращающиеся ручки в нулевое положение, духовой шкаф будет продолжать работать.
EN
Setting the end of cooking time
The oven must switch off after the set end time.
Before setting the end of cooking time you have to set the oven operating function and the temperature (see chapter «Multifunction oven control»).

- Press the middle key 1 repeatedly till the symbol 2 will start flashing.
The symbols 0.00 appear on the display.
- By using the choose keys 3 or 4 (− or +) you set the wanted end of the preparation. After a few seconds the program is activated.

Important! You should set a time that differs from the current day time.

The display shows the countdown time, symbol 2 appears on the display to confirm the successful setting and the current time appears again.
After the set end time is reached a fourfold tone with the interval of 2 seconds sounds and the symbols flash to inform you that all processes in the oven are switched off.
- Turn the rotary handles of oven operating functions and of temperature regulator in the zero position.
- Press any key to turn off the timer and the sound signals.
The symbol 2 goes out. The display shows the current time.

Attention! If you don't turn the rotary handles in the zero position after the switch off of the timer, the oven will continue to operate.
DE
Einstellen der Ausschaltzeit
Der Backofen muss in eingegebener Endzeit ausgeschaltet werden.
Bevor die Ausschaltzeit eingegeben wird, müssen Sie die Backofenfunktion und die
Temperatur der Zubereitung einstellen (siehe Kapitel »Steuerung von Multifunktionsbackofen«).
- Die mittlere Taste 1 mehrmals solange drücken bis das Symbol 2 anfängt zu blinken.
Auf dem Display erscheint 0.00.
- Mit den Wahltasten 3 oder 4 (− oder +) die gewünschte Ausschaltzeit der Gerichtszubereitung einstellen. Nach wenigen Sekunden wird das Programm aktiviert.
Wichtig! Sie sollen die Zeit eingeben, die sich von der aktuellen Uhrzeit unterscheidet!
Auf dem Display erscheint das Symbol 2 als Bestätigung der erfolgreichen Programmierung und die aktuelle Uhrzeit wird wieder angezeigt.
Wenn die programmierte Zeit erreicht ist, dann ertönt ein dreimaliger Signalton mit dem Interval von 2 Sekunden und die Symbole fangen an zu blinken, um Sie zu informieren, dass alle Backofenbetriebsfunktionen abgeschaltet sind.
- Bringen Sie die Drehknebel der Backofenfunktion und des Thermostates in die Nullstellung.
- Drücken Sei eine beliebige Taste, um die Signaltöne und das blinkende Symbol 2 auszuschalten.
Das Symbol 2 erlischt. Auf dem Display erscheint die aktuelle Uhrzeit.
Achtung! Wenn Sie nach dem Ausschalten des Kurzzeitweckers die Drehknebel nicht in die Nullstellung bringen, dann setzt der Backofen seinen Betrieb fort.
RU
Установка времени окончания приготовления
Духовой шкаф должен автоматически отключиться в заранее заданное время.
Прежде чем задать время окончания работы, Вы должны установить режим работы духового шкафа и температуру приготовления. (см. раздел «Управление работой многофункционального духового шкафа»).
- Нажимайте на среднюю кнопку 1 пока не начинает мигать символ 2.
На дисплее появится 0.00.
- С помощью кнопок выбора 3 или 4 (— или +) установите желаемое время. Через несколько секунд начнется отсчет времени приготовления.
Важно! Вы должны задать время, отличающееся от текущего!
На дисплее появится символ 2, подтверждающий успешное программирование, а также вернётся показание текущего времени.
По достижению запрограммированного времени духовка подает трёхкратный звуковой сигнал с интервалом в 2 секунды и замигают символы информируя, что все функции работы духовки отключены.
- Переведете вращающиеся ручки режима работы и терморегулятора духового шкафа в нулевое положение.
- Нажав любую кнопку, отключите звуковые сигналы и мигающий символ 2.
Символ 2 гаснет. На дисплее отображается текущее время.
Внимание! Если по отключению таймера Вы не переведете вращающиеся ручки в нулевое положение, духовой шкаф будет продолжать работать.
EN
Setting cooking duration and end times
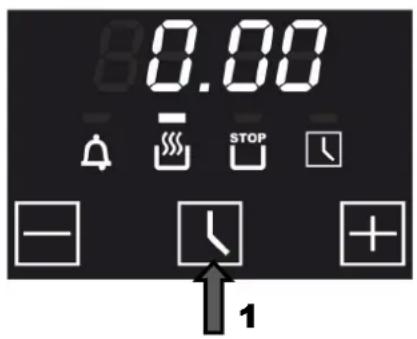
You can combine the cooking duration and end of cooking time functions to set the start and end times for cooking. In this way you can program your electronic oven to cook while you are out or to defrost foods ready for you to cook when you get back. A great help in the kitchen!

Set first the duration 1 and then the end of cooking time 2.

Example: You want to start cooking a dish 30 minutes before you get home so that it will be ready for you arrival at 12:55.
Before you set the duration and the end of cooking time, you have to set the oven function 3 ant the temperature (see chapter «Multifunction oven control»).
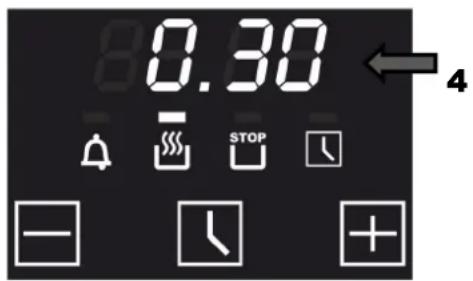
Set the cooking duration 4 (in our example - 30 minutes).

Therefor you have to program the wanted end of cooking time. (see chapter «Setting cooking duration»).
The symbol 5 appears on the display, that confirms a successful programming of the cooking duration and the current time appears again.
Einstellen der Betriebsdauer und Ausschaltzeit
Sie können die beiden Funktionen "Betriebsdauer" und „Ausschaltzeit“ kombinieren, wobei Sie eine gewünschte Zeit eingeben, um den Backofen ein- und auszuschalten. So können Sie Ihren Backofen für die Zeit programmieren, wenn Sie nicht zu Hause sind oder das Auftauen von Speisen bevor Sie nach Hause kommen. Das ist eine große Hilfe in Ihrer Küche.
Zuerst gegeben Sie die Betriebsdauer 1 und danach die Ausschaltzeit 2 ein.
Установка продолжительности и времени окончания приготовления
Вы можете комбинировать функции времени приготовления и времени окончания приготовления, задавая желаемое время включения и выключения духового шкафа. Таким образом, Вы можете запрограммировать процесс приготовления на то время, когда Вас нет дома, или же процесс размораживания продуктов к Вашему приходу. Неплохая помощь на кухне.
Задайте сначала время приготовления 1 и затем время окончания 2.
Beispiel: Sie möchten die Gerichtszubereitung 30 Minuten vor Ihrer Rückkehr nach Hause beginnen, um zu Ihrer Ankunft um 12:55 die Speise fertig wurde.
Например: Вы хотите начать готовить блюдо за 30 минут до возвращения домой, чтобы к Вашему приходу в 12:55 оно было готово.
Bevor die Dauer der Gerichtszubereitung und die Ausschaltzeit eingegeben werden, müssen Sie die Backofenfunktion 3 und die Temperatur der Zubereitung einstellen (siehe Kapitel »Steuerung von dem Multifunktionsbackjfen«).
Geben Sie die Betriebsdauer der Gerichtszubereitung 4 ein (in unserem Fall – 30 Minuten).
Dafür muss die gewünschte Betriebsdauer programmiert werden (siehe Kapitel »Einstellen der Betriebsdauer«)
Прежде чем задать продолжительность приготовления и время окончания работы, Вы должны установить режим работы духовки 3 и температуру приготовления. (см. раздел «Управление работой многофункционального духового шкафа»).
Задайте продолжительность приготовления 4 (в нашем примере – 30 минут).
Для этого запрограммируйте желаемую продолжительность приготовления. (см. раздел «Установка продолжительности приготовления»).
Auf dem Display erscheint das Symbol 5, das eine erfolgreiche Programmierung der Betriebsdauer bestätigt und die aktuelle Uhrzeit wird wieder angezeigt.
На дисплее появится символ 5, подтверждающий успешное программирование продолжительности приготовления, а также вернётся показание текущего времени.
EN
Now set the wanted end time (see chapter «Setting the end time»).
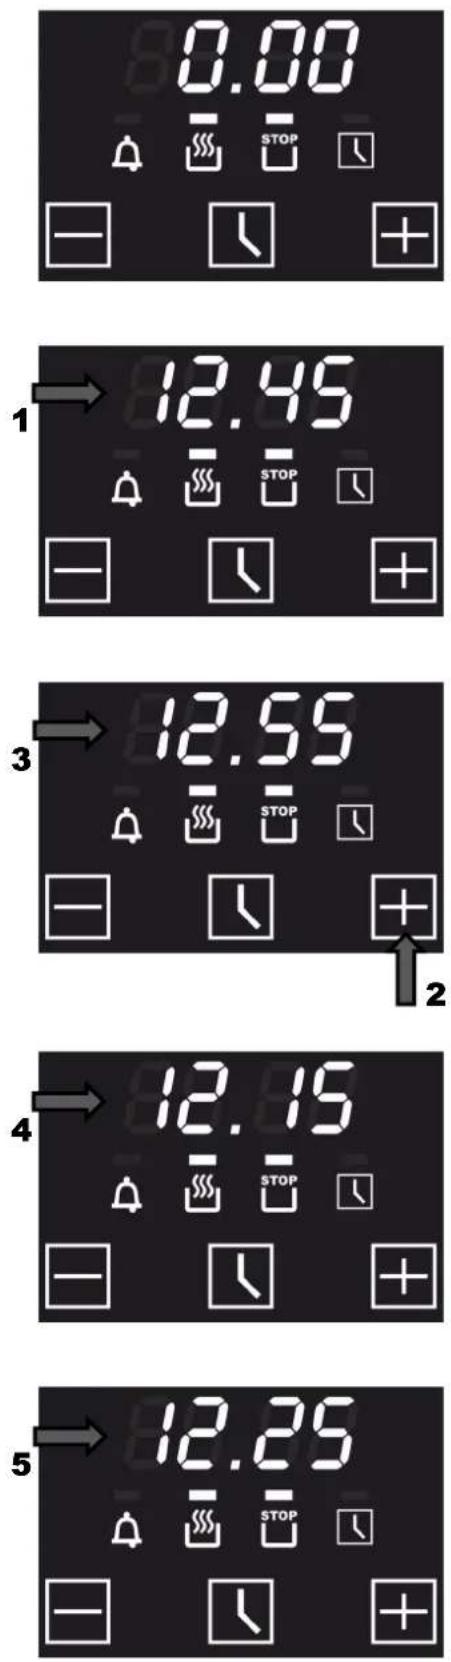
The end time 1 appears on the display, that accords to the current day time plus duration (in our example 12:45, that means plus 30 minutes).
- Set the wanted end time with the choice key 2 (+).
A few seconds later this time will be registered 3 (in our example - 12:55, that means we shifted the end time 10 minutes).
The oven is in expectance state now. The current day time is displayed 4 (in our example 12:15).
In our example the oven should be turned on at 12:25 (5) with the functions "Grill + Thermocirculation" and be turned off at 12:55 according to your setting.
Attention! If you don't turn the rotary handles in the zero position after the switch off of the timer, the oven will continue to operate.
DE
Programmieren Sie jetzt die gewünschte Ausschaltzeit (siehe Kapitel »Einstellen der Ausschaltzeit«).
RU
Теперь запрограммируйте желаемое время окончания процесса приготовления (см. раздел «Установка времени окончания приготовления»).
Auf dem Display erscheint die Ausschaltzeit 1, die der aktuellen Tageszeit plus Betriebsdauer entspricht (in unserem Fall 12:45, d.h. plus 30 Minuten).
На дисплее появится время окончания приготовления 1, равное текущему времени, плюс время продолжительности приготовления (в нашем примере 12:45, т.е. плюс 30 мин.).
- Mit der Wahltaste 2 (+) die gewünschte Ausschaltzeit einstellen.
- Используя кнопку выбора 2 (+) установите желаемое время окончания приготовления.
Nach wenigen Sekunden wird diese Zeit registriert 3 (in unserem Fall - 12:55, d.h. wir haben die Ausschaltzeit um 10 Minuten verschoben).
Через несколько секунд таймер зарегистрирует это значение 3 (в нашем примере - 12:55, т.е мы сдвинули время окончания приготовления на 10 мин.).
Der Backofen ist im Bereitschaftsmodus. Die aktuelle Tageszeit wird angezeigt 4 (in unserem Fall 12:15).
Духовой шкаф перейдет в режим ожидания. Высветится текущее время 4 (в нашем примере – 12:15).
In unserem Fall soll der Backofen um 12:25 (5) bei den Funktionen „Grill + Thermozirkulation“ eingeschaltet und um 12:55 ausgeschaltet werden, gemäß Ihrer Programmierung.
В нашем примере духовой шкаф должен включится в 12:25 (5)в режиме "гриль + горячий обдув" на 30 минут и выключится в 12:55, соответственно заданной Вами программе.

Achtung! Wenn Sie nach dem Ausschalten des Kurzzeitweckers die Drehknebel nicht in die Nullstellung bringen werden, dann setzt der Backofen seinen Betrieb fort.

Внимание! Если по отключению таймера Вы не переведете вращающиеся ручки в нулевое положение, духовой шкаф будет продолжать работать.
EN
PRACTICAL ADVICES
Baking
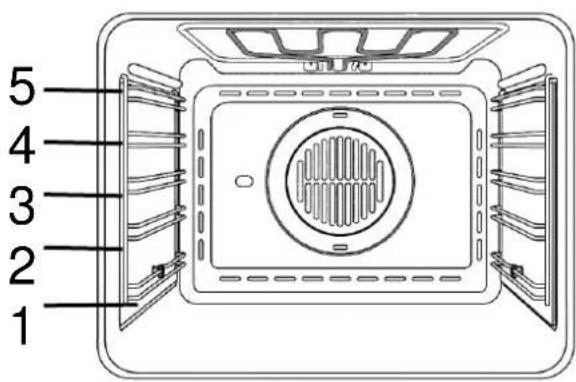

- It is recommended to bake pastry and cakes on the baking trais, which are provided as oven equipment. Choose a matching tray height. Depending on model the ovens have 4 or 5 heights.
- You also can bake on customary baking trais, which are to be placed on the grate. In this case baking trais out of black plate are recommended. These trais have a better heat conductivity, the baking time is abbreviated and energy can be saved.
- Some pastry is to be placed into a preheated oven.
- The oven is to be pre-heated carefully, only for heavy pastry which have a big mass and rise weakly. Pastry that rises quickly can be placed into a weaky pre-heated oven.
- After turning off the oven you can check the pastry quality with a wooden rod. (If the pastry is baked well, the rod will be dry and clean after sticking it in and pulling it out.
• After turning off the oven youshoul let the pastry in it for 5 minutes.
The pastry parameters for conventional heating are summarized in Table 1 and for thermocirculation in Table 2.
If you use thermocirculation, no pre-heating of the oven is necessary.
For baking with thermocirculation baking of dough is advised in height 3 from the bottom and of to heights simultaneously height 1 and 3.
PRAKTISCHE EMPFEHLUNGEN
Backen
- Es wird empfohlen, die Gebäcke und Kuchen auf den Backblechen zu backen, die als Herdausrüstung mitgeliefert sind. Wählen Sie eine passende Höhe für die Backbleche. Je nach Modell verfügen die Backöfen über 4 bzw. 5 Höhen.
- Backen ist auch in den handelsüblichen Kuchenformen und Backblechen möglich, die auf dem Rost aufzustellen sind. In diesem Fall werden die Kuchenformen aus dem schwarzen Blech empfohlen. Solche Backformen besitzen eine bessere Wärmeleitfähigkeit. Die Backzeit wird dadurch kürzer und die Energie kann damit gespart werden.
- Manche Gebäcke soll man in einem vorgewärmten Backofen backen.
- Der Backofen soll vorsichtig nur für schwere Gebäcke, die eine ziemlich große Masse haben und schwach aufgehen, vorgewärtmt werden Die Gebäcke, die schnell aufgehen, sind in einem nur schwach vorgewärmter Backofen anzuordnen.
- Beim Abschalten des Backofens ist die Gebäckqualität mit einem Holzstäbchen zu überprüfen (bei dem gut ausgebackenen Gebäck soll das Holzstäbchen, das aus dem Gebäck nach dem Einstechen herausgezogen ist, trocken und sauber sein).
- Nach dem Abschalten des Backofens solle das Gebäck noch 5 Minuten in dem Backofen bleiben.
ПРАКТИЧЕСКИЕ СОВЕТЫ
Выпечка кондитерских изделий
- Рекомендуется выпечка теста на противнях, поставляющихся вместе с духовым шкафом. Выберите подходящий уровень для установки противня. В зависимости от модели духовки имеют 4 или 5 уровней.
- Выпечка возможна также в формах и на противнях, которые следует устанавливать на решетке. В этом случае рекомендуется употребление форм из черной жести или форм с гальванопокрытием (золотого цвета). Эти формы лучше проводят тепло и сокращают время выпечки, экономя при этом электроэнергию.
- Некоторые из выпекаемых изделий требуют предварительно прогретой духовки.
- Предварительный нагрев духовки следует применять исключительно в случае тяжелого теста большого объема и слабоподнимающегося. Быстро поднимающееся тесто следует устанавливать в слабо разогретую духовку.
- После отключения духовки, рекомендуется проверка качества выпеченного теста при помощи деревянной палочки (в случае правильной выпечки, после накола теста, палочка должна быть сухой и чистой).
- Выпеченное изделие, следует оставить в духовке, после ее отключения, еще на 5 минут.
Gebäckparameter bei Nutzung konventioneller Beheizung sind in der Tabelle 1 zusammengefasst und für die Thermozirkulation in der Tabelle 2.
Beim Gebrauch von Thermozirkulation ist keine Backofenvorwärmung erforderlich.
Beim Backen mit Thermozirkulation ist das Aufbacken von Teig auf der Ebene 3 von unter empfohlen und beim Backen in zwei Ebenen gleichzeitig in der Ebene 1 und 3.
Примерные параметры выпечки с использованием конвенционального нагрева приведены в Таблице 1, а с использованием термоциркуляции в Таблице 2.
При использовании термоциркуляции, не требуется предварительный разогрев духового шкафа.
Для выпечки теста с применением термоциркуляции, рекомендуется выпечка на 3 уровне снизу духовки а в случае одновременной выпечки на двух уровнях рекомендуются уровни 1 и 3.
EN
Pastry parameter
For conventional heating
Table 1
Gebäckparameter bei Nutzung Konventioneller Beheizung Tabelle 1
Параметры выпечки с
конвенционным нагревом.
Таблица 1
| Kind of pastryGebäckartТип теста | HeightHöheРаб. уровень | TemperatureTemperatur °CTemпература °C | Baking time, min.Backzeit, min.Время, мин. |
| Pastry in forms Formgebäck | Выпечка в формах | ||
| Meringue / Schaumgebäck / Безе | 2-3 | 80-100 | 60-70 |
| Sandcake /Sandkuchen / Песочная баба | 2-3 | 160-180 | 40-70 |
| Barmcake / Hefekuchen / Дрожжевая баба | 2-3 | 170-180 | 50-60 |
| Tart /Torte / Торт | 2-3 | 160-180 | 30-50 |
| Sponge cake / Biskuitkuchen / Бисквит | 2-3 | 160-180 | 10-25 |
| Sponge cake / Biskuitkuchen / Бисквит | 2-3 | 160-180 | 10-25 |
| Shortcrust for fruit tart / Mürberteig für Obsttorte/песочное тесто для фруктового торта | 2-3 | Heat / Erhitzter /разогр. 200-220 | |
| Pastry on griddle Gebäck auf dem Blech | Выпечка на противнях | ||
| Barm streusel cake / Hefestreusel / Дрожжеваяхала | 2-3 | 170-190 | 30-40 |
| Éclairs / Eclairs / Эклеры | 2-3 | 200-225 | 30-40 |
| Fruit cake / Obstkuchen / Сладкий пирог сфрукт. | 2-3 | 170-190 | 30-50 |
| Streuselkuchen / Сладкий пирог с крошкой | 2-3 | 170-190 | 20-35 |
Roasting and Stewing of meat
The following is advised:
- Roasting and stewing of meat over 1 kg in the oven. Smaller pieces are to be prepared on the cooking zones.
- For roasting meat on the grid is advised to place a plate with water on the lowest level under the grid with the dish and refill water while preparing
- You should use jars with heat-resistant handles.
Preparation parameters for roasting and stewing with conventional heating are shown in Table 3 and with thermocirculation in Table 4.
Pastry parameter
For thermocirculation.
Table 2
Gebäckparameter bei Nutzung der Heißluft.
Tabelle 2
Параметры выпечки с термоциркуляцией.
Таблица 2
| King of pastry / Gebäckart / Тип теста | Temperature °CTemperatur °CTemпература °C | Baking time, min.Backzeit, min.Время, мин. |
| Pastry in forms / Formgebäck/ Выпечка в формах | ||
| Meringue / Schaumgebäck / Безе | 80 | 60-70 |
| Sandcake / Sandkuchen / Песочная баба | 150 | 65-70 |
| Barmcake / Hefekuchen / Дрожжевая баба | 150 | 60-70 |
| Tart / Torte / Торт | 150 | 25-35 |
Pastry on griddle
Gebäck auf dem Blech
Выпечка на противнях
| Barmcake / Hefekuchen / Дрожжевое тесто | 150 | 40-45 |
| Streuselcake / Streuselkuchen / Сладкий пирог с крошкой | 150 | 20-30 |
| Fruit cake / Obstkuchen / Сладкий пирог с фруктами | 150 | 40-55 |
| Sponge cake / Biskuitkuchen / Бисквит | 150 | 30-40 |
Braten und Schmoren von Fleisch
Es wird Folgendes empfohlen:
- Braten bzw. Schmoren von über 1 kg Fleischstücken im Backofen. Kleinere Fleischstücke sind auf den Kochzonen vorzubereiten,
- beim Braten von Fleisch auf dem Rost wird empfohlen auf der niedrigsten Ebene (unter dem Rost mit Gericht) ein Blech mit etwas Wasser zu stellen. Während der Zubereitung wird das Wasser nachgefühlt,
- zum Braten sollen die Gefäße mit den temperaturbeständigen Griffen benutzt werden.
Zubereitungsparameter für das Braten und Schmoren von Speisen bei der Nutzung der konventionellen Beheizung sind in der Tabelle 3 und für die Thermozirkulation in der Tabelle 4 dargestellt.
Жарение и тушение мяса
Рекомендуется следующее:
- жарение и тушение в духовке блюд массой превышающей 1 кг. Меньшие порции следует подготовить на варочной поверхности,
- в случае жарения мяса на решетке, рекомендуется установка на самом низком уровне (под решеткой с блюдом) противня, содержащего небольшое количество воды, которую пополняют во время жаренья,
- для жарения, следует применять емкости (кастрюли) с жаростойкими ручками,
Примерные параметры условий жаренья и тушения блюд с использованием конвенционального нагрева приведены в таблице 3, а с использованием термоциркуляции в таблице 4.
Roast parameters for usage of conventional heating
Table 3
Bratparameter bei Nutzung Konventioneller Beheizung Tabelle 3
Параметры жарения с
конвенционным нагревом.
Таблица 3
| Kind of meatFleischgattungВид мяса | AdvicesEmpfehlungenРекомендации | HeightHöheРаб. уровень | Temperature °CTemperatura °C | Roasttime min.Bratzeit min.Время, мин. |
| Stewed Beef / Rindfleisch geschmort / Тушеная говядина | 2-3 | 225-250 | 120-150 | |
| Underdone Roastbeef / Roastbeef blutig / Ростбиф с кровью | heated oven erhitzter Backofen разогретая духовка | 3-4 | 225-250 | 5-6 |
| Juicy roastbeef / Roastbeef saftig / Ростбиф сочный | heated oven erhitzter Backofen разогретая духовка | 3-4 | 225-250 | 6-8 |
| Sautéed Roastbeef / Roastbeef angebraten / Ростбиф подрумяненный | heated oven erhitzter Backofen разогретая духовка | 3-4 | 225-250 | 10-11 |
| Pork / Schweinefleisch / Свинина | 2-3 | 150-170 | 30-120 | |
| Veal / Kalbfleisch / Телятина | 2-3 | 150-170 | 45-120 | |
| Lamb / Lammfleisch / Баранина | 2-3 | 150-170 | 90-120 | |
| Game / Wildfleisch / Дичь | heated oven erhitzter Backofen разогретая духовка | 2-3 | 170-190 | 60-110 |
| Fowl / Geflügel, Hähnchen / Птица, цыплята | 2-3 | 160-180 | 45-60 | |
| Canard / Enten / Утки | heated oven erhitzter Backofen разогретая духовка | 2-3 | 200-220 | 60-90 |
| Goose / Gänse / Гуси | 2-3 | 160-180 | 150-360 | |
| Stewed fowl / Geflügel geschmort / Тушеная птица | 2-3 | 210-225 | 45-60 |
Roast parameters for usage of thermocirculation
Table 4
Bratparameter bei Nutzung
der Heißluft
Tabelle 4
Параметры жарения с
термоциркуляцией.
Таблица 4
| FleischgattungВид мяса | PortionПорция | Temperatur °CТемпература °C | Bratzeit min.Время, мин. |
| Fowl / Hähnchen / Цыплята | 1 | 180 | 50-60 |
| Game / Wildfleisch / Дичь | 1-1,5 | 160 | 120-140 |
| Veal / Kalbfleisch / Телятина | 1 | 160 | 100-140 |
| Pork / Schweinefleisch / Свинина | 1 | 175 | 110-120 |
| Beef / Rindfleisch / Говядина | 1 | 160 | 120-150 |
| Goose, canard / Gans, Ente / Гусь, утка | 1 | 175 | corr. massgem. Massecoot. массе |
Grill parameters.
Table 5
Grillparameter.
Tabelle 5
Параметры жарения на
грилле. Таблица 5
| Kind of meatFleischgattungВид мяса | HeightHöheРаб. уровень | Grill time, minGrillzeit, minВремя, мин | |
| 1. side / 1. Seite / 1. сторона | 2. side / 2. Seite / 2. сторона | ||
| Pork chop / Schweinskotelett / Свиная котлета | 4-5 | 8-10 | 6-8 |
| Pork cutlet / Schweinschnitzel / Свиной шницель | 3-4 | 8-10 | 6-8 |
| Cooked beef / Gekochtes RindfleischОтварное говяжье мясо | 3-4 | 10-12 | 6-8 |
| Sausages / WürstchenКолбаски | 4-5 | 8-10 | 6-8 |
| Shashlik / SchaschlikШашлыки | 4-5 | 7-8 | 5-6 |
| Beef steak / RindsteakГовяжье жаркое | 4-5 | 6-7 | 5-6 |
| Veal chop / KalbskotelettКотлета из телятины | 4-5 | 8-10 | 6-8 |
| Veal steak / KalbssteakЖаркое из телятины | 4-5 | 6-7 | 5-6 |
| Lamb chop / LammkotelettКотлета из баранины | 4-5 | 8-10 | 6-8 |
| Chicken – half / Hähnchen, HälfteЦыпленок – половина | 3-4 | 25-30 | 25-30 |
| Fish / Fisch / Рыба | 4-5 | 6-7 | 4-5 |
| Filet / Filet / Филе | 4-5 | 4-7 | 6 |
| Trout / Forellen / Форель | 4-5 | 4-7 | 6 |
| Toasts / Toasts / Тосты | 4-5 | 2-3 | 2-3 |
| Sandwitch / Toasts, belegte / Тосты с начинкой | 3-4 | 6-8 | |
EN
Note! The shown parameters concern roasting on the grid. If you use closed jars the temperature is to be set to 200 °C.
After the run off of the predetermined halftime the meat should be reversed.
It is more advantageous to roast bigger meat shares.
Baste the meat with gravy while roasting.
It is advised to place a plate with water on the lowest level under the grid with the dish and refill water while preparing. (Don't sparkle the meat)
Parameters shown in this chapter concerning baking and roasting are to be corrected corresponding to own experiences.
DE
Bemerkung! Die dargestellten Parameter betreffen das Braten auf dem Rost. Bei der Verwendung von den geschlossenen Gefäßen ist die Temperatur auf 200 °C einzustellen.
Nach Ablauf der Halbzeit, die für das Braten vorbestimmt ist, soll das Fleisch umgewendet werden.
Es ist günstiger, die größeren Fleischportionen zu braten.
Während des Bratens das Fleisch mit der Bratensoße begießen.
Es ist empfohlen, ein Blech mit etwas Wasser auf der niedrigsten Höhe (unter dem Gitter mit Gericht) einzuschieben und während des Bratens das aufgedampfte Wasser nachzufüllen (nicht das Fleisch begießen).
Die in diesem Kapitel dargestellten Parameter des Gebäcks und des Bratens sind aufgrund eigene Erfahrungen zu korrigieren.
RU
Примечание! Приведенные параметры касаются жарения на решетке. В случае применения закрытых емкостей (кастрюль), температуру следует установить на уровне 200°C.
По истечении половины времени, предназначенного для зажаривания, мясо следует переворачивать на другой бок.
Более выгодным является зажаривание больших порций мяса.
Во время жарения поливать мясо вытопившимся соусом.
Рекомендуется установка на самом низком уровне (под решеткой с блюдом) противня, содержащего небольшое количество воды, которую пополняют во время жаренья (мясо водой не поливать).
Параметры, приведенные в этой главе, касающиеся выпечки и жарения, рекомендуется корректировать, основываясь на собственном опыте.
EN
CARE AND ATTENDANCE
IMPORTANT!!! As a safety precaution, before care and attendance of the oven, always disconnect the plug from the power socket or the power cable from the oven.
Make sure that the appliance is cool before cleaning. Do not clean the appliance while it is still hot. Some cleaners produce noxious fumes when they apply to a hot surface. Wet clothes or sponges can cause burns from steam.
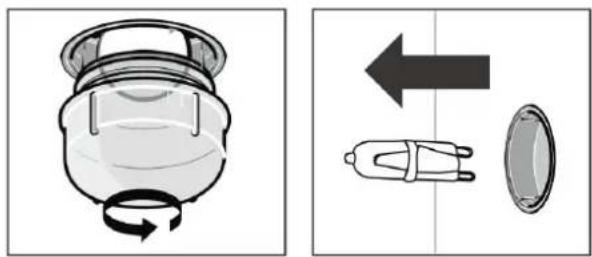
natural_image
Diagram showing a device with rotational arrow and a separate view of a mechanical component (no text or symbols)Replacement the oven light
The oven light must have these precise features:
a) temperature resistance up to 300 °C. b) power supply: see V/Hz indicated on data plate.
c) power 25W
d) E 14 connection.
Attention! First of all disconnect the apparat from the power supply.
• To prevent damage, place a tea cloth in the oven
• Unscrew the glass cover of the light
- Unscrew the old light bulb and replace it with the new one
- Put back the glass cover and remove the tea cloth
- Connect the appliance to the main electricity supply
Attention! Do not use steam cleaning devices to clean this appliance. The steam could reach electrical components and cause a short circuit.
DE
RU
PFLEGE UND WARTUNG
WICHTIG!!! Als Sicherheitsvorkehrung soll vor jeder Pflege- und Wartungarbeit des Backofens immer das Stromnetz abgeschaltet werden.
ОБСЛУЖИВАНИЕ И УХОД
ВАЖНО!!! В качестве меры предосторожности необходимо перед обслуживанием и уходом за духовкой отключать ее от сети.
Vergewissern Sie sich, dass das Gerät vor den Beginn der Reinigung abgekühlt ist. Reinigen Sie das Gerät nicht, solange es noch heiß ist. Einige Reinigungsmittel produzieren giftige Dämpfe, wenn sie auf eine heiße Oberfläche aufgetragen werden. Nasse Schwämme oder Tücher können die Verbrennungen durch den Dampf verursachen.
Перед чисткой убедитесь что устройство не является горячим. При необходимости дайте ему остыть. При контакте с горячей поверхностью чистящие средства могут выделять ядовитые вещества.
Austausch der Ofenbeleuchtung
Die Ofenbeleuchtung muss folgende Merkmale aufweisen:
a) hochtemperaturbeständig bis zu 300 °C.
b) Stromversorgung: siehe Anschlusswerte V/Hz auf dem Typenschild.
c) Leistung 25 W
d) Sockel E 14.
Achtung! Das Gerät zuallererst vom Stromnetz trennen.
- Zur Vermeidung von Schadensfällen ist im Ofen ein Geschirrtuch auszubreiten
- Lampenabdeckung aus Glas abschrauben
- Alte Lampe abschrauben und mit einer neuen auswechseln
- Lampenabdeckung wieder anmontieren und Geschirrtuch entfernen
- Das Gerät erneut an das Stromnetz anschließen.
Замена лампы освещения духовки
Освещение духовки должно иметь следующие параметры:
a) Термостойкость до 300 °C.
b) Электропитание: параметры подключения В/Гц указаны в заводской табличке
с) Потребляемая мощность 25 Вт
d) Цоколь Е 14.

Внимание! Прежде всего отключить духовку от сети.
- Во избежание повреждений разложите в духовке кухонное полотенце
- Выкрутите стеклянный плафон
- Выкрутите старую лампочку и вкрутите новую
- Вкрутите на место плафон и уберите полотенце
- Подключите духовку к электросети

Achtung! Benutzen Sie niemals einen Dampfreiniger zum Reinigen des Gerätes. Der Dampf eines Dampfreinigers kann an die spannungsführenden Teile gelangen und einen Kurzschluss verursachen.

Внимание: Никогда не используйте пароочиститель для очистки устройства, так как его использование может вызвать короткое замыкание.
EN
Oven
The inner walls of the oven are covered with easy to be cleaned high quality enamel. The very smooth surface counteracts against the appearance of the remaining soiling on the walls of the oven very fast and can be also simply cleaned. The anti-acid-containing quality of this enamel permits a long-term qualitatively high exploitation of Your oven
The oven is to be cleaned after every use.
IMPORTANT!!! As a safety precaution, before cleaning the oven, always disconnect the plug from the power socket or the power cable from the oven.
Clean the oven room only with tepid water and a little bit of washing-up liquid. After washing the oven is to be dried with a dry rag or to be dried with an open door.
Do not use acid or alkaline substances to clean the oven (lemon juice, vinegar, salt, tomatoes etc.). Do not use chlorine based products, acids or abrasive products to clean the painted surfaces of the oven.

natural_image
Line drawing of an open oven with a black panel inserted, showing internal components and a numbered label (1) pointing to the panel area.Self-cleaning catalytic panels (if available)
Our smooth walled ovens can be fitted with self cleaning panels 1 to cover the inside walls.
These special panels are simply hooked on to the walls before the side frames are fitted. They are coated in special, micro-porous catalytic enamel which oxidizes and gradually vaporizes splashes of grease and oil at cooking temperatures above 200°C. If the oven is not clean after cooking fatty foods, operate the empty oven for 60 minutes (max.) at maximum temperature.
Never wash or clean self-cleaning panels with abrasive, acid, or alkaline products.
Backofen
Die inneren Wände des Backofens sind mit de hochwertigen und reiniogungsfreundlichen Emaille bedeckt. Die sehr glatte Oberfläche wirkt dem Erscheinen der restlichen Verschmutzungen auf den Wänden des Backofens sehr schnell entgegen und kann auch einfach gereinigt werden. Die antisäurehaltige Eigenschaft dieser Emaille erlaubt eine langfristige qualitativ hohe Ausnutzung ihres Backofens.
Der Backofen ist nach jedem Gebrauch zu reinigen.
WICHTIG!!! Als Sicherheitsvorkehrung soll vor jeder Reinigung des Backofens immer das Stromnetz abgeschaltet werden.
Den Backofenraum nur mit lauwarmem Wasser mit ein wenig Geschirrspülmittel reinigen. Nach dem Reinigen soll der Backofenraum mit einem trockenen Lappen abgewischt oder bei geöffneter Tür getrocknet werden.
Zum Reinigen dürfen auf keinen Fall sauren oder alkalischen Substanzen verwendet werden (Zitronensaft, Essig, Salz, usw.). Chlorhaltige Produkte (Bleichmittel usw.) sind ebenfalls unbedingt zu vermeiden, dies gilt vor allem für die Reinigung der emaillierten Wände.
Духовой шкаф
Внутренние стенки духовки покрыты высококачественной легкоочищающейся эмалью. Очень гладкая поверхность противодействует появлению на стенках духовки остаточных загрязнений и очень быстро и просто очищается. Антикислотное свойство этой эмали позволяет долгосрочно и качественно использовать Вашу духовку.
Чистите духовку после каждого использования.
ВАЖНО!!! В качестве меры предосторожности необходимо перед каждой чисткой духовки отключать ее от сети.
Духовой шкаф мойте используя только теплую воду с небольшим количеством жидкости для мытья посуды. После мытья вытрите духовой шкаф насухо или оставьте дверцу открытой для просыхания камеры.
Не применяйте для чистки кислото- или щелочесодержащих веществ (уксус, сок лимона, соль и т.д.). Ни в коем случае не применяйте также хлоросодержащие средства (отбеливающие и т.д.). Особенно это нужно иметь в виду при чистке эмалированных поверхностей духовок.
Selbstreinigende katalytische Platten (falls vorhanden)
Unsere Backöfen mit glatten Wänden bieten die Möglichkeit, in der Muffel selbstreinigende Platten 1 zu montieren. Diese Platten werden vor den seitlichen Rahmen an den Wänden eingehängt und sind mit einem mikroporösen katalytischen Speziallack bedeckt, der oxidiert, die Öl- und Fettspritzer verdampfen lässt und so bei den Backvorgängen über 200°C eliminiert. Soll der Ofen nach dem Backen sehr fetthaltiger Speisen nicht sauber sein, lässt man ihn maximal 60 Minuten lang leer bei Höchsttemperatur eingeschaltet. Die selbstreinigenden Platten dürfen weder gewaschen, noch mit scheuernden oder säurehaltigen bzw. alkalischen Produkten gereinigt werden.
Самоочищающиеся каталитические пластины (если имеется)
На стенках духовки установлены пластины 1 со специальной экологической микропористой самоочищающейся каталитической эмалью. Эта эмаль при температуре типовой работы духовки свыше 200° С катализирует все находящиеся на ней жирные вещества и, испаряя, устраняет их. Единственные средства, необходимые для уборки духовки после каталитической очистки — это щетка и совок. Если же после приготовления очень жирных блюд на стенках духовки все же остаются заметными следы масла и жира, оставьте пустую духовку включенной при максимальной температуре до тех пор, пока она полностью не очистится. Самоощидающиеся каталитические пластины нельзя ни мыть, ни тем более чистить абразивными материалами и кислото- и щелочесодержащими средствами.
EN
Telescope (if available)

natural_image
Close-up of a mechanical or electronic component with layered structure and an arrow pointing to a numbered feature (no visible text or symbols)The system Telescope 1 (one, two or three levels depending on your model), which your oven is equipped with, enables you to pull out all griddle together or seperated from each other and ever while preparing a meal. The system Telescope is installed on the upper 4 levels.
The given construction Kaiser differs from similar ones through the comfortable and practical access to every griddle and allows you to take out and check pastry without cooling down the whole oven or food on the other griddles.
The tracks of every griddle resist a loading up to 15 kg in the completely pulled out state.
The track system is easily to be removed to clean the oven. The construction is made of stainless steel, which excludes the possibility of corrosion formation.

Removing the oven door
To get a better access to the oven room and for the cleaning the oven door can be reoved easily. To do so, proceed as follows:
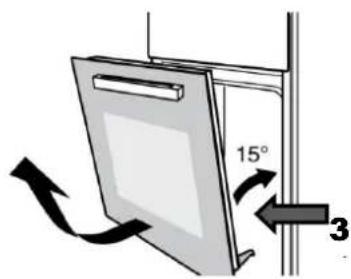
- Open the door fully and pull two locks 2 back at hinges on both sides of the over door.
- Close the oven door, at about 15 degree, then lift the door, and slowly pull out from the oven, 3.
• After cleaning, perform the above-mentioned operations in the opposite steps to restore the door to its original condition.
Teleskop (falls vorhanden)
Das System Teleskop 1 (1fach-, 2fach- oder 3fach-Teleskop-Auszug, je nach Modell), mit dem Ihr Herd ausgestattet ist, ermöglicht Ihnen, alle Bleche sowohl zusammen als auch getrennt voneinander und sogar während der Zubereitung eines Gerichtes herauszuschieben. Das System Teleskop ist auf der4 oberen Ebenen angebracht werden kann.
Diese Konstruktion Kaiser unterscheidet sich von den ähnlichen Konstruktionen durch den bequemen und praktischen Zugriff zu jedem Blech und erlaubt Ihnen, das Gebäck auf jedem Blech herauszunehmen und zu kontrollieren, ohne den gesamten Ofen und die Gerichte auf den anderen Blechen abzukühlen.
Die Schienen jedes Bleches halten eine Belastung bis zu 15 kg im vollständig herausgeschobenen Zustand.
Bei der Reinigung des Backofens können die Schienen leicht entfernt werden. Die Konstruktion is in dem rostfreien Stahl ausgeführt, was die Möglichkeit von Korrosionsbildung ausschließt.
Ausbauen der Ofentür
Um einen besseren Zugang zum Backofenraum und zur Reinigung zu schaffen, kann die Backofentür mühelos ausgebaut werden. Dafür sind folgende Schritte vorzunehmen:
- die Tür vollständig öffnen und zwei Verriegelungen 2 an den Scharnieren auf beiden Seiten der Ofentür ausziehen;
- die Ofentür bei etwa 15 Grad schließen, die Tür anheben und langsam aus dem Ofen sie ziehen, 3;
- Führen Sie nach der Reinigung die oben genannten Schritte in den entgegengesetzten Schritten aus, um den ursprünglichen Zustand der Tür wiederherzustellen.
Телескоп (если имеется)
Система Телескоп 1 (один, два или три уровня в зависимости от Вашей модели), которым оснащена Ваша духовка, позволяет Вам выдвигать все противни как совместно, так и по отдельности даже во время приготовления блюд. Система Телескоп может быть установлена на любой из верхних 4 уровней.
Данная конструкция Kaiser отличается от аналогичных удобным и практичным доступом к любому противню и позволяет доставать и контролировать выпечку на любом из них, не охлаждая всю духовку и находящиеся на других противнях блюда.
Направляющие каждого противня надежно удерживают нагруженный весом до 15 кг. противень в полностью выдвинутом состоянии.
При очистке духовки система направляющих легко снимается. Конструкция выполнена из нержавеющей стали, что исключает возможность появления коррозии.
Демонтаж дверцы духовки
Для получения лучшего доступа к духовому шкафу, а также для его очистки, дверца может быть очень легко демонтирована. Для этого необходимо:
- полностью откройте дверцу и вытяните два фиксатора 2 на петлях с обеих сторон дверцы духовки.
- Закройте дверцу духовки примерно на 15 градусов, затем поднимите дверцу и плавно вытащите её из духовки, 3.
- После очистки выполните вышеуказанные операции в обратном порядке, чтобы восстановить дверь в её исходном состоянии.
EN
Alternate inspection
Besides the current maintenance the user is dutybound to the following actions:
- alternate check and maintenance of oven elements and assemblies,
- let the oven be checked by the customer service after expiration of the warranty once in two years.
- Abolishment of noticed errors,
Note! All installing and maintenance actions mentioned on the top as well as reparations are to be accomplished by a authorized installer.
IMPORTANT!!!
The user is responsible for the irreproachable condition and professional use of the unit. If the customer service is called because of an operating mistake, the visit is liable to pay costs in the warranty, too.
Damages, which are caused through not following this instruction, are not approved.
What to do, if?
Every damage:
- Switch off all oven operating functions
- disconnect the oven from the power supply,
- acquaint the exigence of a reparation (Service-Center or another organisation, which has the corresponding rights).
A few simple defects can be abolished by the user, corresponding to the advices in the present operating instruction.
Problems and mistakes can happen during the usage of the unit. Some remote mistakes the user can abolish on his or her own through following the advices mentioned in the Table below. Before contacting the customer service the following points are to be checked consecutively:
DE
Periodische Besichtigung
Außer den laufenden Wartungsarbeiten ist der Benutzer zu folgenden Tätigkeiten verpflichtet:
- Periodische Überprüfung und Wartung von Backofenelementen und Baugruppen,
- Nach Ablauf der Garantieperiode jede zwei Jahre den Herd vom Kundendienst durchsehen lassen.
- Beseitigung von entdeckten Störungen.
Anmerkung! Alle oben angeführten Einstell- und Nachstelltätigkeiten, sowie Reparaturen müssen durch eine Kundendienststelle oder einen autorisierten Installateur durchgeführt werden.
WICHTIG!!!
Der Benutzer ist für den einwandfreien Zustand des Geräts und die fachgerechte Benutzung verantwortlich. Wenn der Kundendienst wegen eines Bedienfehlers gerufen wird, ist der Besuch auch während der Garantiezeit kostenpflichtig. Schäden, die durch Nichtbeachtung dieser Bedienungsanleitung verursacht wurden, werden nicht anerkannt.
Was ist, wenn?
Bei jeder Störung:
- Alle Betriebsfunktionen abschalten,
• Stromversorgung abschalten, - Die Notwendigkeit der Reparatur melden (Service-Center oder eine andere Organisation, die entsprechende Rechte hat).
Einige einfache Defekte kann der Benutzer selbstständig, entsprechend den Empfehlungen der vorliegenden Bedienungsanleitung, beseitigen.
Bei der Benutzung des Gerätes können manchmal Probleme und Fehler auftreten. Einige geringere Fehler kann der Benutzer eigenständig beheben, indem er die Hinweise befolgt, die in der nachstehenden Tabelle angeführt sind. Bevor Sie sich an den Kundendienst wenden, sind folgende Punkte der Tabelle nacheinander zu überprüfen:
RU
Периодический осмотр
Кроме операций связанных с текущим уходом за плитой, следует:
- производить периодические проверки исправности органов управления и рабочих узлов Духового шкафа,
- после истечения срока гарантии, по крайней мере один раз в два года, следует поручить сервисному центру проведение технического осмотра плиты,
- устранять обнаруженные неисправности.
Примечание! Все ремонты и операции по регулировке, должны производиться сервисным центром или монтером, обладающим соответствующей квалификацией.
ВАЖНО!!!
Пользователь отвечает за безупречное состояние прибора и правильное обслуживание. Если по причине неправильного обслуживания вызывается служба Сервисного Центра, вызов платный, даже при еще действующей гарантии. Поломки, которые вызваны несоблюдением настоящей Инструкции, не признаются.
Что делать, если?
В случае любой неисправности, следует:
- отключить все элементы духовки,
- отключить электропитание,
- заявить о необходимости ремонта (в сервисный центр или другую организацию, обладающую соответствими правами).
Некоторые простые неисправности пользователь может самостоятельно устранять, согласно рекомендациям настоящего руководства.
В период эксплуатации электрического устройства иногда появляются проблемы и неполадки, некоторые из которых потребитель в состоянии удалить самостоятельно при условии соблюдения правил приведенных в таблице ниже. До вызова работника сервисного обслуживания, внимательно прочтите и выполните следующие рекомендации:
| Error | Possible reason | Advices |
| Oven doesn’t work | Disturbance in power supply | Check the protection device of your home conduction. If defective - replace |
| Interruption of the stream supply | Set the current time on the display again and switch on the oven | |
| Zeros flash on the display | Interruption of the stream supply | Set the current time on the display again |
| The oven light doesn’t work | Disturbance in power supply | Check the protection device of your home conduction. If defective - replace |
| Defect of the lamp | Ccheck if the lamp of the oven light is faultless. If not – replace | |
| The controlling lights don’t glow | Disturbance in power supply | Check the protection device of your home conduction. If defective - replace |
| Defect of the lamp | Contact the customer service | |
| Clock goes forward or ater | Too low tension in the net of the house | Check the tension of the conduction. If necessary - stabilise |
IMPORTANT!!!
If despite of the recommendation the problems could not be abolished – contact the customer service.
| Störung | Mögliche Ursache | Hinweise | Проблемы | Возможные причины | Решения |
| Der Ofen funktioniert nicht | Sörung der ElektroversorgungUnterbrechung der Stromzufuhr | Prüfen der Schutzvorrichtug n der häuslichen Leitung. Wenn fehlerhaft - ersetzenErneut die aktuelle Zeit auf dem Display einstellen und den Herd in Betrieb nehmen | Духовка не работает | Нарушение электроснабженияПерерыв в подаче тока | Проверить предохранители домашней проводки. Неисправные - заменить новымиЗаново установить текущее время на дисплее и включить духовку |
| Auf dem Display blinken Nullen | Unterbrechung der Stromzufuhr | Erneut die aktuelle Zeit auf dem Display einstellen | На дисплее мигают нули | Перерыв в подаче тока | Заново установить текущее время |
| Die Ofenbeleutung funktioniert nicht | Sörung der ElektroversorgungDefekt der Lampe | Prüfen der Schutzvorrichtug n der häuslichen Leitung. Wenn fehlerhaft - ersetzenPrüfen, ob die Lampe der Ofenbeleuchtung intakt ist. Wenn fehlerhaft – ersetzen | Не действует освещение духовки | Нарушение электроснабженияДефект лампы | Проверить предохранители домашней проводки. Неисправные - заменить новымиПроверить исправность лампы освещения духовки. Неисправную заменить |
| Die Kontrollämp-chen leuten nicht | Sörung der ElektroversorgungDefekt der Lampe | Prüfen der Schutzvorrichtug n der häuslichen Leitung. Wenn fehlerhaft - ersetzenAn den Kundendienst wenden | Не горят контрольные лампы | Нарушение электроснабженияДефект лампы | Проверить предохранители домашней проводки. Неисправные - заменить новымиОбратиться в Сервисную службу |
| Die Uhr geht vor oder nach | Zu niedrige Spannung im Netz des Hauses | Die Spannung im Netz prüfen. Falls notwendig - die Spannung stabilisieren | Часы спешат или отстают | Низкое напряжение в домашней сети | Проверить напряжение в сети. При необходимости стабилизировать напряжение |
WICHTIG!!!
Wenn trotz der Empfehlungen die Probleme nicht beseitigt werden konnten – wenden Sie sich an den Kundendienst.
ВАЖНО!!!
Если несмотря на рекомендации проблему не удалось устранить – обратиться в Сервисную службу.
EN
RESPECT FOR THE ENVIRONMENT
The documentation provided with this oven has been printed on chlorine free bleached paper or recycled paper to show respect for the environment.
natural_image
Three chasing arrows forming a recycling symbol (no text or labels)The packaging has also been designed to avoid environmental impact. Packaging material is ecological and can be re-used or recycled.
By recycling the packaging, you will help save raw materials as well as reducing the bulk of domestic and industrial waste.
Disposing of the packaging
Please dispose of the packaging that came with your appliance in an environmentally friendly way. Recycling in this way saves on resources and cuts down on waste.

natural_image
Symbolic illustration of a trash bin with crossed lines indicating no waste or discharge (no text or labels)Disposing of old appliances
The symbol on the product or on its packaging indicates that this product may not be treated as household waste. Instead it shall be handed over to the applicable collection point for the recycling of electrical and electronic equipment.
By ensuring this product is disposed of correctly, you will help prevent potential negative consequences for the environment and human health, which could otherwise be caused by inappropriate waste handling of this product.
For more detailed information about recycling of this product, please contact your local city office, your household waste disposal service or the shop where you purchased the product.
DE
RU
UMWELTVERTRÄGLICHKEIT
Als Beitrag zum Umweltschutz wurde die Dokumentation zum diesen Geräts auf einem chlorfrein und gebleichten oder Recycling-Papier gedruckt.
Bei der Herstellung der Verpackung wurde auf die Umweltverträglichkeit Wert gelegt. Die Verpackung kann gesammelt oder recycelt werden, da es sich um ein umweltschonendes Material handelt.
Durch Recycling der Verpackung wird zur Reduzierung des Rohstoffverbrauchs und des Volumens von Industrie- und Hausmüll beigetragen.
ОХРАНА ОКРУЖАЮЩЕЙ СРЕДЫ
В качестве вклада в охрану окружающей среды, вся документация к этому устройству была напечатана на отбеленной, не содержащей хлора или на пригодной ко вторичной переработке бумаге.
При изготовлении упаковки был сделан акцент на соблюдение норм по охране окружающей среды. Она также может быть вторично переработана, поскольку изготовлена из безвредных для окружающей среды материалов.
Возможность переработки упаковочного материала значительно снижает как потребление природно -сырьевых ресурсов, так и образование промышленного и бытового мусора.
Verpackungsentsorgung
Entsorgen Sie die Transportverpackung möglichst umweltgerecht.
Recycling von Verpackungsmaterialien spart die Rohstoffe und verringert die Abfallsmenge.
Утилизация упаковки
Утилизируйте упаковку по возможности более экологично.
Вторичная переработка материалов для упаковки экономит сырье и уменьшает количество мусора.
Entsorgung der Altgeräte
Das Symbol auf dem Produkt oder seiner Verpackung weist darauf hin, dass dieses Produk kein normaler Haushaltsabfall ist. Es soll an einem Sammelpunkt für das Recycling von elektrischen und elektronischen Geräten abgegeben werden.
Durch Ihren Beitrag zur korrekten Entsorgung dieses Produkts schützen Sie die Umwelt und die Gesundheit Ihrer Mitmenschen. Umwelt und Gesundheit werden durch die falsche Entsorgung gefährdet.
Weitere Informationen über das Recycling dieses Produkts erhalten Sie von Ihrem Rathaus, Ihrer Müllabfuhr oder dem Geschäft, in dem Sie das Produkt gekauft haben.
Утилизация старых приборов
Такой символ на продукте или его упаковке указывает на то, что этот продукт, по приходу в негодность, нельзя рассматривать как обычный домашний мусор, его следует сдать в пункт сбора электрических и электронных устройств, для их вторичной переработки.
Вашим взносом в правильную утилизацию этого продукта Вы защищаете окружающую среду и здоровье Ваших ближних. Неправильная утилизация угрожает окружающей среде и здоровью.
Дальнейшие сведения о вторичной переработке этого продукта Вы можете получить в городской администрации, службе вывоза мусора или в магазине, в котором Вь купили этот продукт.

natural_image
Blank gray image with no visible content, text, or symbols
natural_image
Blank gray image with no visible content, text, or symbols
natural_image
Blank gray image with no visible content, text, or symbols
natural_image
Blank gray image with no visible content, text, or symbols
natural_image
Blank gray image with no visible content, text, or symbols| □ | □ |
| □ | □ |
| □ | □ |
| □ | □ |
| □ | □ |

ELESCO EUROPA GmbH
The Service Solution Company
Langer Acker 35, 30900 Wedemark, Deutschland
Tel.: +49 (0) 511-5151 3370
Fax.: +49 (0) 511 5343 0910
E-Mail: kaiser@elesco-europa.com
Internet: www.elesco-europa.com


ESECO
Service Center – Haushaltsgeräte
Wienerbergstr. 11/12 A, 1100 Wien, Austria
Tel.: +43 (0) 1 596 7946
Fax.: +43 (0) 1 596 7946 15
E-Mail: office@eseco.at
Internet: www.eseco.at


SFG
Societe Francaise de Garantie
Impasse Evariste Galois CS 30001
13106 Rousset Cedex France
Tel.: +33 (0) 488 788 900
Fax.: +33 (0) 488 785 901
E-Mail: kaiser@sfg.fr
Internet: www.sfg.fr


USP
Universal Service Provider s.r.l.
Via T .Tasso, 5 - 20825 Barlassina - MB-Italy
Tel.: +39 (0) 02-836 23612
E-Mail: servicekaiser@uspitaly.it
Internet: www.uspitaly.it


ELESCO EUROPA GmbH
Langer Acker 35, 30900 Wedemark, Deutschland
Tel.: +49 (0) 511 1659 5257
E-Mail: kaiser-nl@elesco-europa.com
Internet: www.elesco-europa.com


Представительство Kaiser в России по сервисному обслуживанию и работе с потребителями
Почтовый адрес: 127238, г. Москва, АЯ 46
Тел.: 8-800-500-69-65, 8 (499) 110-79-23
E-Mail: service@kaiser.ru
Internet: http://kaiser.ru


Представництво Kaiser в Україні по сервісному обслуговуванню та роботі зі споживачами
Тел.: (044) 331-50-77, 331-50-78, 496-55-44
Факс: (044) 391-03-00

GARANTIEKARTE
WARRANTY CARD
CARTE DE GARANTIE
ГАРАНТИЙНЫЙ ТАЛОН
ГАРАНТІЙНИЙ ТАЛОН
EG-Konformitätserklärung / EG Declaration of Conformity
Hersteller / Manufacturer:
OLAN-Haushaltsgeräte e.K.
Adresse / Address: 13437 Berlin Germany
Eichborndamm 277
Hiermit wird bestätigt, dass alle El.Backöfen This is to confirm that all electric ovens
Marke / Brand :

Typ/ Type: EH 47...*
... = Laufnummer des Modelles / model number * = Farbe / colour
den Vorschriften der Europäischen Richtlinien entsprechen. comply with the regulations of the European Directives.
Die Übereinstimmung des bezeichneten Produktes mit: The conformity of the designated product with:
- den Vorschriften der Europäischen Richtlinien 2014/35/EU: LVD (Low Voltage Directive) und CE 2014/30/EU: EMC (Electromagnetic Compatibility);
the regulations of the European Directives2014/35/EU: LVD (Low Voltage Directive) and CE 2014/30/EU: EMC (Electromagnetic Compatibility);
- der Verordnung (EU) Nr. 65/2014 der Kommission vom 1. Oktober 2013 zur Ergänzung der Richtlinie 2010/30/EU des Europäischen Parlaments und des Rates im Hinblick auf die Energieverbrauchskennzeichnung von Haushaltsbacköfen und Dunstabzugshauben;
Commission Regulation (EU) No 65/2014 of 1. October 2013 supplementing Directive2010/30/EU of the European Parliament and of the Council with regard to the energy labelling of domestic ovens and range hoods;
- der Verordnung (EU) № 66/2014 der Kommission vom 14. Januar 2014 zur Durchführung der Richtlinie 2009/125/EG des Europäischen Parlaments und des Rates im Hinblick auf die Festlegung von Anforderungen an die umweltgerechte Gestaltung von Haushaltsbacköfen, Kochmulden und Dunstabzugshauben
Commission Regulation (EU) No 66/2014 of 14. January 2014 implementing Directive 2009/125/EC of the European Parliament and of the Council with regard to ecodesign requirements for domestic ovens, hobs and range hoods
wird durch die vollständige Einhaltung folgender harmonisierter Europäischen Normen nachgewiesen:
is demonstrated by full compliance with the following European standards:
| EN 60335-2-6:2015 |
| EN 62233:2008 |
| EN 55014-1:2017 |
| EN 55014-2:2015 |
| EN 61000-3-2:2019 |
| EN 61000-3-3:2013+A1:2019 |
Berlin, 12.11.2021
N. Liskovoj
Abteilungsleiter/ Department Manager
Verringerung der Umweltauswirkungen
Informationen zur Verringerung der Umweltauswirkungen beim Kochen sowie zur zerstörungsfreien Demontage
Für die Ermittlung der Ergebnisse sowie gemäß den Anforderungen an die Kennzeichnung in Bezug auf den Energieverbrauch und in Bezug auf die Anforderungen an das Ökodesign wurden folgende Berechnungs- und Messmethoden angewandt: Richtlinien des Europäischen Parlaments und des Rates – Verordnung (EU) Nr. 65/2014 und Nr. 66/2014.
EN 50564:2011 - Elektrische und elektronische Haushalts- und Bürogeräte - Messung niedriger Leistungsaufnahmen.
Informationen zur Verringerung der Umweltauswirkung (z. B. des Energieverbrauchs) beim Kochen nach Anhang I, Nr. 2 der Verordnung (EU) Nr. 66/2014 im Hinblick auf die Festlegung von Anforderungen an die umweltgerechte Gestaltung von Haushaltsbacköfen, Kochmulden und Dunstabzugshauben.
- Benutzen Sir Backformen und –bleche mit dunklen und matten Oberflächen, weil sie die Wärme besser leiten
- Öffnen Sie die Backofentür während des Garvorgangs nur, wenn es nötig ist
- Heizen Sie den Garraum nur vor, wenn es gemäß Rezept nötig ist
- Wählen Sie bei Gartemperaturen immer die niedrigste empfohlene Temperatur
- Schalten Sie den Backofen kurz vor dem Ende der Garzeit auf Minimaltemperatur, um die Restwärme zu nutzen
- Um die Energieeffizienz zu gewährleisten, schalten Sie bei Nichtgebrauch des Backofens alle Tasten (Temperatur, Innenbeleuchtung und Programm) auf „0/Aus“
- Entfernen Sie Verschmutzungen sofort, sonst kann sich der Reinigungsaufwand erhöhen
- Verwenden Sie zum Reinigen des Backofens biologische Reiniger
Informationen an professionelle Nutzer zur Demontage nach Anhang I, Nr. 2 der Verordnung (EU) Nr. 66/2014
Informationen zur zerstörungsfreien Demontage zu Wartungszwecken
- Eine Demontage zu Wartungszwecken kann nur für die Backofentür durchgeführt werden (siehe Kapitel „Ausbauen der Backofentür“ S.71).
- Eine Demontage zu Wartungszwecken ist nicht vorgesehen.
- Für die Reparatur und den Austausch von defekten Teilen, wenden Sie sich bitte an den Kundendienst.
- Akkumulatoren sind nicht enthalten.
Informationen zur Demontage in Bezug auf Recycling, Rückgewinnung und Entsorgung am Ende der Lebensdauer des Gerätes.
• Die Demontage bei Geräten mit Gasanschluss darf nur von einem konzessionierten Gas- und Wasserinstallateur vorgenommen werden
- Die Demontage bei Geräten mit Elektroanschluss sollte durch einen konzessionierten Elektroinstallateur vorgenommen werden.
Für das Recycling und die Rückgewinnung von Ressourcen geben Sie das Gerät an:
- eine kommunale Sammelstelle der öffentlich-rechtlichen Entsorgungsträger
- einen herstellereigenen Entsorgungsbetrieb, der ein Rücknahmesystem anbietet
- einen ortsansässigen Elektrohändler, der freiwillig Elektrogeräte zurücknimmt.
Die Angaben zum Energieeffizienzindex je Garraum, zur Masse des Gerätes, zur Anzahl der Garräume, zur Wärmequelle je Garraum und zum Volumen je Garraum entnehmen Sie bitte dem der Gebrauchsanweisung beigefügten Datenblatt.
Reduction of environmental impact
Information on reducing the environmental impact from cooking and non-destructive disassembly.
The following calculation and measurement methods were used to determine the results and in accordance with the requirements for labeling in terms of energy consumption and in terms of ecodesign requirements: Directives of the European Parliament and of the Council - Regulation (EU) No. 65/2014 and No. 66/2014.
EN 50564:2011 - Electrical and electronic household and office equipment - Measurement of low power consumption.
Information on reducing the environmental impact (e.g. energy consumption) from cooking in accordance with Annex I, No. 2 of Regulation (EU) No. 66/2014 with a regard to setting ecodesign requirements for household ovens, hobs and cooker hoods.
- Use baking pans and trays with dark and matte surfaces, because they conduct heat better
- Open the oven door during cooking only when necessary
- Preheat the cooking chamber only when necessary according to the recipe
• Always select the lowest recommended temperature for cooking temperatures - Switch the oven to minimum temperature shortly before the end of the cooking time to use the residual heat
- To ensure energy efficiency, switch all buttons (temperature, interior light and program) to "0/Off" when the oven is not in use
- Remove any soiling immediately, otherwise the cleaning effort may increase
- Use biological cleaners to clean the oven
Information for professional users for dismantling according to Annex I, No. 2 of Regulation (EU) No. 66/2014
Information on non-destructive disassembly for maintenance purposes
- Disassembly for maintenance purposes can only be performed for the oven door (see chapter "Disassembling the oven door" p.71).
- Disassembly for maintenance purposes is not foreseen.
- For repair and replacement of defective parts, please contact the customer service.
• Accumulators are not included.
Disassembly information related to recycling, recovery and disposal at the end of the life of the device.
- Dismantling of devices with gas connection may only be carried out by a licensed gas and water installer.
- Dismantling of devices with electrical connection should be performed by a licensed electrician.
For recycling and resource recovery, specify the device:
- municipal collection point run by the public waste disposal authorities
- manufacturer's own waste disposal company that offers a take-back system
- local electrical retailer who voluntarily takes back electrical equipment.
For information on the energy efficiency index for each oven compartment, the dimensions of the appliance, the number of oven compartments, the heat source per oven compartment and the volume per oven compartment please refer to the data sheet, attached to the user manual.

natural_image
Four parallel horizontal black lines on white background, no text or symbols present
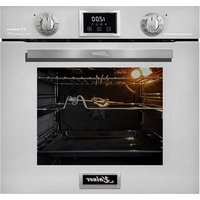
- Kaiser®
- EN
- DEAR CUSTOMERS,
- LIEBE KUNDIN, LIEBER KUNDE,
- Kaiser OLAN-Haushaltsgeräte Berlin Germany
- УВАЖАЕМЫЙ ПОКУПАТЕЛЬ,
- CONTENTS
- SAFETY INSTRUCTIONS 6
- INSTALLATION INSTRUCTIONS 14
- BRIEF DESCRIPTION 18
- EQUIPMENT 22
- USAGE 28
- Touch control
- DE
- INHALTSVERZEICHNIS
- SICHERHEITSHINWEISE 7
- FÜR DEN INSTALLATEUR 15
- KURZBESCHREIBUNG 19
- AUSSTATUNG 23
- BENUTZUNG 29
- PRAKTISCHE EMPFEHLUNGEN 43
- PFLEGE UND WARTUNG 51
- UMWELTVERTRÄGLICHKEIT
- RU
- ОГЛАВЛЕНИЕ
- ТЕХНИКА БЕЗОПАСНОСТИ 7
- ИНСТРУКЦИЯ ПО МОНТАЖУ 15
- КРАТКОЕ ОПИСАНИЕ 19
- ОБОРУДОВАНИЕ 23
- ИСПОЛЬЗОВАНИЕ 29
- ПРАКТИЧЕСКИЕ СОВЕТЫ 43
- ОБСЛУЖИВАНИЕ И УХОД 51
- ОХРАНА ОКРУЖАЮЩЕЙ СРЕДЫ 61
- SAFETY INSTRUCTIONS
- SICHERHEITSHINWEISE
- ТЕХНИКА БЕЗОПАСНОСТИ
- TECHNICAL SAFETY
- TECHNISCHE SICHERHEIT
- ТЕХНИЧЕСКАЯ БЕЗОПАСНОСТЬ
- TERMS OF USE
- NUTZUNGSBEDINGUNGEN
- ПРАВИЛА ЭКСПЛУАТАЦИИ
- CHILD SAFETY
- KINDERSICHERHEIT
- БЕЗОПАСНОСТЬ ДЕТЕЙ
- INSTALLATION INSTRUCTIONS
- ELECTRICAL CONNECTION
- FÜR DEN INSTALLATEUR
- STROMANSCHLUSS
- ИНСТРУКЦИЯ ПО МОНТАЖУ
- ПОДКЛЮЧЕНИЕ К ЭЛЕКТРОСЕТИ
- INSTALLATION OF THE OVEN
- PREPARATION
- Important!!!
- EINBAU DES BACKOFENS
- VORBEREITUNG
- Wichtig!!!
- УСТАНОВКА
- ПОДГОТОВКА
- Важно!!!
- BRIEF DESCRIPTION
- LOCATION DRAWING
- BUILT-IN OVENS
- Arrangement of functional assemblies
- KURZBESCHREIBUNG
- GESAMTANSICHT
- EINBAU-BACKÖFEN
- КРАТКОЕ ОПИСАНИЕ
- ВНЕШНИЙ ВИД
- ВСТРАИВАЕМЫЕ ДУХОВЫЕ ШКАФЫ
- Anordnung von Funktionsbaugruppen
- Размещение функциональных узлов
- CONTROL PANEL
- Model range with sensor control Touch control
- BEDIENBLENDE
- ПАНЕЛЬ УПРАВЛЕНИЯ
- Modellreihe mit Sensorbedienung Touch control
- Модельный ряд с электронным сенсорным управлением Touch control
- EQUIPMENT
- MULTIFUNCTION OVEN CONTROL
- AUSSTATUNG
- STEUERUNG VON MULTIFUNKTIONS- BACKOFEN
- ОБОРУДОВАНИЕ
- УПРАВЛЕНИЕ РАБОТОЙ МНОГОФУНКЦИОНАЛЬНОГО ДУХОВОГО ШКАФА
- OPERATION FUNCTIONS OF THE OVEN
- CONVENTIONAL COOKING
- FAN COOKING
- DEFROSTING
- GRILL COOKING
- BETRIEBSFUNKTIONEN DES BACKOFENS
- KONVENTIONELLES BACKEN
- UMLUFTBACKEN
- AUFTAUEN
- GRILLEN
- РАБОЧИЕ ФУНКЦИИ ДУХОВОГО ШКАФА
- ОБЫЧНОЕ ПРИГОТОВЛЕНИЕ
- ПРИГОТОВЛЕНИЕ С ОБДУВОМ
- ОТТАИВАНИЕ
- ГРИЛЬ
- ROTISSERIE (if available)
- PREPARING OF THE FOOD ON THE SPIT
- COOLING FAN
- DREHSPIEß (wenn verfügbar)
- GRILLEN AM DREHSPIEB
- KÜHLVENTILATOR
- ВЕРТЕЛ (если доступно)
- ПРИГОТОВЛЕНИЕ НА ВЕРТЕЛЕ
- ОХЛАЖДАЮЩИЙ ВЕНТИЛЯТОР
- OVEN LIGHT
- USAGE
- INNENBELEUCHTUNG
- ОСВЕЩЕНИЕ ДУХОВКИ
- BENUTZUNG
- ИСПОЛЬЗОВАНИЕ
- DIGITAL CLOCK TIMER WITH SENSOR Touch control
- Setting the clock
- ELEKTRONISCHE ZEITSCHALUHR MIT SENSOR-BEDIENUNG Touch control
- Uhrzeiteinstellung
- СЕНСОРНОЕ ЭЛЕКТРОННОЕ ПРОГРАММИРУЮЩЕЕ УСТРОЙСТВО Touch control
- Установка текущего времени
- Electronical countdown timer
- Elektronischer Kurzzeitwecker
- Электронный минутник
- Setting the cooking time
- Einstellen der Betriebsdauer
- Установка продолжительности приготовления
- Setting the end of cooking time
- Einstellen der Ausschaltzeit
- Установка времени окончания приготовления
- Setting cooking duration and end times
- Einstellen der Betriebsdauer und Ausschaltzeit
- Установка продолжительности и времени окончания приготовления
- PRACTICAL ADVICES
- Baking
- PRAKTISCHE EMPFEHLUNGEN
- Backen
- ПРАКТИЧЕСКИЕ СОВЕТЫ
- Выпечка кондитерских изделий
- Roasting and Stewing of meat
- Braten und Schmoren von Fleisch
- Жарение и тушение мяса
- CARE AND ATTENDANCE
- Replacement the oven light
- PFLEGE UND WARTUNG
- ОБСЛУЖИВАНИЕ И УХОД
- Austausch der Ofenbeleuchtung
- Замена лампы освещения духовки
- Oven
- Self-cleaning catalytic panels (if available)
- Backofen
- Духовой шкаф
- Selbstreinigende katalytische Platten (falls vorhanden)
- Самоочищающиеся каталитические пластины (если имеется)
- Telescope (if available)
- Removing the oven door
- Teleskop (falls vorhanden)
- Ausbauen der Ofentür
- Телескоп (если имеется)
- Демонтаж дверцы духовки
- Alternate inspection
- What to do, if?
- Periodische Besichtigung
- Was ist, wenn?
- Периодический осмотр
- Что делать, если?
- RESPECT FOR THE ENVIRONMENT
- Disposing of the packaging
- Disposing of old appliances
- ОХРАНА ОКРУЖАЮЩЕЙ СРЕДЫ
- Verpackungsentsorgung
- Утилизация упаковки
- Entsorgung der Altgeräte
- Утилизация старых приборов
- ELESCO EUROPA GmbH
- ESECO
- SFG
- USP
- GARANTIEKARTE
- WARRANTY CARD
- CARTE DE GARANTIE
- EG-Konformitätserklärung / EG Declaration of Conformity
- Verringerung der Umweltauswirkungen
- Informationen zur zerstörungsfreien Demontage zu Wartungszwecken
- Reduction of environmental impact
Marque : Kaiser
Modèle : EH 4747
Catégorie : Four