
Explore 2 EXP-6510 - Écran tactile Legamaster - Notice d'utilisation et mode d'emploi gratuit
Retrouvez gratuitement la notice de l'appareil Explore 2 EXP-6510 Legamaster au format PDF.


| Type de produit | Tableau blanc interactif |
| Marque | Legamaster |
| Modèle | Explore 2 EXP-6510 |
| Dimensions (L × H × P) | 120 cm × 90 cm × 3 cm |
| Surface active | 114 cm × 86 cm |
| Poids | 15 kg |
| Alimentation | USB 5 V ou adaptateur secteur 5 V / 2 A |
| Connexion | USB 2.0 (câble fourni) |
| Technologie tactile | Infrarouge |
| Nombre de points tactiles | 4 points simultanés |
| Fonctions principales | Écriture, annotation, projection interactive, reconnaissance de gestes |
| Entretien et nettoyage | Nettoyer avec un chiffon doux et sec. Éviter les produits abrasifs. |
| Sécurité | Fixation murale obligatoire. Ne pas exposer à l'humidité. |
| Pièces détachées et réparabilité | Stylos tactiles, câble USB, support de fixation disponibles en option. |
| Température de fonctionnement | 0°C à 40°C |
| Humidité relative | 20 % à 80 % (sans condensation) |
| Logiciel compatible | Windows, macOS, Linux (via pilotes standard) |
| Contenu de la boîte | Tableau blanc interactif, câble USB 2 m, 2 stylos, kit de fixation murale, manuel d'utilisation |
| Garantie | 2 ans |
FOIRE AUX QUESTIONS - Explore 2 EXP-6510 Legamaster
Questions des utilisateurs sur Explore 2 EXP-6510 Legamaster
0 question sur cet appareil. Repondez a celles que vous connaissez ou posez la votre.
Poser une nouvelle question sur cet appareil
Téléchargez la notice de votre Écran tactile au format PDF gratuitement ! Retrouvez votre notice Explore 2 EXP-6510 - Legamaster et reprennez votre appareil électronique en main. Sur cette page sont publiés tous les documents nécessaires à l'utilisation de votre appareil Explore 2 EXP-6510 de la marque Legamaster.
MODE D'EMPLOI Explore 2 EXP-6510 Legamaster

Explore EXP 10 Series Touch monitor Integrationshandbuch
English
Deutsch
Nederlands
Français
Español
Inhaltsübersicht
01 TECHNISCHE DATEN 3
1.1 UNTERSTÜTZTE TAKTFREQUENZEN 4
02 SERIELLE KOMMUNIKATION 5
2.1 RS-232-ANSCHLUSS UND PORT-KONFIGURATION 5
03 ABMESSUNGEN 7
3.1 EXP-6510 7
3.2 EXP-7510 8
3.3 EXP-8610 9
3.4 VERPACKUNG 10
TECHNISCHE DATEN
1. TECHNISCHE DATEN
| PRODUKT SPEZIFIKATIONEN | |||
| Bilddiagonale | 65" | 75" | 86" |
| Display Technologie | LED LCD | LED LCD | LED LCD |
| Display Auflösung | 3840 x 2160 | 3840 x 2160 | 3840 x 2160 |
| Helligkeit | 400 cd/m2 | 400 cd/m2 | 400 cd/m2 |
| Kontrastverhältnis | 5000:1 | 5000:1 | 5000:1 |
| Reaktionszeit | 8ms | 8ms | 8ms |
| Bildfrequenz | 60Hz | 60Hz | 60Hz |
| Betrachtungswinkel | 178° | 178° | 178° |
| Unterstützte Farben | 1.07G | 1.07G | 1.07G |
| Hintergrundbeleuchtung | Direct LED | Direct LED | Direct LED |
| Lebensdauer | 50.000 Std. | 50.000 Std. | 50.000 Std. |
| Bildschirmausrichtung | Querformat | Querformat | Querformat |
| Betriebssystem | nein | nein | nein |
| Touch-Technologie | IR | IR | IR |
| Anzahl Berührungspunkte | 40 | 40 | 40 |
| Reaktionszeit | <= 5ms | <= 5ms | <= 5ms |
| Mindest-Eingabegröße | 1mm | 1mm | 1mm |
| USB-C x1, USB-A 2.0 x1, USB 3.0 x3, HDMI 2.0 x3, RS-232, Touch USB-B x2, Audio in mini jack x1 | |||
| Eingangsanschlüsse | |||
| Ausgangsanschlüsse | |||
| OPS-Steckplatz | |||
| Wi-Fi Modul | |||
| Lautsprecher | |||
| VESA 100x100 | |||
| Glas | |||
| Glas Beschichtung | AG + AF - Blendschutzbeschichtung + Antifingerabdruckbeschichtung | ||
| Stromversorgung | AC 100-240V 50/60Hz | ||
| Anwesenheitssensor | Optional | ||
| Betriebstemperatur | 0 – 40°C | 0 – 40°C | 0 – 40°C |
| Betrieb Luftfeuchtigkeit | 35 – 85% RH (No Cond.) | 35 – 85% RH (No Cond.) | 35 – 85% RH (No Cond.) |
| VESA Standard | 600 x 400 | 800 x 600 | 800 x 600 |
TECHNISCHE DATEN
1.1 UNTERSTÜTZTE TAKTFREQUENZEN
| HDMI Taktungen | Type-C Taktungen | ||
| 1 | 640x480/60Hz | 1 | 640x480/60Hz |
| 2 | 640x480/75Hz | 2 | 640x480/75Hz |
| 3 | 720x576P/50Hz | 3 | 720x576P/50Hz |
| 4 | 720x480P/60Hz | 4 | 720x480P/60Hz |
| 5 | 800x600/60Hz | 5 | 800x600/60Hz |
| 6 | 800x600/75Hz | 6 | 800x600/75Hz |
| 7 | 1024x768/60Hz | 7 | 1024x768/60Hz |
| 8 | 1024x768/75Hz | 8 | 1024x768/75Hz |
| 9 | 1280x960/60Hz | 9 | 1280x960/60Hz |
| 10 | 1280x1024/60Hz | 10 | 1280x1024/60Hz |
| 11 | 1280x1024/75Hz | 11 | 1280x1024/75Hz |
| 12 | 1600x1200/60Hz | 12 | 1600x1200/60Hz |
| 13 | 1280x720P/50Hz | 13 | 1280x720P/50Hz |
| 14 | 1280x720P/60Hz | 14 | 1280x720P/60Hz |
| 15 | 1920x1080I/50Hz | 15 | 1920x1080I/50Hz |
| 16 | 1920x1080I/60Hz | 16 | 1920x1080I/60Hz |
| 17 | 1920x1080P/50Hz | 17 | 1920x1080P/50Hz |
| 18 | 1920x1080P/60Hz | 18 | 1920x1080P/60Hz |
| 19 | 3840x2160/30Hz | 19 | 3840x2160/30Hz |
| 20 | 3840x2160/60Hz | 20 | 3840x2160/60Hz |
Integrationshandbuch - Version
1.0
SERIELLE KOMMUNIKATION
2. SERIELLE KOMMUNIKATION
Der Monitor verwendet ein einfaches textbasiertes Steuerprotokoll, mit dessen Hilfe Anfragen von Steuerungsgeräten angenommen und Antworten an diese Geräte zurückgegeben werden. In diesem Abschnitt wird beschrieben, wie Steuermeldungen über eine serielle Verbindung zwischen dem Monitor und einem Automations-/Steuersystem oder einem PC gesendet werden, auf dem ein Terminalemulationsprogramm wie Windows® HyperTerminal oder Tera Term läuft.
2.1 RS-232-ANSCHLUSS UND PORT-KONFIGURATION
Schließen Sie Ihr Steuersystem oder den PC an den RS-232-Eingang des Monitors an.
Konfigurieren Sie den RS-232-Controller oder den seriellen Port des PCs wie folgt:
- Baud rate: 9600 (as a default), können Sie diesen Parameter auch auf dem Bildschirm konfigurieren.
- 8bit
- non parity
- 1 stop bit
| Direct Input Commands | ||
| Mode | Code | Description |
| POWER OFF | 02 50 57 44 3A 30 30 30 03 | Power ON Direct Command |
| POWER ON | 02 50 57 44 3A 30 30 31 03 | Power OFF Direct Command |
| PC | 02 49 4E 50 3A 30 30 34 03 | Input Switch to OPS Command |
| HDMI 1 | 02 49 4E 50 3A 30 30 38 03 | Input Switch to HDMI 1 Command |
| HDMI 2 | 02 49 4E 50 3A 30 30 39 03 | Input Switch to HDMI 2 Command |
| HDMI 3 | 02 49 4E 50 3A 30 31 30 03 | Input Switch to HDMI 3 Command |
| USB C1 | 02 49 4E 50 3A 30 31 36 03 | Input Switch to USB C Side Command |
| AUDIO ONLY | 02 49 4E 50 3A 30 31 37 03 | Input Switch to Audio Only |
| e-Screen Control Commands | ||
| Mode | Code | Description |
| CMD BLU OFF | 02 42 4C 54 3A 30 30 30 03 | Turn Backlight OFF Command |
| CMD BLU ON | 02 42 4C 54 3A 30 30 31 03 | Turn Backlight ON Command |
| CMD SET VOL | 02 56 4F 4C 3A 30 30 31 03 | Set Volume to 001 Ex: 02 56 4F 4C 3A 3X 3X 3X 03 |
| CMD SET MUTE | 02 4D 55 54 3A 30 30 31 03 | Activate MUTE Command |
SERIELLE KOMMUNIKATION
| Remote Control Key Commands | ||
| Mode | Code | Description |
| R.KEY VOLUMEUP + | 02 4B 45 59 3A 30 31 32 03 | Remote Control Volume Key + |
| R.KEY VOLUMEDOWN - | 02 4B 45 59 3A 30 31 33 03 | Remote Control Volume Key - |
| REMOTE KEY MENU | 02 4B 45 59 3A 30 31 34 03 | Remote Control Menu Key |
| REMOTE KEY SELECT | 02 4B 45 59 3A 30 31 35 03 | Remote Control Select Key |
| REMOTE KEY EXIT | 02 4B 45 59 3A 30 31 36 03 | Remote Control Exit Key |
| REMOTE KEY UP | 02 4B 45 59 3A 30 31 37 03 | Remote Control UP Key |
| REMOTE KEY DOWN | 02 4B 45 59 3A 30 31 38 03 | Remote Control DOWN Key |
| REMOTE KEY LEFT | 02 4B 45 59 3A 30 31 39 03 | Remote Control LEFT Key |
| REMOTE KEY RIGHT | 02 4B 45 59 3A 30 32 30 03 | Remote Control RIGHT Key |
| REMOTE KEY INPUT | 02 4B 45 59 3A 30 32 32 03 | Remote Control Input Key |
| REMOTE KEY MUTE | 02 4B 45 59 3A 30 32 33 03 | Remote Control MUTE Key |
| REMOTE KEY INFO | 02 4B 45 59 3A 30 32 34 03 | Remote Control INFO Key |
| R.KEY FREEZE | 02 4B 45 59 3A 30 33 35 03 | Remote Control Freeze Tool Key |
| R.KEY BACKLIGHT UP + | 02 4B 45 59 3A 31 31 38 03 | Remote Control Backlight Key + |
| R.KEY BACKLIGHT DOWN - | 02 4B 45 59 3A 31 31 39 03 | Remote Control Backlight Key - |
| REMOTE KEY RETURN | 02 4B 45 59 3A 30 33 31 03 | Remote Control Return/Back Key |
Integrationshandbuch - Version 1.0
ABMESSUNGEN
3.1 EXP-6510
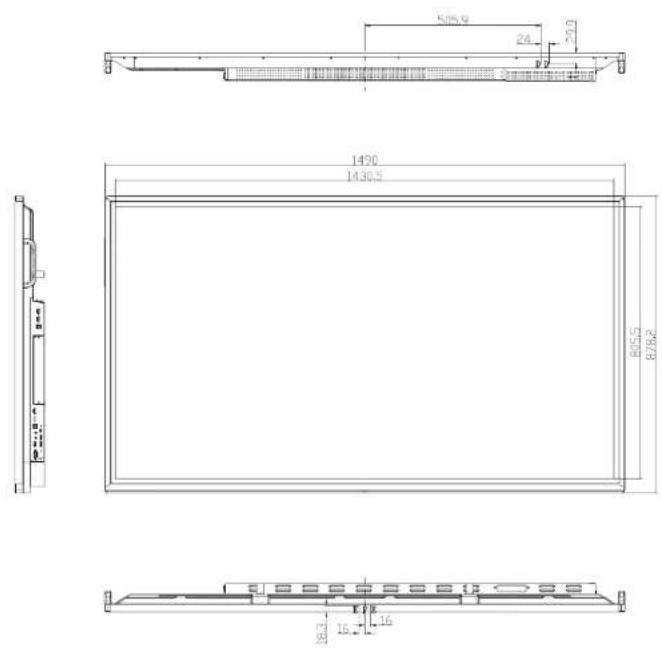


ABMESSUNGEN
3.2 EXP-7510


Integrationshandbuch - Version 1.0
ABMESSUNGEN
3.3 ETX-8610

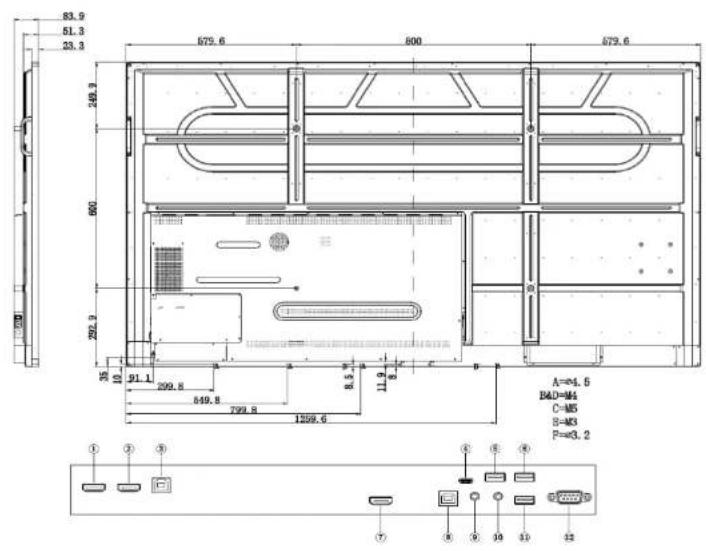
Integrationshandbuch - Version 1.0
ABMESSUNGEN
3.4 VERPACKUNG
| Pos. | Beschreibung | Menge |
| 1 | Bildschirm | 1 |
| 2 | Antistatische Hülle | 1 |
| 3 | EPE-Polster Unten | 1 |
| 4 | EPE-Polster oben | 1 |
| 5 | Karton Unterteil | 1 |
| 6 | Eckplatte | 4 |
| 7 | Zubehörtasche | 1 |
| 8 | Karton | 1 |
| 9 | Karton-Verschluss | 4 - 6 |
| EXP-6510 | |
| Produktabmessungen | 1490 x 878 x 83.7 (mm) |
| Verpackung | 1615 x 1000 x 230 (mm) |
| Nettogewicht | 37 (kg) |
| Bruttogewicht | 48 (kg) |
| EXP-7510 | |
| Produktabmessungen | 1714 x 1005 x 83.7(mm) |
| Verpackung | 1839 x 1127 x 230 (mm) |
| Nettogewicht | 49 (kg) |
| Bruttogewicht | 64 (kg) |
| EXP-8610 | |
| Produktabmessungen | 1959.1 x 1143 x 83.7(mm) |
| Verpackung | 2084 x 1264 x 230 (mm) |
| Nettogewicht | 59 (kg) |
| Bruttogewicht | 75 (kg) |


Integrationshandbuch - Version
1.0
Marque : Legamaster
Modèle : Explore 2 EXP-6510
Catégorie : Écran tactile