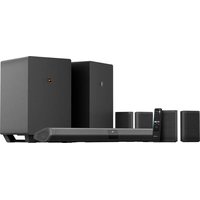
Shockwafe Ultra 9.2 eARC - Haut-parleur NAKAMICHI - Notice d'utilisation et mode d'emploi gratuit
Retrouvez gratuitement la notice de l'appareil Shockwafe Ultra 9.2 eARC NAKAMICHI au format PDF.


| Type de produit | Barre de son avec caisson de basses sans fil |
| Marque | Nakamichi |
| Modèle | Shockwafe Ultra 9.2 eARC |
| Canaux audio | 9.2 canaux (9 haut-parleurs + 2 caissons de basses) |
| Puissance totale | 1000 W RMS |
| Connectivité | HDMI eARC, 2 entrées HDMI, optique, Bluetooth, USB |
| Formats audio | Dolby Atmos, DTS:X, Dolby TrueHD, DTS-HD Master Audio |
| Caisson de basses | Sans fil, 2 caissons de 10 pouces (254 mm) |
| Dimensions barre de son | 1200 x 70 x 120 mm |
| Dimensions caisson (unité) | 450 x 400 x 450 mm |
| Poids barre de son | 6,5 kg |
| Poids caisson (unité) | 12 kg |
| Alimentation | 100-240 V, 50/60 Hz |
| Consommation électrique | 150 W (barre), 300 W (caissons) |
| Fonctions principales | Mode nuit, Dialogue Enhancer, égaliseur personnalisable, télécommande |
| Entretien et nettoyage | Nettoyer avec un chiffon doux et sec. Ne pas utiliser de produits liquides ou abrasifs. |
| Sécurité | Ne pas exposer à l'humidité ou à des températures extrêmes. Débrancher en cas d'orage. |
| Pièces détachées disponibles | Télécommande, câbles HDMI, adaptateurs secteur, caissons de basses |
| Réparabilité | Indice de réparabilité non communiqué, mais pièces disponibles sur le site du fabricant. |
| Informations générales | Barre de son 9.2 canaux avec double caisson de basses sans fil, compatible eARC et Dolby Atmos. |
FOIRE AUX QUESTIONS - Shockwafe Ultra 9.2 eARC NAKAMICHI
Questions des utilisateurs sur Shockwafe Ultra 9.2 eARC NAKAMICHI
0 question sur cet appareil. Repondez a celles que vous connaissez ou posez la votre.
Poser une nouvelle question sur cet appareil
Téléchargez la notice de votre Haut-parleur au format PDF gratuitement ! Retrouvez votre notice Shockwafe Ultra 9.2 eARC - NAKAMICHI et reprennez votre appareil électronique en main. Sur cette page sont publiés tous les documents nécessaires à l'utilisation de votre appareil Shockwafe Ultra 9.2 eARC de la marque NAKAMICHI.
MODE D'EMPLOI Shockwafe Ultra 9.2 eARC NAKAMICHI
USER MANUAL
Dolby
ATMOS

COMPATIBLE WITH
Dolby Vision
eARC
HOMI21
HDCP2.3

Bluetooth

Qualcomm
aptX HD

ONE-STOP SUPPORT SOLUTION
www.helpdesk.nakamichi-usa.com
SPEAK TO OUR NINJAS BASED IN CALIFORNIA
support@nakamichi-usa.com,(415)8056913
(Weekdays 10am - 6:45pm PST; Saturday, Holidays 10am - 5pm PST)
BE PART OF THE NAKAMICHI SHOCKWAFE COMMUNITY
www.community.nakamichi-usa.com
IMPORTANT SAFETY INSTRUCTIONS
Your Unit is designed and manufactured to operate within defined design limits, and misuse may result in electric shock or fire. To prevent your Unit from being damaged, the following rules should be observed for its installation, use and maintenance. Please read the following safety instructions before operating your unit. Keep these instructions in a safe place for future reference.
■ Read, keep and follow all instructions.
■ Heed all warnings.
■ Do not use apparatus near water.
■ Clean only with a dry cloth.
■ Do not block any ventilation openings. Install in accordance with the
■ manufacturer's instructions.
■ Do not install near any heat sources such as radiators, heat registers, stoves, or other apparatus (including amplifiers) that produce heat.
- Do not defeat the safety purpose of the polarized or grounding-type plug. A polarized plug has two blades with one wider than the other. A grounding type plug has two blades and a third grounding prong. The wide blade or the third prong are provided for your safety. If the provided plug does not fit into your outlet, consult an electrician for replacement of the obsolete outlet.
■ Protect the power cord from being walked on or pinched, particularly at plugs, convenience receptacles, and the point where they exit from the apparatus.
■ Only use attachments / accessories specified by the manufacturer.
■ Use only with the cart, stand, tripod, bracket, or table specified by the manufacturer, or sold with the apparatus. When a cart is used, use caution when moving the cart / apparatus combination to avoid injury from tipover.
■ Unplug this apparatus during lightning storms or when unused for long periods of time.
■ Refer all servicing to qualified service personnel. Servicing is required when the apparatus has been damaged in any way, such as when the power supply cord or plug is damaged, liquid has been spilled or objects have fallen into the apparatus, the apparatus has been exposed to rain or moisture, does not operate normally, or has been dropped.
■ To reduce the risk of electric shock or component damage, switch off the power before connecting other components to your Unit.
■ Unplug the power cord before cleaning your Unit. A damp cloth is sufficient for cleaning. Do not use a liquid or a spray cleaner on your Unit. Do not use abrasive cleaners.
■ Always use the accessories recommended by the manufacturer to ensure compatibility.
- When moving your Unit from an area of low temperature to an area of high temperature, condensation may form in the housing. Wait before turning on your Unit to avoid causing fire, electric shock, or component damage.
■ Slots and openings in the back and bottom of the cabinet are provided for ventilation. To ensure reliable operation of your Unit and to protect it from overheating, be sure these openings are not blocked or covered. Do not place your Unit in a bookcase or cabinet unless proper ventilation is provided.
■ Never push any objects into the slots and openings on your Unit enclosure. Do not place any objects on the top of your Unit. Doing so could short circuit parts causing a fire or electric shock. Never spill liquids on your Unit.
■ When connected to a power outlet, power is always flowing into your Unit. To totally disconnect power, unplug the power cord.
■ Do not overload power strips and extension cords. Overloading can result in fire or electric shock.
■ The wall socket should be located near your Unit and be easily accessible.
- Keep your Unit away from moisture. Do not expose your Unit to rain or moisture. If water penetrates into your Unit, unplug the power cord and contact your dealer. Continuous use in this case may result in fire or electric shock.
- Do not use your Unit if an abnormality occurs. If any smoke or odor becomes apparent, unplug the power cord and contact your dealer immediately. Do not try to repair your unit yourself.
- Avoid using dropped or damaged appliances. If your Unit is dropped and the housing is damaged, the internal components may function abnormally. Unplug the power cord immediately and contact your dealer for repair.
■ Continued use of your Unit may cause fire or electric shock. Do not install your Unit in an area with heavy dust or high humidity.
■ Operating your Unit in environments with heavy dust or high humidity may cause fire or electric shock.
■ Ensure that the power cord and any other cables are unplugged before moving your Unit.
■ When unplugging your Unit, hold the power plug, not the cord.
■ Pulling on the power cord may damage the wires inside the cord and cause fire or electric shock. When your Unit will not be used for an extended period of time, unplug the power cord.
■ To reduce risk of electric shock, do not touch the connector with wet hands.
■ Insert the remote control batteries in accordance with instructions.
■ Incorrect polarity may cause the battery to leak which can damage the remote control or injure the operator.
■ The marking label of the subwoofer was located on the external bottom enclosure of the product.
■ The equipment shall be used at maximum 95F ambient temperature. See the important note and rating located on the back of the unit.
■ WARNING - This equipment is not waterproof. To prevent a fire or
■ shock hazard, do not place any container filled with liquid near the equipment (such as a vase or flower pot) or expose it to dripping, splashing, rain or moisture.
To prevent injury, this apparatus must be securely attached to the
■ floor / wall in accordance with the installation instructions.
CAUTION - Danger of explosion or fire if batteries are mistreated.
■ Replace only with the same or specified type.
Do not leave the batteries exposed to direct sunlight for a long
■ period of time with doors and windows closed. Do not disassemble the batteries or dispose of it in fire.
Where the MAINS plug or appliance coupler is used as the
■ disconnect device, the disconnect device shall remain readily operable.
WARNING: To reduce the risk of fire or electric shock, do not expose this apparatus to rain or moisture.


This lightning flash with arrowhead symbol within an equilateral triangle is intended to alert user to the presence of not isolated dangerous voltage within the product that may be sufficient magnitude to constitute a risk of shock to persons.

The exclamation point within the equilateral triangle is to alert the user to the presence of important operating and servicing instructions in the literature accompanying the appliance.

Warning: This equipment is a Class II or double insulated electrical appliances. It has been designed in such way that it does not require a safety connection to electrical earth.
TABLE OF CONTENTS
1 Understanding your Soundbar System 4
Package Contents 4
Controls & Connections 5
2 Setting up your Home Theater 8
Speaker Placements 8
Connecting Surround Speakers to Subwoofers 11
Turning on your Soundbar System 12
Connecting your TV 13
Listening to your Soundbar 15
Setting up your TV 16
Connecting your Content Devices 17
Setting up your Content Devices 22
3 Understanding your Remote Control 23
Overview 24
Selecting Different Input Sources 25
Accessing Audio Presets 26
Accessing Channel Mapping / Upmixing 27
Accessing Setup Button 29
Accessing Room Size 30
Accessing SSE Max Mode 31
Accessing Info Mode 32
Saving Audio Settings to System Memory 33
4 Bluetooth Audio Streaming 34
5 Re-pairing Subwoofers with the System 35
6 Installing the Wall Mount 36
Mounting your Soundbar 36
Mounting your Surround Speakers 37
7 Firmware Upgrade 38
8 Specifications 39
9 Warranty Information & Support 40
10 Glossary 41
11 Legal & Compliance 42
12 Help & Troubleshooting 43
1 PACKAGE CONTENTS

Soundbar Main Unit x 1
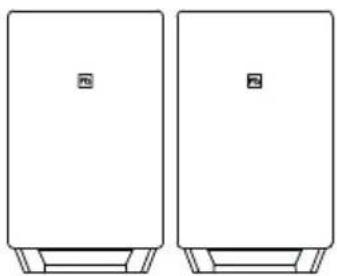
10" Wireless Subwoofers x 2

Surround Speakers x 4

Remote Control w/ Batteries x 1
Soundbar Power Cable x 1 Subwoofer Power Cables x 2 (Length: 5 ft. each)

Satellite Speaker Audio Cables x 4 (Length: 32.8 ft. each)

HDMI 2.1 Cable x 1 (Length: 5 ft.)

Optical Cable x 1 (Length: 5 ft.)

3.5mm Audio Cable x 1 (Length: 4 ft.)

Soundbar Power Adapter
(Length: 5 ft.)

Wall Screws & Brackets x 20

Satellite Speaker Mounting Brackets (Dipole) x 2

Mounting Screws (Soundbar) x 2

Mounting Screws (Satellite Speakers) x 8

Surround Speakers Backplate Screws (Dipole) x 8

Speakers Connectors (Dipole) x 4 + Silver Flathead Screws x 8

Soundbar & Satellite Wall
Mount Brackets x 10

Soundbar Mounting Guide
1.2 CONTROLS & CONNECTIONS
A. SOUNDBAR

![graph TD A["DC IN Power Supply"] --> B["OPTICAL Digital Optical Audio Input"] B --> C["USB For Firmware Upgrade only"] D["COAXIAL Digital Coaxial Audio Input"] --> E["AUX 3.5mm Stereo Analog Audio Input"] F["HDMI IN [2"] (HDCP 2.3, Dolby Vision, 4K HDR Pass-thru)] --> G["HDMI IN [3"] (HDCP 2.3, Dolb…](/content/2026/06/1392593/images/a4b4bba34fbc615cae22a9f3051174ee23462a06bee17b85127eabc62e465df8.jpg)
1.2 CONTROLS & CONNECTIONS
B. SUBWOOFERS & SURROUND SPEAKERS

1.2 CONTROLS & CONNECTIONS
C. USING YOUR REMOTE CONTROL
Inserting Batteries before using the Remote Control (AAA Batteries x 2)
Slide the back cover in the direction of the arrow until it is completely removed. Insert 2 x AAA Batteries and gently push the cover back into place.

Remote Angle
Tilt the remote downwards by 15-25 degrees for best response. (As if you are aiming the remote slightly towards the ground)
Once HDMI-CEC is set up. use your TV / content device's remote control to power ON the entire system.
Always use your TV's remote control to power OFF the entire system.

2 SETTING UP YOUR HOME THEATER
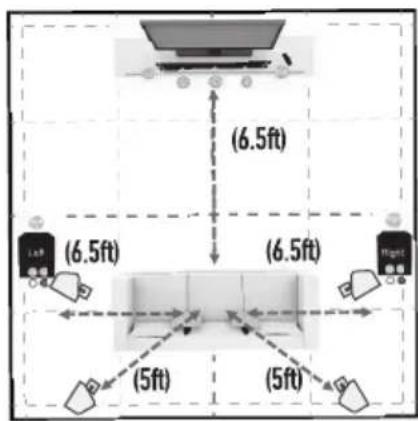
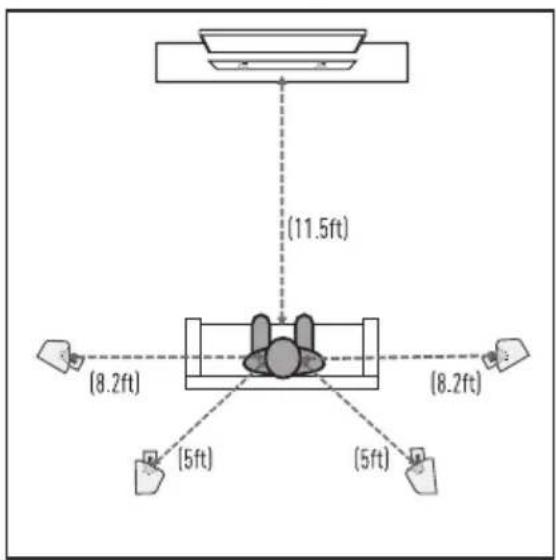
A. BEST SURROUND: SIGNATURE PLACEMENT (4 INDIVIDUAL SPEAKERS SETUP)
The soundbar system features modular surround speakers, giving you placement flexibility to suit your listening environment. The diagram below illustrates the recommended speaker placement. Actual distance can vary based on actual room layout.
![graph TD A["Room Top"] -->|3.2 ft min clearance| B["Sub Left"] A -->|3.2 ft min clearance| C["Sub Right"] B -->|3.2 ft| D["SURROUND LEFT"] B -->|3.2 ft| E["SURROUND RIGHT"] C -->|3.2 ft| F["SURROUND BACK LEFT"] C -->|3.2 ft| G["SURROUND BACK RIGHT"] D -->|6.5 ft| H["Top Room"] E -->|6.5 ft| I["Top R…](/content/2026/06/1392593/images/f1df6ce8d91a7c89dc93c9f8559e2baca7fe46940a10ac13ac7b58577bdeeeee.jpg)
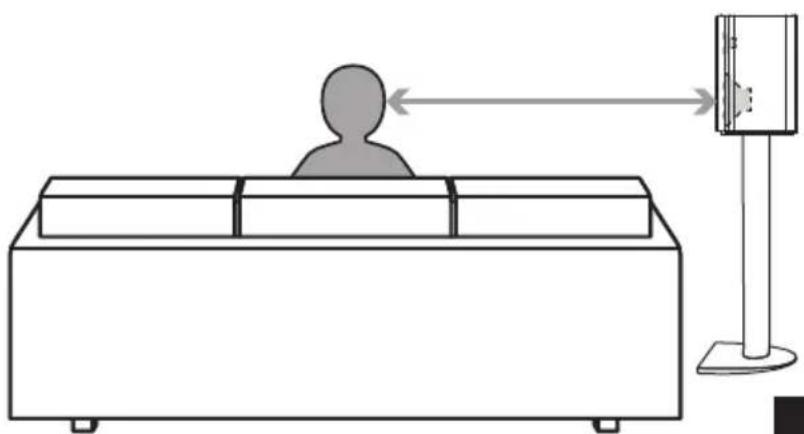
Note: Illustration is not to scale. Speaker stands are not included.

Tip:
Toggle the surround speaker switch to 9CH mode.

The bottom speaker driver of the surround speakers should be at ear level and pointing directly at the listener's sitting area for optimal performance.
For recommended speaker stands, scan QR code or visit: bit.ly/shockwafe-speaker-stands

2 SETTING UP YOUR HOME THEATER
B. BETTER SURROUND: DIPOLE CONFIGURATION (SPEAKERS ARE ATTACHED TO FORM TWO PAIRS)
The diagram below illustrates the recommended speaker placement. Actual distance can vary based on actual room layout.
![graph TD A["Sub Left"] -->|3.2 ft 5 ft| B["90°-110° OPTION A"] C["Sub Right"] -->|3.2 ft 5 ft| D["90°-110° OPTION A"] B -->|6.5 ft| E["OPTION B"] D -->|6.5 ft| F["OPTION B"] G["3.2 ft min clearance"] --> H["Top of Sub Left"] I["9 ft min clearance"] --> J["Top of Sub Right"] style A fill:#f9f,stroke:…](/content/2026/06/1392593/images/7236eca1a46b991680b2eb7a26f00eeb6088e8001795b584f6b67e813f3c8e6f.jpg)
Attaching the speakers for dipole setup
①
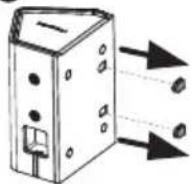
Left Speaker
Remove the rubber stoppers from the slots
②
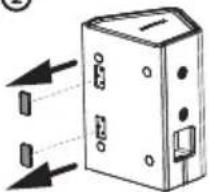
Right Speaker
③

Attach the L-shaped silver connectors onto the slots of the right speaker. Secure the connectors using silver flathead screws.
④

Attach left and right speaker
⑤
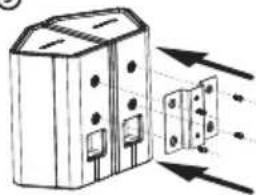
Secure the dipole mounting bracket with screws

Tip:
The bottom speaker driver of the surround speakers should be at ear level. The silver seam in between the speakers should be pointing directly at the listening area for optimal performance.
Toggle the surround speaker switch to DIPOLE mode.

For recommended speaker stands, scan QR code or visit: bit.ly/shockwafe-speaker-stands

2 SETTING UP YOUR HOME THEATER
C. HYBRID ELEVATION
Lay the surround speakers down (drivers tilted upward in 2 modes, see illustration on the right) to enable vertical effects to bounce off the ceiling of your room.
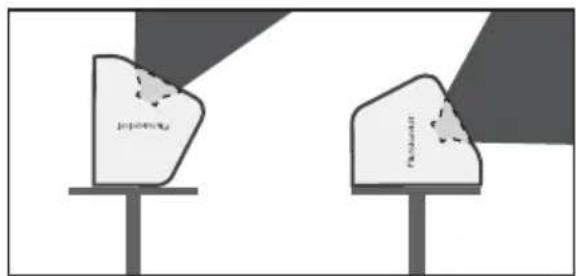
Elevation 1: Vertical Effects-Centric Mode
Elevation 2: Hybrid 360° Surround with Vertical Effects
OPTION C1: 9.2CH SIDE ELEVATION
For added perceptibility of height effects from both sides of the room
![graph TD A["3.2 ft min clearance"] --> B["Sub Left"] A --> C["Sub Right"] B --> D["6.5 ft"] C --> E["6.5 ft"] D --> F["Surround Right (Vertical Effects)"] E --> G["Surround Right (Vertical Effects)"] F --> H["135°-150°"] G --> I["135°-150°"] H --> J["SURROUND BACK LEFT 6.5 ft"] I --> K["SURROUND BAC…](/content/2026/06/1392593/images/b4a62949288cf618c895a5b657762ad4f8d6f7ac1bd261f3164cdf904a5010d6.jpg)
OPTION C3: 9.2CH ALL ELEVATION
For added perceptibility of height effects from sides and back of room
OPTION C2: 9.2CH REAR ELEVATION
For added perceptibility of height effects from the back of the room
![graph TD A["Top Section"] --> B["Sub Left"] A --> C["Sub Right"] B --> D["90°-110°"] C --> E["90°-110°"] D --> F["Surround Left"] D --> G["Surround Right"] E --> H["Surround Back Left (Vertical Effects)"] E --> I["Surround Back Right (Vertical Effects)"] style A fill:#f9f,stroke:#333 style B fill:#c…](/content/2026/06/1392593/images/cbaf5e43d994f0d32772ccabb0000bdcde524b796864af776af0485a0a1a1065.jpg)
![graph TD A["Central Hub"] -->|3.2 ft min clearance| B["Sub Left"] A -->|3.2 ft clearance| C["Sub Right"] A -->|9 ft min clearance| D["Sub Left (Vertical Effects)"] A -->|9 ft min clearance| E["Sub Right (Vertical Effects)"] A -->|6.5 ft| F["Surround Back Left (Vertical Effects)"] A -->|6.5 ft| G["Su…](/content/2026/06/1392593/images/dcb5de56f746e1bbfcae874718c820bb7afa9915d0652645410e13a093df2826.jpg)

Tip:
Find a video clip, invest the time to play the clip with different speaker placements and audition to see what works best for your room.
2.2 CONNECTING SURROUND SPEAKERS TO SUBWOOFERS


2.3 TURNING ON YOUR SOUNDBAR SYSTEM


Tip: Once soundbar is powered off, the blue LED lights on the subwoofers will continue blinking for 10 minutes before going into standby mode. You do not need to turn off the subwoofers after each use.
2.4 CONNECTING YOUR TV
A. VIA HDMI ARC / EARC

BACK OF SOUNDBAR
![1. Connect one end of the HDMI cable to the HDMI (ARC / eARC) port at the back of your TV 2. Connect the other end to the HDMI OUT (TV) [1] port of your Nakamichi soundbar Tip: HDMI Audio Return Channel (ARC) / enhanced Audio Return Channel (eARC) offers two-way communication between your soundbar a…](/content/2026/06/1392593/images/4c792f685567a41f946bd4af6b372c2e50b62406c3ecac4cb1b8cf79b08f80e3.jpg)
2.4 CONNECTING YOUR TV
B. DIGITAL OPTICAL BETTER, COAXIAL BETTER, AUX
BACK OF SOUNDBAR
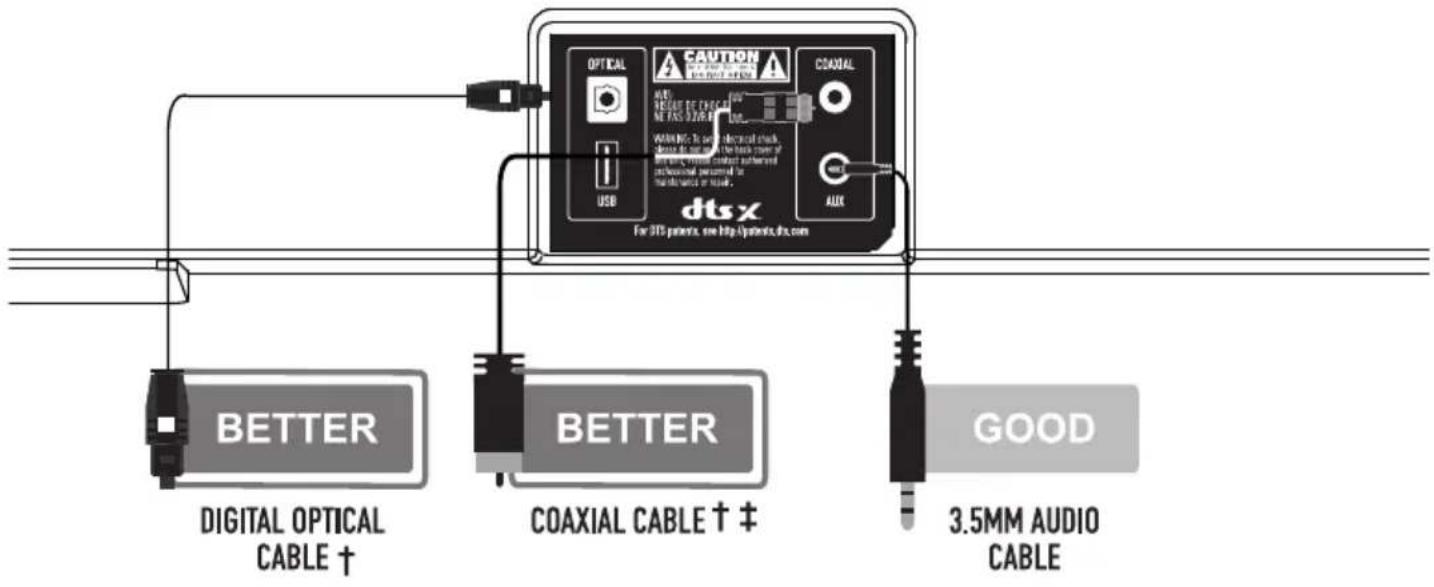

Note: Be sure to connect to a TV's audio output port, not an audio input port.
* Not all TVs have the audio outputs shown above. To connect the soundbar directly to your other devices (Blu-ray player, game consoles, etc). See Pg 21, CONNECTING YOUR CONTENT DEVICES
* Cable appearance may differ from the ones supplied.
† If there is no audio during the setup, see Pg 43 for Help & Troubleshooting
‡ Cable not included
2.5 LISTENING TO YOUR SOUNDBAR

For expanded remote control guide, scan QR code or visit: bit.ly/92earc-shockwafe-remote

Dolby Atmos is Dolby's latest object-based 3D surround sound format. It is encoded into Dolby TrueHD or Dolby Digital Plus stream with meta-data to extract and place the objects in relevant positions of a surround environment.
2.6 SETTING UP YOUR TV
A. What is Enhanced Audio Return Channel (ARC / eARC)?
HDMI Audio Return Channel (ARC) / enhanced Audio Return Channel (eARC) offers two-way communication between your soundbar and TV over a single HDMI connection. Essentially, the HDMI ARC port lets you use HDMI as both an input and an audio output. An eARC-compatible TV can send original, full resolution (lossless) audio signals to the soundbar. For eARC, you will need to connect your soundbar to the TV's HDMI eARC port using a high speed HDMI 2.1 cable.
The soundbar's eARC port is backwards-compatible with ARC and can also accept audio signals from HDMI ARC Equipped TV's.
Audio Settings for TV\*
Setting the audio output:
- Go to Settings > Sound
- Select Speaker Settings
- Set as HDMI Audio Out
- For eARC equipped TV's only:
Please also check your TV settings and turn on eARC mode if available. This option might be found under the advanced/expert options on your TV.
For brand specific TV audio settings, scan QR code or visit: www.nakamichi-usa.com/best-sound

Setting the audio format:
A) Go to Settings > Sound > Additional Settings
B) Select Speaker Audio Format
C) Set as Dolby Digital / DTS / Bitstream (whichever is available)
B. What is CEC?
CEC is an HDMI protocol that is only available when:
- Your TV is CEC enabled. (Check with your TV manufacturer for more information)
- The soundbar and TV is connected via a HDMI cable through the ARC ports.
By doing so, you are able to control the soundbar's volume and power functions with the TV remote.
Enabling CEC^
From the SYSTEM menu, enable CEC and ARC^ functions.
From the CEC menu, select Device Discovery to register the soundbar with the TV.
Enable CEC for TV only. Do not enable CEC for other source devices or inputs may switch randomly.
To disable CEC on the soundbar, see Pg 28.
* Steps may differ based on TV brand. See your TV's user manual for more information.
^ HDMI-CEC TV Trade names: Samsung (Anynet+), Sharp (Aquos Link), Sony (Bravia Sync), LG (SIMPLINK), Panasonic (HDAVI Control / EZ Sync / Viera Link), Philips (EasyLink), Vizio (CEC), TCL (CEC), Hisense (CEC). Naming may differ based on TV brand. See your TV's user manual for more information.
Visit www.nakamichi-usa.com/best-sound for expanded list of TVs' audio settings instructions. Visit bit.ly/hdmi-cec-settings or scan QR Code for HDMI-CEC setup instructions by device
If your devices are not listed on our website, please check with the device manufacturer's manual

2.7 CONNECTING YOUR CONTENT DEVICES
A. CONNECTIONS CENTRAL - RECOMMENDED CONNECTION BASED ON DEVICES

Use our Perfect Device Matching Tool to create a custom setup guide based on your TV and devices. Scan QR code or visit bit.ly/device-matching-tool
![graph TD A["XBOX Series X / PS5*"] --> B["TV"] C["Satellites"] --> B D["Set-Top Boxes"] --> B B --> E["Connect these devices directly to your TV via HDMI"] B --> F["Connect TV HDMI ARC / eARC to Soundbar HDMI 1 eARC"] E --> G["HELLO"] F --> H["Streaming Devices"] F --> I["PS4, XBOX ONE, Switch & Old…](/content/2026/06/1392593/images/ad55198c48ced7f60b20165cae9ce70fed7a802e0549efddd78f67bdb97a0edf.jpg)
2.7 CONNECTING YOUR CONTENT DEVICES
B. HDMI CONNECTION SETUP
HDMI cables transmit both audio and video content. To view video from these devices, turn the soundbar on, then set the soundbar input to HDMI IN [2], HDMI IN [3] or HDMI IN [4]. Set your TV input to the HDMI ARC / eARC port which the soundbar is connected.
BACK OF SOUNDBAR
![This device consists with 1st of the FCC Video Operation is subject to the following two conditions: (1) This device may not cause harmful testing. (2) This device must use any interference. including interferon that may cause uncontrolled operation. ON ECS-3 HDMS (1) HDMI IN [2] (HDCP 2.3, Dolby Vi…](/content/2026/06/1392593/images/922ea46f6691bc40d84787f7d1f3d9b3b7fead58242c0f3161be696b7199f91e.jpg)
* Connect XBOX Series X and PS5 directly to TV's HDMI inputs if TV is equipped with eARC.
Note 1: Cables may appear differently from the ones supplied.
Note 2: Connect devices with the same HDCP standards for seamless switching between sources. If there are devices with different HDCP standards, connect all HDCP 2.3 devices to soundbar while connecting HDCP 1.4 / 2.0 / 2.1 devices to TV to avoid audio and video instability.
2.7 CONNECTING YOUR CONTENT DEVICES
C. NON-HDMI CONNECTION SETUP
BACK OF SOUNDBAR

Note: Dolby Digital Plus, Dolby True HD, Dolby Atmos, DTS HD MA, DTS HD and DTS:X are not supported on Optical, Coaxial and Aux connections
* Cable not included
2.7 CONNECTING YOUR CONTENT DEVICES
D. ADVANCED SETUP - FOUR DEVICE SETUP FOR HDTV

Use our Perfect Device Matching Tool to create a custom setup guide based on your TV and devices. Scan QR code or visit bit.ly/device-matching-tool
![graph TD A["Switch the soundbar's source to TV for playing Device's 4 audio. (Via TV's ARC / eARC connection. Dolby Atmos and DTS:X audio are not supported on ARC connection)"] --> B["Video & Audio"] B --> C["HDMI IN*"] C --> D["Device 4"] D --> E["Dolby Atmos / DTS:X supported if TV is equipped wit…](/content/2026/06/1392593/images/b328dbdd7e2aac412df37a00e809599bc29c1cc2bca856d547d78180d4b6280f.jpg)
Note: If the device is not equipped with a HDMI port, use an Optical or Coaxial output.
* Compatible HDMI eARC TVs can pass original, full resolution audio (with Dolby Atmos and DTS:X support) to the Soundbar. Selected HDMI ARC-equipped TVs can send compressed Dolby Atmos audio to the soundbar.
2.7 CONNECTING YOUR CONTENT DEVICES
E. ADVANCED SETUP - THREE DEVICE SETUP FOR HDTV WITHOUT HDMI ARC / eARC

Use our Perfect Device Matching Tool to create a custom setup guide based on your TV and devices. Scan QR code or visit bit.ly/device-matching-tool
![graph TD TV["TV"] -->|Optical from TV to Soundbar*| Optical1["Optical"] Optical1 -->|HDMI IN| HDMIOUT[" HDMI OUT (TV) [1"] ] Optical1 -->|HDMI_IN["2"]| HDMIOUT2[" HDMI OUT (DTS:X devices supported) "] Optical1 -->|HDMI OUT| Device1[" Device 1 "] Optical1 -->|HDMI OUT| Device2[" Device 2 "] Optical1…](/content/2026/06/1392593/images/e37f80850552ce1a2156dded5155f1fc765b8f279ca8ac6c46bca52ad2e36c4f.jpg)
2.8 SETTING UP YOUR CONTENT DEVICES
RECOMMENDED AUDIO SETTINGS FOR BEST AUDIO
APPLE TV® 4K (2021)
Setting Audio Output:
- Settings > Video and Audio > Audio > Audio Output > Receiver Speakers
- Settings > Video and Audio > Audio > Reduce Loud Sounds > Off
- Settings > Video and Audio > Audio > Audio Mode > Auto
AMAZON FIRE® TV CUBE / FIRE® TV 4K
Settings > Display & Sounds > Audio > Surround Sound > Best Available
NOTE: When plugging Fire TV 4K directly to TV, set TV audio's digital output format > select Dolby Digital
ROKU™ ULTRA 4K (2020)
Setting Audio Format:
Roku Ultra 4K: Settings > Audio > Audio Mode > Auto (Dolby D+, DTS)
NVIDIA® SHIELD PRO 4K
Setting Audio Format:
- Settings > Device Preferences > Display & Sound > Advanced Sound Settings > Surround Sound > Dolby Audio Processing > ON, Available Formats > Auto
PLAYSTATION® 5
Setting Audio Output:
- Settings > Sound > select Audio Output
a. Audio Output > Output Device > HDMI Device (AV amplifier) > Switch Output Device Automatically > On > HDMI Device Type > select AV amplifier
b. AV amplifier > Number of Channels > 7.1ch
c. Audio Output > General > Audio Format (Priority) > Bitstream (Dolby)
XBOX® SERIES X
Setting Audio Format:
-
Menu > Settings > General > Volume & Audio Output
a. Volume & Audio Output > Speaker Audio > HDMI Audio > Bitstream Out
b. Volume & Audio Output > Speaker Audio > Bitstream Format > Dolby Atmos for Home Theater -
Blu-ray Playback Audio Settings:
Menu > Settings > Devices & Connections
a. Devices & Connections > Blu-ray
b. Blu-ray > Dolby Digital > Dynamic range Control Off > Let my receiver decode audio > Check
NINTENDO® SWITCH
Recommended Setup: Connect the device directly to TV via HDMI port and send out audio to soundbar via ARC
Setting Audio Format: (Put the console in TV mode)
-
SWITCH Audio Settings: System Settings > TV Settings > TV Sound > Surround
-
TV Audio Settings: Digital Output Format > select Dolby Digital
SONY® BLU-RAY PLAYER
Setting Audio Output:
Setup > System Settings > HDMI Audio Output > Auto
Setting Audio Format:
Setup > Audio Settings >
- Digital Audio Output > Auto
- DSD Output Mode > Off
- BD Audio MIX Setting > Off
- DTS Neo:6 > Off
- DSEE HX > Off
- Downmix > Surround
DIRECT TV®
Menu > Settings > Audio > Dolby Audio > Off
DISH® Satellite TV SET-TOP BOX
- Launch System Settings
- Set Decoder to Dolby Digital
- Set Mode to Line
- Select Done
Xfinity® SET-TOP BOX
- Go to Setting
- Select Audio Codec
- Select HDMI or Optical
- Set Audio Range to Normal
- Set Audio Output to Fixed
For complete devices list, visit www.nakamichi-usa.com/best-sound or scan QR code on the right.

3 UNDERSTANDING YOUR REMOTE CONTROL
A. OVERVIEW

① POWER*
Turn ON/OFF the Soundbar
② INPUT SOURCE
Select audio input source (See Pg 24 for more details)
③ EQ (EQUALIZER) & NIGHT MODE
Select between Nakamichi pre-tuned audio EQ modes. [See Pg 25 for more details]
④ ALL CH STEREO / STEREO ONLY
Activate All Channel Stereo or Stereo Only
⑤ INFO ■
Display system information on the soundbar LED display (See Pg 31 for more details)
⑥ SETUP
Access to advanced system settings (See Pg 27 for more details)
⑦ SSE + I -
(SPATIAL SURROUND ELEVATION MAX PROCESSING)**
Select different SSE Max modes (See Pg 30 for more details)
⑧ ◀/▶ BUTTON
Toggle between different settings (Setup function only)
⑨ ENTER BUTTON
Select desired settings (SETUP function only)
⑩ BASS / VOLUME
Adjust bass / volume level by pushing the button up or down
⑪ CR + /-
Adjust center channel volume level
⑫ SYSTEM MEMORY
Save your personalized audio settings (See Pg 32 for more details)
⑬ PLAY/PAUSE ▶II, STOP ■, NEXT ▶I, PREVIOUS ◀◀
Buttons for audio playback (Bluetooth mode only)
⑭ MUTE
Mute / unmute the soundbar
⑮ SURROUND
Select between different channel mapping / upmixing methods (See Pg 26 for more details)
⑯ RETURN
Return to the previous selection (SETUP function only)
⑰ TR +/-
Adjust high tones (treble) volume level
⑱ SB +/-
Adjust volume level of both back surround channels
⑲ SS + /-
Adjust volume level of both side surround channels
For expanded remote control guide,
scan QR code or visit:
bit.ly/92earc-shockwafe-remote

3 UNDERSTANDING YOUR REMOTE CONTROL
B. SELECTING DIFFERENT INPUT SOURCES
Press source buttons to select an audio input source. Each input source will be displayed on the soundbar's front LED display.

| Button | LED Digits on Soundbar |
| TV | TV EARC, TV ARC |
| HDMI 2 | HDMI 2 |
| HDMI 3 | HDMI 3 |
| HDMI 4 | HDMI 4 |
| OPT (Optical) | OPT |
| COAX (Coaxial) | COAX |
| Bluetooth | BT |
| AUX | AUX |
| USB | USB |
For expanded remote control guide,
scan QR code or visit:
bit.ly/92earc-shockwafe-remote

3 UNDERSTANDING YOUR REMOTE CONTROL
C. ACCESSING AUDIO PRESETS

EQ (EQUALIZER)
Press these EQ buttons on your remote to select your desired EQ settings. The system will remember the last setting.

For expanded remote control guide, scan QR code or visit: bit.ly/92earc-shockwafe-remote
| MUSIC | MUSIC | Feel like you are seated in front of a stage. Produces a faithful reproduction of your music, just as the artist intended. | MUSIC |
| MOVIE | MOVIE(Default) | Reproduces the thrilling environment and takes you to the center of the action. Feel the dynamic excitement. | MOVIE |
| GAME | GAME | Reproduces sound field effects for all game genres and adds depth and spaciousness to your game's surround sound. | GAME |
| NEWS | Makes you feel like you are in the front row of a live talk show. Hear crystal clear dialog. | NEWS | |
| SPORTS | Reproduces the energetic environment of live sports broadcasts. Place the commentator's voice center stage and lets the sounds that fill the stadium surround you. | SPORTS | |
| DSP OFF | DSP OFF | Audio playback without using any predefined Nakamichi EQ settings. | DSP OFF |
NIGHT MODE
Night mode feature normalizes the overall volume to avoid sudden changes in loudness. This feature is available with DTS and DOLBY encoded content on HDMI, HDMI ARC / eARC, Optical and Coaxial inputs.
| NIGHT | OFF (Default) | Volume normalization OFF. Maximum audio impact from video content. | DRC OFF |
| 50% | 50% of volume normalization | DRC 50 | |
| 100% | 100% of volume normalization, recommended for night time listening | DRC 100 | |
| AUTO | Contextual adaptive volume normalization to retain audio dynamism during normalization (For DOLBY content only) | DRC AUTO |
3 UNDERSTANDING YOUR REMOTE CONTROL
D. ACCESSING CHANNEL MAPPING / UPMIXING
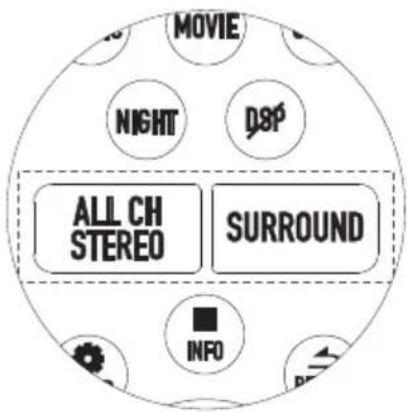
CHANNEL MAPPING
Channel mapping / upmixing is essential because most content are not recorded in 9.2 channels. The soundbar utilizes different channel mapping methods to optimize your listening experience. Dolby & DTS encode their own content with their respective proprietary upmixers to optimize surround performance.

For expanded remote control guide, scan QR code or visit: bit.ly/92earc-shockwafe-remote
Dolby Upmixing (Available for Dolby and PCM contents)
| SURROUND | Native | Direct decode 2.1 / 5.1 / 7.1 channel audio (No audio upmixing). Best for music and Bluetooth. | NATIVE |
| DOLBY UPMIX | Dolby technology upmixes audio content to all audio channels | DOLBY UPMIX | |
| DOLBY SURR(Default) | Dolby technology upmixes audio content to all audio channels with vertical surround effects. (See Pg 40 for details) | DOLBY SURR |
DTS Upmixing (Available for DTS content only)
| SURROUND | Native | Direct decode 2.1 / 5.1 / 7.1 channel audio (No audio upmixing). Best for music and Bluetooth. | NATIVE |
| DTS DIRECT | System DSP upmixes audio content to all audio channels. | DTS DIRECT | |
| NEURAL:X (Default) | DTS technology upmixes audio content to all audio channels. Set to NEURAL:X to receive audio from all rear speakers. (See Pg 40 for details) | NEURAL:X |
ALL Channel Stereo / Stereo Only Mode
| ALLCH STEREO | DTS, Dolby & PCM | Enables 3 channels (Left, Center, Right) playback on the soundbar. Front channels are upmixed and outputted to surround speakers. | ALLCH STEREO |
| STEREO ONLY | DTS | Enables 2-channels stereo playback using the right front and left front channels. It down-mixes DTS multi-channel signals to 2 Channels. | STEREO ONLY |
| DOLBY & PCM | Enables 3-channels (Left, Center, Right) playback using the right front, center and left front channels. It down-mixes Dolby & PCM multi-channel signals to 3 Channels. |
3 UNDERSTANDING YOUR REMOTE CONTROL
E. ACCESSING SETTINGS BUTTON (Accessible from all inputs)

- Press the SETUP (☐) button to cycle through different system settings.
Refer to Function column on table below for available options.
-
Press ENTER to select desired function for adjustment.
-
Press ◀ /▶ button to change the SELECTION value*
* To select different settings or exit the SETUP function:
a. Press RETURN button to quit the current action and back to SETUP list to select different settings.
b. Press SETUP button to exit SETUP function
- Press ENTER button to save your selected value.
| Function | Selection | Options |
| Wireless Subwoofer channel selection*{between soundbar / subs and surrounds} | WL-CH(Default: AUTO) | AUTO |
| WL C1 - WL C6 | ||
| LED Brightness | DIM(Default: 3)*DIM=0. Display will turn off after a few seconds | DIMO* |
| DIM1 | ||
| DIM2 | ||
| DIM3 | ||
| LIP SYNC** | LIP (Default: 00ms) | 00ms - 200ms |
| Room Size(Refer to Pg 29 for more details) | RM Size(Default: Med) | SMALL |
| MED | ||
| LARGE | ||
| Surround On / Off | SURR ON/OFF(Default: On) | ON |
| OFF | ||
| DOLBY & DTS CONTENTDynamic Range Compression (DRC)(Normalizes sudden loud volume changes.Functions the same as Night Mode on remote) | DRC(Default: Off) | OFF |
| 50 | ||
| 100 | ||
| AUTO | ||
| Power Saving(30 mins auto power off without any input signal) | ECO(Default: ON) | OFF |
| ON | ||
| Subwoofer Crossover Frequency(Sends each speaker the group of frequencies that it will play most efficiently) | CROSS(Default: 180Hz) | 130Hz |
| 150Hz | ||
| 180Hz |
3 UNDERSTANDING YOUR REMOTE CONTROL
F. ACCESSING SETUP BUTTON (Accessible from all inputs)

| Function | Selection | Options |
| Volume Balance for RIGHT Surround and RIGHT Rear Speakers | RSURR (Default: 00) | -3 To +3 |
| Volume Balance for LEFT Surround and LEFT Rear Speakers | LSURR (Default: 00) | -3 To +3 |
| HDMI-CEC: One Touch Play*(Enable or disable HDMI CEC connection between soundbar and TV) | CEC-OTP(Default: ON) | OFF |
| ON | ||
| DIALOG CONTROL (DTS:X Content Only)(Increase dialog levels in contrast with background sound and boost vocals separately) | DIALG (Default: +3) | DIA+1 to DIA+6 |
| Firmware Upgrade(Refer to Pg 37 for more details) | FWUPG | UPGRADING |
| DONE | ||
| FAIL | ||
| Subwoofer Pairing(Refer to Pg 34 for more details) | SUB PAIR | PAIRING |
| DONE | ||
| FAIL | ||
| Factory Reset(System will restart when selecting YES) | RESET | YES |
| NO |
* CEC-OTP: HDMI-CEC ONE TOUCH PLAY is a HDMI function on the soundbar that automatically switches between HDMI sources. (E.g. Auto switch to ARC mode when a TV is powered on). By turning OFF the One Touch Play, you can manually select the input sources by using soundbar remote or Harmony universal remotes.
3 UNDERSTANDING YOUR REMOTE CONTROL
E. ACCESSING ROOM SIZE BUTTON
For instant surround optimization to Small, Medium and Large Rooms, there are 3 pre-tuned acoustic environments. To access:
- Press SETUP (💡) button several times to access Room Size (RM SIZE)
- Press ◀/▶ button to change the SELECTION value (SMALL, MED, LARGE)
- Press ENTER button to save setting value.
| Selection | Options | Size (Sq ft.) | Dimensions (Length x Width (ft)) |
| RM Size(Default: Med) | SMALL | 196 | 14 x 14 |
| MED | 324 | 18 x 18 | |
| LARGE | 484 | 22 x 22 or bigger |
LARGE ROOM

MEDIUM ROOM

SMALL ROOM
3 UNDERSTANDING YOUR REMOTE CONTROL
G ACCESSING SSE MAX MODE
SPATIAL SURROUND ELEVATION (SSE) MAX MODE
Activate the most immersive 360° cinema, music and gaming experience by unlocking the full potential of SSE MAX state of the art hardware and software performance technologies. The next best thing to being there! (SSE MAX OFF = No vertical surround effects)

WHAT IS SSE MAX

Spatial
Performs spatial-amplification techniques to unlock extra details, enhance directionality and enlarge spaciousness of the surround sound experience.

Surround
Executes upmixing, phase and volume improvements to optimize the clarity and balance of the surround sound across all channels, delivering up to 9.2.4 channels.

Elevation
Enables the processing of all the latest 3D object-based content, including Dolby Atmos, and interlaces a height effects sound layer.
Max
Precisely-tuned acoustic hardware brought by high-output amplifiers, extended range twin-cone drivers, upgraded subwoofer drivers and silk dome surround effects tweeters.
![graph TD A["INFO"] --> B["ENTER"] C["RETURN"] --> B D["SETUP"] --> B E["SSE+"] --> B F["SSE-"] --> B B --> G["Arrow Left"] B --> H["Arrow Right"]](/content/2026/06/1392593/images/100cb415a3cae8a97fb423f368a3f5b7eb17708e6dd4e37aefd8121ff5d964c0.jpg)
SSE2 MAX
SSE1 MAX

SSE3 MAX

3 UNDERSTANDING YOUR REMOTE CONTROL
H ACCESSING INFO BUTTON

![graph TD A["Firmware version FW XX"] --> B["HDMI-CEC One Touch Play CEC-OTP ON, CEC-OTP OFF"] B --> C["Surround Left Overall Balance LSURR -3 (L-3) to LSURR+3 (L+3)"] C --> D["Surround Right Overall Balance RSURR -3 (R-3) to RSURR+3 (R+3)"] D --> E["Cross Over Frequency CROSS 130Hz, CROSS 150Hz, Cro…](/content/2026/06/1392593/images/dd00808fe62667dfb9b57ec686ff46b437e5f6a5c48515ad5014d8afb3f85237.jpg)
Note: Value highlighted in bold are the default settings of the soundbar
3 UNDERSTANDING YOUR REMOTE CONTROL
I SAVING AUDIO SETTINGS TO SYSTEM MEMORY
Three sets of audio settings can be saved onto the soundbar's memory, allowing quick access to your audio preferences.

| Function | Button | LED Digits on Soundbar |
| SYSTEM MEMORY | Customized Memory 1Long press to Save 1Once saved, show M1SET | SAVE1 |
| M1SET | ||
| Customized Memory 2Long press to Save 2Once saved, show M2SET | SAVE2 | |
| M2SET | ||
| Customized Memory 3Long press to Save 3Once saved, show M3SET | SAVE3 | |
| M3SET |
Saving Settings to System Memory
- Hold down the SYSTEM MEMORY 1 / 2 / 3 button until "SAVE1" / "SAVE2" / "SAVE3", corresponding to the button pressed, is displayed on LED.
- When the SYSTEM MEMORY 1 / 2 / 3 settings are saved, "M_SET" is displayed.
Loading the Setting
Press the SYSTEM MEMORY 1 / 2 / 3 button once and the corresponding settings will be loaded. If the SYSTEM MEMORY 1 button is pressed, "M1" will be displayed.

- You can override any saved settings by holding down the system memory button.
- The following audio settings can be saved to system memory:
a) EQ Mode
b) Volume
c) Bass
d) Treble
e) Center
f) Surround L&R
g) Surround Back L&R
4 WIRELESS BLUETOOTH AUDIO STREAMING
A BLUETOOTH 5.0 WITH APTX™ HD
Stream music wirelessly from your favorite devices via Bluetooth (BT) with Qualcomm aptX™ HD. aptX™ HD enables Bluetooth to transmit audio at a maximum bitrate up to 1.8× higher than standard Bluetooth codecs, enabling 24-bit high-resolution audio to be transmitted wirelessly. Bluetooth 5.0 also brings meaningful improvements to wireless stability, allowing your favorite devices to stream audio content to the soundbar at further distances than previous Bluetooth protocols.
Maximizing Signal
If you hear any break-up or disconnect while streaming music from your device, move the source device closer to the soundbar.
Note: Soundbar will be switched to ALL CHANNEL STEREO in Bluetooth mode.
B BLUETOOTH FUNCTIONS
To pair the soundbar with a Bluetooth device:
- Set your Bluetooth device into Bluetooth pairing mode (discoverable)
- Press and hold the Bluetooth (✗) button on the remote control until the LED display on the soundbar shows "BT" blinking.
- You can now search for the soundbar (SHOCKWAFE) using your Bluetooth device, and connect to it. For more information, refer to the user documentation of your device.
- Play audio from your Bluetooth device. Volume can be controlled on your source device or soundbar remote control.
Note: If the soundbar detects a Bluetooth device that was previously connected, the soundbar will automatically connect to your Bluetooth device after Step 2.
To disconnect the soundbar with a paired Bluetooth device:
- Press and hold the Bluetooth (*) button on the remote control until the LED display on the soundbar shows "BT" blinking.
- The soundbar is ready to pair with new device.
To switch to Bluetooth mode:
Press the BT button once (Note: holding down the BT button will trigger the device pairing mode for the soundbar)
To pair BT with voice assistants like Google Home or Amazon Alexa, scan QR code on the right or visit the link: bit.ly/92earc-va-pairing


Your soundbar is not equipped with a microphone, so it cannot operate as a hands-free device for a smartphone.

Reduce the volume levels on your device and on the soundbar before pressing Play. High volume levels can damage your hearing.
5 RE-PAIRING SUBWOOFERS WITH THE SYSTEM
![graph TD A["Speaker 1"] -->|Signal| B["Pairing"] C["Speaker 2"] -->|Signal| B["Pairing"] D["Speaker 3"] -->|Signal| B["Pairing"] B --> E["HOLO Signal"] style B fill:#f9f,stroke:#333](/content/2026/06/1392593/images/130b42ce18d59b7f88360a751a7499542e03669826dd4b796577c4fa83d9a286.jpg)
- Ensure the soundbar and two subwoofers are powered OFF
- Power ON the soundbar and switch to USB input
- Power ON the LEFT subwoofer
- Power ON the RIGHT subwoofer
- Press and hold PAIRING button at the back of LEFT subwoofer until the BLUE LED light starts blinking rapidly
- Press and hold PAIRING button at the back of the RIGHT subwoofer until the BLUE LED light starts blinking rapidly
- Pair the soundbar to the subwoofers in 2 ways:
a. On the soundbar
i. Press and hold the DEMO button until "PAIR-" is shown on LED display.
b. On the remote control
i. Press the SETUP button on remote control
ii. Press the ◀/▶ button until "SUB PAIR" is displayed on the LED display
iii. Press ENTER and the "PAIR-" will be shown on LED display
- The soundbar will now begin the pairing process with the subwoofers (LED display: "PAIR-")
- Once the pairing process is completed, the soundbar's LED display will show "DONE" and the blue LED at the back of both subwoofers will stay lit constantly
Note:
- Once soundbar is powered off, the blue LED lights on the subwoofers will continue blinking for 10 minutes before going into standby mode.
- Steps 7 to 8 must be completed while the BLUE LED light of both subwoofers are blinking rapidly.
6 INSTALLING THE WALL MOUNT
A MOUNTING SOUNDBAR

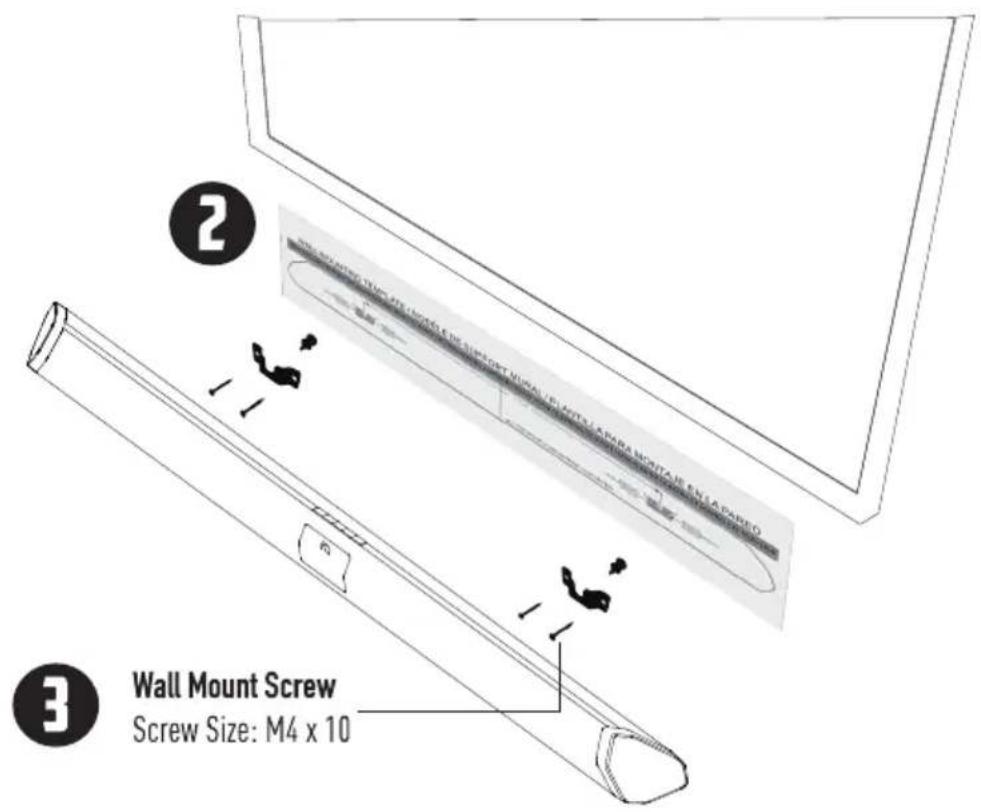
1 Insert the 2 mounting screws into the wall-mount screw holes, and tighten them.
2 Place the included wall-mounting template against the wall under your TV. Mark the 4 bracket holes using a pencil.
3 Be sure your screws are attached to wood studs, drywall anchors (for drywall), or concrete anchors (for brick / concrete walls).
Choose the screw type and length appropriate to your home's construction. If in doubt, consult a professional installer.

If you are unfamiliar with power tools or the layout of electrical wiring in the walls of your home, consult a professional installer.
6 INSTALLING THE WALL MOUNT
B MOUNTING SURROUND SPEAKERS
To wall-mount the satellite speakers:
- Attach the mounting screws to the back of the satellite speaker.
- Align and mount the satellite speaker with the wall mount bracket
Note: Be sure your screws are attached to wood studs or drywall anchors (for drywall) or concrete anchors (for brick / concrete walls). Wall mounting tools are not included.

If you are unfamiliar with power tools or the layout of electrical wiring in the walls of your home, consult a professional installer.

BEST SURROUND: DETACHED
GOOD SURROUND: ATTACHED (DIPOLE)

7 FIRMWARE UPGRADE
Firmware upgrades that provide additional features and performance improvements are released periodically. For more information, visit bit.ly/92earc-firmware
This procedure must only be done with official firmware files that are provided by Nakamichi and created for your soundbar model. Failure to do so may result in a bricked/malfunctioning soundbar that will not be covered by warranty.
Checking the firmware version:
On the remote control toggle the INFO button until the LED display "FWXX". The firmware version will be displayed.
Installing the firmware:
![graph LR A["Smartphone"] --> B["USB"] C["Smartphone"] --> D["USB"] E["Smartphone"] --> F["USB"] G["Smartphone"] --> H["USB"] I["Smartphone"] --> J["USB"] K["Smartphone"] --> L["USB"] M["Smartphone"] --> N["USB"] O["Smartphone"] --> P["USB"] Q["Smartphone"] --> R["USB"] S["Smartphone"] --> T["USB"] U…](/content/2026/06/1392593/images/9d1fb4f949440eacb3e3a4d274eeb7185b34dff11c674c6f1bc775a0c4a8858d.jpg)
- Insert the USB stick* with the unzipped firmware file (.BIN format) into the soundbar's USB port
- Press the SETUP button on the remote control several times until you see "FWUPG"
- Press and hold the ENTER button until "UPG--" is displayed on front LED display
- Firmware upgrading process will be displayed on the LED screen
- Once the firmware is completed, the soundbar will restart automatically
- Press SETUP button to navigate to Reset function to reset your soundbar. Press ENTER
*USB Stick Specs: USB2.0 and above; Max Drive Size: 32GB; Format: FAT16 / FAT32
Checking the firmware version:
Firmware upgrade process may take up to 1-10 minutes, depending on versions. Update progress is displayed on the front panel display when the firmware is upgrading. During each upgrading stage, there will be a numeric percentage to show its progress.
![graph TD A["UPGRADING"] --> B["UPG-"] B --> C["MCU"] C --> D["DSP"] D --> E["HDMI"] E --> F["Wireless"] F --> G["Bluetooth"] G --> H["DONE"] H --> I["DONE"]](/content/2026/06/1392593/images/a294696dac33b10cec49231c7abf256a6b6182064da56c689942927fe8e34182.jpg)
Note: If the soundbar is on the latest firmware, "FW UP TO DATE" will be displayed on the soundbar LED display.
8 SPECIFICATIONS
SOUNDBAR
6 x 2.75" Full Range Driver 2 x 1" High Frequency Tweeter
SURROUND LEFT & RIGHT
1 x 3" Full Range Driver (Each Side) 1 x 1" High Frequency Tweeter (Each Side)
SURROUND BACK LEFT & RIGHT
1 x 3" Full Range Driver (Each Side) 1 x 1" High Frequency Tweeter (Each Side)
WIRELESS LEFT & RIGHT SUBWOOFERS
1 x 10" Down Firing Driver (Each Side)
CONNECTIVITY
HDMI (Dolby Vision & 4K HDR Pass-Thru) HDMI Out (eARC to TV) x 1 [HDCP 2.3] HDMI Input x 3 [HDCP 2.3] USB x 1 (For Firmware Upgrade Only)
DIGITAL AUDIO
Optical Input x 1 Coaxial Input x 1 Analog AUX Audio Input x 1 Bluetooth 5.0 with aptX™ HD
PERFORMANCE
Channels: 9.2 Sound Pressure Level (SPL): 113dB
Total Power: 1300W Power Output: 400W (Soundbar) 150W (Surround Left & Right Each) 150W (Surround Back Left & Right Each) 600W (Subwoofers)
Frequency Response: 20Hz - 20kHz
AUDIO PROCESSING
Dolby Atmos, Dolby TrueHD, Dolby Atmos MAT, Dolby Digital Plus, Dolby Digital, DTS:X, DTS-HD Master Audio, DTS-HD High Resolution Audio, DTS Digital Surround
REMOTE CONTROL
43-Key Backlit LED 6 EQ Modes – Movie, Music, Game, News, Sports, Night
DIMENSIONS (L x W x H), WEIGHT & POWER RATING
Soundbar: 45.5 x 3.0 x 3.6 Inch, 6.0lbs. Subwoofer: 12.0 x 13.6 x 20.2 Inch, 23.8lbs. (Each) Satellite Speaker: 4.8 x 5.6 x 8.1 Inch, 2.9lbs. (Each)
Power Input: Soundbar: 100 - 240V, 50 / 60Hz Subwoofer: 110 - 240V, 50 / 60Hz
9 WARRANTY INFORMATION & SUPPORT
LIMITED WARRANTY (U.S. Only)
Nakamichi LLC ("Nakamichi") warrants this product against defects in material or workmanship for the time periods and set forth below. Pursuant to this Limited Warranty, Nakamichi will, at its option, (i) repair the product using new or refurbished parts or (ii) replace the product with a new or refurbished product. For purposes of this Limited Warranty, "refurbished" means a product or part that has been returned to its original specifications. In the event of a defect, these are your exclusive remedies.
Labor: For a period of one (1) year from the original date of purchase of the product ("Labor Warranty"). Nakamichi will, at its option, repair or replace with new or refurbished product, product determined to be defective. If Nakamichi elects to replace the product after this Labor Warranty has expired but while the Parts Warranty below is still in effect, it will do so for the applicable labor charge.
Parts: For a period of one (1) year from the original date of purchase of product ("Parts Warranty"), Nakamichi will supply new or refurbished replacement parts in exchange for parts determined to be defective.
This Limited Warranty covers only the hardware components packaged with the Product. It does not cover technical assistance for hardware or software usage and it does not cover any software products whether or not contained in the Product; any such software is provided "AS IS" unless expressly provided for in any enclosed software Limited Warranty. Please refer to the End User License Agreements included with the Product for your rights and obligations with respect to the software.
Instructions: To obtain warranty service, you must deliver the product, freight prepaid, in either its original packaging or packaging affording an equal degree of protection to the Nakamichi authorized service facility specified. It is your responsibility to backup any data, software or other materials you may have stored or preserved on your unit. It is likely that such data, software, or other materials will be lost or reformatted during service and Nakamichi will not be responsible for any such damage or loss. A dated purchase receipt is required.
Repair / Replacement Warranty: This Limited Warranty shall apply to any repair, replacement part or replacement product for the remainder of the original Limited Warranty period or for ninety (90) days, whichever is longer. Any parts or product replaced under this Limited Warranty will become the property of Nakamichi.
This Limited Warranty only covers product issues caused by defects in material or workmanship during ordinary consumer use; it does not cover product issues caused by any other reason, including but not limited to product issues due to commercial use, acts of God, misuse, limitations of technology, or modification of or to any part of the Nakamichi product. This Limited Warranty does not cover Nakamichi products sold AS IS or WITH ALL FAULTS or consumables (such as fuses or batteries). This Limited Warranty is invalid if the factory-applied serial number has been altered or removed from the product.
This Limited Warranty is valid only in the United States. This Limited Warranty is valid only for Nakamichi products purchased from the following authorized retailers with a valid receipt stating date, product description and purchase price:
- Amazon.com (under seller "Nakamichi LLC")
- Best Buy
- Ebay (under seller "nakamichi-usa")
- B&H Photo Video
LIMITATION ON DAMAGES: NAKAMICHI SHALL NOT BE LIABLE FOR ANY INCIDENTAL OR CONSEQUENTIAL DAMAGES FOR BREACH OF ANY EXPRESS OR IMPLIED WARRANTY ON THIS PRODUCT.
DURATION OF IMPLIED WARRANTIES: EXCEPT TO THE EXTENT PROHIBITED BY APPLICABLE LAW, ANY IMPLIED WARRANTY OF MERCHANTABILITY OR FITNESS FOR A PARTICULAR PURPOSE ON THIS PRODUCT IS LIMITED IN DURATION TO THE DURATION OF THIS WARRANTY.
Some states do not allow the exclusion or limitation of incidental or consequential damages, or allow limitations on how long an implied warranty lasts, so the above limitations or exclusions may not apply to you. This Limited Warranty gives you specific legal rights any you may have other rights which vary from state to state.
CUSTOMER SUPPORT
If you have any questions or comments, you may reach us at the following:
Visit our website at www.nakamichi-usa.com/faq
Email us at support@nakamichi-usa.com
Phone Support: +1 (415) 805 6913 (Weekdays 10am - 6:45pm PST; Saturday, Holidays 10am - 5pm PST)
Join our Community: community.nakamichi-usa.com
10 GLOSSARY
This section explains the technical terms used in this user manual.
Dolby Atmos object-based audio
Dolby Atmos is an object-based audio format with the capability to reproduce up to 128 simultaneous objects. Every sound in a scene can be represented as a separate audio object that can be positioned and moved throughout the 3D space. For more information, visit https://www.dolby.com/us/en/brands/dolby-atmos.html
Dolby Vision
Dolby Vision transforms your TV experience with dramatic imaging with incredible brightness, contrast, color, details and dimensionality. And with the advanced capabilities in Dolby Vision, you'll see there's more to the story that generic HDR cannot reveal.
Dolby TrueHD
Dolby TrueHD is a lossless multi-channel audio codec developed by Dolby Laboratories which is used in home-entertainment equipment such as Blu-ray disc players and soundbar systems. It competes with DTS-HD Master Audio, a lossless codec from DTS.
Dolby Digital Plus
Dolby Digital Plus, also known as Enhanced AC-3 is a digital audio compression scheme developed by Dolby Labs for transport and storage of multi-channel digital audio. This format is commonly found on many streaming services, including Netflix, Amazon Prime, Disney+, HBO Max and many more.
Dolby Digital
Dolby Digital is a compressed digital audio format developed by Dolby Laboratories, Inc. that supports 5.1-channel audio. This technology is used for audio on most DVD discs.
Dolby Surround
Dolby Surround expands on stereo to deliver sound from the sides, behind, and even above you, creating a natural, multidimensional sonic environment based on the science of how humans hear. Dolby audio in your home theater improves the power, clarity, and realism of sound by upmixing content into 9.2 Channels of sound with height dimension.
Dolby Upmix
Dolby Upmix expands on stereo to deliver sound all around you by offering up to 9.2 channels of sound. It is designed to bring cinematic surround sound to your home.
DTS:X object-based audio
DTS:X uses a technology called object-based audio that processes each sound contained in an audio source as an "object" and memorizes each object's sound changes and positional changes in a sound field to control these changes during playback. For more information, visit https://dts.com/dtsx
DTS-HD Master Audio
DTS-HD Master Audio is an advanced lossless audio format developed to offer a high-definition home theater experience by DTS, Inc. It is commonly found on Blu-ray discs and it can carry up to eight channels of 96kHz / 24-bit audio (up to six channels of 192kHz / 24-bit audio) simultaneously.
DTS-HD High Resolution Audio
DTS-HD High Resolution Audio is a compressed digital audio format that supports 7.1-channel and up to 96kHz / 24-bit audio. It remains fully compatible with the existing DTS multichannel audio systems.
DTS Digital Surround
DTS Digital Surround is a compressed digital audio format developed by DTS that supports 5.1-channel audio. This technology is used for audio on most DVD discs.
NEURAL:X
Neural:X is the latest down-mixing / up-mixing and spatial remapping technology from DTS. It is built in to DTS:X to provide upmix of Neural:X-encoded data. In DTS:X for soundbars, Neural:X can produce up to 11.x channels.
DTS:X Dialog Control
DTS:X Dialog Control allows you to boost the volume of dialog, increasing its intelligibility. People with impaired hearing may also benefit. Note: Content creators may disable the use of this feature on their content, so this feature may not always be available.
PCM (Pulse Code Modulation)
PCM is a signal format under which an analog audio signal is digitized, recorded, and transmitted. This is the basis of digital audio. Linear PCM is a lossless audio format sampled in a linear format, without any audio encoding. It provides the best audio compatibility among different devices.
Lip Sync
Video output sometimes lags behind audio output due to the complexity of signal processing caused by an increase in video signal capacity and internet streaming delay. Lip Sync is a technique to compensate the timing lag between audio and video output.
Dynamic Range Control (DRC)
DRC is an audio signal processing operation that reduces the volume of loud sounds, while amplifying quiet sounds. This reduces (or compresses) an audio signal's dynamic range. DRC is also known as volume normalization.
Power Saving (ECO Mode)
Designed to prevent electrical wastage and promote eco-friendliness. ECO Mode automatically puts the system to standby mode when there is no signal detected for 20 minutes.
Spatial Surround Elevation (SSE) Max Processing Technology
A state of the art architecture of hardware and software performance technologies that activates the most immersive 360° cinema, music and gaming experience. For more info, visit www.nakamichi-usa.com/shockwafe-ssemax
Subwoofer Crossover Frequency
The subwoofer crossover frequency is the frequency at which your speakers start to roll off and your subwoofer kicks in with low frequency effects and bass notes.
10 GLOSSARY
HDMI
HDMI (High-Definition Multimedia Interface) is the world-wide standard interface for digital audio/video signal transmission. This interface transmits both digital audio and digital video signals using a single cable without any loss. HDMI complies with HDCP (High-bandwidth Digital Content Protection) and provides a secure audio/video interface. For further information on HDMI, visit the HDMI website at "http://www.hdmi.org/".
HDMI ARC / eARC
HDMI Audio Return Channel (ARC) / enhanced Audio Return Channel (eARC) offers two-way communication between your soundbar and TV over a single HDMI connection. Essentially, the HDMI ARC port lets you use HDMI as both an input and an audio output.
HDMI-CEC CONTROL
HDMI-CEC Control allows you to operate external devices via HDMI. If you connect a TV that supports HDMI CEC control to the soundbar with an HDMI cable, you can control the soundbar (such as power and
volume) with TV remote control operations. Operation available from the TV's remote control:
• Standby synchronization.
• Volume control, including mute.
HDCP
HDCP (High-bandwidth Digital Content Protection) is a digital copy protection form that prevents copying of digital contents as it travels across connections (such as HDMI).
What is aptX™ HD?
Qualcomm® aptX™ HD was designed to answer the growing demand for high resolution audio. This enhanced codec supports 24-bit music quality over Bluetooth. This allows listeners to hear even the smallest details in their music.
The soundbar is compatible with the following audio formats:
| Audio Signal Types | Audio Signal Formats | Compatible Media |
| 2 Ch Linear PCM | 2 Ch, 32-192kHz, 16 / 24-bit | CD, DVD-Video, DVD-Audio, etc. |
| Multi-ch Linear PCM | 7 Ch, 32-192kHz, 16 / 24-bit | DVD-Audio, Blu-ray disc, HD DVD, etc. |
| Bitstream (SD Audio) | Dolby Digital, DTS | DVD-Video, etc |
| Bitstream (HD Audio) | Dolby Digital, Dolby Digital Plus, Dolby TrueHD, Dolby Atmos, DTS Digital Surround, DTS-HD High Resolution Audio, DTS-HD Master Audio, DTS:X | Online streaming media, Blu-ray disc, HD DVD |
HDMI (ARC / eARC)
| Audio Signal Types | Audio Signal Formats | Compatible Media |
| 2 Ch Linear PCM | 2 Ch, 32-192kHz, 16 / 24-bit | TV / TV ARC / TV eARC |
| Bitstream (5.1ch) | Dolby Digital, DTS Digital | TV / TV ARC / TV eARC |
| Bitstream (DD+) | Dolby Atmos Digital Plus | TV ARC / TV eARC |
| Bitstream | Dolby Atmos Digital Plus, Dolby Atmos TrueHD, DTS-HD MA, DTS:X | TV ARC / TV eARC |
DIGITAL AUDIO SIGNAL (OPTICAL/COAXIAL)
| Audio Signal Types | Audio Signal Formats | Compatible Media |
| 2 Ch Linear PCM | 2 Ch, 32-192kHz, 16 / 24-bit | CD, DVD-Video, DVD-Audio, etc. |
| Bitstream (5.1ch) | Dolby Digital, DTS Digital | DVD-Audio, etc. |
- Refer to documentation supplied with the playback device, and set the device appropriately.
- To decode audio bitstream signals on this unit, set the input source device appropriately so that the device outputs bitstream audio signals directly. Refer to documentation supplied with the device for details.
11 LEGAL & COMPLIANCE
FCC Class B Radio Interference Statement
NOTE: This equipment has been tested and found to comply with the limits for a Class B digital device, pursuant to Part 15 of the FCC Rules. These limits are designed to provide reasonable protection against harmful interference in a residential installation. This equipment generates, uses and can radiate radio frequency energy and, if not installed and used in accordance with the instructions, may cause harmful interference to radio communications. However, there is no guarantee that interference will not occur in a particular installation. If this equipment does cause harmful interference to radio or television reception, which can be determined by turning the equipment off and on, the user is encouraged to try to correct the interference by one or more of the following measures:
- Reorient or relocate the receiving antenna.
- Increase the separation between the equipment and receiver.
- Connect the equipment into an outlet on a circuit different from that to which the receiver is connected.
- Consult the dealer or an experienced radio/TV technician for help.
This device complies with Part 15 of the FCC Rules. Operation is subject to the following two conditions: (1) This device may not cause harmful interference, and (2) this device must accept any interference received, including interference that may cause undesired operation.
Warning: Changes or modifications to this unit not expressly approved by the party responsible for compliance could void the user's authority to operate the equipment.
Notice:
- The changes or modifications not expressly approved by the party responsible for compliance could void the user's authority to operate the equipment.
- Shielded interface cables and AC power cord, if any, must be used in order to comply with the emission limits.
- The manufacturer is not responsible for any radio or TV interference caused by unauthorized modification to this equipment. It is the responsibility of the user to correct such interference.
FCC RF Radiation Exposure Statement
- This transmitter must not be collocated or operating in conjunction with any other antenna or transmitter.
- This equipment complies with FCC radiation exposure limits set forth for an uncontrolled environment. This equipment should be installed and operated with minimum distance 20cm between the radiator & your body.
- FCC RF Warning
This equipment must be installed and operated in accordance with provided instructions and the antenna(s) used for this transmitter must be installed to provide a separation distance of at least 20cm from all persons and must not be co-located or operating in conjunction with any other antenna or transmitter. End-users and installers must be provided with antenna installation instructions and transmitter operating conditions for satisfying RF exposure compliance.
Disposal and Recycling
You must dispose of this product properly, according to local laws and regulations. Because this product contains electronic components and a battery, it must be disposed of separately from household waste. Contact local authorities to learn about disposal and recycling options.
| COMPATIBLE WITH ATMOS Dolby Vision | Manufactured under license from Dolby Laboratories. Dolby, Dolby Atmos, Dolby Surround, Dolby Vision Compatible and the double-D symbol are trademarks of Dolby Laboratories. |
| dts x | For DTS patents, see http://patents.dts.com. Manufactured under license from DTS Licensing Limited. DTS, the Symbol, DTS in combination with the Symbol, DTS:X, and the DTS:X logo are registered trademarks or trademarks of DTS, Inc. in the United States and/or other countries.®DTS, Inc. All Rights Reserved. |
| HDMI®HIGH-DEFINITION MULTIMEDIA INTERFACE | The terms HDMI and HDMI High-Definition Multimedia Interface, and the HDMI Logo are trademarks or registered trademarks of HDMI Licensing Administrator, Inc. in the United States and other countries. |
| Bluetooth | The Bluetooth®word mark and logos are registered trademarks owned by Bluetooth SIG, Inc. and any use of such marks by Nakamichi LLC is under license. Other trademarks and trade names are those of their respective owners. |
| Qualcomm®aptX®HD | Qualcomm® aptXTM HD is a product of Qualcomm Technologies, Inc. and/or its subsidiaries. Qualcomm is a trademark of Qualcomm Incorporated, registered in the United States and other countries. aptXTM is a trademark of Qualcomm Technologies International, Ltd., registered in the United States and other countries. |
12 HELP & TROUBLESHOOTING
1. HDMI ARC eARC - No Sound or Video
Performing a Soundbar Soft Reset can restore the soundbar settings back to factory default and refresh HDMI settings.
If your TV's connected to another sound system via HDMI previously, perform a Soundbar & TV Hard Reset + HDMI Connection Refresh to establish a new HDMI handshake.
Soundbar Soft Reset:
- Press SETUP button multiple times to locate RESET function
- Press ENTER button to select the function
- Press ENTER button again to confirm RESET function
- The soundbar will restart automatically to complete the reset sequence.
("HELLO" appears on soundbar LED and it will be back to TV ARC / eARC mode by default)
Soundbar & TV Hard Reset + HDMI Connection Refresh
- While all source devices are on, disconnect all HDMI cables connected to TV and soundbar as well as TV to soundbar
- Power OFF TV, soundbar and all source devices
- Unplug all devices from the AC outlets
- Wait for 5 minutes before plugging the TV, soundbar and source devices back to the AC outlets
- Power ON the soundbar, TV and all source devices
- While they are on, connect the TV and soundbar via HDMI ARC / eARC.
Once the connection is established, connect other source devices one at a time. Use Perfect Device Matching Tool on Pg 17 to create a customized setup guide based on your source devices.
2. Soundbar Intermittent Cut Out or No Sound
Perform a soft reset on the soundbar with the following steps:
- Press the SETUP button
- Toggle and select "RESET"
- Press ENTER button
- Disconnect the source device that is having issues from the soundbar or TV. Unplug the source device from the AC outlet for 5 minutes before powering it back on
- While the source device is on, connect it to the soundbar or TV. Use Perfect Device Matching Tool (bit.ly/device-matching-tool) to create a customized setup guide based on your device
- Get the best performance using the recommended AUDIO (bit.ly/audio-settings) + VIDEO (bit.ly/video-settings) settings
3. No Sound from Surround Speakers
Press the "ALL CH STEREO" or "SURROUND" buttons on the remote to enable Dolby Surround, Dolby Upmix or All Channel Stereo to get sound from all speakers.
4. Subwoofer or Surround Speakers Sound Abnormalities – Cut Out / Crackling / Popping / Distorting:
When there is a wireless device (E.g. Wireless LAN) using the same frequency (5.8Ghz) in near range to the soundbar (can be your neighbor's Wi-Fi router), the wireless connection between Subwoofer and Surround Speaker could become unstable. In this case, you can change the frequency channel as below:
- Press SETUP button on the remote a few times until soundbar LED displays "WL CH"
- Use the LEFT or RIGHT arrow to change the frequency channel*
- Press ENTER button on the remote
\*Notes:
- The default channel "WL AUTO" is optimized for avoiding wireless interference from external devices. If there is no audio popping / crackling / cut out from subwoofer(s) or surround speakers, it is recommended to keep using the default channel
- WL C1 - WL C6 are available for selection, depending on the type of interference
- Changing the radio frequency channel may affect the performance of other near wireless devices (e.g., wireless LAN) using the same frequency bandwidth
- Below is the table of the various radio frequencies and their respective channels we are using for each selection
| Selection | Channels | Frequency (MHz) |
| Auto (Default) | 149, 151, 153, 155, 159, 161, 163 | 5736, 5762, 5814 |
| WL C1 | 32, 33, 34, 35, 36 | 5180 |
| WL C2 | 38, 39, 40, 41, 42, 43, 44, 45, 46 | 5210 |
| WL C3 | 46, 47, 48, 49, 50 | 5240 |
| WL C4 | 149,151 | 5736 |
| WL C5 | 151,153, 155 | 5762 |
| WL C6 | 159, 161, 163 | 5814 |
If you are still having issues, visit:
bit.ly/92earc-subwoofers-audio-distortion. For other subwoofer related issues, visit: bit.ly/92earc-dual-subwoofers-faq
For expanded FAQ, scan QR code or visit: bit.ly/92earc-faq

NEED HELP WITH YOUR SHOCKWAFE?
Flip this side of the manual open for commonly asked questions.
ONE-STOP SUPPORT SOLUTION
www.helpdesk.nakamichi-usa.com
SPEAK TO OUR NINJAS BASED IN CALIFORNIA
support@nakamichi-usa.com, (415) 805 6913
(Weekdays 10am - 6:45pm PST; Saturday, Holidays 10am - 4:45pm PST)
BE PART OF THE NAKAMICHI SHOCKWAFE COMMUNITY
www.community.nakamichi-usa.com
NAKAMICHI USA. ALL RIGHTS RESERVED.


- USER MANUAL
- IMPORTANT SAFETY INSTRUCTIONS
- TABLE OF CONTENTS
- 1 UNDERSTANDING YOUR SOUNDBAR SYSTEM 4
- 2 SETTING UP YOUR HOME THEATER 8
- 3 UNDERSTANDING YOUR REMOTE CONTROL 23
- 4 BLUETOOTH AUDIO STREAMING 34
- 5 RE-PAIRING SUBWOOFERS WITH THE SYSTEM 35
- 6 INSTALLING THE WALL MOUNT 36
- 7 FIRMWARE UPGRADE 38
- 8 SPECIFICATIONS 39
- 9 WARRANTY INFORMATION & SUPPORT 40
- 10 GLOSSARY 41
- 11 LEGAL & COMPLIANCE 42
- 12 HELP & TROUBLESHOOTING 43
- 1 PACKAGE CONTENTS
- 1.2 CONTROLS & CONNECTIONS
- SOUNDBAR
- SUBWOOFERS & SURROUND SPEAKERS
- USING YOUR REMOTE CONTROL
- REMOTE ANGLE
- 2 SETTING UP YOUR HOME THEATER
- BEST SURROUND: SIGNATURE PLACEMENT (4 INDIVIDUAL SPEAKERS SETUP)
- TIP
- BETTER SURROUND: DIPOLE CONFIGURATION (SPEAKERS ARE ATTACHED TO FORM TWO PAIRS)
- HYBRID ELEVATION
- OPTION C1: 9.2CH SIDE ELEVATION
- OPTION C3: 9.2CH ALL ELEVATION
- OPTION C2: 9.2CH REAR ELEVATION
- 2.2 CONNECTING SURROUND SPEAKERS TO SUBWOOFERS
- 2.3 TURNING ON YOUR SOUNDBAR SYSTEM
- 2.4 CONNECTING YOUR TV
- VIA HDMI ARC / EARC
- DIGITAL OPTICAL BETTER, COAXIAL BETTER, AUX
- 2.5 LISTENING TO YOUR SOUNDBAR
- 2.6 SETTING UP YOUR TV
- WHAT IS ENHANCED AUDIO RETURN CHANNEL (ARC / EARC)
- AUDIO SETTINGS FOR TV
- WHAT IS CEC
- ENABLING CEC
- 2.7 CONNECTING YOUR CONTENT DEVICES
- CONNECTIONS CENTRAL - RECOMMENDED CONNECTION BASED ON DEVICES
- HDMI CONNECTION SETUP
- BACK OF SOUNDBAR
- NON-HDMI CONNECTION SETUP
- ADVANCED SETUP - FOUR DEVICE SETUP FOR HDTV
- ADVANCED SETUP - THREE DEVICE SETUP FOR HDTV WITHOUT HDMI ARC / EARC
- 2.8 SETTING UP YOUR CONTENT DEVICES
- RECOMMENDED AUDIO SETTINGS FOR BEST AUDIO
- APPLE TV® 4K (2021)
- SETTING AUDIO OUTPUT
- AMAZON FIRE® TV CUBE / FIRE® TV 4K
- ROKU™ ULTRA 4K (2020)
- SETTING AUDIO FORMAT
- NVIDIA® SHIELD PRO 4K
- PLAYSTATION® 5
- XBOX® SERIES X
- NINTENDO® SWITCH
- SONY® BLU-RAY PLAYER
- DIRECT TV®
- DISH® SATELLITE TV SET-TOP BOX
- XFINITY® SET-TOP BOX
- 3 UNDERSTANDING YOUR REMOTE CONTROL
- SELECTING DIFFERENT INPUT SOURCES
- ACCESSING AUDIO PRESETS
- EQ (EQUALIZER)
- NIGHT MODE
- ACCESSING CHANNEL MAPPING / UPMIXING
- CHANNEL MAPPING
- ACCESSING SETTINGS BUTTON (ACCESSIBLE FROM ALL INPUTS)
- ACCESSING SETUP BUTTON (ACCESSIBLE FROM ALL INPUTS)
- ACCESSING ROOM SIZE BUTTON
- G ACCESSING SSE MAX MODE
- SPATIAL SURROUND ELEVATION (SSE) MAX MODE
- H ACCESSING INFO BUTTON
- I SAVING AUDIO SETTINGS TO SYSTEM MEMORY
- SAVING SETTINGS TO SYSTEM MEMORY
- LOADING THE SETTING
- 4 WIRELESS BLUETOOTH AUDIO STREAMING
- A BLUETOOTH 5.0 WITH APTX™ HD
- MAXIMIZING SIGNAL
- B BLUETOOTH FUNCTIONS
- TO PAIR THE SOUNDBAR WITH A BLUETOOTH DEVICE
- TO DISCONNECT THE SOUNDBAR WITH A PAIRED BLUETOOTH DEVICE
- TO SWITCH TO BLUETOOTH MODE
- 5 RE-PAIRING SUBWOOFERS WITH THE SYSTEM
- NOTE
- 6 INSTALLING THE WALL MOUNT
- A MOUNTING SOUNDBAR
- B MOUNTING SURROUND SPEAKERS
- 7 FIRMWARE UPGRADE
- CHECKING THE FIRMWARE VERSION
- 8 SPECIFICATIONS
- SURROUND LEFT & RIGHT
- SURROUND BACK LEFT & RIGHT
- WIRELESS LEFT & RIGHT SUBWOOFERS
- CONNECTIVITY
- DIGITAL AUDIO
- PERFORMANCE
- AUDIO PROCESSING
- REMOTE CONTROL
- DIMENSIONS (L X W X H), WEIGHT & POWER RATING
- 9 WARRANTY INFORMATION & SUPPORT
- LIMITED WARRANTY (U.S. ONLY)
- CUSTOMER SUPPORT
- 10 GLOSSARY
- DOLBY ATMOS OBJECT-BASED AUDIO
- DOLBY VISION
- DOLBY TRUEHD
- DOLBY DIGITAL PLUS
- DOLBY DIGITAL
- DOLBY SURROUND
- DOLBY UPMIX
- DTS:X OBJECT-BASED AUDIO
- DTS-HD MASTER AUDIO
- DTS-HD HIGH RESOLUTION AUDIO
- DTS DIGITAL SURROUND
- NEURAL:X
- DTS:X DIALOG CONTROL
- PCM (PULSE CODE MODULATION)
- LIP SYNC
- DYNAMIC RANGE CONTROL (DRC)
- POWER SAVING (ECO MODE)
- SPATIAL SURROUND ELEVATION (SSE) MAX PROCESSING TECHNOLOGY
- SUBWOOFER CROSSOVER FREQUENCY
- HDMI
- HDMI ARC / EARC
- HDMI-CEC CONTROL
- HDCP
- WHAT IS APTX™ HD
- 11 LEGAL & COMPLIANCE
- FCC CLASS B RADIO INTERFERENCE STATEMENT
- NOTICE
- FCC RF RADIATION EXPOSURE STATEMENT
- DISPOSAL AND RECYCLING
- 12 HELP & TROUBLESHOOTING
- HDMI ARC EARC - NO SOUND OR VIDEO
- SOUNDBAR SOFT RESET
- SOUNDBAR & TV HARD RESET + HDMI CONNECTION REFRESH
- SOUNDBAR INTERMITTENT CUT OUT OR NO SOUND
- NO SOUND FROM SURROUND SPEAKERS
- SUBWOOFER OR SURROUND SPEAKERS SOUND ABNORMALITIES – CUT OUT / CRACKLING / POPPING / DISTORTING
- NOTES
Marque : NAKAMICHI
Modèle : Shockwafe Ultra 9.2 eARC
Catégorie : Haut-parleur