
NP2000 - Projecteur NEC - Notice d'utilisation et mode d'emploi gratuit
Retrouvez gratuitement la notice de l'appareil NP2000 NEC au format PDF.


| Type de produit | Projecteur |
| Marque | NEC |
| Modèle | NP2000 |
| Résolution native | XGA (1024 x 768) |
| Luminosité | 2000 lumens ANSI |
| Contraste | 3000:1 |
| Durée de vie de la lampe | 2000 heures (mode normal) |
| Alimentation électrique | 100-240 V AC, 50/60 Hz |
| Consommation électrique | 280 W (mode veille < 1 W) |
| Dimensions (L x P x H) | 300 x 230 x 100 mm |
| Poids | 3,5 kg |
| Connectivité | HDMI, VGA (D-sub), S-Vidéo, Vidéo composite, audio entrée/sortie |
| Fonctions principales | Correction trapèze verticale, zoom numérique, mode économique, haut-parleur intégré |
| Entretien et nettoyage | Nettoyage régulier du filtre à air (tous les 500 heures) |
| Sécurité | Ventouse de sécurité Kensington, mot de passe utilisateur |
| Pièces détachées et réparabilité | Lampe de rechange disponible (modèle NP13LP) |
| Informations générales | Projecteur conçu pour l'entreprise et l'éducation, compatible montage au plafond |
FOIRE AUX QUESTIONS - NP2000 NEC
Questions des utilisateurs sur NP2000 NEC
0 question sur cet appareil. Repondez a celles que vous connaissez ou posez la votre.
Poser une nouvelle question sur cet appareil
Téléchargez la notice de votre Projecteur au format PDF gratuitement ! Retrouvez votre notice NP2000 - NEC et reprennez votre appareil électronique en main. Sur cette page sont publiés tous les documents nécessaires à l'utilisation de votre appareil NP2000 de la marque NEC.
MODE D'EMPLOI NP2000 NEC
NP1000/2000 Installation Guide
Desktop and Ceiling Mount
v 1.3
Contents
Product Description, Lens Specs, Screen/Aspect Ratio
Notes and Formulas Pg 1
Diagrams & Distance Charts; 4:3 Pg 2
1 6 : 9 Pg 3
Lens Shift Adjustable Range Pg 4
Cabinet Dimensions Pg 5
Lens Dimensions Pg 6
Ceiling Mount Dimensions Pg 7
Ceiling Mount Dimensions Pg 8
Input Panel and Control Codes Pg 9

natural_image
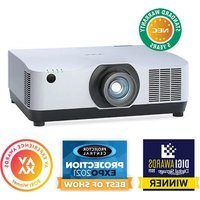
Exterior view of a white projector with a black lens and control buttons (no visible text or symbols)Product Description
| Type: | 3 panel LCD projector,0.8 p-Si TFT w/MLA | Dimensions: 15.7"(W) x 5.9"(H) x 14.1"(D) | |
| Resolution: | 1024 x 768 (4:3) / 1024 x 576 (16:9) | Weight: 16.1 lbsBrightness: NP1000 – 3500 ANSI LumensN P 2 0 0 0 – 4 0 00 | |
| Network Ready, integrated wired/optional wireless | Manual: Lens Shift, Horizontal & Vertical /Zoom/ Focus | ||
Lens Specifications
| NP01FL: | Throw Ratio: ~ 0.8:1Screen Sizes: 40"-150" | Focal Length: 13.2mmF/#:2.3 | NP03FL: | Throw Ratio:~1.94 - 3.07:1Screen Sizes: 40" - 500" | Focal Length:31.6 - 50.2mmF/#:2.2 |
| NP02FL: | Throw Ratio: ~1.18 - 1.54:1Screen Sizes: 30" - 500" | Focal Length: 19.42 - 25.26mmF/#:2.2 | NP04FL: | Throw Ratio:2.98 -4.77:1Screen Sizes: 60" - 500" | Focal Length:48.8 - 77.6mmF/#:2.2 |
| Standard: | Throw Ratio:~1.5 - 2.0:1Screen Sizes: 30" - 500" | Focal Length:24.4 - 32.5mmF/#:1.7 | NP05FL: | Throw Ratio:4.62 - 7.02:1Screen Sizes: 80" - 500" | Focal Length:76.6 - 116.5mmF/#:2.2 |
Screen/Aspect Ratio
Both 4:3 and 16:9 screens are fully supported with proper aspect ratio control for both type sources using NEC developed scaling technology. Menu selections have settings for each screen type and aspect ratio control for each source type.
Notes
- For screen sizes not indicated on the projection tables, use the formulas below.
If the figures on the tables do not match the results of formulas, use the figures in the table. - All calculations are based on 4:3 aspect ratio.
• Distances are in inches, for millimeters multiply by 25.4.
• Distances may vary ±5%.
Formulas
The Projection Formulas use the image width for calculation. Image width is the same for all aspect ratios, only vertical image size varies. For proper projector placement, determine the image width for a desired screen size. Use the Screen Formulas below to calculate all screen dimensions. Plug in the image width for "W" in the Projection Formulas.
Refer to the diagrams and charts for popular screen sizes on page 2 and 3:
Projection Formulas:
| NP01FL: | C = 0.8325W - 1.33 | |
| NP02ZL: | C(Wide) = 1.2220W - 1.798 | C(Tele) = 1.5894W - 1.795 |
| Standard: | C(Wide) = 1.5455W - 2.022 | C(Tele) = 2.0555W - 2.015 |
| NP03ZL: | C(Wide) = 2.0069W - 2.830 | C(Tele) = 3.1710W - 2.840 |
| NP04ZL: | C(Wide) = 3.0537W - 4.830 | C(Tele) = 4.8860W - 4.850 |
| NP05ZL: | C(Wide) = 4.8275W - 7.625 | C(Tele) = 7.3379W - 7.645 |
Definitions:
| W = Image Width |
| H = Image Height (size) |
| C = Throw distance |
4:3 Screen Formulas:
| W = H × 4/3 | ||||||||||
| H | = | W | x | 3 | / | 4 | ||||
| D | i | a | g | o | n | a | l | = | W | |
16:9 Screen Formulas:
| W = H x 1 6 / 9 |
| H = W x 9/16 |
| Screen Diagonal = W x 18.358/16 |
Note: Tilting the front of the projector from level up or down by more than 45^ could reduce lamp life up to 20%.
www.necvisualsystems.com
NP1000/2000
Page 1 of 9
NP1000/2000 Installation Guide
Desktop and Ceiling Mount
v 1.3
Projection Distance and Screen Size for Ceiling Mount
The following shows the proper relative positions of the projector and screen. Refer to the table to determine the position of installation.
Distances are in inches. For millimeters multiply by 25.4.
Ceiling Mount Installation
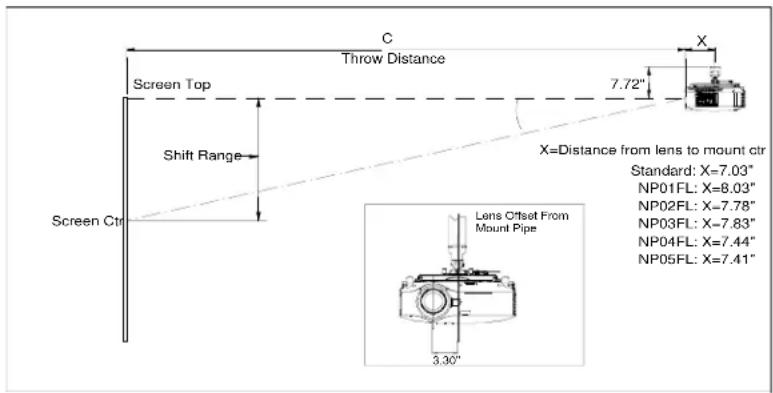
Desktop Installation
Note: Lens shift feature is not available with NP01FL (rear lens) NP01FL should be used only for "zero degree" / "no-offset" applications.

Distance Chart for popular 4:3 screens
| Screen Size (4:3) | Rear Lens | Zoom Lenses | ||||||||||||
| NP01FL | Standard | NP02ZL | NP03ZL | NP04ZL | NP05ZL | |||||||||
| Diagonal inches | Width(W) | Height (H) | 0.8:1 | 1.5 - 2.0:1 | 1.18 - 1.54:1 | 1.94 - 3.07:1 | 2.98 - 4.77:1 | 4.62 - 7.02:1 | ||||||
| inches | inches | inches | inches | inches | ||||||||||
| 40 | 32 | 24 | 25.38 | 47.37 | - | 63.8 | 37.3 | - | 49.07 | 61.4 | 98.6 | NA | NA | |
| 60 | 48 | 36 | 38.7 | 72.11 | - | 96.6 | 56.9 | - | 74.5 | 93.5 | - | 149.4 | 141.7 | 229.7 |
| 67 | 53.6 | 40.2 | 43.3 | 80.8 | - | 108.2 | 63.7 | - | 83.4 | 104.7 | - | 167.1 | 158.8 | 257.0 |
| 72 | 57.6 | 43.2 | 46.6 | 86.9 | - | 116.4 | 68.6 | - | 89.8 | 112.8 | - | 179.8 | 171.1 | 276.6 |
| 84 | 67.2 | 50.4 | 54.6 | 101.8 | - | 136.1 | 80.3 | - | 105.0 | 132.0 | - | 210.3 | 200.4 | - |
| 90 | 72 | 54 | 58.6 | 109.2 | - | 146.0 | 86.2 | - | 112.6 | 141.7 | - | 225.5 | 215.0 | - |
| 100 | 80 | 60 | 65.2 | 121.6 | - | 162.4 | 95.96 | - | 125.4 | 157.7 | - | 250.8 | 239.5 | - |
| 120 | 96 | 72 | 78.5 | 146.3 | - | 195.3 | 115.5 | - | 150.8 | 189.8 | - | 301.6 | 288.3 | - |
| 150 | 120 | 90 | 98.46 | 183.4 | - | 244.6 | 144.8 | - | 188.9 | 238.0 | - | 377.7 | 361.6 | - |
| 180 | 144 | 108 | NA | 220.5 | - | 294.0 | 174.2 | - | 227.1 | 286.2 | - | 453.8 | 434.9 | - |
| 210 | 168 | 126 | NA | 257.6 | - | 343.3 | 203.5 | - | 265.2 | 334.3 | - | 529.9 | 508.2 | - |
| 240 | 192 | 144 | NA | 294.7 | - | 392.6 | 232.8 | - | 303.4 | 382.5 | - | 606.0 | 581.5 | - |
| 270 | 216 | 162 | NA | 331.8 | - | 442.0 | 262.2 | - | 341.5 | 430.7 | - | 682.1 | 654.8 | - |
| 300 | 240 | 180 | NA | 368.9 | - | 491.3 | 291.5 | - | 379.7 | 478.8 | - | 758.2 | 728.1 | - |
| 400 | 320 | 240 | NA | 492.6 | - | 655.7 | 389.2 | - | 506.8 | 639.4 | - | 1011.9 | 972.4 | - |
| 500 | 400 | 300 | NA | 616.30 | - | 820.2 | 487.0 | - | 634.0 | 799.9 | - | 1265.6 | 1216.7 | - |
Note: For screen sizes not indicated on the projection tables, use the formulas on page 1.
NP1000/2000 Installation Guide
Desktop and Ceiling Mount
v 1.3
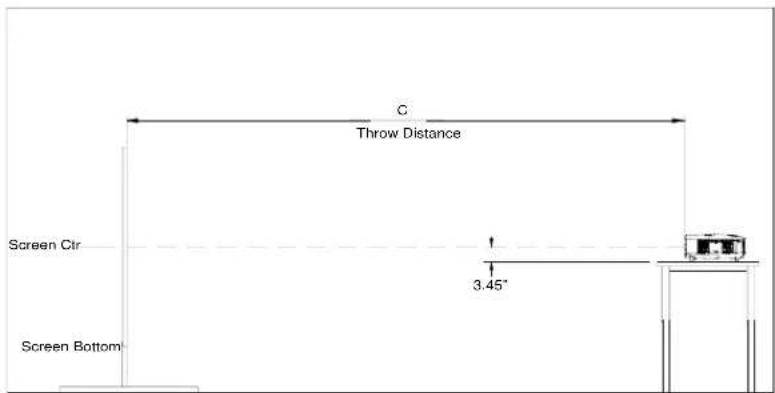
Projection Distance and Screen Size for Ceiling Mount
The following shows the proper relative positions of the projector and screen. Refer to the table to determine the position of installation.
Distances are in inches. For millimeters multiply by 25.4.
Ceiling Mount Installation

Desktop Installation
Note: Lens shift feature is not available with NP01FL (rear lens) NP01FL should be used only for "zero degree" / "no-offset" applications.
Distance Chart for popular 16:9 screens
| Screen Size (16:9) | Rear Lens | Zoom Lenses | |||||||||||||
| NP01FL | Standard | NP02ZL | NP03ZL | NP04ZL | NP05ZL | ||||||||||
| Diagonal inches | Width(W) | Height (H) | 0.8:1 | 1.5 - 2.0:1 | 1.18 - 1.54:1 | 1.94 - 3.07:1 | 2.98 - 4.77:1 | 4.62 - 7.02:1 | |||||||
| inches | inches inches | inches | inches | inches | inches | inches | inches | ||||||||
| 92 | 80 | 45 | 65.24 | 121.6 | - | 162.4 | 96.0 | - | 125.4 | 157.7 | 250.8 | 239.5 | 386.0 | 366.4 | 579.4 |
| 100 | 87 | 49 | 71.1 | 132.4 | - | 176.8 | 104.5 | - | 136.5 | 171.8 | 273.0 | 260.8 | 420.2 | 399.5 | 630.8 |
| 106 | 92 | 52 | 75.2 | 140.1 | - | 187.1 | 110.6 | - | 144.4 | 181.8 | 288.9 | 276.1 | 444.7 | 423.1 | 667.4 |
| 110 | 96 | 54 | 78.5 | 146.3 | - | 195.3 | 115.5 | - | 150.8 | 189.8 | 301.6 | 288.3 | 464.2 | 442.0 | 696.8 |
| 119 | 104 | 58.8 | 85.2 | 158.7 | - | 211.8 | 125.3 | - | 163.5 | 205.9 | 326.9 | 312.8 | 503.3 | 494.4 | 755.5 |
| 123 | 107 | 60 | 87.7 | 163.3 | - | 217.9 | 129.0 | - | 168.3 | 211.9 | 336.5 | 321.9 | 518.0 | 508.9 | 777.5 |
| 133 | 116 | 65 | 95.1 | 177.2 | - | 236.4 | 140.0 | - | 182.6 | 230.0 | 365.0 | 349.4 | 561.9 | 552.4 | 843.6 |
| 135 | 118 | 66 | 96.8 | 180.3 | - | 240.5 | 142.4 | - | 185.8 | 234.0 | 371.3 | 355.5 | 571.7 | 562.0 | 858.2 |
| 159 | 139 | 78 | NA | 212.8 | - | 283.7 | 168.1 | - | 219.1 | 276.1 | 437.9 | 419.6 | 674.3 | 663.4 | 1012.3 |
| 161 | 140 | 79 | NA | 214.3 | - | 285.8 | 169.3 | - | 220.7 | 278.1 | 441.1 | 422.7 | 679.2 | 668.2 | 1019.7 |
| 229 | 200 | 113 | NA | 307.1 | - | 409.1 | 242.6 | - | 316.1 | 398.6 | 631.4 | 605.9 | 972.4 | 957.9 | 1459.9 |
| 275 | 240 | 135 | NA | 368.9 | - | 491.3 | 291.5 | - | 379.7 | 478.8 | 758.2 | 728.1 | 1167.8 | 1151.0 | 1753.5 |
| 367 | 320 | 180 | NA | 492.6 | - | 655.7 | 389.2 | - | 506.8 | 639.4 | 1011.9 | 972.4 | 1558.7 | 1537.2 | 2340.5 |
| 459 | 400 | 225 | NA | 616.3 | - | 820.2 | 487.0 | - | 634.0 | 799.9 | 1265.6 | 1216.7 | 1949.6 | 1923.4 | 2927.5 |
Note: For screen sizes not indicated on the projection tables, use the formulas on page 1.
Lens Shift Adjustable Range

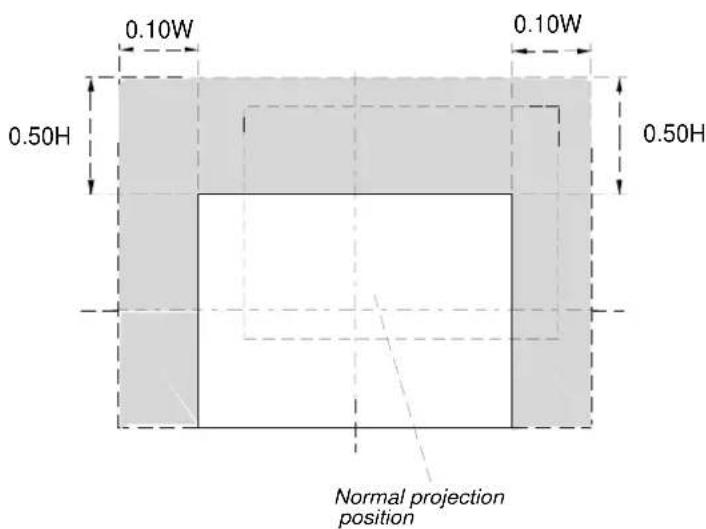
Lens Shift Range for Desktop and Ceiling Mount Application
The diagram below shows the location of the image position in the lens. The lens can be shifted within the shaded area as shown using the normal projection position as a starting point.
Note: Lens shift feature is not available with NP01FL (rear lens). NP01FL should be used only for "zero degree" / "no-offset" applications.
Maximum Possible Range
for Standard Lens/NP02ZL/NP03ZL/NP04ZL/NP05ZL:
Up: 0.5H
Right: 0.10W
Left: 0.10W
(W: width of projected image, H: height of projected image)
NP1000/2000 Installation Guide
Desktop and Ceiling Mount
v 1.3
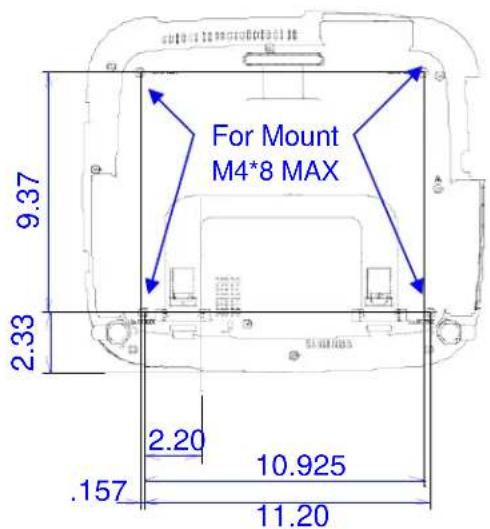
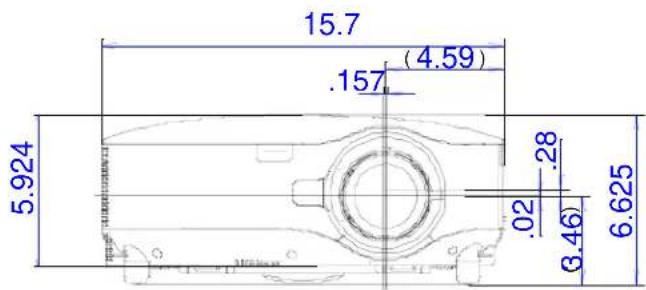
Cabinet Dimensions
The following diagrams show the cabinet dimensions for the NP1000/2000.
Dimensions are in inches. For millimeters multiply by 25.4.
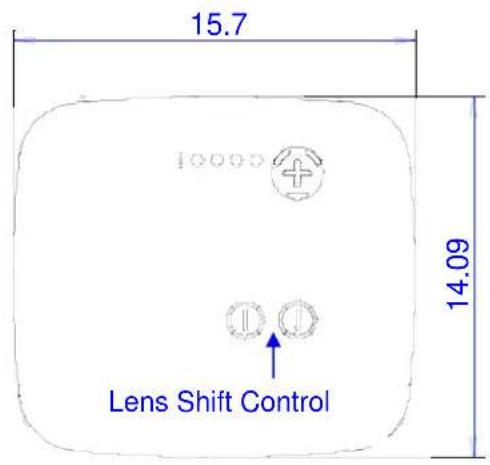


Lens Dimensions
The following drawings show the added dimensions for the optional lenses
Dimensions are in inches. For millimeters multiply by 25.4.

NP1000/2000 Installation Guide
Desktop and Ceiling Mount
v 1.3
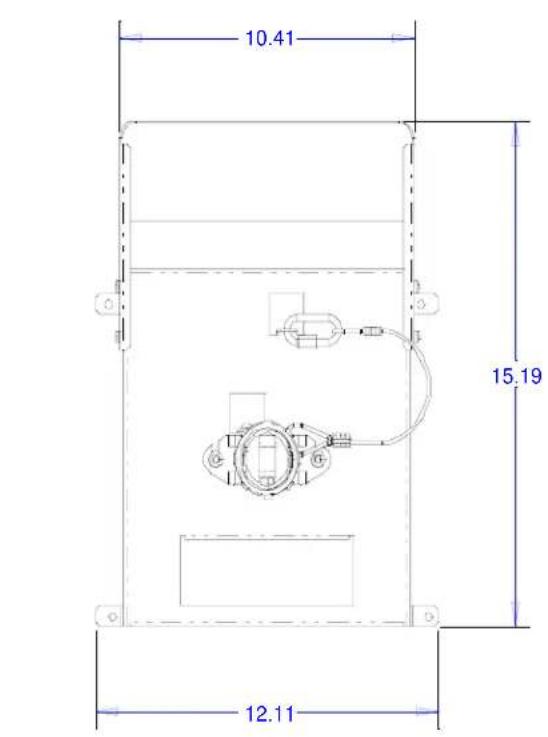
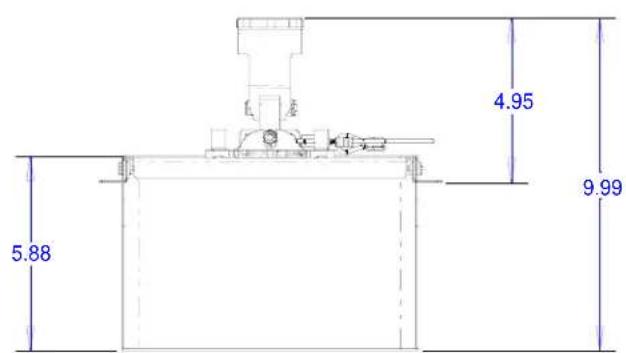
Optional Ceiling Mount Dimensions (Model #: NP1000CM)
The following diagrams show ceiling mount dimensions for the NP1000/2000.
Dimensions are in inches. For millimeters multiply by 25.4.

natural_image
Technical line drawings of a projector and its internal components (no text or symbols)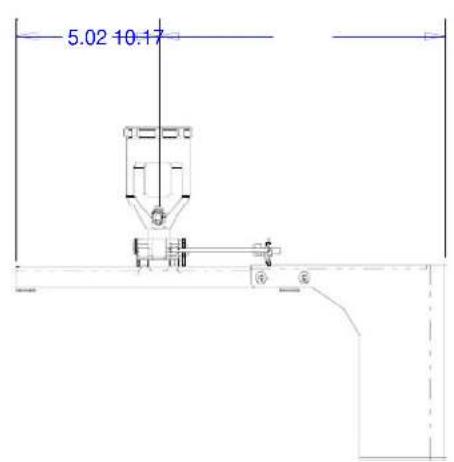
Pole Ceiling Mount with Input Cover
NP1000/2000 Installation Guide
Desktop and Ceiling Mount
v 1.3
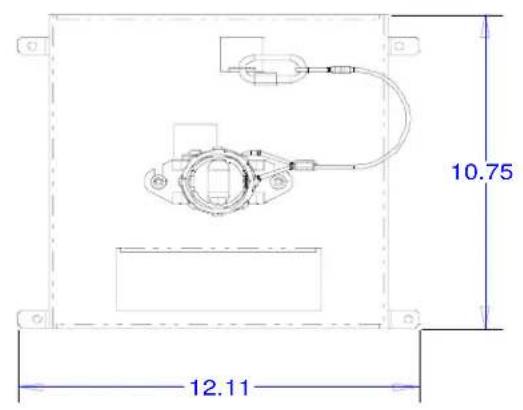
Optional Ceiling Mount Dimensions (Model #: NP1000CM) (continued)
The following diagrams show ceiling mount dimensions for the NP1000/2000.
Dimensions are in inches. For millimeters multiply by 25.4.

natural_image
Technical line drawing of a mechanical assembly with no visible text or symbols
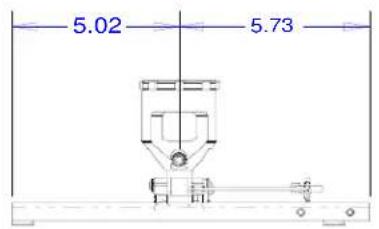
POLE MOUNT W/O I/O COVER
NP1000/2000 Installation Guide
Desktop and Ceiling Mount
v 1.3

PC Control Codes
| F | u | n | c | t | l | o | n | C | o | d | e | D | a | t | a | |||||
| POWER | ON | 02H | 00H | 00H | 00H | 00H | 00H | 02H | ||||||||||||
| POWER | OFF | 02H | 01H | 00H | 00H | 00H | 03H | |||||||||||||
| INPUT SELECT RGB 1 | 02H | 03H | 00H | 00H | 00H | 02H | 01H | 01H | 01H | 09H | ||||||||||
| INPUT SELECT RGB 2 | 02H | 03H | 00H | 00H | 02H | 01H | 02H | 0AH | ||||||||||||
| INPUT SELECT RGB 3 | 02H | 03H | 00H | 00H | 02H | 01H | 1AH | 22H | ||||||||||||
| INPUT SELECT COMPONENT | 02H | 03H | 00H | 00H | 02H | 01H | 10H | 18H | ||||||||||||
| INPUT SELECT VIDEO | 02H | 03H | 00H | 00H | 02H | 01H | 06H | 0EH | ||||||||||||
| INPUT SELECT S-VIDEO | 02H | 03H | 00H | 00H | 02H | 01H | 0BH | 13H | ||||||||||||
| INPUT SELECT PC CARD VIEWER | 02H | 03H | 00H | 00H | 02H | 01H | 1FH | 27H | ||||||||||||
| INPUT SELECT LAN | 02H | 03H | 00H | 00H | 02H | 01H | 20H | 28H | ||||||||||||
| PICTURE MUTE ON | 02H | 10H | 00H | 00H | 00H | 12H | ||||||||||||||
| PICTURE MUTE OFF | 02H | 11H | 00H | 00H | 00H | 13H | ||||||||||||||
| SOUND MUTE ON | 02H | 12H | 00H | 00H | 00H | 14H | ||||||||||||||
| SOUND MUTE OFF | 02H | 13H | 00H | 00H | 00H | 15H | ||||||||||||||
| ON SCREEN MUTE ON | 02H | 14H | 00H | 00H | 00H | 16H | ||||||||||||||
| ON SCREEN MUTE OFF | 02H | 15H | 00H | 00H | 00H | 17H | ||||||||||||||
Cable Connection
Communication Protocol:
Baud Rate: 38400 bps (for cable lengths longer than 20', it is recommended changing to 9600 bps in setup menu)
Data Length: 8 bits
Parity: No Parity
Stop Bit: One bit
X on/off: None
Communications: Full duplex
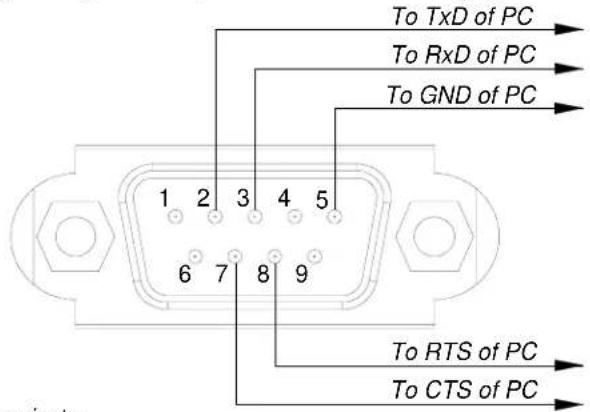
PC Control Connector (D-Sub 9P)
NOTE: Pins 1, 4, 6, and 9 are used inside the projector.
Jumper "Request to send" and "Clear to Send" together on both ends of the cable to simplify cable connection.



- NP1000/2000 Installation Guide
- Desktop and Ceiling Mount
- Contents
- Screen/Aspect Ratio
- Notes
- Formulas
- Projection Distance and Screen Size for Ceiling Mount
- Ceiling Mount Installation
- Desktop Installation
- Distance Chart for popular 4:3 screens
- Distance Chart for popular 16:9 screens
- Lens Shift Range for Desktop and Ceiling Mount Application
- Maximum Possible Range
- Cabinet Dimensions
- Lens Dimensions
- Optional Ceiling Mount Dimensions (Model #: NP1000CM)
- Pole Ceiling Mount with Input Cover
- Cable Connection
- Communication Protocol:
- PC Control Connector (D-Sub 9P)
Marque : NEC
Modèle : NP2000
Catégorie : Projecteur