
HY-VM7B - Support mural TOA - Notice d'utilisation et mode d'emploi gratuit
Retrouvez gratuitement la notice de l'appareil HY-VM7B TOA au format PDF.


| Type de produit | Support mural pour haut-parleur ou équipement audio |
| Marque | TOA |
| Modèle | HY-VM7B |
| Dimensions (L x H x P) | 250 x 150 x 100 mm (estimé) |
| Poids du support | 1,5 kg (estimé) |
| Charge maximale | 20 kg (estimé) |
| Matériau | Acier laqué |
| Couleur | Noir |
| Fixation murale | Visserie fournie, chevilles pour béton et brique |
| Inclinaison verticale | +/- 15° (estimé) |
| Rotation horizontale | +/- 30° (estimé) |
| Compatibilité | Haut-parleurs avec fixation arrière standard (type insert) |
| Entretien et nettoyage | Essuyer avec un chiffon doux sec ; ne pas utiliser de produits abrasifs |
| Sécurité | Ne pas dépasser la charge maximale ; vérifier régulièrement la fixation murale |
| Pièces détachées et réparabilité | Vis de fixation disponibles ; support non réparable, remplacer l'ensemble |
| Informations générales | Utilisation en intérieur ; température de fonctionnement : -10 à +50°C |
| Garantie | 2 ans (selon conditions du fabricant) |
FOIRE AUX QUESTIONS - HY-VM7B TOA
Questions des utilisateurs sur HY-VM7B TOA
0 question sur cet appareil. Repondez a celles que vous connaissez ou posez la votre.
Poser une nouvelle question sur cet appareil
Téléchargez la notice de votre Support mural au format PDF gratuitement ! Retrouvez votre notice HY-VM7B - TOA et reprennez votre appareil électronique en main. Sur cette page sont publiés tous les documents nécessaires à l'utilisation de votre appareil HY-VM7B de la marque TOA.
MODE D'EMPLOI HY-VM7B TOA
SPEAKER RIGGING BRACKETS HY-VM7B
HY-VM7W
Thank you for purchasing TOA's Speaker Rigging Bracket.
Please carefully follow the instructions in this manual to ensure long, trouble-free use of your equipment.
TABLE OF CONTENTS
- SAFETY PRECAUTIONS .... 1
- GENERAL DESCRIPTION ...... 2
- MOUNTING THE SPEAKER ON A WALL (using the optional HY-WM7B or HY-WM7W bracket) ..... 2
- MOUNTING THE SPEAKER TO A CEILING (using the optional HY-C0801 or HY-C0801W bracket) .. 6
- SUSPENDING THE SPEAKER FROM A CEILING (only the T-bracket is used) 8
- DIRECT SPEAKER CEILING MOUNTING (only the T-bracket is used) 10
- SPECIFICATIONS ...... 12
1. SAFETY PRECAUTIONS
- Before installation or use, be sure to carefully read all the instructions in this section for a safe operation.
- Be sure to follow all the precautionary instructions in this section, which contain important warnings and/or cautions regarding safety.
• After reading, keep this manual handy reference.
WARNING
Indicates a potentially hazardous situation which, if mishandled, could result in death or serious personal injury.
• Refer all installation work to the dealer from whom the speaker was purchased. Installation for requires extensive technical knowledge and experience. The speaker may fall off if incorrectly installed, resulting in possible personal injury.
- Flying Precautions
Be sure to follow the instructions below. Otherwise, the suspension wires or belts may be off or snap and the speaker may fall off, causing injury.
- Check to confirm that the suspension belts are strong enough to withstand the speaker load.
- The connectors of the suspension wires and belts must be securely linked with those of the speaker.
- All parts and components (such as enclosures, metal pieces, and screws) must be free from any deformation, crack, and corrosion.
correct Be sure to use screws supplied with the optional flying hardware when installing the speaker using such hardware.
• Install the speaker only in a location that can structurally support the weight of the speaker and for the mounting bracket. Doing otherwise may result in the speaker falling down and causing personal injury and/or property damage.
- Since the bracket is designed for indoor use, do not install it outdoors. If installed outdoors, the aging of parts causes the speaker to fall off, resulting in personal injury. Also, when it gets wet with rather there is a danger of electric shock.
- Owing to the speaker's size and weight, be that at least two persons are available to install the speaker. Failure to do so could result in personal living injury.
- Do not use other methods than specified to mount the bracket. Extreme force is applied to the bracket and the speaker could fall off, possibly resulting in personal injuries.
- Attach the safety wire to the speaker. If not attached, person could fall off, resulting in personal injury.
- Use safety wires when installing speakers. If r wired, and personal injury could result if a speaker should accidentally fall.
- Use nuts and bolts that are appropriate for the ceiling's or wall's structure and composition. Failure to do so may cause the speaker to fall, resulting in
material damage and possible personal injury.
- Tighten each nut and bolt securely. the bracket has no loose joints after to prevent accidents that could result injury.
- Use the HX-7B or HY-7W Speaker S combination. Doing otherwise may cause the speaker or component to fall off, resulting in personal injury.
- Do not mount the speaker in locations to constant vibration. The mounting bracket can be damaged by excessive vibration, poten causing the speaker to fall, which could personal injury.
- Avoid installing the speaker in locations as in indoor swimming facilities that are ventilated. In such locations, the bracket vulnerable to corrosion, eventually allowing the speaker to fall resulting in personal injury.
sure! that
CAUTION
allation Indicates a potentially hazardous situation which, if mishandled, could result in moderate or minor personal injury, and/or property damage.
System in
- Avoid touching the bracket's sharp metal edge prevent injury.
- Do not place heavy objects on the speaker as this exposed may cause it to fall or break which may result in personal injury and/or property damage. In addition,ally, the object itself may fall off and cause injury and/or result in damage:
- Do not stand or sit on, nor hang down from such bracket as this may cause the speaker to fall down or drop, resulting in personal injury and/or property may be damage.
- Have the bracket checked periodically by the shop from where it was purchased. Failure to do so may result in corrosion or damage to the bracket that could cause the speaker to fall, possibly causing personal injury.
2. GENERAL DESCRIPTION
The HY-VM7 Series Speaker Rigging Brackets are used to connect the HX-7B or HX-7W Speaker System to the optional HY-WM7B or HY-WM7W Speaker Wall Mounting Brackets or HY-C0801 or HY-C0801W Speaker Ceiling Mounting Brackets. It is also possible to suspend the speaker system from the ceiling or mount it to the ceiling or beams with the use of the HY-VM7 bracket.
3. MOUNTING THE SPEAKER ON A WALL
(using the optional HY-WM7B or HY-WM7W bracket)
Mount a single HX-7B or HX-7W Speaker System to the wall by using the HY-VM7 in combination with optional HY-WM7B or HY-WM7W bracket.
3.1. Mounting Diagrams
[Component disassembly] [Completed installation]
HY-WM7B or HY-WM7W
Speaker Wall Mounting Bracket

![TOA HY-VM7B - [Component disassembly] [Completed installation] - 2](/content/2026/06/1388982/images/13ccd72084b91d86d1543d8222c7aea001594df9f862bddc4a66e6b1beed74c5.jpg)
natural_image
Technical line drawing of a mechanical assembly with stacked components and a bracket (no text or symbols)Note
Only one HX-7B or HX-7W speaker can be mounted. Two joined speakers cannot be mounted.
3.2. Installation

WARNING
Tighten the bolts securely, as instructed below.
Failure to follow instructions precisely could result in a falling and potential personal injury.
speaker
- Ensure that all bolts are securely inserted as far as their threads go, then securely fasten each bolt with a nut.
- Tighten all the bolts with the designated tightening torque. For tightening, use a Phillips screwdriver, or open- or box-end wrench.
Step 1. Attach the angle bracket to the T-bracket.
Use four of the supplied bolts to secure.
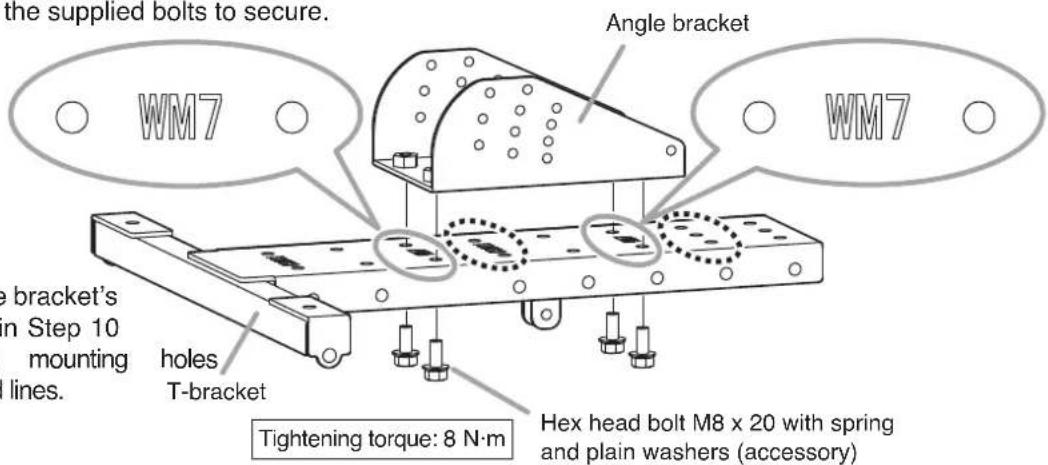
Note
Only when the angle bracket's angle is set to 25^ in Step 10 (p. 5), use the mounting enclosed with dashed lines.
Step 2. Attach the mounting base to the angle bracket. Temporarily secure it in the angle bracket's 20^ position* using four of the supplied bolts.
* 25^ position only when the angle bracket's angle is set to 25^ .


Step 3. Attach Bracket B of the HY-WM7B or HY-WM7W to the mounting base. Use four of the bolts supplied with the HY-WM7B or HY-WM7W to secure.

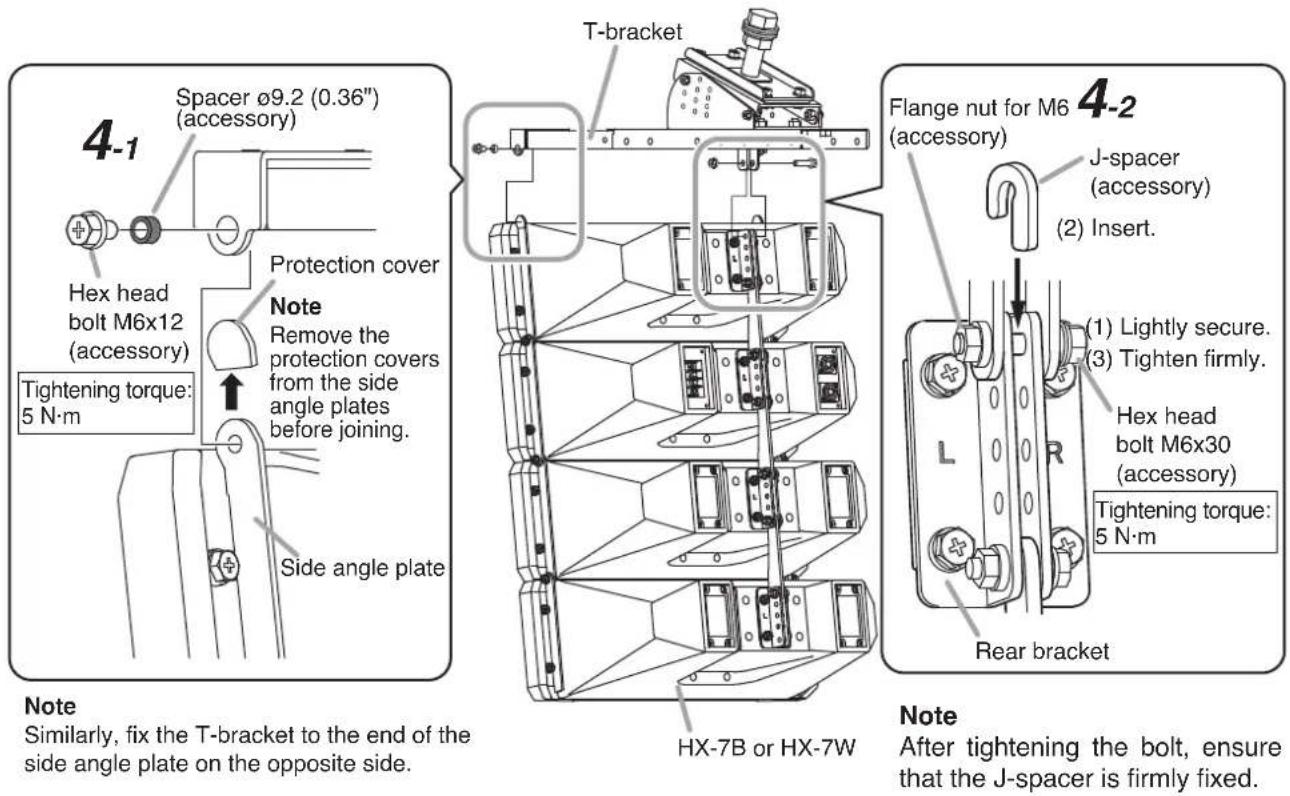
Step 4. Attach the T-bracket to the speaker.
Attach with the speaker set above as shown in the figure.
Fix the T-bracket to the speaker at all 3 indicated positions.
4-1. Fix the T-bracket to both ends of the side angle plates of the speaker front.
Use the supplied bolts (with spring and plain washers) and spacers.
4-2. Fix the T-bracket to the speaker's rear bracket.
Fix to the rear bracket's endmost hole.
Use the supplied bolt (with spring and plain washers), J-spacer, and flange nut.
For details, refer to the procedures (1) to (3) as shown below.
Step 5. Remove the safety bolt from Bracket A of the HY-WM7B or HY-WM7W.
Step 6. Using 8 bolts, etc., mount Bracket A of the HY-WM7B or HY-WM7W to the wall.

WARNING
Wall mounting bolts and nuts are not supplied.
Use nuts and bolts that are appropriate for the wall's structure and composition. Failure to do so may cause the speaker to fall, resulting in personal injury.
![HY-WM7B or HY-WM7W (Bracket A) Plain washer for M8 Nut for M8 Plain washer for M8 Safety bolt 6 To wall surface 5 [Bracket A's mounting dimensions] 90 (3.54") Unit: mm 555 555 (2.17") (2.1" Note Be sure to use 8 mounting holes in Bracket A.](/content/2026/06/1388982/images/d66e9708f3e723ca2e7f81a05cf8fe700bb7e95000d2b3e0a7b7e5dd022463de.jpg)
Step 7. Fit the HY-WM7B's or HY-WM7W's Bracket B bolt into the notch of Bracket A.
In this event, a fixed washer must be positioned above the notch, and a plain washer positioned below it.

WARNING
Owing to the speaker's size and weight, be sure that at least two persons are available to install the unit. Failure to could result in personal injury.
do so

Step 8. Insert the safety bolt into Bracket A of the HY-WM7B or HY-WM7W, and tighten the bolt securely with a nut.
Step 9. Adjust the speaker's horizontal angle. B's horizontal angle adjustment nut. Horizontal angle adjustment range: 90^ to left and right (180° in total)
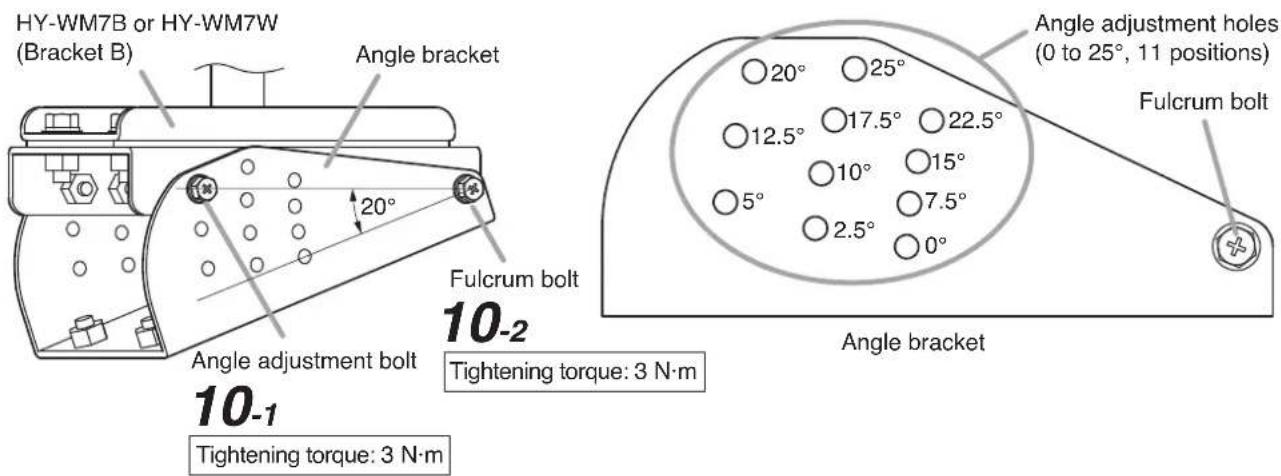
Step 10. Set the angle bracket's angle and secure with a bolt. The speaker's downward tilt angle is determined by the angle bracket's set angle.
10-1. Remove the angle setting bolt, then fit it into the desired angle setting hole and fix.
10-2. Tighten the partially inserted fulcrum bolt.
[Mounting example when set to 20^ ] [Angle adjustment holes]
Step 11. Mount the safety wires and stopper wire.
For the safety wire mounting method, refer to the operating instructions supplied with the HX-7B or HX-7W speaker.

Note
Secure the safety wire to beams, pillars or other strong structures.
4. MOUNTING THE SPEAKER TO A CEILING
(using the optional HY-C0801 or HY-C0801W bracket)
Mount a single HX-7B or HX-7W Speaker System to a ceiling by using the HY-VM7 in combination with the optional HY-C0801 or HY-C0801W Speaker Ceiling Mounting Bracket.

WARNING
- Joined HX-7B or HX-7W speakers cannot be suspended from ceiling using either the HY-C0801 or HY-C0801W brackets. Failure to observe this caution could result in a speaker falling, potent causing personal injury.
• Tighten the bolts securely, as instructed below.
Failure to follow instructions precisely could result in a falling speaker and potential personal injury.
- Ensure that all bolts are securely inserted as far as their threads go, then securely fasten each bolt with a nut.
- Tighten all the bolts with the designated tightening torque.
For tightening, use a Phillips screwdriver, or open- or box-end wrench
Step 1. Remove the safety bolt from Bracket A of the HY-C0801 or HY-C0801W, and detach Bracket B.

[Bracket A's mounting dimensions]

Note
Be sure to use 4 mounting holes at 4 corners in Bracket A.
Step 2. Mount Bracket A of the HY-C0801 or HY-C0801W to a ceiling using four or more bolts.

WARNING
Ceiling mounting bolts and nuts are not supplied.
Use nuts and bolts that are appropriate for the ceiling's structure and composition. Failure to do so may cause the speaker to fall, resulting in personal injury.
Step 3. Attach the angle bracket of this bracket to the T-bracket.
Use four of the supplied bolts to secure.

Step 4. Mount the HY-VM7's T-bracket and angle bracket, and Bracket B of the HY-C0801 or HY-C0801W to the speaker.
Subsequent procedures are the same as those described in Steps 2 to 4 in the chapter, "MOUNTING THE SPEAKER ON A WALL" (p. 3 and 4). However, read "HY-WM7B or HY-WM7W C0801 or HY-C0801W."
Step 5. Fit the HY-C0801's or HY-C0801W's Bracket B bolt into the notch of Bracket A.
In this event, a fixed washer must be positioned above the notch, and a plain washer positioned below it.

WARNING
Owing to the speaker's size and weight, be sure that at least two persons are available to install the unit. Failure to do so could result in personal injury.

Step 6. Insert the safety bolt into Bracket A of HY-C0801 or HY-C0801W, and tighten the bolt securely with a nut.
Step 7. Adjust the speaker's horizontal angle.
After completing adjustment, tighten Bracket
B's horizontal angle adjustment nut.
Horizontal angle adjustment range:
180° to left and right (360° for entire circumference)
Step 8. Set the angle bracket's angle and secure with a bolt.
Subsequent procedures are the same as those described in Step 10 in the chapter, "MOUNTING THE SPEAKER ON A WALL" (p. 5).
Step 9. Mount the safety wires.
For the safety wire mounting method, refer to the operating instructions supplied with the HX-7B or HX-7W speaker.
5. SUSPENDING THE SPEAKER FROM A CEILING (only the T-bracket is used)
The HX-7B or HX-7W Speaker System can be suspended from a ceiling by only using the T-bracket.

WARNING
Tighten the bolts securely, as instructed below.
Failure to follow instructions precisely could result in a falling and potential personal injury.
- Ensure that all bolts are securely inserted as far as their threads go, then securely fasten each bolt with a nut.
- Tighten all the bolts with the designated tightening torque. For tightening, use a Phillips screwdriver, or open- or box-end wrench.
speaker
Step 1. Attach the T-bracket to the speaker.
Attach with the speaker set above as shown in the figure.
Fix the T-bracket to the speaker at all 3 indicated positions.
1-1. Fix the T-bracket to both ends of the side angle plates of the speaker front.
Use the supplied bolts (with spring and plain washers) and spacers.
1-2. Fix the T-bracket to the speaker's rear bracket.
Fix to the rear bracket's endmost hole.
Use the supplied bolt (with spring and plain washers), J-spacer, and flange nut.
For details, refer to the procedures (1) to (3) as shown below.

Note
Similarly, fix the T-bracket to the end of the side angle plate on the opposite side.
HX-7B or HX-7W
After tightening the bolt, ensure that the J-spacer is firmly fixed.
Note
Step 2. Mount eyebolts to the T-bracket.
The T-bracket has three M8 eyebolt mounting holes.
Be sure to install the eyebolts in these 3 places.
Note
Eyebolts are not supplied with the bracket. Prepare them separately.
Step 3. Attach the suspension wires to the eyebolts, and suspend the speaker at 3 points using chains, anchor shackles, etc.

Step 4. Mount the safety wires.
For the safety wire mounting method, refer to the operating instructions supplied with the HX-7B or speaker.
WARNING
Carefully note the following instructions in order to prevent accidental dropping of the speakers, which could potentially result in personal injury.
- Do not join together and suspend 5 or more HX-7B or HX-7W speaker units in a single cluster.
- Ensure that the installation location is structurally capable of supporting the weight of the speakers and their mounting brackets.
- Use eyebolts, cables, chains and anchor shackles that can sufficiently support the weight of the speakers and their speaker mounting brackets.
- When suspending speakers as shown at left, limit the number of joined speakers to 2 units or less.
- When suspending 3 or 4 joined speakers, suspend the speakers from 5 or more points, distributing the load equally to each cable. In addition to the T-bracket and 3-point suspension system, also attach cables places at the lower portion of the joined speakers in order to pull up the speakers from their lower part.

natural_image
Technical line drawing of a curved structural component with hanging fasteners (no text or symbols)6. DIRECT SPEAKER CEILING MOUNTING (only the T-bracket is used)
A single HX-7B or HX-7W Speaker System can be mounted to ceilings or beams by only using the T-bracket.
Note
Only one HX-7B or HX-7W speaker can be mounted. Two joined speakers cannot be mounted.
Step 1. Mount the T-bracket to the ceiling or beam using bolts, etc.

WARNING
Ceiling or beam mounting bolts and nuts are not supplied. Use nuts and bolts that are appropriate for the beam's structure and composition. Failure to do so may cause the speaker to fall, resulting in personal injury.
ceiling's
[Mounting dimensions]
Unit: mm

(Front) (Right side)

other
| Position | Value | | -------- | --------- | | Ø8.5 | 0.33" | | (14 positions)* | (14 positions)* |Note: Left-side surface same.
* These holes not fitted with M8 weld nuts.
Step 2. Mount the speaker system to the T-bracket.

WARNING
- Owing to the speaker's size and weight, be sure that at least two persons are available to install the unit. Failure to do so could result in personal injury.
- Tighten the bolts securely, as instructed below. Failure to follow instructions precisely could result in a falling speaker and potential personal injury.
- Ensure that all bolts are securely inserted as threads go, then securely fasten each bolt with a nut.
- Tighten all the bolts with the designated tightening torque. For tightening, use a Phillips screwdriver, or open- or box-end wrench.
far as
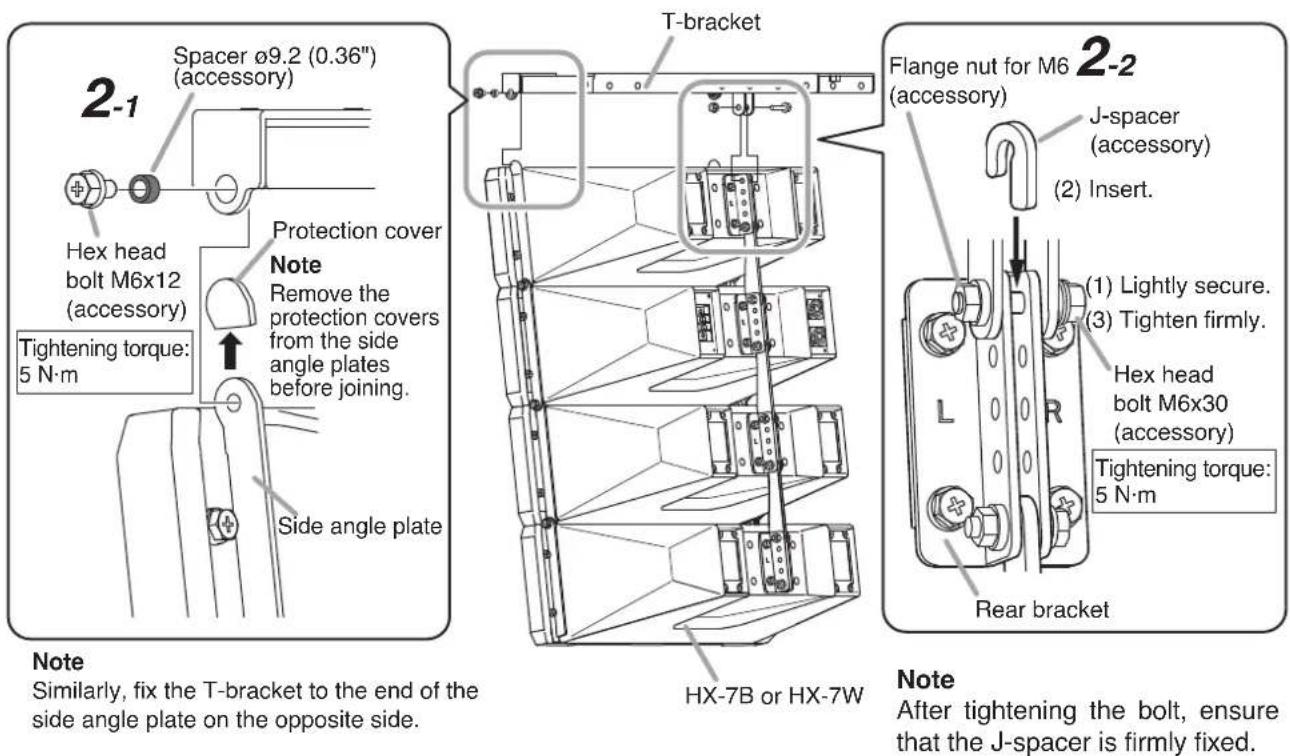
Mount the speaker system vertically, as shown in the figure.
Fix the speaker to the T-bracket at all 3 indicated positions.
2-1. Fix the T-bracket to both ends of the side angle plates of the speaker front.
Use the supplied bolts (with spring and plain washers) and spacers.
2-2. Fix the T-bracket to the speaker's rear bracket.
Fix to the rear bracket's endmost hole.
Use the supplied bolt (with spring and plain washers), J-spacer, and flange nut.
For details, refer to the procedures (1) to (3) as shown below.
7. SPECIFICATIONS
| Model No. HY-VM7B HY-VM7W | ||
| Finish Steel plate, black | semi-gloss, paint Steel plate, white, semi-gloss, paint | |
| Weight 4.8 kg (10.58 lb) | ||
| Product Composition T-bracket ... 1, Mounting base ... 1, Angle bracket ... 1 | ||
Note: The design and specifications are subject to change without notice for improvement.
- Accessories
Hex head bolt M6 x 12 with spring and plain washers ..... 2
Hex head bolt M6 x 20 with spring and plain washers ..... 4
Hex head bolt M6 x 30 with spring and plain washers ..... 1
Hex head bolt M8 x 20 with spring and plain washers ..... 4
Spacer ø9.2 (0.36") 2
J-spacer 1
Flange nut for M6 1
- Optional products
[HY-VM7B]
Speaker wall mounting bracket: HY-WM7B
Ceiling mount bracket: HY-C0801
[HY-VM7W]
Speaker wall mounting bracket: HY-WM7W
Ceiling mount bracket: HY-C0801W
- SPEAKER RIGGING BRACKETS HY-VM7B
- HY-VM7W
- TABLE OF CONTENTS
- SAFETY PRECAUTIONS
- WARNING
- CAUTION
- GENERAL DESCRIPTION
- MOUNTING THE SPEAKER ON A WALL
- Mounting Diagrams
- [Component disassembly] [Completed installation]
- Note
- Installation
- MOUNTING THE SPEAKER TO A CEILING
- (using the optional HY-C0801 or HY-C0801W bracket)
- SUSPENDING THE SPEAKER FROM A CEILING (only the T-bracket is used)
- DIRECT SPEAKER CEILING MOUNTING (only the T-bracket is used)
- SPECIFICATIONS
- - Accessories
- - Optional products
Marque : TOA
Modèle : HY-VM7B
Catégorie : Support mural