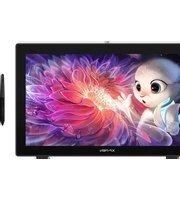
Artist 22 - Tablette graphique XP-Pen - Notice d'utilisation et mode d'emploi gratuit
Retrouvez gratuitement la notice de l'appareil Artist 22 XP-Pen au format PDF.


| Type de produit | Tablette graphique avec écran LCD |
| Marque | XP-PEN |
| Modèle | Artist 22 |
| Dimensions (L x l x h) | Environ 576 x 356 x 30 mm |
| Poids | Environ 5,6 kg |
| Alimentation | Adaptateur secteur 12V DC (fourni) |
| Taille de l'écran | 21,5 pouces (diagonale) |
| Résolution | 1920 x 1080 pixels (Full HD) |
| Technologie du stylet | Sans pile, avec 8192 niveaux de pression |
| Angle de vue | 178° (horizontal et vertical) |
| Luminosité | 250 cd/m² |
| Connectivité | HDMI, USB, prise audio |
| Fonctions principales | Dessin, illustration, retouche photo, design graphique |
| Entretien et nettoyage | Nettoyer avec un chiffon doux et sec ; éviter les produits abrasifs |
| Sécurité | Utiliser uniquement l'adaptateur fourni ; ne pas exposer à l'humidité |
| Pièces détachées et réparabilité | Stylets, câbles et adaptateurs disponibles ; réparation par service agréé |
| Informations générales | Compatible Windows et macOS ; pilotes téléchargeables |
FOIRE AUX QUESTIONS - Artist 22 XP-Pen
Questions des utilisateurs sur Artist 22 XP-Pen
0 question sur cet appareil. Repondez a celles que vous connaissez ou posez la votre.
Poser une nouvelle question sur cet appareil
Téléchargez la notice de votre Tablette graphique au format PDF gratuitement ! Retrouvez votre notice Artist 22 - XP-Pen et reprennez votre appareil électronique en main. Sur cette page sont publiés tous les documents nécessaires à l'utilisation de votre appareil Artist 22 de la marque XP-Pen.
MODE D'EMPLOI Artist 22 XP-Pen

XP-Pen Drawing different
Graphic
Pen Display
Artist 22HD Manual

XP-Pen
Any questions, please contact us
Web site: www.xp-pen.com Mail: service@xp-pen.com


Designed by XPPEN Technology CO. in California, Assembled in China
Windows 10, 8.1, 8, 7 Vista&XP
Mac OS X 10.6.8 or above
www.xp-pen.com
Important Safety Instructions
1-1 About the product
WARNING
Please read the following instructions carefully. This manual should be kept and retained for future use.
WARNING
Only use the included power adapter to charge the XP-PEN Display. Do not use any other non-compatible power adapters.
WARNING
Before cleaning your tablet, turn off the PC and turn off the monitor. Unplug your monitor from the wall outlet before cleaning. Do not use thinner Spray-type cleaner or liquid chemical cleaner on the monitor. Use a tightly twisted soft cloth to wipe the screen and cabinet front and sides.
CAUTION
Do not place any objects near the vent holes to prevent obstruction of ventilation in the device. It is not advised to use this product in a book shelf, built-in cabinet or other confined spaces which may effect proper ventilation.
Dropping your display may cause damage or malfunction to the device, and may void the warranty. Do not drop your display. Do not place your display on any unstable surfaces. Excessive impact to the display may cause damage or malfunction of the device.
Do not expose the display to ANY liquids. Avoid placing the display in areas of potential leakage or spillage.
Do not place or rest anything on the power cord. Do not step on or walk on the power cord. Otherwise, it may cause damage/malfunction and possibly void warranty of the device.
Only use the proper, compatible cables for the external device ports(USB, Charge, Etc...). Do not place any foreign objects in the device ports. Failure to follow these guidelines may potentially cause electrical shock and/or fire.
Do not attempt to disassemble or repair the display if there is any malfunction. Adjust only the controls that are covered in the operating instructions. If your monitor is not operating properly or has been dropped or damaged, refer to the products Warranty first.
CAUTION
Unplug this product from the wall outlet and seek professional help if:
- The power cord or plug is damaged, cut or frayed.
- The product was exposed to excessive water/liquid.
- The product has been dropped or the case has been damaged.
- The product exhibits a distinct change in performance, indicating a need for service.
WARNING
Adjust only the controls that are covered by the operating instructions. Improper adjustment of other controls may result in damage and will often require extensive work by a qualified technician to restore the product to normal condition. Do not attempt to service or repair this product by yourself. Failure to follow these instructions may cause irreparable damage to the display and/or self injury.
Catalog
- Introduction.... 3
1-1.About the product 4
1-2. System requirements 4
1-3. Products and accessories 4
1-4.Pen instructions 5
1-5.Pen tip replacement....6
1-6. Charge 7
- Setting up the monitor 8
2-1.Hardware setup 9
2-2.Driver install on Windows 10
2-3.Driver install on Mac 10
2-4.Driver uninstall 11
3.Windows control panel settings 12
3-1.Info 12
3-2. Monitor settings.... 14
3-3.Button 15
3-4. Pressure 16
3-5.Calibration 17
4.Mac control panel settings....18
4-1.Info....19
4-2.Button 20
4-3. Pressure....21
5.Unit instructions....22
5-1.Front panel 23
5-2.Rear panel 24
6.Adjust OSD settings 25
6-1.Menu 26
- Product specifications....27
7-1. Display specifications 28
7-2. Tablet (digitizer) specifications 29
7-3. Best resolution 30
- Troubleshooting 31
Chapter I
Introduction
1-1. About the XP-PEN display
Thank you for purchasing the XP-PEN display. It features a high definition, high resolution, low radiation, energy saving LED monitor. The tablet's LED monitor will bring a whole new visual impression to your work experience. This outstanding product was designed with a high definition screen featuring advantage plus with pen display/pen pressure technology. Simply connect the tablet monitor to your personal computer or notebook then you will be able to use the pressure pen with the tablet monitor to draw, paint, or operate like a traditional mouse. This ground braking technology is ideal for multi-media teaching and educational purposes.
1-2. System Requirements
- Operation System: Windows8 / 7 / Vista / XP, MAC10.6.x or above.
- CPU Pentium 233MHz minimum required
- Memory 64MB minimum required
- Hard Disc space: a minimum of 128MB of free space
- 4X speed CD ROM or faster
- USB Port x1
1-3. Product and accessories
Please check all contents in the box.
These products and accessories are included in your purchase.
Contents in box:
- Artist 22HD graphic tablet monitor
- VGA connector cable
- Universal AC power adaptor
- Power cord
- USB cable
- Cordless pressure stylus pen
- Stylus pen battery charging cable
- instructional and installation CD-ROM disc
- User's manual
If you are missing any of the items mentioned above, please contact your nearest sales dealer.
1-4. Pen instructions

- Nib
- Button 1
- Button 2
- Power indicator
- Power charging input hole
- Pen stand upper cap
- Spare pen tips
- Pen clip
- Pen stand bottom

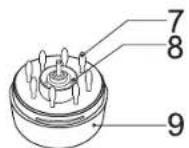
1-5. Pen tip replacement

natural_image
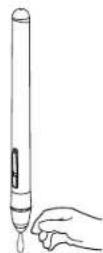
Three sequential illustrations of hands holding small objects, no text or symbols present- Pull out the worn pen tip from the digital pen by using a pen clip.
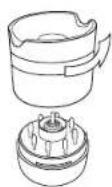

- Rotate the upper cap in an anti-clockwise direction for 75irc and remove it.
- Take the pen tip out.
- Replace it with a new one.
1-6. Charge

natural_image
Line drawing of a USB cable with connector (no text or symbols)
- USB power cord for the stylus pen
Steps:
- The Red indicator light will come on when the pen is low in battery, reminding you to charge the pen in time.
- Connect the USB stylus charging cable to the USB Port of your computer and place the other end of the charging cable into the power adapter input hole on your stylus pen.
- The blue indicator light will come on when the Stylus pen is actively charging.
- When the stylus pen has been charged completely, the blue light will darken or turn off.
Chapter II
Setting up the monitor
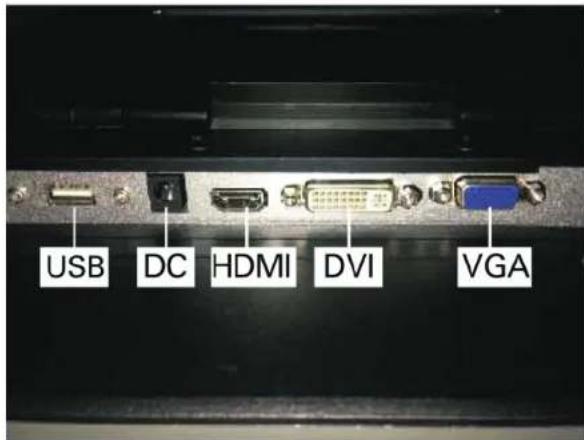
2-1. Hardware setup
- Make sure both the monitor and computer are switched off.
- Connect the AC cord to the power adapter. Connect one end of the adapter to the monitor (DC12V) and the other end to a properly grounded, AC outlet.
- Connect the VGA video cable to the computer. And connect the digital cable to monitor VGA port. Please make sure screw it tightly.
- Use the included mini USB adapter to connect your computer to the Artist 22HD monitor's USB port.
(Image 1)
2-2. Driver install on Windows
- Make sure you have all hardware installed properly. Turn on the monitor first then the computer, and wait for the system to boot up.
- Insert the included tablet software CD-ROM disc. Follow the install instruction to setup your tablet.
- When driver installation is completed, please reboot your computer. Once restarted you will see a tablet icon displayed on the bottom right corner of your system tray. Pressure sensitivity should be activated now, and you should be able to control the cursor with your Stylus Pen on screen.
2-3. Driver install on Mac
- Connect the Artist 22HD tablet to a computer.
- Mac OS Driver install: Open the tablet software disc's contents and run the "under Mac Driver contents for installation.
- Follow the installation steps and restart the computer.
Note:
- Close or disable any anti-virus software and firewalls before installing the driver program to avoid problems occurring during the installation.
- It is suggested that you uninstall any driver programs used by previously connected Display, and restart the computer for installation.
2-4. Driver uninstall
There are several ways to remove the driver:
- Run "Start" > "All Program" > "Tablet" > "Uninstall". Follow the given instructions to complete uninstall.
- Run "Control panel" > "Add/remove driver" > "Tablet Driver" > "Change/Uninstall". Follow the given instructions to complete uninstall.
Chapter III
Windows control panel setting
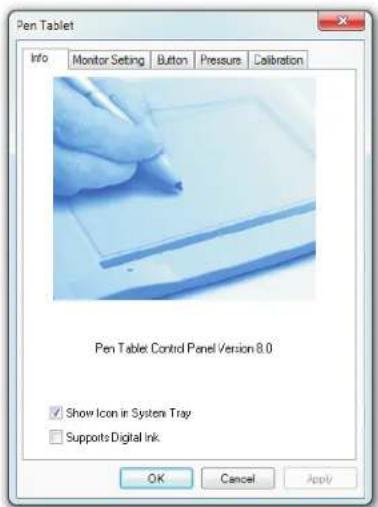
3-1. Info
- Driver version Info: The current driver version installed on the display.
- Show icon in system tray: Enable by checking the box to show the display icon in the computer's system tray.
- Supports Digital Ink: Enable by checking the box to support digital ink functions between Windows Vista / 7 / 8 and the XP-PEN display.
3-2. Monitor Setting
The Monitor Setting provides 2 options "Monitor 1" or "Monitor 2".
If you set your graphics display to a single monitor select "Monitor 1", select "Monitor 2" for a dual monitor setting.
![Pen Tablet Info Monitor Setting Button Pressure Calibration Monitor Mapping 1. 2 Offset [X] 1280 Width [X] 1920 Offset [Y] 0 Height [Y] 1080 Monitor 2 Monitor 1 Monitor 2 OK Cancel Apply](/content/2026/06/1388431/images/6c02a7e5187828b6b530ff3741e0cb832d01addc29fd4a199eac218329a846aa.jpg)
3-3. Button tab
You are able to re-program the commands of your Stylus pen's two-barrel buttons. Select button 1 or button 2 from the button name options box and assign your preferred mouse command for each button.
You can also adjust the double-click response time of your Stylus Pen. Double click Time: Move the speed options slider to adjust the required duration of time between double-click's to execute the double-click command.
Move the Double Click Time slide bar towards "Slow" if you prefer to have a slower response time between double-clicks to execute the assigned command. Move the options bar towards Fast if you prefer to double-click quickly or desire to have a quicker response time between double-clicks to execute the assigned command.
The Double Click Time setting for the tablet is synced to the double-click sensitivity options for a Mouse on your computer. This can be found by clicking on Start > Control Panel > Mouse > Buttons. Adjustment of the Display Pen's Double Click Time option simultaneously adjusts your computer's Mouse sensitivity settings.

15
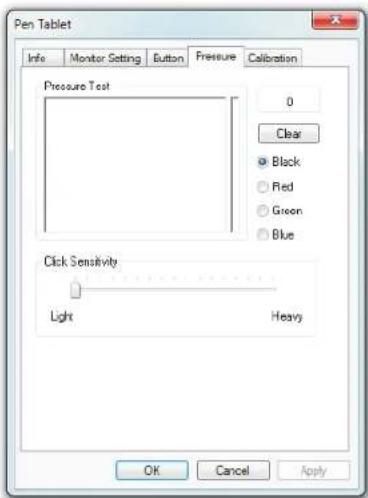
3-4. Pressure
Under the Pressure settings tab you are able to alter your Stylus Pen's pressure sensitivity to the display. There is a test area to alter the thickness of the line according to the pressure applied by the pen on the display. The numerical value of the pressure level is shown in the field above the clear button. Heavier pressure corresponds to a thicker line.
16
3-5. Calibration
If you are having problems with the Stylus Pen's cursor alignment or improper function of the Stylus Pen with the display screen try recalibrating. Calibration is used to correct mechanical misalignments and scaling factors that causes improper alignment between the Stylus Pen and display.
- Calibration correction: Select the Calibration box. Then choose "4-Point Calibration" or "9-Point Calibration" to enter the calibration mode. Click on the point where the horizontal and vertical lines meet. Your eye sight and the Stylus Pen should be perpendicular to the screen during calibration.
- Rotation: You may configure the software to identify and optimize to the positioning angle that you prefer to hold your Stylus Pen during use. Select your preferred pen holding angle from the options box: 0irc , 90irc , 180irc or 270irc

Chapter IV
Mac control panel setting
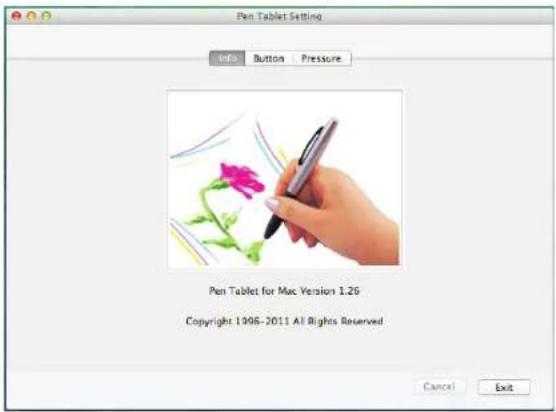
4-1.Info
Pen display setting info tab: displays the current updated software version on your computer.
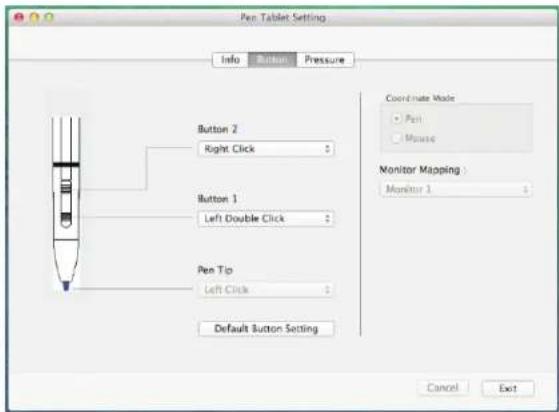
4-2.Button
Button 1 & Button 2:
Select your preferred command for each button: "No Action", "Left Click", "Left Double Click", "Right Click", "Middle Click"...
4-3. Pressure
The pressure tab helps you to get familiar with pen pressure functions. While using the digital pen with the pressure function activated whenever you press the Stylus Pen tip down on the graphic display, it will detect the applied pressure value and send it to the current application. Pressure value starts with zero; the maximum value can vary slightly according to the device used.

Chapter V
Unit instruction
5-1. Front panel
Primary options and controls are displayed on the right corner of your Display screen:
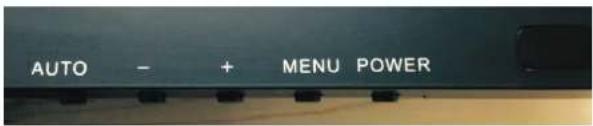
- "AUTO": When the OSD(On Screen Display) menu is active, press this button to exit the OSD menu. When the OSD menu is inactive, press this button for the default setting.
- “-”: button to navigate to the desired function.
- “+”: button to navigate to the desired function.
- "Menu": Press to view the OSD menu. Press it again to enter a selection in the OSD menu.
- "Power": Turn the monitor on/off
- LED:
| Color | Status |
| Green | Power On |
| Red | No signal |
| X | Power off |
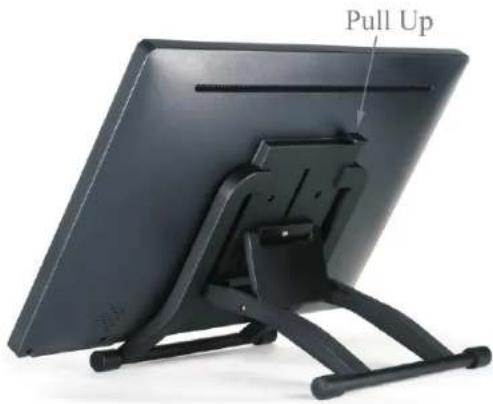
5-2.Rear panel
natural_image
Black rectangular electronic device with a pull-up indicator and stand (no text or symbols on the device itself)"Monitor base": Adjust viewing angles at the rear of the monitor base to a comfortable setting for use.
Chapter VI
Adjust OSD settings
6-1.Menu
Picture brightness, image adjustments and settings
| [Brightness]: increase or decrease image brightness |
| [Contrast]: increase or decrease image contrast |
| [Gamma]: Gamma color adjustment |
Position: display position adjustment
| [Phase]: Adjust picture phase to reduce horizontal-line noise |
| [Clock]: Adjust picture clock to reduce vertical-line noise |
| [H Position]: Adjust the horizontal position of the picture |
| [V Position]: Adjust the vertical position of the picture |
Color: Adjust color/temperature
| [Color Temperature]: Adjust color temperature |
| [Red, Green, Blue]: Independently adjust the Red, Green, and Blue display colors |
OSD: OSD function menu
| [Horizontal]: Select to view the OSD horizontally |
| [Vertical]: Select to view the OSD vertically |
| [Transparency]: Adjust the transparency of the OSD menu |
| [OSD Time Out]: Adjust the amount of time for the display to turn off when not in use |
Function Setup
| [Language]: Select the OSD language |
| [Mute]: Sound mute |
| [Input]: Single input |
| [DCR]: Adjust mega dynamic contrast ratio |
| [Display Size]: The current aspect ratio being used |
| [Reset]: Reset all settings |
Chapter VII
Product specification
7-1. Display Specifications
| Description | Specification |
| Product Dimensions | 517x321.8x30(w/o stand) mm |
| Display Area | 476.64 x 268.11 mm |
| Display Resolution | 1920 x 1080 pixels |
| Response Time | 14ms |
| Pixel Pitch | 0.24825(H) x 0.24825(V) mm |
| Electrical Interface | Dual channel LVDS |
| Color Depth | 16.7M |
| Contrast Ratio | 1000:1 |
| Backlight Unit | 1-LED Light |
| Brightness | 250cd/m2 |
| Viewing Angle | -89°~89°(H), -89°~89°(V) Typical |
| Environmental | Recommended Operating temperature: 0°C~50°C Recommended Storage temperature: -20°C~60°C |
| Power Consumption | During Use: 18.49W |
| Power source | AC 100~240V Universal |
| I/O Connectors | DC power in; VGA 15-pin D-sub input; DVI input; HDMI input; USB-connector |
• We reserve the right to change any wording and specifications regarding the XPPEN display without prior notice.
- The XPPEN display is not intended for application on or around aerostat, aircraft, submarine, or life support systems. Do not use the display in areas with Nuclear/Radioactive activity.
7-2. Tablet (digitizer) specifications
| Description | Specification |
| Technology Used | Electromagnetic |
| Tablet working area | 476.64 x 268.11 mm |
| Pressure Sensitivity | 2048 levels |
| Resolution | 5080LPI |
| Accuracy | 0.25mm |
| Reading Height | 15mm(Max) |
| Supply Voltage | +5V(Voltage) |
| Power consumption | 0.05A (0.25Watts) Max |
| USB interface | USB Port 1.1 |
| Report Rate | 220 reports/per second |
| Pen buttons | 1. Left (Pen tip); 2. Right(barrel backward); 3. Middle(barrel forward) |
Keep your Stylus Pen charged as needed, and avoid letting the battery drain too low to maintain the best signal transmission during use.
For optimal Pen/Tablet performance tap the pen tip on the center of the tablet screen to test the Pen/Cursor calibration before you begin using it.
7-3. Best resolution
The XPPEN display's maximum display resolution is 1920x1080.
Chapter VIII
Troubleshooting
These are problems that can be fixed by the user without additional help. If the problem still persists after you have tried the following solutions, please contact a customer service representative.
| Problem & Question | Possible Solution |
| The picture does not appear | 1.Make sure the cable connecting your display to the computer is firmly and properly attached to each input port.2.Check that your tablet monitor's POWER is ON.3.Check the brightness and contrast options, If either one is at a minimum setting, it may effect visibility. |
| The screen is not synchronized properly with the tablet | 1.Make sure the cable connecting your display to the computer is firmly and properly attached to each input port.2.Make sure the signal timing settings of your computer are within the specifications of the monitor. |
| The position of the screen in not in the center | 1.Adjust the H-position and V-position, or perform the Auto adjustment. |
| The display is shaking or waving | 1.Press the "Auto" key for Auto adjustment.2.Remove any objects that emit a magnetic field such as a motor or transformer, away from the monitor.3.Make sure the signal timing settings of your computer are within the specifications of the monitor. |
| The Stylus Pen is not functioning | 1.Check if the display icon appears on the right-bottom corner of the screen. If YES, Charge the battery.2.If NOT, re-plug in the USB cable or restart the computer.3.If the above steps fail to work, re-install the tablet driver and remove any possible conflicting software on your PC. |
| The cursor doesn't function properly | Unplug then Re-plug the USB cable or restart the computer. |
- Graphic
- Pen Display
- Artist 22HD Manual
- Important Safety Instructions
- 1-1 About the product
- WARNING
- CAUTION
- Catalog
- Chapter I
- Introduction
- 1-1. About the XP-PEN display
- 1-2. System Requirements
- 1-3. Product and accessories
- Contents in box:
- 1-4. Pen instructions
- 1-5. Pen tip replacement
- 1-6. Charge
- Chapter II
- 2-1. Hardware setup
- 2-2. Driver install on Windows
- 2-3. Driver install on Mac
- Note:
- 2-4. Driver uninstall
- Chapter III
- 3-1. Info
- 3-2. Monitor Setting
- 3-3. Button tab
- 3-4. Pressure
- 3-5. Calibration
- Chapter IV
- Mac control panel setting
- 4-1.Info
- 4-2.Button
- 4-3. Pressure
- Chapter V
- Unit instruction
- 5-1. Front panel
- 5-2.Rear panel
- Chapter VI
- Adjust OSD settings
- 6-1.Menu
- Chapter VII
- Product specification
- 7-3. Best resolution
- Chapter VIII
- Troubleshooting
Marque : XP-Pen
Modèle : Artist 22
Catégorie : Tablette graphique