
Elevator - Pédale d'effet guitare Radial Engineering - Notice d'utilisation et mode d'emploi gratuit
Retrouvez gratuitement la notice de l'appareil Elevator Radial Engineering au format PDF.


| Type de produit | Boîte de direct active avec élévateur de niveau |
| Dimensions (L x l x h) | 12,7 x 6,35 x 4,45 cm |
| Poids | 0,5 kg |
| Alimentation | Alimentation fantôme 48V ou adaptateur secteur 15V DC |
| Connecteurs d'entrée | 1 x Jack 6,35 mm TRS |
| Connecteurs de sortie | 1 x XLR mâle |
| Réponse en fréquence | 20 Hz – 20 kHz |
| Gain maximum | +20 dB |
| Impédance d'entrée | 10 kΩ |
| Impédance de sortie | 600 Ω |
| Rapport signal/bruit | > 100 dB |
| Distorsion harmonique totale | < 0,01 % |
| Fonctions principales | Élévation de niveau ligne, isolation galvanique, désadaptation d'impédance |
| Entretien et nettoyage | Nettoyer avec un chiffon sec non pelucheux. Ne pas utiliser de solvants. |
| Sécurité | Ne pas exposer à l'humidité ou aux liquides. Utiliser une alimentation adaptée. |
| Pièces détachées et réparabilité | Pièces disponibles sur demande auprès du fabricant. Réparation par centre agréé. |
| Informations générales | Garantie 3 ans, fabrication au Canada |
FOIRE AUX QUESTIONS - Elevator Radial Engineering
Questions des utilisateurs sur Elevator Radial Engineering
0 question sur cet appareil. Repondez a celles que vous connaissez ou posez la votre.
Poser une nouvelle question sur cet appareil
Téléchargez la notice de votre Pédale d'effet guitare au format PDF gratuitement ! Retrouvez votre notice Elevator - Radial Engineering et reprennez votre appareil électronique en main. Sur cette page sont publiés tous les documents nécessaires à l'utilisation de votre appareil Elevator de la marque Radial Engineering.
MODE D'EMPLOI Elevator Radial Engineering
FEATURES
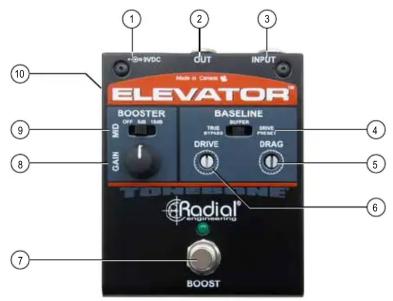
- 9VDC POWER: Connection for 9 volt (center negative) power adapter. Includes a cable clamp to prevent accidental power disconnection.
- OUTPUT: High-Z 14 " connection to your amplifier.
- INPUT: High-Z 14 " connection from your instrument.
-
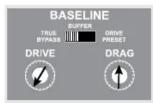
BASELINE SELECTOR: Three position switch sets the way the Elevator handles your instrument signal when the power booster is not in use.
-
TRUE-BYPASS: Takes the Elevator completely out of the signal path.
-
BUFFER: Uses a unity gain buffer to drive long cables without added
• DRIVE PRESET: Lets you preset a baseline amount of gain. -
DRAG: Load Correction circuit lets you replicate the tone and feel as if connected directly to your amp.
- DRIVE: Lets you dial-in a little extra punch and push your amp harder.
- FOOTSWITCH: Activates the power BOOSTER. An LED indicator illuminates when the BOOSTER is active.
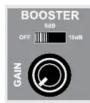
- GAIN: Controls the amount of boost applied when the BOOST footswitch is active. Adds up to 15dB of clean gain.
-
MID BOOST: Three position switch lets you add extra mid-range for greater sustain and stage presence.
-
Position 1: OFF: No mid-range boost is applied.
- Position 2: 5dB: Applies a small amount of mid-range boost.
-
Position 3: 10dB: Applies a big mid-range boost.
-
STEEL ENCLOSURE: Heavy-duty 14-gauge steel enclosure for long life.

True to the Music
Radial Elevator Specifications
Circuit type 100% discrete Class-A
Drag Control ....... Variable from 22k \~ 1 meg-Ohms
Baseline gain ....Variable from unity to +9dB
Boost gain ....Variable from unity to +18dB
Mid boost....+5dB at 1kHz, +9.5dB at 800Hz
Footswitch .... Momentary (controls relay)
Relay type .... Sealed with gold contacts
Power 9VDC, adapter not included
RADIAL ENGINEERING 3 YEAR TRANSFERABLE LIMITED WARRANTY
RADIAL ENGINEERING LTD. ("Radial") warrants this product to be free from defects in material and workmanship and will remedy any such defects free of charge according to the terms of this warranty. Radial will repair or replace (at its option) any defective component(s) of this product (excluding finish and wear and tear on components under normal use) for a period of three (3) years from the original date of purchase. In the event that a particular product is no longer available. Radial reserves the right to replace the product with a similar product of equal or greater value. In the unlikely event that a defect is uncovered, please call 604-942-1001 or email service@radialeng.com to obtain a RA number (Return Authorization number) before the 3 year warranty period expires. The product must be returned prepaid in the original shipping container (or equivalent) to Radial or to an authorized Radial repair center and you must assume the risk of loss or damage. A copy of the original invoice showing date of purchase and the dealer name must accompany any request for work to be performed under this limited and transferable warranty. This warranty shall not apply if the product has been damaged due to abuse, misuse, misapplication, accident or as a result of service or modification by any other than an authorized Radial repair center.
THERE ARE NO EXPRESSED WARRANTIES OTHER THAN THOSE ON THE FACE HEREOF AND DESCRIBED ABOVE. NO WARRANTIES WHETHER EXPRESSED OR IMPLIED, INCLUDING BUT NOT LIMITED TO, ANY IMPLIED WARRANTIES OF MERCHANTABILITY OR FITNESS FOR A PARTICULAR PURPOSE SHALL EXTEND BEYOND THE RESPECTIVE WARRANTY PERIOD DESCRIBED ABOVE OF THREE YEARS. RADIAL SHALL NOT BE RESPONSIBLE OR LIABLE FOR ANY SPECIAL, INCIDENTAL OR CONSEQUENTIAL DAMAGES OR LOSS ARISING FROM THE USE OF THIS PRODUCT. THIS WARRANTY GIVES YOU SPECIFIC LEGAL RIGHTS, AND YOU MAY ALSO HAVE OTHER RIGHTS, WHICH MAY VARY DEPENDING ON WHERE YOU LIVE AND WHERE THE PRODUCT WAS PURCHASED.
Radial® engineering
True to the Music
ELEVATOR™
GUITAR BOOSTER AND LINE DRIVER

USER GUIDE
Radial Engineering Ltd.
1588 Kebet Way, Port Coquitlam BC V3C 5M5
tel: 604-942-1001 • fax: 604-942-1010
info@radialeng.com • www.radialeng.com Made in Canada
Elevator™ User Guide - Part# R870 1152 00 / 04-2017 / V2 • © Copyright 2017 Specifications and appearance are subject to change without notice.
OVERVIEW
The Elevator is a combination buffer and power booster and designed to be the driving force on your pedalboard. What makes it unique is that you can set up the Elevator to work in a variety of ways, depending on your personal preference and playing style.
The Elevator has two basic sections, the baseline and the power booster. The baseline section controls how the Elevator handles your instrument signal when the power booster is bypassed. The power booster section lets you kick up the gain for solos and includes a mid-range switch that further helps to cut through the mix.

MAKING CONNECTIONS
Before you make any connections, it is a good idea to set your amp to standby or turn it off. This will avoid loud power and connection transients from reaching the loudspeakers and your ears. There is no power switch for the Elevator. As soon as you plug in your power supply, it will spring to life. A handy cable clamp next to the power jack can be used to prevent accidental disconnection. The Elevator does not come with a power supply nor can it be powered by an internal battery. You will need to purchase a 'Boss' style 9 Volt supply or use a multi-pedal power source.
Normally, the Elevator will be the first pedal in your chain. For testing it is a good idea to start without other effect pedals in the signal chain. This way you will get a good sense of how each function works and sounds on its own.
Connecting to the Elevator is done using a cable with 14 " connectors. It is a good idea to keep the cable between your guitar and the Elevator as short as possible to reduce the potential for noise. High impedance cables work best when less than 6 meters (20') in length.
Connecting from the Elevator to your amp is done using a second high impedance guitar cable. The length of this cable can vary depending on which baseline setting you choose.

Radial Engineering Ltd.
Elevator™
START-UP SETTINGS
Before turning on your amp, set up the Elevator controls as follows:
Power booster settings
• Mid-range switch: set to OFF.
• GAIN: turned fully counter-clockwise.
- Footswitch: set to bypass (LED off).
Baseline settings
- Baseline: set to TRUE BYPASS.
- DRIVE: turned fully counter-clockwise.
- DRAG: set to the 12 o'clock position.
ESTABLISHING THE BASELINE
Power on your amp and slowly turn up the volume to a comfortable volume level. Set your amp to a clean sound to begin with. The Baseline section gives you a 3-position switch and two set & forget controls that let you control how the Elevator works when the power booster is bypassed (footswitch LED off).
TRUE BYPASS: At this setting the Elevator will have no effect on your sound when the booster is bypassed. Some guitarists prefer the TRUE BYPASS setting because the Elevator is taken completely out of the signal path when not using the power booster. This has the benefit of being a 'true' straight wire connection but tends to introduce switching noise when used with high gain amps. If you choose the TRUE BYPASS setting its important the total length of your high impedance cables is limited to 8 meters (25') or less for good results.

flowchart
graph TD
    A["INPUT"] --> B["DRAG"]
    B --> C["BUFFER"]
    C --> D["DRIVE GAIN"]
    D --> E["BOOSTER GAIN"]
    E --> F["MID BOOST"]
    F --> G["OUTPUT"]
    G --> H["BASELINE SWITCH"]
    H --> I["TRUE BYPASS"]
    I --> J["BUFFER"]
    J --> K["DRIVE PRESET"]
    K --> C
    F --> L["BOOST FOOTSWITCH"]
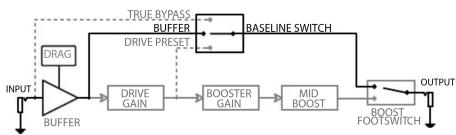
BUFFER: Moving the Baseline switch to the middle position activates the unity gain buffer and the DRAG™ Control. A unity gain buffer is basically an amplifier that does not add or take away any gain. It is designed to condition the signal and lower it's output impedance in order to drive longer cables without noise or signal loss. The BUFFER setting lets you employ high impedance cables as long as 16 meters (50') between the Elevator and your amp with good results.
flowchart
graph LR
    A["INPUT"] --> B["BUFFER"]
    B --> C["DRIVE GAIN"]
    C --> D["BOOSTER GAIN"]
    D --> E["MID BOOST"]
    E --> F["BASELINE SWITCH"]
    F --> G["BUFFER"]
    G --> H["DRIVE PRESET"]
    H --> I["TRUE BYPASS BUFFER"]
    I --> J["BORDER SWITCH"]
    J --> K["OUTPUT"]
Radial Engineering Ltd.
Elevator ^TB
DRAG CONTROL: Radial's DRAG Control load correction allows you to dial in just the right amount of loading for your pickups to create the same tone as if plugging directly into your amplifier. With DRAG set at the 12 o'clock position, strum a chord and use a small screwdriver or guitar pick to slowly turn the DRAG control until the tone sounds right to you.
DRIVE PRESET: If you move the Baseline switch all the way to the right, you will activate the DRIVE control. This innovative control lets you increase the level and drive your amp harder when the power booster is bypassed (footswitch LED off). The idea is that you can use the set & forget DRIVE control to preset just the right amount of baseline gain for your setup.

flowchart
graph TD
    A["INPUT"] --> B["BUFFER"]
    B --> C["DRIVE GAIN"]
    C --> D["BOOSTER GAIN"]
    D --> E["MID BOOST"]
    E --> F["BASELINE SWITCH"]
    F --> G["OUTPUT"]
    H["DRAG"] --> B
    I["TRUE BYPASS BUFFER DRIVE PRESET"] --> F
    J["BOOST FOOTSWITCH"] --> F
Try setting your amp to a slightly dirty sound and then use a small screwdriver or guitar pick to slowly turn the DRIVE control clockwise. As you increase the gain, it will drive your amps input harder enhancing the harmonics and saturation. There's enough gain on tap here to make your amp do a whole lotta shakin' so tread lightly at first.
POWER BOOSTER
The power booster section has three controls, the GAIN knob, the mid-range switch and the footswitch. Start with the 3-position mid-range switch set to the OFF position. Depress the BOOST footswitch and bring up the power booster level by rotating the GAIN knob clockwise. The footswitch LED illuminates to let you know that the power booster is active. Note that

with a clean amp sound, the booster can get very loud. You may have to turn your amp's master volume down. When using an already distorted sound, the power booster will add harmonics and sustain to your guitar. Adjust the GAIN control to find the boost level that works best.
MID-RANGE SWITCH: The power boost section is equipped with a 3-position switch that lets you increase the mid-range content of the signal. Move the switch to the middle 5dB position for a little mid-range boost. The 10dB position further boosts the mid-range increasing the sustain and presence of your guitar on stage and in the room. Keep in mind that electric guitar lives in the mid-range so boosting it can really help define your sound in a busy mix. This can be particularly useful with single coil pickups that are not as fat sounding as their humbucker counterparts.
BALANCING THE BUFFER AND BOOSTER: Go back and compare the tone when using a baseline buffer versus the true bypass setting. Work at balancing the gain between the baseline and the power booster until you decide what works best for you. Have fun and experiment. The Elevator is very flexible and there are no rules.
Radial Engineering Ltd.
Elevator ^™


Marque : Radial Engineering
Modèle : Elevator
Catégorie : Pédale d'effet guitare