
PowerTel 50 alarm plus - Téléphone Amplicom - Notice d'utilisation et mode d'emploi gratuit
Retrouvez gratuitement la notice de l'appareil PowerTel 50 alarm plus Amplicom au format PDF.


| Type de produit | Téléphone fixe amplifié avec fonction alarme |
| Marque | Amplicom |
| Modèle | PowerTel 50 alarm plus |
| Dimensions (L x l x H) | 220 x 180 x 80 mm |
| Poids | 350 g (combiné inclus) |
| Alimentation | Adaptateur secteur 230 V / 50 Hz |
| Fonctions principales | Appel mains-libres, répertoire jusqu'à 50 numéros, alarme programmable, amplification sonore jusqu'à 50 dB, indicateur lumineux d'appel |
| Écran | Écran LCD rétroéclairé avec affichage des numéros et de l'heure |
| Compatibilité | Compatible avec les lignes analogiques et les box ADSL/VDSL |
| Entretien et nettoyage | Nettoyer avec un chiffon doux légèrement humide ; ne pas utiliser de produits abrasifs |
| Sécurité | Ne pas exposer à l'humidité ni aux températures extrêmes ; utiliser uniquement l'adaptateur fourni |
| Pièces détachées et réparabilité | Batterie de rechange (type AAA NiMH) et adaptateur secteur disponibles ; réparation par centre agréé |
| Garantie | 2 ans (pièces et main-d'œuvre) |
| Contenu de la boîte | Combiné, base, adaptateur secteur, cordon téléphonique, notice d'utilisation |
FOIRE AUX QUESTIONS - PowerTel 50 alarm plus Amplicom
Questions des utilisateurs sur PowerTel 50 alarm plus Amplicom
0 question sur cet appareil. Repondez a celles que vous connaissez ou posez la votre.
Poser une nouvelle question sur cet appareil
Téléchargez la notice de votre Téléphone au format PDF gratuitement ! Retrouvez votre notice PowerTel 50 alarm plus - Amplicom et reprennez votre appareil électronique en main. Sur cette page sont publiés tous les documents nécessaires à l'utilisation de votre appareil PowerTel 50 alarm plus de la marque Amplicom.
MODE D'EMPLOI PowerTel 50 alarm plus Amplicom

nplicomms
Emergencytelephone

OperatingInstructions
@amplicomms
Contents
1 Safety Information4......
2PuttingtheTelephoneintoOperation5...
3OperatingElements7......
4OperatingtheTelephone8...... ....
5Telephoning9
6PrivateBranchExchanges/Suppl.Services
7MenuStructure ... 12
8 Phone Book 13
9CallsList 15
10 Emergency Call Unit 16
11 If Problems Occur 18
12 Maintenance/Guarantee 19...
13 Index 20
SafetyInformation
1 Safety Information
Pleasereadthisoperatinginstructionmanualthoroughly.
Intendeduse
Thetelephoneissuitablefortelephoningwithinapublictelephonenetworksystem.Anyotheruseisconsideredunintendeduse.Unauthorised modificationorreconstructionisnotpermitted.Undernocircumstances openthedeviceorcompleteanyrepairworkyourself.
Installationlocation
Preventexcessiveexposureosmoke,dust,vibration,chemicals,moisture,heatanddirectsunlight.
Powersupply
Caution: Only us the power adapter plugs supplied because other powers supplies could damage the telephone. Ensure access to the power adapter plug is not obstructed by furniture or such.
Hearingaidcompatibility
Using the premium receiver, the telephone is perfectly compatible with most popular hearing aids on the market. However, duetothewider range of hearing aids available, there is no guarantee that the telephone will function problem-free with every model.
Caution: This telephone is capable of producing very volume levelswhentheamplifierisswitchedonandthevolumecomtrolis settomaximum. Extremecautionshouldbetakenifthehandset istobesharedbetweenuserswithnormalhearingandthosewith hearingimpairment.
Disposal
You are obliged to dispose of consumable goods properly in accordance with the applicable legal regulations. The adjacent symbol on the telephone indicates that electrical and electronic apparatus and batteries no longer required must be disposed of separate from domestic waste.
Electricalandelectronicdevicesmustbedisposedofat suitablecollectionpointsprovidedbythepublicwasteauthorities.
Batteriesmustbedisposedofatthepointofsaleorattheappropriatecollectionpointsprovidedbythepublicwasteauthorities.
Packagingmaterialsmustbedisposedofaccordingtolocalregulations.


2PuttingtheTelephoneintoOperation
Safetynotes

Caution: It is essential to read the safety information in Chapter 1 before preparing the telephone for use.
Checkingthecontentsofthepackage
Thepackagecontains:
| Content | POWERTEL50ALARMPLUS |
| Baseunit1 | |
| Poweradapterplug1 | |
| Premiumreceiver1 | |
| Coilcableforthereceiver1 | |
| Emergencycallunit,canbeworn onneckbandorwristband (splash-proof) | 1 |
| Telephoneconnectioncable1 | |
| Batteries,AA1.5V4 | |
| Batterytype23A,12V alreadyinstalledintheemergency callunit | 1 |
| Wall-mountingbracket1 | |
| Operatingmanual1 |
PuttingtheTelephoneintoOperation
Connectingthetelephone
Connect the telephone as illustrated in the diagram. For reason of safety, only use the power adapter plugs supplied and telephone connection line enclosed.

flowchart
graph TD
    A["Shakerunit (option)"] --> B["Mainspoweroutlet"]
    B --> C["Receiverconnection"]
    C --> D["Telephonelinesocket"]
    D --> E["Radio Station"]
    style A fill:#f9f,stroke:#333
    style B fill:#ccf,stroke:#333
    style C fill:#cfc,stroke:#333
    style D fill:#fcc,stroke:#333
The full range of telephone functions can only be used when the power adapter plug is fitted.
In order to an approved shaker unit, connect the shaker unit plug to the VIB socket in the telephone. No other work is necessary. Theshaker unit is ready to operate immediately after connection. The shaker unit does not belong to the material supplied.
PuttingtheTelephoneintoOperation
Insertingthebatteries
Insertthebatteriesintheopen batterycompartment. Only usebatteriesofthetypeAA alkaline1.5V.Payattentionto correctpolarity. Closethebatterycompartment.
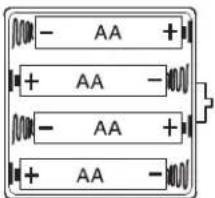
Insertionofbatteriesisnotabsolutelyessential. Thetelephone canbeoperatedwithorwithoutbatteries. Thefullrangeoftele- phonefunctionscanonlybeusedwhenthepoweradapterplug arefitted. Payattentionthatthetelephoneisnotconnectedtothe telephonelinesocketand/ormainspowerconnectionwhenthe batteriesarebeinginsertedorreplaced.
Whenthebatteriesareempty, theiconappearsinthedisplay. Replacethebatteries.
Settingthetimeanddate
The time and date a reset viathemenu. Referto Page 12 for these sequence of menu options selections necessary.
Privatebranchexchanges
TheinformationonPage11explainshowtoinstallyourtelephoneinaprivatebranchexchange.
Wallinstallation
Feedtheguidetabs(1)onthewall-mountingbracket(2)intheslots(3)on theundersideofthetelephone.Slidethewall-mountingbracket10mm upwardsuntilaudiblylocksintoplace.Drillaholeandinsertascrew leavingabout5mmofthescrewprojectingfromthewall.Guide the mountinghole(4)inthemountingbracket(2)overthescrewandslidethe telephonedownwards.

Caution: Ensure there are no electrical cables, water pipes etc. inthewallwheretheholeisdrilled.

Turnthehook(5)inthereceivercradlesothatthereceivercanbeplaced on-hook.

flowchart
graph TD
    A["Block 1"] --> B["Block 2"]
    B --> C["Block 3"]
    C --> D["Block 4"]
    D --> E["Block 5"]
    style A fill:#f9f,stroke:#333
    style E fill:#f9f,stroke:#333
3OperatingElements
Telephone
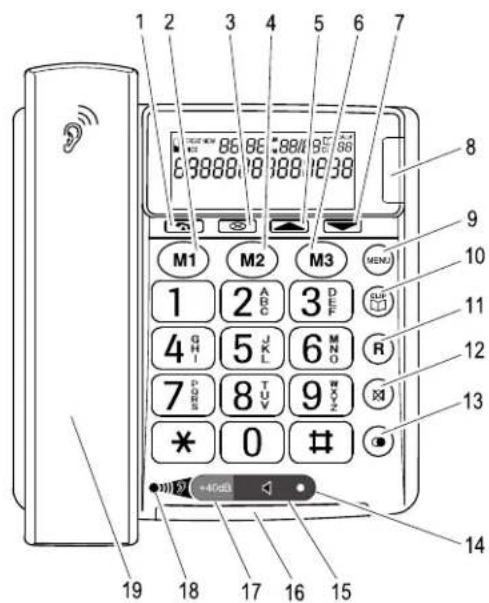
1Callbackbutton
2QuickdialbuttonM1 (emergencycall number1)
3Delete
4QuickdialbuttonM2 (emergencycall number2)
5Scrollupwards
6QuickdialbuttonM3 (emergencycall number3)
7Scrolldownwards
8LED, emergency callunit/ Newcallindication
9Menubutton
10Callslist(CLIP)/Phonebook
11Rbutton
Emergencycallunit
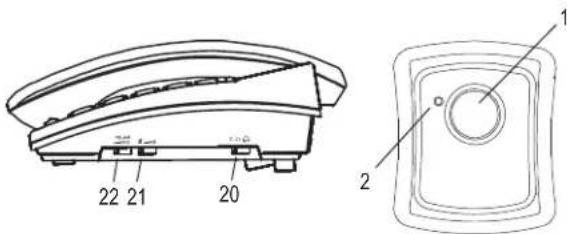
1Startautomaticemergency call
2LED, batterylevelindicator
12Microphonemuting button
13Redialbutton
14LED, handsfree mode
15Handsfreemodebutton
16LED, telephoneis ringing
17Receiver+40dBboost button
18VolumeboostonLED
19Controlknob, receivervolume (hiddenunderpremium handset)
20"Ringingvolume"slide control
21"Tone"slidecontrol
22"Handsfreevolume" slidecontrol
Thebuttonsinthisoperating manualaredepictedwithauniformcontour. Variationsinthe symbolsonthetelephonebuttonscomparedtothosedepictedherearepossible.
OperatingElements
OperatingtheTelephone
4OperatingtheTelephone
Displayandexplanationofoperationsequences
Enterdigitsorletters
* Pressthebuttondepictedbriefly
2x * Pressthebuttondepictedtwice,briefly
2sec ✱ Pressthebuttondepictedfor
2seconds
Pressandhold * Pressandholdthebuttondepicted
Release * Releasethebuttondepicted
(€) Telephonerings

Liftthereceiver

Replacethereceiveron-hook
≥Text
Textflashesinthedisplay
GERMAN

Textoriconinthedisplay

The translucent digit key block is illuminated from inside as soon as you lift the receiver, press a button or an incoming call is received.
Iconsinthedisplay
Icon
Description

On:Replacethebatteries.
14:45
DisplayofthetimePage12.
19/09
Displayofthedate Page12.

Thephonebookisopen Page13.
REPEAT The caller in the calls list has called several times Page15.
VOICE Flashing: Recording mode is active ☐ Pages 12 and 16. On: Anamehasbeenrecordedforthisphonebookentry.
+
Anemergencycallnumber(M1,M2orM3)hasbeendiaI-ledPage16.
CLIP Thecallslistisopen Page15.
NEW Theentryinthecallslistisnew Page15.
Navigatinginthemenu
Allthefunctionscanbeaccessedviathevariousmenus.RefertoMenu Structure Page12forinformationonhowtoaccesseachrespective function.
MENU Openthemainmenu

Select the submenurequired

Openthesubmenu

Selectthesettingrequired
Enterdigitsorlettersusingtherelevant
digitkeys

Confirmtheentries

Cancelprogrammingandsaving
processesandreturntoStandbymode

Every process is automatically cancelled if there is no input within 15 seconds.
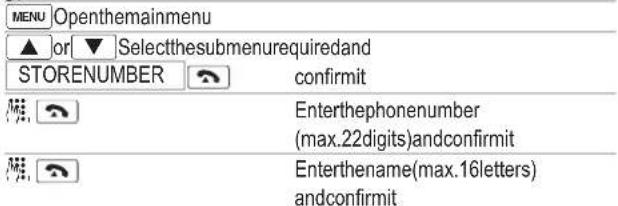
Creatingphonebookentries-example
The example in Creating phone book entries explain show to navigate and make entries in the phonebook. Proceedings this example for all the settings.
MENU Opentheimainmenu

Select the submenu required and

confirmit

Enterthephonenumber(max.22

digits)andconfirmit
Enterthename(max.16letters)and confirmit
Telephoning
5Telephoning
Takingacall

Endingacall

Makingacall
Enterthephonenumber
(max.22digits)
Followingincorrectinput, pressto
deletethelastdigit
or Dialthephonenumber
Itisalsopossibletoliftthereceiverfirsttoobtainthediallingtone.
Thedigitsinthephonenumberthenenteredaredialledimmediately. Itisnotpossibletocorrectwrongdigitsindividuallyusin
thisdiallingprocedure.
Redialling
Yourtelephonestorestelastphonenumberdialled.

Redial the last phone number dialled
Callingbackmissedcalls
Thetelephonestorestenumbersofthelast64callsreceivedinacalls list.
CLIP Openthecallslist


Dialthenumber
Diallingphonenumberfromthephonebook
Theremustbephonenumbersstoredinthephonebook Page13.
Openthephonebook


Dialthenumber
Quickdial
The quick dial buttons M1, M2 or M3 can be used for normal quick dial numbers as a memory location for automatic emergency call dialling.
Phonenumbersmusthavebeenstoredasquickdialnumbers.
Page16.


thenumber
Further information on automatic emergency calls ☐ Page 16.
Chaindialling
The function is used in more complex telephone services, e.g. for telephone banking, call-by-callor calling card procedures. Several numbers stored in the phonebook can be called successively when a connection has already been made. It is also possible to combine numbers for transfer from the phonebook with numbers centered manually. Numbers stored in the phonebook can be chained and transmitted as required.

connectionhasbeenmade

Select the phone book entry and transmit then number
Adjustingthereceivervolume
Thereceivervolumecanbeadjustedwhenthe+40dBvolumeboostbuttonisactivated.

Adjustthevolumewiththecontrolknob
Increasingthereceivervolumeon+40dB.
Thereceivervolumecanbeincreasedbypassingtheleft-handsideof theloudspeakerkeymarked+40dB
+40dB Increasingthevolumeon+40dB
Telephoning
Tonecontrol
Thetoneofthereceivercanbeadjustedusingthecorrespondingslide controlontheright-handsideofthehousing.

Adjustthetoneusingtheslidecontrol
Toneadjustmentisonlypossiblewhenthereceivervolume +40dBboostbuttonison.
Ringingvolume
Theringingvolumecanbeadjustedusingthecorrespondingslidecontrol ontheright-handsideofthehousing.

Adjustthevolumeusingtheslide control
Talktimedisplay
The duration of facall is displayed in minutes and seconds during the call.
Handsfree
Usethisfunctiontolistentothecallerviatheloudspeaker.
Switchonhandsfreemode
Deactivatehandsfreemode
Adjustingthehandsfreevolume
The handsfreevolumecanbeadjusted using the correspondingslidecontrol on theright-hand side of the housing.

Adjustthevolumeusingtheslide control
Mutingthemicrophoneinthehandset
The microphone in the handset can be activated and deactivated during a telephone conversation.
Pressandhold ☒ Switchthemicrophoneoff(muting)
Release ☒ Switchthemicphoneon
6PrivateBranchExchanges/Suppl.Services
Rbuttononprivatebranchexchanges
If the telephone is connected to a private branch exchange, function such as transferring calls and automatic callback can be used via the Rbutton. Pleasereferto the operating manuals supplied with your private branch exchange to determine which recall (Flash) timemust beset in order to these functions. The dealer where you purchased the exchange can provide information at how whether the telephone will work properly with the exchange. Setting therecall time Page 12
Diallingpause
In the case of private branch exchanges, it is necessary to enter an access codeto getan outsideline with its corresponding diallingtone. When usingsome older private branch exchanges, it takes all little time before the diallingtone becomes audible. Particularly in the case of such private branch exchanges, it is possible to insert radial pause after then number for the outside lines that then number can be called a continuous process without having to wait forth the diallingtone.
Insertadiallingpause.
"P"isshowninthedisplay.
Afterdiallingthenumberfortheoutside line, thetelephonethenwaits approx.3secondsbeforediallingtheactualphonenumber.
The pause can also be entered with the phonenumber in the phonebook.
Rbuttonandsupplementaryservices
Yourtelephonesupportsthesupplementaryservicesofferedbyyourtelephonenetworkprovider,suchas brokering,callwaitingandconference calls. ThesupplementaryservicescanbeusedinconjunctionwiththeR button.Pleasecontactyourtelephonenetworkproviderregardingwhich recalltimemustbesettousethesupplementaryservices.Pleasecontact thetelephonenetworkproviderwithregardtoenablingthesupplementary services.SettingtherecalltimePage12.
PrivateBranchExchanges/Suppl.Services
Callernumberdisplay(CLIP 1)
If this function is available with your telephone line, then number of the caller appears in the display when the phonerings. If he caller has suppressed transmission of his phonenumber, according message appears in the display. The phonenumber is not displayed and, as a result, is not stored in the calls list.
Thecallernumberdisplayfunctionisanoptionalserviceoffered bytelephonenetworkproviders.Contactyournetworkprovider forfurtherinformation.
1 CLIP: Calling Line Identification Presentation
MenuStructure
7MenuStructure
Mainmenu
Accessthemainmenubypressingthe MENU button.Page8explainshow tonavigateandmakeentriesinthemainmenu.
LCDCONTRASTLCDCONTRAST1-5
TIME/DATE

ENTERTIME

STORENUMBER
ENTERNUMBER ENTER
NAME
NAMERECORDING Page14
RECORDMESSAGEPage16
CHECKMESSAGE
Page16
LANGUAGE 1
GERMAN
FRENCH
ENGLISH
ITALIAN
FLASH
FLASH100
FLASH300
RINGERTONE
RINGERTONE1-3
VOICE 2
VOICEYES
VOICENO
1Theoutgoingmessagesanddisplaytextsonthetelephoneareavailablein4languages.
2 Whenabuttonispressed, avoiceaccompaniestheaction. This voice can beactivated and deactivated, as required.
PhoneBook
8PhoneBook
Thirtyphonenumberscanbestoredinthephonebooktogetherwiththe associatednames.
•Alwaysentertheareaaccesscodewiththephonenumberssothat thetelephonecanalsoassignincominglocalcallstoaphonebook entry.
- Whenthememorycapacityofthephonebookisusedup, the message MEMORYFULL appearswhenanattemptismadeto storeanothernumber. Tocreatespace,anexistingentrymustfirstbe deleted.
- The phone book entries are arranged alphabetically. To skip to the requiredphonebookentrydirectly, enterthefirstletterofthe correspondingentry.
Enteringaname
Thedigitkeysarealsolabelledwithlettersfortheentryoftherespective letters.Pressingtherespectivekeythenecessarynumberoftimesenablescapitallettersanddigitstobeentered.

Creatingphonebookentries
Editingentriesinthephonebook
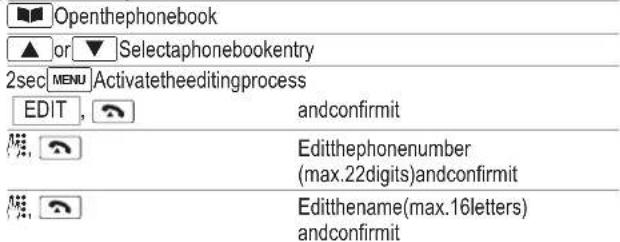
Deletingentriesfromthephonebook
Deletingasingleentry
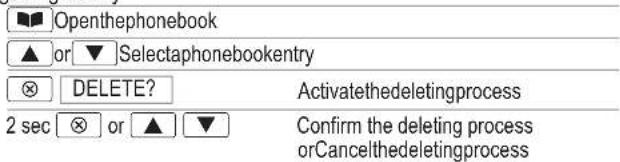
Deleteallentries

PhoneBook
Recordingnamesforphonebookentries
Anamecanberecordedforeachphonenumberstoredinthephone book.Whenyousubsequentlyselectanentryinthephonebook,there-cordingyoumadeforitisplayedandyoucanheartheentryyouhavese-lected.
Recordingnames
MENU Openthemainmenu
▲ or ▼ Selectthesubmenurequiredand
NAMERECORDING, confirmit
▲ or ▼ Selectaphonebookentry
hold ➕ VOICE≤ Startrecording
releaseEndecording
If the key is not released, recording is automatically stopped after 3 seconds.
Deletingrecordings
MENU Openthemainmenu
▲ or ▼ Selectthesubmenurequiredand
NAMERECORDING,confirmit
▲ or ▼ Selectaphonebookentry
☒ Pressthebuttonduring playbackto deletetherecording
CallsList
9CallsList
Atotalof64callnumberscanbestoredinthecallslist. Theflashingred LEDindicatesnewcallsinthecallslist.
Displayingphonenumbersinthecallslist
▲ or ▼ Openthecallslistandselectanentry Displaymessages:
DisplayDescription
NEWTheentryinthecallslistisnew.
REPEATThecallerinthecallslisthascalledseveral times.
Outofarea Thecallconcernsaninternationalcalloritis fromaPBX.
NonumberThecaller'snumberisonlyreceivedinpart oriserroneous. Theinformationonthecaller'snumberisnotavailable.
PrivatecallThecallerhassuppressedtransmissionof hisnumberorthecallisfromaPBX.
Storingnumbersfromthecallslistinthephonebook
Aphonenumberstoredinthecallslistcanbetransferreddirectlytothe phonebook.
▲ or ▼ Openthecallslistandselectanentry
2sec MENU Startthestoringprocess
COPYTOMEMORY
Confirmthestoringprocess
Thephonenumberisstoredinthephonebookwithoutanamebeingassigned. Then enter a name for the phone number. Editing entries in thephonebookPage13.

When the number in the phone book is stored together with a name, thenameenteredalsoappearsinthecallslist.
Deletingphonenumberfromthecallslist
Deleting phone numbers individually
▲ or ▼ Openthecallslistandselectanentry
DELETE? Activatethedeletingprocess
2sec ☑ Confirmthedeletingprocess
or
▲ or ▼ Cancelthedeletingprocess
Deleting all the phonenumbers
▲ or ▼ Openthecallslistandselectanentry
2sec ☒ DELETEALL? Activatethedeletingprocess
2sec ☑ Confirmthedeletingprocess
or
▲ or ▼ Cancelthedeletingprocess

Before deleting the phone numbers, check that the entries have been viewed.
EmergencyCallUnit
10EmergencyCallUnit
The emergency call unit can be used to daily an emergency services exchange or persons for assistance.
Thereare several appropriate emergency service call numbers available, such as the Red Cross, St. John's Ambulance Brigade, etc. In some countries emergency calls are not free of charge. The unit can also be used for private emergency calls within the family, for example.
Outgoingalertmessage
Thereisadefaultoutgoingalertmessagerecordedonthetelephone.You canreplacethismessagewithoneofyourown.Afteractivatinganautomaticemergencycall,thephonenumbersassignedtobuttonsM1,M2and M3arecalledautomatically.Thealertmessageisplayedrepeatedlyuntil youremergencycallsacknowledged bythepersonreceivingitthrough pressingthe"0"key.Forthisreason,youmustendyourownalertmessage clearly telling the receiving party to "...take this emergency call by pressingthe0key!".
When recording your message, makes sure that the person called recognises your name in the emergency call. Inform them clearly that this is an emergency call and that you need help.
Recordinganoutgoingalertmessage
MENU Openthemainmenu
▲ or ▼ Selectthesubmenu RECORDMESSAGE
hold ⚡ ≥VOICE≤ Startrecording
Release Endrecording
Playingtheoutgoingalertmessage
MENU Openthemainmenu
▲ or ▼ CHECKMESSAGE Selectthesubmenu
Playtheoutgoingalertmessage
Deletingtheoutgoingalertmessage
MENU Opentheimainmenu
▲ or ▼ Selectthesubmenu CHECKMESSAGE
Playtheoutgoingalertmessage ☒ Deletetheoutgoingalertmessage
Storingemergencycall/quickdialnumbers
The quick dial buttons M1, M2 and M3 can be used for normal quick dial numbers or a memory locations for automatic emergency call dialling.
MENU Openthemainmenu
▲ or ▼ Selectthesubmenurequiredand STORENUMBER, confirmit
m
M1, M2 or M3, Selectthequickdialbuttonand confirm
Thephonenumbersassignedtothequickdialkeyscannotbe deleted.Whenstoringnewnumbers,theexistingentriesare overwritten.
Automaticemergencycall
The automatic emergency call can be initiated by pressing and hold the buttons M1, M2 or M3 on the telephone or the button on the emergency call unit. If phonenumber has been assigned to M1, M2 or M3, no phonenumber is dialled but loud warnings signal is issued from the telephone.
Payattentionthattheemergencycallunitiswithinrangeofthe telephone.
Thebatteriesintheemergencycallunitshouldalwaysbefull.
Automaticemergencycallsviathetelephone
5 sec M1, M2 or M3
Start the automatic emergency call function
5 sec M1, M2, M3 or function
End the automatic emergency call
Automaticemergencycallsviatheemergencycallunit
-
Pressandholdthebutton(1) on the emergencycallunitfor5seconds to start the automatic emergencycall function.
-
Pressandholdthebuttononthe emergencycallunitfor5seconds againtoendtheautomatic emergencycallfunction.

Starting/Endingtheautomaticemergencycall
Thephonebehavesasfollowsonstartingtheautomaticemergencycall:
-
The emergency phoneloudspeaker is switched on. An acoustic "emergency call active" signal is sounded for 15 sec.
-
You can then hear the diallingtone and the phonenumbers assigned to the M1, M2 and M3 buttons are automatically dialled, in succession, at interval so approx 60 seconds. The outgoing alert message is played in a continuous cycle.
EmergencyCallUnit
- The person answering the call immediately hear this alert message. The person taking the call stops the outgoing alert message by pressing "0". You can then converse for 3 minutes. Hands freemode remains active on the phonemaking the emergency call during this time.
- When the 3 minutes have elapsed, the call is disconnected. An attempt begins a partial the phone numbers assigned to buttons M1, M2 and M3 as described above.
- If the call is disconnected or there receiver is placed on a hook before the 3 minutes have elapsed, an attempt made at the emergency numbers. The emergency procedure won't best upon less than numbers have been dialed out or press the button on the emergency call unit again or press M1, M2 or M3 for 5 seconds.

To end an emergency call, press the button on the emergency call unit again or press M1, M2 or M3 for 5 seconds.
Emergencycallunitbattery
Testingthebattery
- Pressandholdthebutton(1) on the emergency call unit briefly. The LED(2) lightsup.
- If the LED(2) nolonger lights up when the button is pressed and held, replace the battery.
Replacingthebattery
- Removethescrewontherearside of the emergency call unit using a small, crosstipscrewdriver.
- Insert the tip of a small screw driver in thenotch(3) and open the housing.
- Replacethebattery. Only use batteries of the sametype. Pay attention to correct polarity.
- Closethehousing.

IfProblemsOccur
11IfProblemsOccur
ServiceHotline
Shouldproblemsarisewith the telephone, pleaserefertothefollowinginformationfirst. In the case of technical problems, you can also contact our hot lines service, tel. 08448006503. In the case of claims under the term so guarantee, contact your sales outlet. There is a year period of guarantee.
| ProblemsReply | |
| Notelephonecallspossible-Thetelephonelineisnotconnec-tedproperlyorisdefective.Only usethetelephoneconnectionca-blesupplied.-Thepoweradaptorplugisnot pluggedinorthereisacomplete powerfailure. | |
| Somefunctionseg+40dBam-plifierorhandsfreenotworking | -Checkthebatteriesarefittedand theyarenotexhausted. |
| Thecallernumberdisplay (CLIP 1 )doesnotfunction | -Thecallernumberdisplayfunc-tionisanoptionalserviceoffered bytelephonenetworkproviders. Contactyournetworkproviderfor furtherinformation.-Thecallerhassuppressedthe transmissionoftheirphonenum-ber. |
1 CLIP: Calling Line Identification Presentation
12 Maintenance/Guarantee
Maintenance
- Cleanthehousingsurfaceswithasoft,fluff-freecloth.
- Neverusecleaningagentsorsolvents.
Guarantee
AMPLICOMMSequipmentisproducedandtestedaccordingtothelatest productionmethods. Theimplementationofcarefullychosenmaterials andhighlydevelopedtechnologiesensuretrouble-freefunctioninganda longservicelife. Thetermsofguaranteedonotapplywherethecauseof equipmentmalfunctionisthefaultofthetelephonenetworkoperatoror any interposedprivatebranchextensionsystem. Thetermsofguarantee donotapplytothebatteries,rechargeablebatteriesorpowerpacksused intheproducts. Theperiodofguaranteeis24monthsfromthedateofpurchase.
Alldeficienciesresultingfrommaterialorproductionfaultswhichoccurduringtheperiodofguarantee willbeeliminatedfreeofcharge.Rightsto claimsunderthetermsofguaranteeareannulledfollowinginterventionby thepurchaserorthirdparties.Damagecausedasaresultofimproper handlingoroperation,incorrectpositioningorstoring,improperconnection orinstallation,ActsofGodorotherexternalinfluencearenotcoveredby thetermsofguarantee.Inthecaseofcomplaints,wereservetherightto repairorreplacedefectpartsorprovideareplacementdevice.Replacementpartsordevicesbecomeourproperty.Rightstocompensationinthe caseofdamageareexcludedwherethereisnoevidenceofintentor grossnegligenceby themanufacturer.
If you requirement show sign of defect during the period of guarantee, pleasereturnitto the sales outlet in which you purchased the AMPLI-COMM Equipment together with the purchase receipt. All right to claims under the term so guarantee in accordance with this agreement must be asserted exclusively with regard to your sales outlet. Two years after the purchase and transfer of four products, claims under the term so guarantee can longer be asserted.
Maintenance/Guarantee
DeclarationofConformity
This device fulfilstherequirementsstipulatedintheEU directive:
1999/5/EU directiveonradioequipmentandtelecommunicationsterminalequipmentandthemutualrecognitionoftheir conformity.Conformitywiththeabovementioneddirectiveis confirmedbytheCEsymbolonthedevice.
ToviewthecompleteDeclarationofConformity, pleaserefertothe freedownloadavailableonourwebsitewww.amplicomms.com.

Index
13Index
A
Automaticemergencycall,17
C
Callernumberdisplay,11
Callingbackmissedcalls,9
Callslist,15
Chaindialling,9
Connectingthetelephone,5
Contrastsetting,12
Creatingphonebookentries,8,13
D
Date,6
Dateandtimesetting,12
DeclarationofConformity,19
Deletingentriesfromthephonebook,13
Deletingphonenumbers
fromthecallslist,15
Diallingpause,11
Diallingphonenumbers
fromthephonebook,9
Display,8
Displayingphonenumber
inthecallslist,15
E
Editingentriesinthephonebook,13
Emergencycallunit,16
Emergencycallunitbattery,17
Endingacall,9
Enteringaname,13
Explanations,8
G
Guarantee,19
H
Handsfree,10
Handsfreevolume,10
1
Iconsinthedisplay,8
Insertingbatteries,6
L
Languagesetting,12
M
Mainmenu,12
Maintenance,19
Makingacall,9
Menustructure,12
Mutingthemicrophone,10
N
Navigatinginthemenu,8
0
Operatingelements.7
OperatingtheTelephone,8
Outgoingalertmessage,16
P
Packagecontents,5
Phonebook,13
Privatebranchexchanges,11
Putting the telephone into operation, 5
Q
Quickdial,9
R
Rbuttonandsupplementaryservices,11
Rbuttononprivatebranchexchanges,11
Receivervolume,9
Recordingnamesfor
phonebookentries,14
Redialling,9
Ringertonesetting,12
Ringingvolume,10
S
Safetyinformation.4
ServiceHotline,18
Storingemergencycallnumbers,16
Storingnumbersfromthecallslist
inthephonebook,15
Storingquickdialnumbers,16
Supplementary services, 11
T
Takingacall,9
Talktime,10
Telephoning,9
Time,6
Tonecontrol,10
W
Wallinstallation,6
Notes
ImportantNotesontheGuarantee
The period of guarantee for the AMPLICOM product begins on the date of purchase. Rights to claims under the terms of guarantee relate to deficiencies resulting from material or production faults. Rights to claims under the terms of guarantee are annulled following intervention by the purchaser or third parties. Damagecausedasa result of improper handling or operation, normal wear and tear, incorrect positioning or storing, improper connection or installation, Acts of God or other external influence are not covered by the terms of guarantee.
CLAIMSUNDERTHETERMSOFGUARANTEEMAYONLYBEASSERTED TOTHERETAILERWHERETHEEQUIPMENTWASPURCHASED, WHEREBYTHEPURCHASERECEIPTMUSTALSOBESUBMITTED.
TOPREVENTUNNECESSARYLONGDELAYS, PLEASEDONOTSEND EQUIPMENTUNDERCOMPLAINTTOOUROFFICEADDRESS.
INTHECASEOFQUESTIONSCONCERNINGOPERATIONORTHETERMS OFGUARANTEE, PLEASEREFERTOTHEOPERATINGMANUALOR CONTACTOURHOTLINE: 08448006503 (UsinganUKlandline, atthetimeofgoingtoprint: callscost6pforconnection chargeandthen5p aminute.Mobilecostsmayvary.)
AUDIOLINEGmbH
Neuss
Internet:www.amplicomms.com-E-mail:info@audioline.de
- Contents
- SafetyInformation
- Safety Information
- Intendeduse
- Installationlocation
- Powersupply
- Hearingaidcompatibility
- Disposal
- 2PuttingtheTelephoneintoOperation
- Safetynotes
- Checkingthecontentsofthepackage
- PuttingtheTelephoneintoOperation
- Connectingthetelephone
- Insertingthebatteries
- Settingthetimeanddate
- Privatebranchexchanges
- Wallinstallation
- 3OperatingElements
- Telephone
- Emergencycallunit
- OperatingElements
- OperatingtheTelephone
- 4OperatingtheTelephone
- Iconsinthedisplay
- Navigatinginthemenu
- Creatingphonebookentries-example
- Telephoning
- 5Telephoning
- Takingacall
- Endingacall
- Makingacall
- Redialling
- Callingbackmissedcalls
- Diallingphonenumberfromthephonebook
- Quickdial
- Chaindialling
- Adjustingthereceivervolume
- Increasingthereceivervolumeon+40dB.
- Tonecontrol
- Ringingvolume
- Talktimedisplay
- Handsfree
- Adjustingthehandsfreevolume
- Mutingthemicrophoneinthehandset
- 6PrivateBranchExchanges/Suppl.Services
- Rbuttononprivatebranchexchanges
- Diallingpause
- Rbuttonandsupplementaryservices
- PrivateBranchExchanges/Suppl.Services
- Callernumberdisplay(CLIP 1)
- MenuStructure
- 7MenuStructure
- Mainmenu
- PhoneBook
- 8PhoneBook
- Enteringaname
- Creatingphonebookentries
- Editingentriesinthephonebook
- Deletingentriesfromthephonebook
- Deletingasingleentry
- Deleteallentries
- Recordingnamesforphonebookentries
- Recordingnames
- Deletingrecordings
- CallsList
- 9CallsList
- Displayingphonenumbersinthecallslist
- DisplayDescription
- Storingnumbersfromthecallslistinthephonebook
- Deletingphonenumberfromthecallslist
- 10EmergencyCallUnit
- Outgoingalertmessage
- Storingemergencycall/quickdialnumbers
- Automaticemergencycall
- Automaticemergencycallsviathetelephone
- Automaticemergencycallsviatheemergencycallunit
- Starting/Endingtheautomaticemergencycall
- Emergencycallunitbattery
- Testingthebattery
- Replacingthebattery
- IfProblemsOccur
- 11IfProblemsOccur
- ServiceHotline
- Maintenance/Guarantee
- Maintenance
- Guarantee
- Maintenance/Guarantee
- DeclarationofConformity
- Index
- 13Index
- A
- C
- D
- E
- G
- H
- 1
- L
- M
- N
- 0
- P
- Q
- R
- S
- T
- W
- ImportantNotesontheGuarantee
- AUDIOLINEGmbH
Marque : Amplicom
Modèle : PowerTel 50 alarm plus
Catégorie : Téléphone