
MARCO1000WH - Chauffage DELONGHI - Notice d'utilisation et mode d'emploi gratuit
Retrouvez gratuitement la notice de l'appareil MARCO1000WH DELONGHI au format PDF.


| Type de produit | Radiateur à huile |
| Marque | DeLonghi |
| Modèle | MARCO1000WH |
| Puissance | 1000 W |
| Nombre de niveaux de chaleur | 3 |
| Thermostat réglable | Oui |
| Dimensions (L x P x H) | 60 x 40 x 25 cm |
| Poids | 10 kg |
| Alimentation | 220-240 V, 50 Hz |
| Couleur | Blanc |
| Protection antigel | Oui |
| Sécurité surchauffe | Oui, arrêt automatique |
| Interrupteur basculement | Oui |
| Thermostat ambiant | Intégré |
| Indicateur lumineux de fonctionnement | Oui |
| Entretien et nettoyage | Dépoussiérer avec un chiffon doux et sec. Ne pas utiliser de produits abrasifs. |
| Pièces détachées | Disponibles auprès du service après-vente DeLonghi |
| Réparabilité | Index de réparabilité : non communiqué. Contacter le SAV pour toute réparation. |
| Garantie | 2 ans |
FOIRE AUX QUESTIONS - MARCO1000WH DELONGHI
Questions des utilisateurs sur MARCO1000WH DELONGHI
0 question sur cet appareil. Repondez a celles que vous connaissez ou posez la votre.
Poser une nouvelle question sur cet appareil
Téléchargez la notice de votre Chauffage au format PDF gratuitement ! Retrouvez votre notice MARCO1000WH - DELONGHI et reprennez votre appareil électronique en main. Sur cette page sont publiés tous les documents nécessaires à l'utilisation de votre appareil MARCO1000WH de la marque DELONGHI.
MODE D'EMPLOI MARCO1000WH DELONGHI
INSTRUCTIONS
MARCO
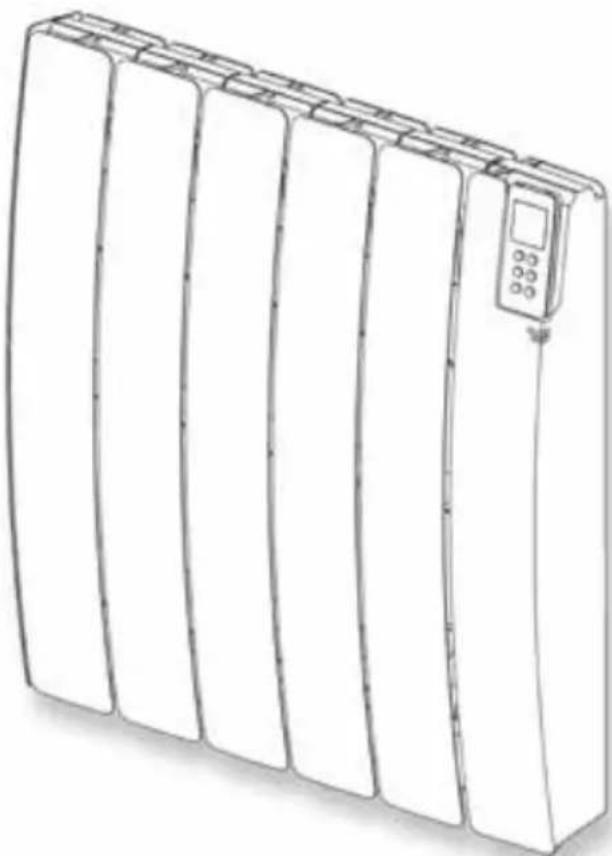
ELECTRIC RADIATOR
natural_image
Line drawing of a multi-panel electronic device with a control panel (no text or symbols)SCHEME 1

natural_image
3D rendering of a mechanical component with vertical grooves and mounting base (no text or symbols)
natural_image
Collection of mechanical tool packages and a close-up of a screwdriver (no text or symbols visible)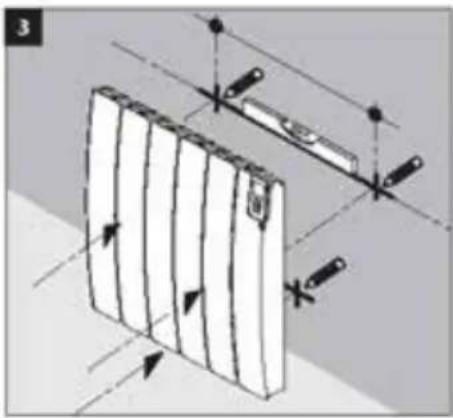
natural_image
Diagram of a rectangular object with vertical strips and directional arrows, possibly a panel or device, against a plain background (no text or symbols)
natural_image
Mechanical clamp assembly diagram showing two vertical arms with levers and a central rod (no text or symbols)

natural_image
Diagram showing three mechanical components with directional arrows, no text or symbols present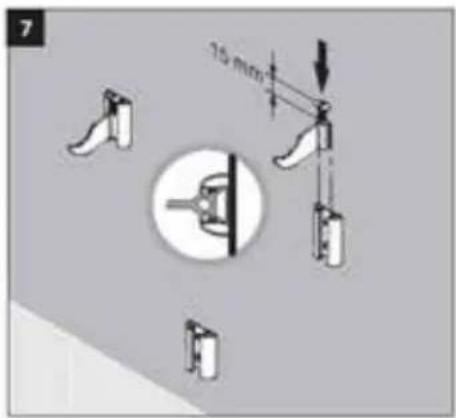

flowchart
graph TD
    A["Central Circle"] --> B["Foot Icon 1"]
    A --> C["Foot Icon 2"]
    A --> D["Foot Icon 3"]
    A --> E["Foot Icon 4"]

natural_image
Illustration of three mechanical or robotic arms with directional arrows indicating movement (no text or symbols)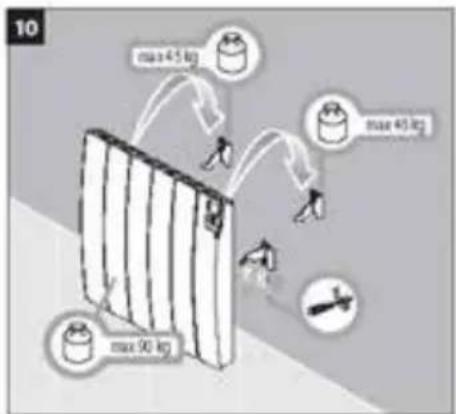

natural_image
3D illustration of a rectangular panel with vertical lines and a small inset detail (no text or symbols)



CE
This appliance complies with European Directives:
2004/108/EC on electromagnetic compatibility
2006/95/EC on low voltage
2011/65/EU on restriction of the use of certain hazardous substances
SYMBOLS USED IN THE MANUAL

IMPORTANT!
DANGER FOR THE SAFETY OF PERSONS, PETS AND THINGS.

IMPORTANT!
DANGER OF ELECTRIC SHOCK.

IMPORTANT!
DANGER OF DAMAGE TO THE APPLIANCE.

IMPORTANT!
HIGH TEMPERATURES. RISK OF BURNS.

TIPS FOR EFFICIENT OPERATION.

DO NOT COVER THE APPLIANCE!

Children of less than 3 years should be kept away unless continuously supervised.
Children aged from 3 years and less than 8 years shall only switch on/off the appliance provided that it has been placed or installed in its intended normal operating position and they have been given supervision or instruction concerning use of the appliance in a safe way and understand the hazards involved.
Children between 3 and 8 years old must not disconnect, regulate and clean the appliance or perform user maintenance.
This appliance can be used by children aged from 8 years and above and persons with reduced physical, sensory or mental capabilities or lack of experience and knowledge if they have been given supervision or instruction concerning use of the appliance in a safe way and understand the hazards involved.

Children shall not play with the ap- pliance.
Cleaning and user maintenance shall not be made by children without supervision.
CAUTION: Some parts of this product can become very hot and cause burns. Particular attention has to be given where children and vulnerable people are present.
1. SPECIFICATIONS OF THE APPLIANCE
Voltage: 240 V \~ 50 Hz
Insulation class II
Protection class: IP24
| Power [W] | Length [cm] | Height [cm] | Weight [kg] | Rated current [A] |
| 1000 | 57 | 58 | 18 | 4,5 |
| 1500 | 81 | 58 | 27 | 6,5 |
| 2000 | 105 | 58 | 35 | 8,5 |
Table 1

The technical specifications of the appliance are indicated on the rating plate on the side of the radiator (Fig. 1).
A Brand/Manufacturer
G Disposal procedures
B Model, category
H Quality marks
C Bidimensional Code (QR)
I Voltage and Power
D Protection class
L Serial number
E EC Mark
M Certificate number
F Double isolation
2. GENERAL INFORMATION

Unpack the appliance carefully and rest it on the polystyrene corner pieces or a carpet.
The package contains:
- the appliance
- remote control with two batteries and container for wall mouting
- mounting kit
- instructions

Read all the instructions carefully before installation and use. Keep for future consultation.

Install and use the appliance as described in these instructions only.

These instructions do not cover all situations which might arise. Caution and common sense should be applied when installing, operating and servicing the appliance.

Modifying the characteristics of the appliance and removing any fixed component including the caps is expressly prohibited.
Make sure the appliance is complete and undamaged. If damaged, do not use the appliance, but contact your local dealer or a qualified professional.

The materials used for packaging can be recycled. You are therefore recommended to dispose of them in special differentiated waste collection containers.
3. POSITIONING AND INSTALLING

The appliance is designed to heat domestic rooms or similar. It must not be used for other purposes.
The appliance must be used permanently mounted on a wall as described in the instructions.
Install the appliance with the control panel of the thermostat at the top, as shown in figure (Fig. 2).

In bathrooms (with bath or shower), install the appliance outside zone 1 (Fig. 2).
The appliance must be installed in such a way that the electronic controls and other control devices may not be touched by someone in the bath or shower (Fig. 2). The electronic controls and other control devices must always be in zone 3.

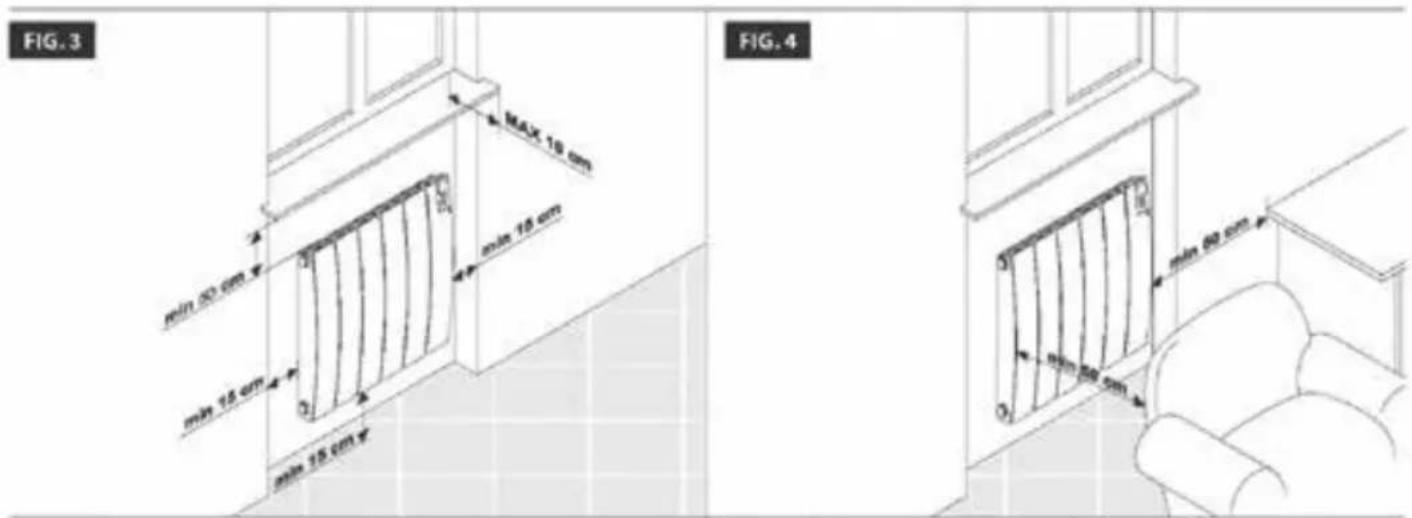
Respect the distances shown in figures 3,4.

Never install the appliance:
- immediately below or in front of a power socket (fig. 5)
- in contact with the wall or floor
- near curtains, flammable or combustible materials or pressure vessels

Make sure there are no pipes or electric wires in the wall which could be damaged while mounting the appliance.
3.1 WALL MOUNTING

Make sure the screws and anchors included in the mounting pack are suitable for the type of wall on which you are mounting the appliance. If in doubt, contact a qualified professional or your local dealer.

The installation template is on the back of the box. Open up the box completely and rest it against the wall. Follow the installation sequence shown on the folding leaf of the cover (Scheme 1), respecting the minimum distance between the bottom of the radiator and the floor (Fig. 3).

During installation, make sure the power cable is disconnected from the power line.
3.2 ELECTRICAL CONNECTIONS

You are recommended to have the appliance installed by a qualified professional.

The appliance must be installed in compliance with national legislation regulating electrical equipment and installations.
When the appliance is installed, make sure the power is off and the mains switch is in the "O" position.
If the supply cord is damaged, it must be replaced by the manufacturer, its service agent or similarly qualified persons in order to avoid hazard.
Never use the appliance if the electronic controls are damaged.

The appliance requires a 240 V \~ 50 Hz power supply. Make sure the power line is appropriate for the data given in table 1.

Make sure the fixed power line is fitted with a disconnecting switch allowing the appliance to be disconnected completely from the household mains in accordance with the wiring rules.
If the appliance is installed in a bathroom, the power line must be fitted with a 30 mA RCD (high sensitivity residual current protection device).
The power supply line must be protected by a suitable RCD.
When installing the appliance in damp rooms (kitchen, bathroom), the point of connection with the household mains must be at least 25 cm from the floor. Make sure that the plug and the socket fit into each other. Insert the plug into the socket.

Make sure the power cable cannot in any way come into contact with the surface of the appliance (Fig. 6).
4. REGULATION AND OPERATION

The appliance is not intended for use by persons (including children) with reduced physical, sensory or mental capabilities, or lack of experience and knowledge, unless they have been given supervision or instruction concerning use of the appliance by a person responsible for their safety.
Children must be supervised to ensure they do not play with, climb on or rest against the appliance.

The appliance is designed to heat rooms.
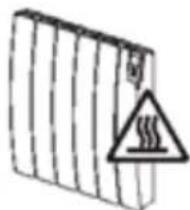
Some parts of this product can become very hot and cause burns. Particular attention has to be given where children and vulnerable people are present.

Keep combustible or flammable materials or pressure vessels (e.g. spray cans, fire extinguishers) at least 50 cm from the appliance. Do not vaporise any type of substance on the surface of the appliance.
natural_image
Illustration of a corrugated metal sheet with a warning triangle indicating thermal hazard (no text or symbols present)
Never touch the appliance with wet or damp hands or feet.
Do not wet the plug or the electronic control unit with water or other fluids. If this occurs, disconnect the appliance from the mains power supply and allow to dry completely.

When the appliance is installed at high altitude, the air will be hotter than the set temperature.

To turn off the appliance completely, unplug from the mains socket or switch off the disconnecting switch by moving it in the "O" position.
This is recommended whenever the appliance is not used for a long time.

When you turn on the appliance for the first time, it is normal for it to give off a bad smell which disappears rapidly. You are recommended to ventilate the room after using the appliance for the first time.

In cold conditions, the radiator may emit metallic sounds when turned on. This is due to the expansion of the materials.

To avoid hazardous overheating, never under any circumstances cover the appliance (Fig.7). Never obstruct the air flow by inserting material into the appliance.
4.1 OPERATING MODES
The appliance can be controlled by means of the infrared remote control with LCD display or, in case of need, by using the MANUAL button on the radiator (Fig. 9).
4.2 LEDS
The control LEDS allow you to immediately recognize the active mode (Fig. 9).

4.2.1 UPPER LED
| Green | Stand-by | |
| Red | Pilot Wire | |
| Blue | Comfort | |
| Yellow | Night | |
| White | Chrono | |
| Flashing green | Anti-freeze | |
| Flashing red | Overdrive (2h) | 2h |
| Yellow and red alternating | Malfunction alert | |
| Pulse green | No power supply |
4.2.2 LOWER LED
| Red | The heating element is on. |
| Off | The desired temperature has been reached.The heating element is off. |
| Flashing red | Transmission of the signal from theremote control |
4.2.3 LED DISABLE
If the radiator is placed in a bedroom or in another place where the light from the LEDs may be annoying, it is possible to activate the "LED DISABLE" function. If this function is active, the LEDs turn automatically off 15 seconds after the last received command.
The function is activated by powering the appliance by means of the dedicated switch of the house electrical system, while pressing at the same time the MANUAL button for 4 seconds. The appliance emits an acoustic signal for confirmation. When you turn the appliance on for the first time, wait at least 15 minutes before activating this procedure.
To return to the normal LED operation (to deactivate the function), simply turn the appliance off and repeat the same procedure as above. The appliance emits a double acoustic signal for confirmation.
4.3 INFRARED REMOTE CONTROL
The remote control communicates with the appliance by infrared rays. For efficient communication, point the remote control towards the appliance receiver lens (fig. 10).
The distance between the remote control and the receiver must not be more than 5 m.

The remote control communicates with the appliance also when placed in the dedicated slot on the right side of the radiator.
The lower LED blinks for 2 seconds. Then the appliance emits an acoustic signal to confirm the transmission of the signal.
Always handle the remote control with great care and keep it in the slot on the appliance. If the batteries are inserted, a magnet placed behind the slot will keep the remote control in place. It is recommended not to put within the slot objects sensitive to magnetic fields.
As an alternative, the remote control can be placed in the wall-mount support included in the packaging.
Do not drop the remote control nor leave it exposed to direct sunlight. Do not spray water or other liquids onto the remote control. Do not rest the remote control on the top of the radiator or near other intense sources of heat.
Inserting or replacing the batteries:
- Remove the cover on the back of the remote control.
- Insert two 1.5V LR03 "AAA" alkaline batteries in the correct position
- Put the cover back
When replacing the batteries or disposing of the remote control, the batteries must be removed and disposed of in compliance with current legislation as they are harmful to the environment.
Characteristics:
| Size | 100 x 42 x 20,5 mm |
| Power supply | LR03 "AAA" 1,5V alkaline batteries |
REMOTE CONTROL

DISPLAY

flowchart
graph TD
    A["Fan Heater Icon"] --> B["80.0°C min"]
    C["Operating mode icons"] --> D["80.0°C min"]
    E["Clock"] --> F["80.0°C min"]
    G["Chrono program time bar"] --> H["Chronic program time bar"]
    I["Temperature set point/Fan heater timer"] --> J["Children safety"]
    I --> K["Infrared transmitter"]
    I --> L["Keypad lock"]
    I --> M["Program indicator"]
    N["Days of the Week"] --> O["Chrono temperature Set"]

Signal transmission from the remote control to the radiator
4.3.1 ON/STAND-BY MODE

20:30
In "Stand-by" mode the current time and the day of the week appear on the display.
All modes are suspended, but the appliance is powered and waiting for one of the modes described below to be selected.

Press the "ON/Stand-by" button to turn on the remote control in the last operating mode selected before turning it off.
When first using the remote after replacing the batteries, the "Comfort" mode is selected.
4.3.2 OPERATING MODES

Press the "Mode" button to cycle among the operating modes. An icon on the display indicates the operating modes, that are displayed as follows:
| Pilot Wire | Comfort | ||
| Night | Anti-freeze | ||
| Chrono | 2h | Overdrive (2h) | |
| Fan Heater | |||

ATTENTION:
The "Overdrive (2h)" and "Fan Heater" modes are obtained by pressing the corresponding buttons on the remote control.
The "Fan Heater" mode is available only for the towel rails with integrated fan heater. It is not available on this appliance. If the "Fan Heater" command is given on the remote control, the appliance confirms the reception of the signal and remains in the previously selected operating mode.
4.3.3 MODE DESCRIPTION

STAND-BY
The appliance is off, but still powered.

PILOT WIRE
This mode is not available on this appliance. When the Pilot wire mode is selected, the appliance confirms the reception and the upper led colour changes accordingly, but the actual operation mode is "Comfort".

COMFORT
The "Comfort" temperature corresponds to the temperature desired by the user.

NIGHT
Night temperature keeps a comfortable temperature with a minimum energy consumption.

ANTI-FREEZE
In the Anti-freeze mode the temperature set point is fixed at 7^ C.
The appliance starts heating automatically when the room temperature drops below 7°C.

CHRONO
In this mode, you can select one of the three preset chrono-thermostat programs or the custom program. The latter lets you set a daily and weekly program with two temperature levels (Comfort and Night).

OVERDRIVE (2h)
The overdrive (2h) can be used to heat the room quickly. The appliance heats at the maximum power for 2 hours.
4.3.4 COMFORT MODE

The "Comfort" temperature set point is the temperature desired by the user.
Press the "Mode" button until the icon 🔗 appears on the display.
On the appliance the upper LED turns blue.

Modify the desired temperature, if needed, using the buttons "+" and "-" . The temperature can be chosen in the interval between 7°C and 32°C.

NOTE: the red led state (lower led) may not be exactly aligned with the actual state of the heating element, but it depends on the temperature control logic.
4.3.5 NIGHT MODE C
In "Night" mode the temperature has to be equal to or lower than the set "Comfort" temperature. If the "Comfort" temperature is set below the "Night" temperature, the latter will be automatically adjusted accordingly.

Press the "Mode" button until the icon C appears on the display.
Modify the desired temperature, if needed, using the buttons "+" and "-"

On the appliance the upper LED turns yellow.
It's recommended during the night and when the room is empty for 2 hours or more.
4.3.6 ANTI-FREEZE MODE
In "Anti-freeze" mode the temperature set point is fixed at 7°C. The appliance starts heating automatically when the room temperature drops below 7°C.

Press the "Mode" button until the icon ✿ appears on the display.
On the appliance the upper LED turns green and flashing.
It's recommended when the room is not used for one day or longer.
4.3.7 CHRONO MODE
In "Chrono" mode, you can select one of the three preset chrono-thermostat programs or the custom program. The latter lets you set various temperatures (comfort and night) over a 24 hour period for each day of the week.
CHOICE OF PROGRAM

Press the "Mode" button until the icon is displayed. Then press the "Stand-by" button followed by the "+" button, holding both together for at least 3 seconds.


The program code (P1, P2, P3 and P4) flashes. Press the "+" and "-" buttons to set the program. Press the "Mode" button to confirm.
| PROGRAM P1 | HOURS | MODE |
| FROM MONDAY TO FRIDAY | 0 - 5 | Night |
| 6 - 8 | Comfort | |
| 9 - 15 | Night | |
| 16 - 22 | Comfort | |
| 23 - 0 | Night | |
| SATURDAY AND SUNDAY | 0 - 6 | Night |
| 7 - 22 | Comfort | |
| 23 - 0 | Night |
| PROGRAM P2 | HOURS | MODE |
| FROM MONDAY TO SUNDAY | 0 - 6 | Night |
| 7 - 22 | Comfort | |
| 23 - 0 | Night |
| PROGRAM P3 | HOURS | MODE |
| FROM MONDAY TO FRIDAY | 0 - 5 | Night |
| 6 - 8 | Comfort | |
| 9 - 12 | Night | |
| 13 - 22 | Comfort | |
| 23 - 0 | Night | |
| SATURDAY AND SUNDAY | 0 - 6 | Night |
| 7 - 22 | Comfort | |
| 23 - 0 | Night |
PROGRAM P4 - CUSTOM
With the "P4" program, you can set different temperatures (Comfort and Night) over a 24 hour period for each day of the week.
A) SETTING THE CURRENT DAY AND TIME
natural_image
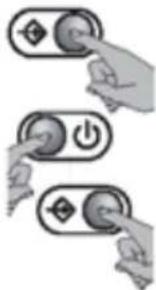
Three identical hand buttons with control icons, no text or symbols visibleTo access "Chrono" mode, press the "Mode" button until the icon ② appears on the remote control display. Then press the "Stand-by" button followed by the "Mode" button and hold them down together until the number indicating the day starts flashing.

Press the "+" and "-" buttons to set the correct day of the week (1=MON, 2=TUE,...7=SUN). Press the "Mode" button to confirm.

The hour is now flashing: use the "+" and "-" buttons to set and confirm with the "Mode" button.
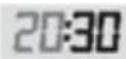
Minutes are now flashing: repeat the same procedure.
B) SETTING THE PROGRAM
Now an hourly sequence can be set for each day. Start with the first day. Choose by means of the "+" and "-" buttons, for each hour, between the high temperature set point (comfort, full bar) and the low temperature set point (night, empty bar).

bar
| Time | T Comfort | T Night | |---|---|---| | 0h | 0 | 0 | | 2 | 0 | 0 | | 4 | 0 | 0 | | 6 | 1 | 1 | | 8 | 1 | 1 | | 10 | 1 | 1 | | 12 | 0 | 0 | | 14 | 0 | 0 | | 16 | 0 | 1 | | 18 | 1 | 1 | | 20 | 1 | 1 | | 22 | 1 | 1 | | 24 | 1 | 1 |Press "Mode" to confirm and repeat the procedure for every day of the week.
The weekly program is now set, the appliance emits an acoustic signal for confirmation.
4.3.8 OVERDRIVE (2h)
The "Overdrive (2h)" can be used to heat the room quickly.

Press the "2h" button to start the "Overdrive (2h)".
The temperature set point disappears from the display of the remote control. The upper LED on the appliance turns red and flashing. The lower LED turns red.
The appliance heats at the maximum power for 2 hours, independently from the temperature setting.
To deactivate the "Overdrive (2h)" function at any time, press the "2h" button again, the "Mode" button or the "Stand-by" button.
The "Overdrive (2h)" is set to stop automatically after 2 hours anyways.
The function can also be activated when the appliance is in "Stand-by", in this case, when the two hours have elapsed the radiator returns to "Stand-by".
4.4 CHILDREN SAFETY
When the "Children Safety" function is activated, the surface temperature of the appliance is lower than in normal operation in the active mode (Comfort, Night,...) to avoid the risk of burns caused by brief accidental contact.
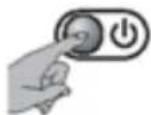
Press the button "Stand-by" followed by the "-" button and hold them down together until the icon 🎩 is displayed.
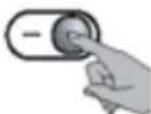
To deactivate the function, repeat the same operation.
"Children Safety" can be activated in any mode, including "Stand-by".
If the remote control cannot be used, the function can also be disabled using the MANUAL button.
Turn the appliance off by unplugging it from the mains power supply, then turn it on again while holding the MANUAL button down for 15 seconds.
The appliance emits one long and three short beeps to confirm receipt of the command.
IMPORTANT:
When this function is active, the appliance heats at reduced power and therefore the room takes longer to warm up.
Even when this function active, children should still be supervised to make sure they are not in danger.
Always avoid prolonged contact between the appliance and the body.
If the appliance is already operating or is still hot after recent use and "Children Safety" is activated, it takes at least two hours for the temperature to drop to the lower value and the function to be operational.
4.5 KEYPAD LOCK
It is possible to lock the remote control keypad to avoid accidental modifications.
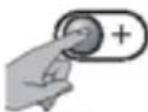
Press simultaneously “+” and “Mode” buttons for about 3 seconds to lock the keypad.

The lock icon appears on the display.
To unlock press simultaneously the two buttons for about 3 seconds once again, the lock icon disappears from the display.
If the remote control is pointing towards the appliance while activating the Keypad Lock function, the MANUAL key on the appliance will also be blocked. The MANUAL key can be unlocked in the same way as above, if the remote control is transmitting the signal to the appliance.
In case it is necessary to unlock the MANUAL key and the remote control is not available, it is enough to turn the appliance off by means of the dedicated switch of the house electrical system. When turning the appliance on, the MANUAL key will be active.

ATTENTION:
If the batteries are flat, the "batt" warning appears on the display of the remote control.
4.6 USE OF THE APPLIANCE WITH THE MANUAL BUTTON
The MANUAL built-in button on the underneath of the remote control slot (see fig. 9) allows the user to control the radiator even if the remote control is lost, missing or with no batteries.
Press repeatedly the button to cycle among the following operating modes: Pilot Wire still selectable, but operating as in comfort mode – Comfort – Night – Anti-freeze – Overdrive (2h) – Stand-by. The upper LED changes colour accordingly. See page 4 for the description of the colours.
Default temperature set points are fixed at 20°C for Comfort, 17°C for Night and 7°C for Anti-freeze.
Any command sent by the remote control switches back to the normal operating modes and to the temperature settings set on the remote control.
IMPORTANT: In the event of power failures, the date and time setting is retained for around 1 hour and 30 minutes. The other settings remain saved in the memory even after the 1 hour and 30 minutes. When the appliance comes on
after longer than 1 hour and 30 minutes, the Stand-by mode will automatically be selected. The user programming will be restored by any command given by the remote control.
5. CLEANING

Before cleaning, make sure the appliance is turned off, cold and disconnected from the household mains.

To clean, just wipe with a soft damp cloth and neutral detergent. Never use abrasive or corrosive cleaning products or solvents.

To maintain efficiency, remove the dust from the surface and inside of the appliance at least twice a year using a vacuum cleaner.
6. MAINTENANCE

Should any technical problems arise, contact a qualified professional (recognised or authorised by the dealer or manufacturer) or your local dealer.

All operations on the appliance must be carried out by a qualified professional who before performing maintenance must make sure the appliance is turned off, cold and disconnected from the household mains.
7. TROUBLESHOOTING
| The appliance does not heat up. | Check if the radiator is correctly connected to the mains power grid and powered.Check the position of the mains switch of the installation.Increase the temperature set point on the appliance regulator.The heating element requires a few minutes for the appliance to become hot. Wait the necessary time.The safety device has tripped. Eliminate the cause of overheating(for example, obstructions or covering).Disconnect the appliance from the household mains for a few minutes to reset the electronic system.If it still does not heat up, contact your local dealer or a qualified professional. |
| The appliance heats continuously. | Reduce the temperature set point on the appliance regulator.Make sure the “Overdrive (2h)” function has not been activated accidentally.If it continues to heat, contact your local dealer or a qualified professional. |
| The room stays cold. | Make sure the power of the appliance is adequate for the room to be heated.If the appliance is being used for the first time, the room takes at least a couple of hours to heat to the required temperature (setting the radiator to maximum does not raise the temperature more quickly). |
| The appliance does not cool down. | The heating element requires a few dozen minutes to cool down. Wait the necessary time. |
| The upper LED becomes alternating yellow and red. | The temperature sensor is malfunctioning. Turn off the appliance and contact your dealer. |
8. GUARANTEE

You are recommended to keep all parts of the packaging in case the appliance needs to be returned to the dealer. The appliance must arrive complete and undamaged in order to maintain the validity of the guarantee.
The manufacturer guarantees customers all the rights specified in European Directive 1999/44/EC and the consumer rights recognised by national legislation.
The guarantee specifically covers all non-conformities and production defects present at the moment of sale or becoming evident within two years from the date of purchase and gives the customer the right to free repair of the defective product or replacement should repair be impossible.
The above rights are invalidated in the following cases:
- defects caused by uses other than those specified in the instructions, which are an integral part of the sales contract;
- defects caused by accidental breakage, negligence or tampering.
Operations involved in installation, connection to the household mains and maintenance described in these instructions are not covered by the guarantee.
The Manufacturer declines all liability for damage or injury caused directly or indirectly to people, objects or pets as a result of the failure to apply these instructions, with particular
reference to warnings regarding installation, start-up and use of the product.
To claim the above rights, the Customer must contact his/her dealer and present a valid proof of purchase issued by the seller, complete with date of purchase.
9. DISPOSAL

Make sure the power cable is disconnected from the power line before performing any operation. To remove the appliance, follow the procedure for fixing to the wall in reverse (Scheme 1).
To dispose of the appliance, comply with current legislation for the disposal and management of waste.

Important information for correct disposal of the product in accordance with EC Directive 2002/96/EC.
At the end of its working life, the product must not be disposed of as urban waste.
It must be taken to a special local authority differentiated waste collection centre or to a dealer providing this service.
DL Radiators S.p.A.
via L. Seitz 47
31100 Treviso
Italy

Cod.
5725200282/1.14
- INSTRUCTIONS
- MARCO
- ELECTRIC RADIATOR
- SCHEME 1
- CE
- SYMBOLS USED IN THE MANUAL
- SPECIFICATIONS OF THE APPLIANCE
- GENERAL INFORMATION
- POSITIONING AND INSTALLING
- WALL MOUNTING
- ELECTRICAL CONNECTIONS
- REGULATION AND OPERATION
- OPERATING MODES
- LEDS
- UPPER LED
- LOWER LED
- LED DISABLE
- INFRARED REMOTE CONTROL
- Inserting or replacing the batteries:
- ON/STAND-BY MODE
- 20:30
- OPERATING MODES
- ATTENTION:
- MODE DESCRIPTION
- STAND-BY
- PILOT WIRE
- COMFORT
- NIGHT
- ANTI-FREEZE
- CHRONO
- OVERDRIVE (2h)
- COMFORT MODE
- NIGHT MODE C
- ANTI-FREEZE MODE
- CHRONO MODE
- CHOICE OF PROGRAM
- PROGRAM P4 - CUSTOM
- A) SETTING THE CURRENT DAY AND TIME
- B) SETTING THE PROGRAM
- OVERDRIVE (2h)
- CHILDREN SAFETY
- IMPORTANT:
- KEYPAD LOCK
- USE OF THE APPLIANCE WITH THE MANUAL BUTTON
- CLEANING
- MAINTENANCE
- TROUBLESHOOTING
- GUARANTEE
- DISPOSAL
Marque : DELONGHI
Modèle : MARCO1000WH
Catégorie : Chauffage