
NVR-7713-24RD2-N - Téléviseur NEVIR - Notice d'utilisation et mode d'emploi gratuit
Retrouvez gratuitement la notice de l'appareil NVR-7713-24RD2-N NEVIR au format PDF.


| Type de produit | Téléviseur LED |
| Marque | Nevir |
| Modèle | NVR-7713-24RD2-N |
| Taille de l'écran | 24 pouces (61 cm) |
| Résolution | HD Ready (1366 x 768 pixels) |
| Technologie d'affichage | LED |
| Dimensions (sans pied) | 55,5 x 33,5 x 8,5 cm |
| Poids (sans pied) | 3,2 kg |
| Alimentation | 220-240 V ~ 50/60 Hz |
| Consommation électrique | 30 W (max) |
| Connectivité | 2 HDMI, 1 USB, 1 VGA, 1 antenne, 1 prise casque |
| Haut-parleurs | 2 x 3 W |
| Fonctions principales | TV numérique DVB-T/T2, lecteur multimédia USB, EPG, minuterie |
| Réglages | Contraste, luminosité, couleur, son, langues OSD |
| Montage mural | Compatible VESA 100 x 100 mm |
| Entretien et nettoyage | Débrancher avant nettoyage, utiliser un chiffon doux et sec |
| Sécurité | Ne pas exposer à l'humidité, ne pas ouvrir le boîtier |
| Température d'utilisation | 5 °C à 35 °C |
| Accessoires fournis | Télécommande, piles, socle, câble d'alimentation |
| Réparabilité | Indice de réparabilité : 6,5/10 (estimation) |
| Pièces détachées | Disponibles via service après-vente Nevir |
FOIRE AUX QUESTIONS - NVR-7713-24RD2-N NEVIR
Questions des utilisateurs sur NVR-7713-24RD2-N NEVIR
0 question sur cet appareil. Repondez a celles que vous connaissez ou posez la votre.
Poser une nouvelle question sur cet appareil
Téléchargez la notice de votre Téléviseur au format PDF gratuitement ! Retrouvez votre notice NVR-7713-24RD2-N - NEVIR et reprennez votre appareil électronique en main. Sur cette page sont publiés tous les documents nécessaires à l'utilisation de votre appareil NVR-7713-24RD2-N de la marque NEVIR.
MODE D'EMPLOI NVR-7713-24RD2-N NEVIR
nevir
USER MANUAL
NVR-7713-24RD2-N

IMPORTANTE
Please read this manual carefully before installing and operating the TV.
Keep this manual handy for further reference
Table of Contents
Caution and Warning.... 1
Safety Precautions 2
Preparation for Your New TV 3
Check Accessories 3
Stand Installation Guide 3
Wall mount specification 4
TV Jacks Explanation 5
External Device Connection Diagram 6
Side Keypad and Front Panel 7
Keypad Buttons....7
Front Panel 7
Remote Control Instructions 8
Inserting Batteries in the Remote 8
Remote Control Reception Angle 8
Learning about Remote Control 9
Remote Control Buttons 9
Basic Operations 10
Turning On and Off 10
Select input source 10
Adjust the OSD Screen 10
First Time Settings.... 11
OSD Menu Operations 12
Channel Menu....12
Picture Menu 15
Sound Menu 16
Time Menu 17
Lock Menu 18
Setup Menu 19
PVR File System 20
SCREEN MENU(IN PC MODE)....21
Media Operation 22
Troubleshooting....23
Identifying Problems 23
Specification 24
Caution and Warning

CAUTION
RISK OF ELECTRIC SHOCK DO NOT OPEN

Caution: To reduce the risk of electric shock, do not remove cover or back. No user-serviceable parts inside. Refer servicing to qualified service personnel.

The lightning flash with arrowhead symbol, within an equilateral triangle is intended to alert the user to the presence of uninsulated dangerous voltage within the product enclosure that may be of sufficient magnitude to constitute a risk of electric shock.

The exclamation point within an equilateral triangle is intended to alert the user to the presence of important operating and maintenance (servicing) instructions in the literature accompanying the TV.
WARNING: TO REDUCE THE RISK OF FIRE OR ELECTRIC SHOCK, DO NOT EXPOSE THIS APPLIANCE TO RAIN OR MOISTURE.
CAUTION: CHANGES OR MODIFICATIONS NOT EXPRESSLY APPROVED BY THE PARTY RESPONSIBLE FOR COMPLIANCE WITH THE FCC RULES COULD AVOID THE USERS AUTHORITY TO OPERATE THIS EQUIPMENT.
Safety Precautions
-
Read these instructions.
-
Keep these instructions.
-
Notice all warnings.
-
Follow all instructions.
-
Do not use this apparatus near water. For example, do not use near a laundry tub, in a wet basement, or near a swimming pool, and the like.
-
Clean only with dry cloth.
-
Do not block any ventilation openings. Install in accordance with the manufacturer's instructions. Slots and openings in the cabinet back or bottom are provided for ventilation, to ensure reliable operation of the TV and to protect it from overheating. These openings must not be blocked or covered. The openings should never be blocked by placing the TV on a bed, sofa, rug, or other similar surface.
-
Do not install near any heat sources such as radiators, heat registers, stoves, or other apparatus (including amplifiers) that produce heat.
-
Do not modify the safety purpose of the polarized or grounding-type plug. A polarized plug has two blades with one wider than the other. A grounding-type plug has two blades and a third grounding prong. The wide blade or the third prong is provided for your safety. If the provided plug does not fit into your outlet, consult an electrician for replacement of the obsolete outlet.
-
Protect the power cord from being walked on or pinched particularly at plugs, convenience receptacles, and the point where they exit from the apparatus.
-
Only use attachments/accessories specified by the manufacturer.
-
Use only with cart, stand, tripod, bracket, or table specified by the manufacturer, or sold with the apparatus. When a cart is used, use caution when moving the cart/apparatus combination to avoid injury from tip-over. A TV and cart combination should be moved with care. Quick stops, excessive force, and uneven surfaces may cause the TV and cart combination to overturn.

-
Unplug this apparatus during lightning storms or when unused for long periods of time. For added protection for this TV receiver during a lightning storm, or when it is left unused for long periods of time, unplug it from the wall outlet and disconnect antenna or cable system. This will prevent damage to the TV due to lightning and power line surges.
-
Refer all servicing to qualified service personnel. Servicing is required when the apparatus has been damaged in any way, such as power-supply cord or plug is damaged, liquid has been spilled or objects have fallen into the apparatus, the apparatus has been exposed to rain or moisture, does not operate normally, or has been dropped.
-
This TV should be operated only from the type of power supply indicated on the rating label. If customer is not sure the type of power supply in your home, consult your appliance dealer or local power company. For TV remote control battery power, refer to the operating instructions.
-
The TV set shall not be exposed to dripping or splashing. No objects filled with liquids, such as vases, shall be placed on the TV set.
-
Never insert objects of any kind into this TV through openings as they may touch dangerous voltage or other electrical parts that could result in fire or electric shock. Never spill liquid of any kind into the TV.
-
Unplug the TV from the wall outlet before cleaning. Do not use liquid or aero cleaners. Use a damp cloth for cleaning.
-
This TV should never be placed near or over a radiator or heat resource. This TV should not be placed in a built-in installation such as a bookcase or rack unless proper ventilation is provided or the manufacturer's instructions have been adhered to.
-
Do not place this TV on an unstable cart, stand, tripod, bracket, or table. The TV may fall, causing serious injury to someone, and serious damage to the appliance.
-
Do not attempt to service this TV by yourself because opening or removing covers may expose you to dangerous high voltage or other hazards. Refer all servicing to qualified service personnel.
-
WARNING: To prevent injury, this apparatus must be securely attached to the floor/wall in accordance with the installation instructions.
Preparation for Your New TV
Check Accessories
Check the accessories that are packed with your TV.

natural_image
Plain gray rectangular background with no visible text, symbols, or features.LED TV

natural_image
Black remote control with two batteries (no text or symbols visible)Remote Control & Batteries
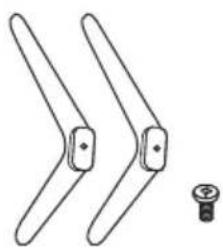
natural_image
Pure mechanical linkage diagram without any text, numbers, or symbolsTV Stand Base + 2 x Screws

User's manual + Warranty Card

Car charger
Stand Installation Guide
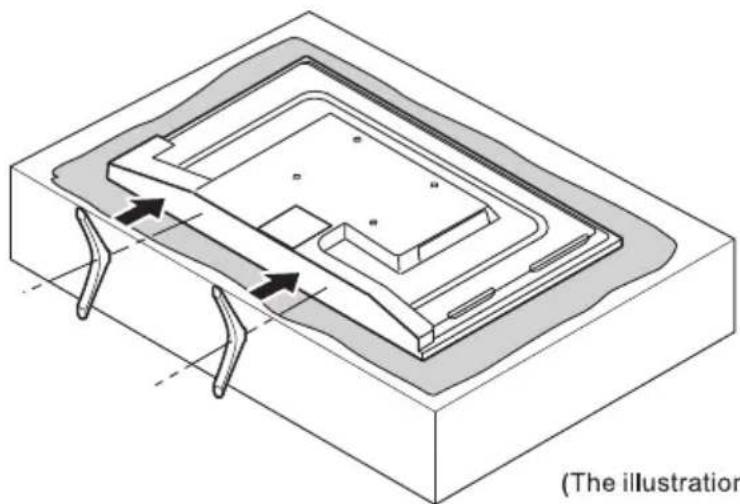
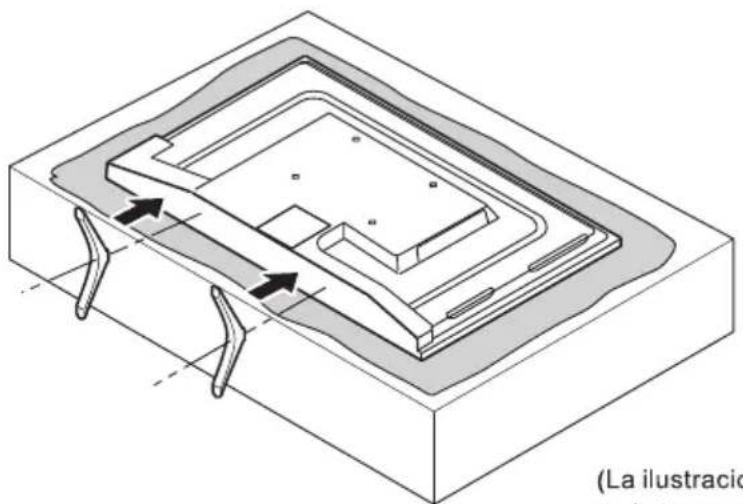
The TV is packaged with the TV stand separated from the cabinet. To setup the TV table stand, please carry out the installation according to the instructions below.
-
The panel can be scratched easily, so please:
Place a soft cloth on the table and place the TV face down on the cloth.
Note: Always unplug the AC cord first when installing/removing the stand. -
Take the base. Please align the screw holes of the base and the TV, and then insert the screws into the holes on the base and tighten them.
Note: To ensure that the TV is stable, please lock all screws.
natural_image
Isometric technical diagram of a mechanical component with internal channels and directional arrows, labeled (no text or symbols on the diagram itself)Please take note of the base direction:

natural_image
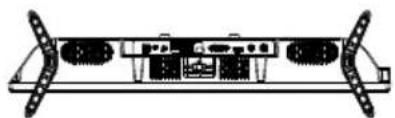
Technical line drawing of a mechanical or electrical component with no visible text or symbolsThe bottom view of the TV (Front cabinet faces down)
(The illustration is for reference only, Please prevail in kind)
Wall Mounting(if available)
| Unit Dimension (unit:mm) | Screws |
| VESA 100 x 100 | M4x6mm, 4pcs |
Note: The length of the screw specified is only a recommendation; actual length required can vary depending on the type of wall mount used.

Warnings:
- Do not set up the wall mount by yourself. Please contact qualified professionals for installation.
- The TV should not be mounted on walls or surfaces which have an angle more than 10 degrees with vertical direction. Otherwise the TV set may fall.
- The walls for mounting must have enough strength to hold the whole weight of TV set. For example, concrete wall and brickwork are eligible. Do not place the mount on soft walls such as earth walls and plasterboard.
- If spare parts of different specifications (such as screws) are used during mounting, consult with qualified professionals to make sure these parts are safe and effective.
- Before attaching the base to wall, ensure the holes for anchors are in keeping with the installing rules. Otherwise there may exist some potential problems.
- Do not place any heating source under your television. Or else, it can cause fire.
- Do not place the TV near anything dripping. Transducers and high voltage wires should be kept far away from the apparatus too. Or else, it may cause creepage, electric shock or bad resonance.
- Do not place TV in a location where collision or vibration is liable to happen.
- In order to avoid unexpected falling of the TV set, do not put any strong force on TV or wall mount after installing.
- Be sure to unplug the TV before installing. Keep anything hard or sharp away from the screen panel to prevent the scuffing.
- After installing, if there is any need to move the cabinet, please contact the qualified professionals.
TV Jacks Explanation

1

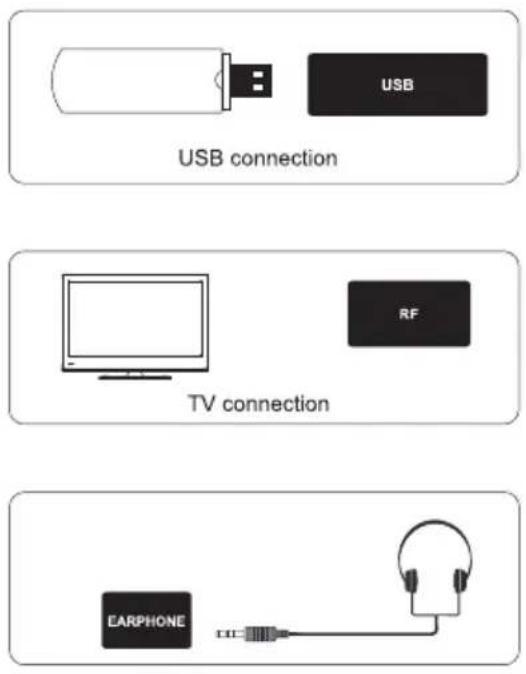
EARPHONE: Connect a 3.5mm headset for personal audio.
VGA: Connect the PC to these jacks.
SCART: Connect the SCART jack of DVD or VCR.
PC AUDIO IN: Connect the audio output of the PC.
RF: Connect to receive the signal from your antenna or cable through a coaxial cable.
COAX: Digital TV sound output.
HDMI: (High-Definition Multimedia Interface) Provides an uncompressed digital connection.
USB: Connect the USB device such as the flash disk to access the TV media function.
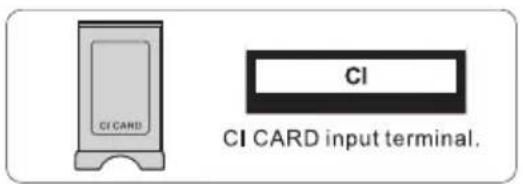
CI: CI card reader.
MINI AV: Connect the Audio/Video output jack of DVD or VCR.
MINI YPbPr: Connect the YPbPr output jack of DVD or VCR.
DC IN : 12V DC, only for the outdoor use. Please use the car charging adapter to get the power from the Car.
External Device Connection Diagram

flowchart
graph TD
    A["DVD"] --> B["Set-top boxes"]
    B --> C["HDMI"]
    C --> D["HDMI input connection"]
    B --> E["Mini AV"]
    E --> F["MINI YPbPr"]
    E --> G["MINI AV"]
    F --> H["Mini YPbPr input connection"]
    G --> I["Mini YPbPr input connection"]
    J["SCART"] --> K["↓"]
    L["→"] --> M["↓"]
    N["→"] --> O["↓"]


Side Keypad and Front Panel
Keypad Buttons
If you cannot locate your remote, you can use the side keypad buttons on your TV to operate many TV features.
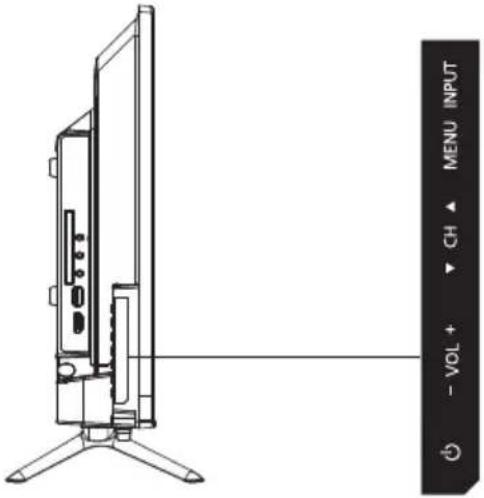
INPUT: Displays the Source Select List.
MENU: Displays the TV Main Menu.
CH▲: Scans up through the channel list. In the TV menu system, it acts like the up arrow on the remote control and can be used to select menu options.
CH▼: Scans down through the channel list. In the TV menu system, it acts like the down arrow on the remote control and can be used to select menu options.
VOL+: Increases the volume. In the TV menu system, it acts like the right arrow on the remote control and can be used to select menu options.
VOL-: Decreases the volume. In the TV menu system, it acts like the left arrow on the remote control and can be used to select menu options.
POWER (☐): Turns the TV on and off.
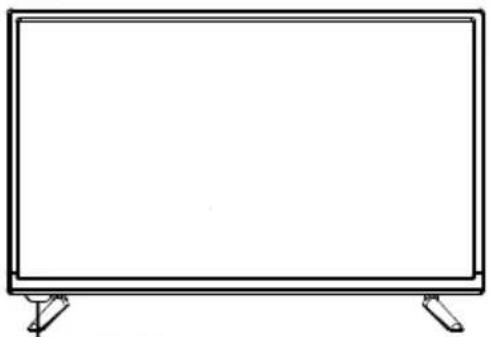
Front Panel
Power/Standby Indicator: White and indicator off. It shows White when the TV is standby and indicator off when turned on. Remote Control Sensor: Remote control IR sensor, which receives infrared ray sent by remote control.

NOTE: If there is a protective film around the screen, remove the protective film before using the TV.
Remote Control Instructions
Inserting Batteries in the Remote
- Remove the battery compartment cover from the back of the remote control by lifting the cover.
- Insert 2AAA batteries, making sure the polarities(+and-) are aligned correctly.
- Replace the cover.
If the remote control does not work, check these points:
• Are the polarities (+, -) correct?
• Are the batteries worn out?
• Is there an AC power failure?
• Is the power cord plugged in?
- Is there any interference or block near the remote control sensor?
CAUTION:
• Used batteries should be recycled.
- Keep out of children's reach.
• DO NOT use new and old batteries together.
- Change both the batteries at the same time.
- When not using the remote control for a long time, remove the batteries from the unit.
Warning: All batteries (packed or in use) must not be exposed to high temperature like sun heat or fire.
Remote Control Reception Angle
Use your remote control within the distance and angle range shown below.
Remote Control Sensor

Learning about Remote Control
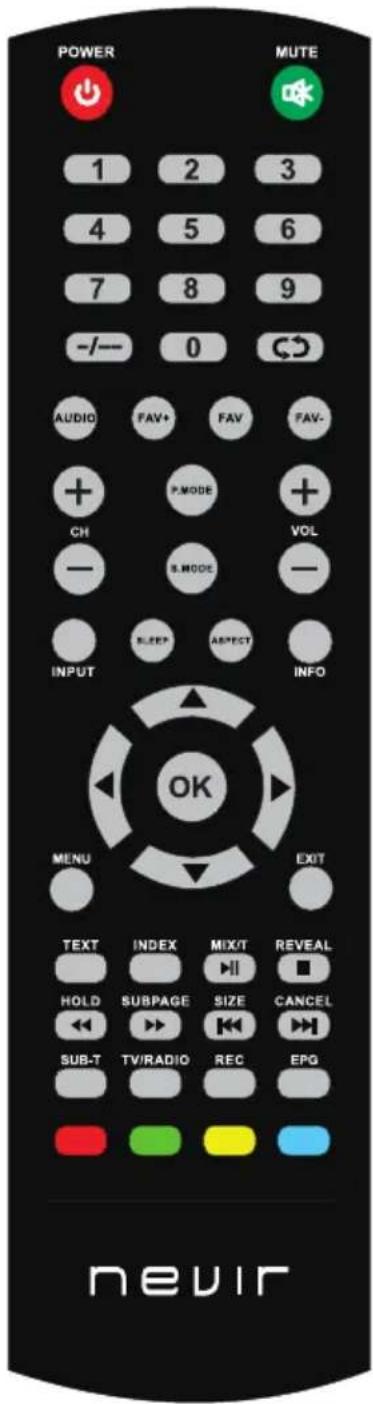
Remote Control Buttons

POWER (☐): Turns the TV on or switches it to Standby.
MUTE (☒): Reduces the TV volume to its minimum level. Press again to restore the volume.
NUMBER BUTTONS: Press 0-9 select a TV channel directly when you are watching TV.
“-/-”: To switch the channel digit.
Recall (CD): Returns to the previous channel.
AUDIO: Switch the audio channel in DVD or multimedia mode.
FAV-/FAV+.: Scan up or down through the current favorite channel list.
FAV.: Show favorite channel list.
CH+ or CH- : Scans up or down through the current channel list.
VOL+ or VOL-: Increases or decreases the TV volume.
P.MODE: Switches between the preset picture mode.
S.MODE: Switches between the preset sound mode.
INPUT:Accesses the available input channels, Use the arrows to highlight options, and press OK to select.
SLEEP: Selects the sleep timer, after which the TV will shut off automatically.
ASPECT: Switches between the preset screen size mode.
INFO: Press to display the current program information on the screen.
Arrows (◄/►/▲/▼): Uses the four arrows to highlight different items in the TV menu or change the value.
OK: Enter and confirm button.
MENU: Accesses the Main Menu, or return to the upper level of a sub-menu.
EXIT: Exits the current menu or function.
TEXT: To enter Teletext mode.
INDEX: To display the index page.
MIX/T: TV and TXT picture are mixed together in transparent background. Press to activate Time Shift function in Digital TV mode, for delayed viewing.
REVEAL: Teletext mode-To reveal or hide the hidden words.
HOLD: Teletext mode-Hode current page which is display.
SUBPAGE: Sub coded page access.
SIZE: Change the size of display in Teletext mode.
CANCEL: To cancel the display.
SUB-T: Display caption information
TV/RADIO: Switch between TV and RADIO.
REC: Presonal video record button. A USB memory device must be connected to the USB port for recording.
EPG: Shows Electronic Program Guide.
RED/GREEN/YELLOW/BLUE: Use add-on functions in OSD menu.
▶II Play or pause media files.
■ Stop playing media files.
◀◀▶▶ Fast review and fast forward.
◀◀ ▶▶ Select the previous or the next media file.
NOTE:
- All pictures in this manual are examples, only for reference, actual product may differ from the pictures.
◆ The buttons not mentioned here are not used.
Basic Operations
Turning On and Off
Connect the AC cord to power the TV. At this time the TV will enter standby mode and power indicator will turn white. Use Power button (☐) on the side panel of TV or on the remote control to turn on the TV. After switching off the TV for 5 seconds, you can turn on TV again.
Select input source
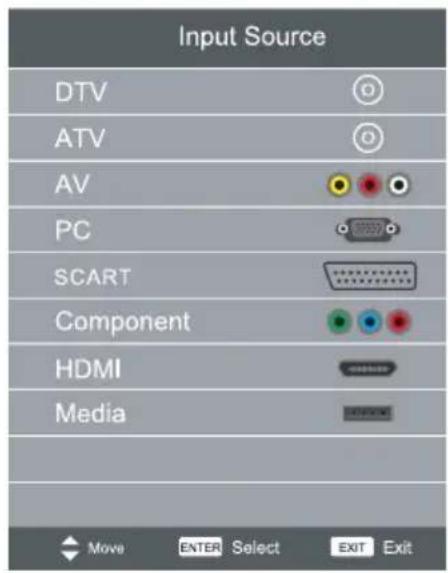
Press INPUT button on remote control to display Source Select list.
Use ▲ / ▼ arrows to highlight the source you need and press OK to confirm.
Adjust the OSD Screen
The OSD (On Screen Display) menu enables you to approach to the TV functions.
To use OSD menu system, press MENU button on remote control, then use ◀ / ▶ arrow to highlight an option from CHANNEL, PICTURE, SOUND, TIME, LOCK, SETUP and press OK/▼ button.
Press the ▲ /▼ arrow to move to a different option within each menu. If necessary, press OK or ▶ arrow to display the choices of the option you've highlighted. If available, use the text at the bottom of each screen for help. To return to the previous menu, press the MENU button.
To exit the OSD menu:
- Press the EXIT button. The menu will clear from the screen.
- Press the MENU button repeatedly until the menus disappear.
Basic Operations
First Time Settings
Connect an RF cable from the TV's input called "TV-In" and to your TV Aerial socket.
Language
select the language to be used for menus and message.
Country
Press ◀ / ▶ button to select the country you want to.
Press OK button to tuning setup menu, uses the arrows button select tune type.
| First Time Installation | ||
| Language | English | |
| Country | Spain | |
| Environment | On | |
| Enter Auto Tuning | ||
Auto Tuning
First tuning digital, press Menu button to skip digital tuning, Second tuning analogue, press Menu button to skip analogue tuning.
| Tuning Setup | |
| Tune Type | DTV + ATV |
| Digital Type | DVB-T |
| Scan Type | Full |
| Network ID | Auto |
| Frequency | Auto |
| Symbol Rate | Auto |
| MENU Back | ENTER Start |
OSD Menu Operations
CHANNEL menu
CHANNEL menu is used for channel searching and edit, it's only available in TV input.
Press MENU on the remote. Select CHANNEL from the Main menu. Press the OK button to proceed to CHANNEL menu.

Auto Tuning
Uses up and down button to select Auto Tuning, then press Enter button to enter sub-menu.

OSD Menu Operations
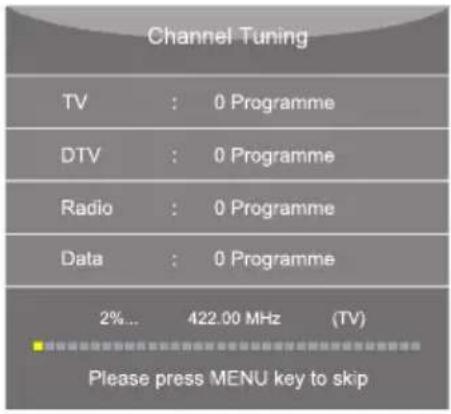
- Channel tuning: search channel automatically. You can stop searching with MENU button.
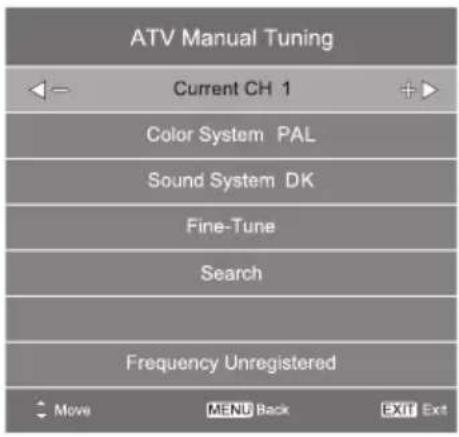
- ATV Manual tuning: search the channel manually. You can customise the color/sound system, frequency of channel.
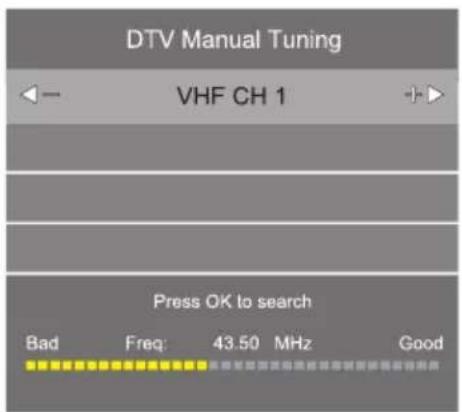
- DTV Manual tuning: search the channel manually. Use the arrows button to select DTV Manual Tuning, then press OK button to enter sub-menu,
OSD Menu Operations
- Programme Edit: via color buttons you can edit the programme, functions include delete, rename, skip channel, etc. You can also add or erase the channel to the favorite channel list via FAV button on remote control.

- Schedule List
Show the Schedule list, it is available under DTV source.
• Signal Information
Press▲/▼button to select signal information, then press the OK button to see the detailed information about the signal. Only available when there is signal under DTV.
- CI Information
Press ▲/▼button to select CI, and then press OK button to display the CI slot information.
• Logical Channel Number
Set the Logical Channel Number option to on or off.
OSD Menu Operations
PICTURE menu
Picture menu is used for picture effect adjusting.
Press MENU on the remote. Select PICTURE from the main menu. Press the OK button to proceed to picture menu.

- Picture Mode: select the preset picture mode. You can also switch the mode via PMODE button on the remote control. You can only customise the contrast, color, brightness and tint in Personal mode.
- Contrast: Adjusts the difference between the light and dark areas of the picture. To get better picture value, Contrast should be adjusted to the proper value.
- Brightness: Adjusts the brightness of the picture, and usually is adjusted together with Contrast.
• Colour: Adjust the saturation of the colour based on your own like.
• Tint: Adjust the tint of TV display. - Sharpness: Adjusts the sharpness of the picture. This function is not available in PC mode.
- Colour Temp: Press OK button to enter the color temperature sub menu. Color Temperature Adjusts the colour temperature of the picture, to select the option: Cold, Normal, Warm.
- Noise Reduction: To filter out and reduces the image noise and improve picture quality.
• HDMI Mode: Select HDMI Mode to Auto, Video and PC.
OSD Menu Operations
SOUND menu
Picture menu is used for TV sound effect adjusting.
Press MENU on the remote. Select SOUND from the main menu. Press the OK button to proceed to sound menu.

- Sound Mode: Select the preset Sound Mode. You can also switch the mode via SMODE button on the remote control. Standard, Music, Movie, Sport and Personal five kinds of voice mode for your choice. Bass and Treble can only be adjusted when Sound mode is set to Personal.
• Treble: Adjuststhe highest part of the sound.
• Bass: Adjuststhe lowest part ofthe sound.
• Balance: Adjusts how much audio (loudness) gets sent to the left and right speakers. - Auto Volume Level: This function may be set as On or Off. Auto Volume Level can set the volume automatically adjust corresponding to the input audio.
- SPDIF Mode: Select three modes area available including Auto, PCM and Off.
- AD Switch: Enter the AD Switch sub-menu, then select this option to adjust AD volume.
NOTE:
Balance: This item can adjust the speaker's output, it enables you to listen to best at your position.
Auto volume level: This item uses for reducing the difference between channel and program's volume automatically. It made the overall water to be even. This function will also reduce the fluctuation of the sound.
OSD Menu Operations
TIME menu
Time menu is used for TV TIME adjusting.
Press MENU on the remote. Select TIME from the main menu. Press the OK button to proceed to time menu.

• Clock: Set the TV clock.
• Time Zone: Showing the country's time zone.
- Sleep Timer: Set the sleep timer. the TV will automatically enter standby mode after times up.
• Auto Standby: Set the auto sleep on / off. including Off, 3 hours, 4 hours and 5 hours.
- OSD Timer: Set the time how long to display OSD menu.
• Summer Time: Set the Summer Time option to Auto, on and off.
OSD Menu Operations
LOCK MENU
Time menu is used for TV Lock effect adjusting.
Press MENU on the remote. Select LOCK from the main menu. Press the OK button to proceed to lock menu.

- System Lock: Press OK button to enter, input password, default password is 0000.
- Set Password: To set your own password, first enter the old password, and then enter your new password twice.
- Channel Lock: To enter "Channel Lock" menu, select the program you want to, then press the "Green" button to lock or unlock the channel.
- Parental Guidance: You can set the parental control function to suit viewing for children of all ages. Choose the categories in the sub menu.
• Key Lock: You can set to lock or unlock the keypad. - Hotel Mode
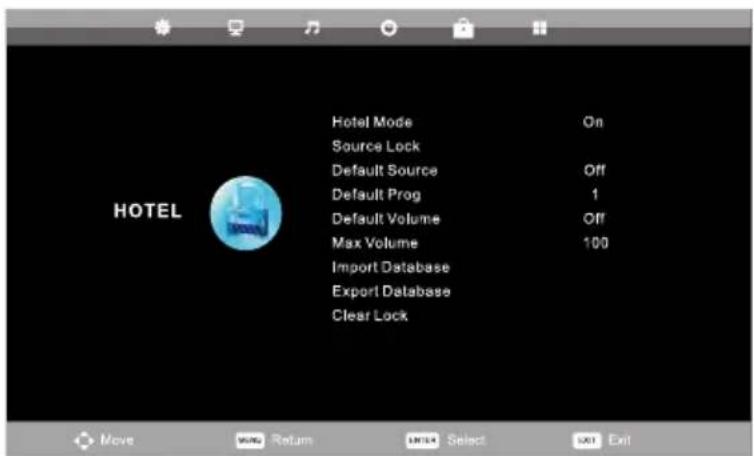
- Press ▼/▲ button on the remote control to select hotel mode in the Lock menu.
- Press Enter button on the remote control to enter the sub-menu.
- After finishing your adjustment, Press MENU button to save and return back to the previous menu.
OSD Menu Operations
SETUP MENU
Setup menu is used for TV additional options.
Press MENU on the remote. Select SETUP from the main menu. Press the OK button to proceed to setup menu.

• Language : Select your desired OSD language.
- TT Language/Audio Language/Subtitle Language : Select your desired teletext language/ the primary audio language /the primary subtitle language.
- Hearing impaired: This function is for the Hearing Impaired, when the status is on, you can see subtitles in the programs.
- PVR File System: Enter the submenu to make PVR settings.
- Aspect Ratio: To select between the available modes: Auto, 4:3, 16:9, Zoom1 and Zoom2.
- Blue Screen: To turn the blue screen on/off. If the Blue Screen is turned on, the TV will display a blue background when there is no signal input.
- First Time Installation: To set relevant options, including OSD language, country and tuning.
- Reset: Press OK button to enter a dialogue, select Yes to restore factory default.
- Software Update (USB): Update the firmware of this model. (Please contact the dealer.)
• Environment: To set environment mode, including home and shop mode.
• HDMI CEC: Used for CEC effect adjusting
OSD Menu Operations
PVR File System
To Check and format your USB Disk to be compatible with the PVR file system of this model. Select "Check PVR File System" to check your USB Disk. Select "Format" to format your USB Disk to be compatible with this model. Select "Free Record Limit" to set the record limit for your USB Disk.

IMPORTANT NOTE:
For any type of recording with this television, you must have plugged a USB device into the appropriate USB port at the back of the television to record on.
- Please insert the external high-speed storage devices, insert must be formatted before.
- Select the DTV program and channel you wish to record.
- Press [REC] button to enter PVR mode and start recording. PVR control bar on the screen shown below.
You can select the appropriate settings required.
You could change the mode of Recording menu by OK button.
- If you wish to stop the recording, press [ ■ ] button and the recording will stop.
Instant one-touch recording and playback
In DTV mode and with a USB device properly plugged in, press the REC button on the remote control to activate the PVR function for instant recording of the channel you are watching. Press [■] button to stop recording,
Select the schedule list in channel menu and press OK to enter schedule list, then uses left or right button to select recorded list.

Display the recorded list
RED button: Delete the program you select.
OK button: Play the program you select.
OSD Menu Operations
SCREEN MENU(IN PC MODE)
Press menu button on the remote control to display the main menu. use the ◀/▶ arrow button select screen menu.
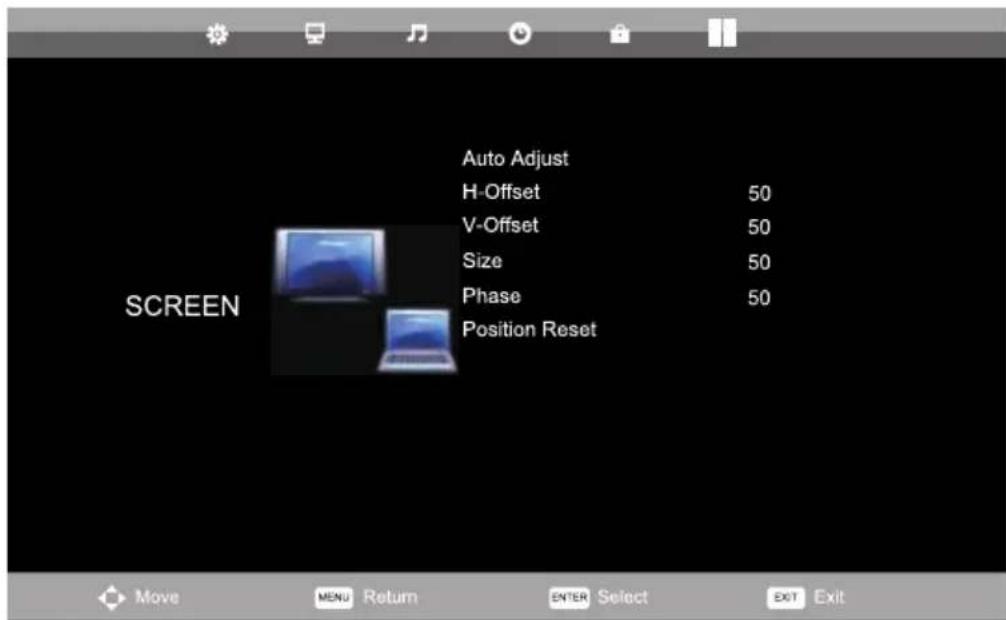
Auto Adjust
Press OK button to start adjusting automatically.
H-Offset
To adjust horizontal position of picture.
V-Offset.
To adjust vertical position of picture.
Size
To adjust horizontal stripes in the screen image.
Phase
To adjust the phase of picture.
Position Reset
To reset position of screen.
OSD Menu Operations
Media Operation
Note: Before operation MEDIA menu, Plug in USB device or memory card.
Press ▲/▼ button to select MEDIA in the source menu, and then press "OK" button to enter. You can browse multimedia files by selecting PHOTO, MUSIC, MOVIE or TEXT. Then press the "▶II" button to start playing.

- Press ◀/▶ button to select the option that you want to adjust in the Media menu, then press OK button to enter.
- Press ◀/▶ button to adjust or press ▲/▼ button to select.
- After finishing your adjustment, press MENU button to save and return back to the previous menu and press EXIT button to exit the entire menu.
Troubleshooting
Identifying Problems
If there are any problems when using the product, please consult the list below. If the list does not solve the problem, call our Customer Service Center immediately.
TV Problems
The TV can't be turned on.
• Make sure the AC cord is plugged in.
- Check the wall outlet, make sure the AC output works normally and stably.
- Select the Key Lock function in the OPTION Menu and press OK to uncheck the locking status.
No picture or sound but the TV is on and there is a "No Signal" sign on screen.
- Are you trying to use an input source with no device connected to it? For using other video/audio device, make sure the external device works normally first, then press Source and choose the right input source.
• The signal type option may be set incorrectly. - The channel may be blank. Try to search the channel again or change another channel.
The sound is fine, but the picture is poor.
- If you can only get black and white pictures from external device that you've connected to your TV, maybe it is due to the video cables is not connected well, or they are connected wrongly. Check the connection stability first, then check the correctness.
- For AV input, the yellow video cable connects to the yellow Video In jack on the side of your TV. For Component input, the three Y, Pb, Pr video cables (red, blue, and green) should be connect to the corresponding input jacks on the side of your TV.
- Check the antenna connections. Make sure all of the cables are firmly connected to the TV jack on side of your TV.
- Try adjusting the color features to improve.
There is no sound, but the picture is fine.
• The sound might be muted. Try pressing the MUTE button to restore sound.
- For using AV or Component, remember to connect the device's left and right audio output correctly. The left channel cable is white and the right channel cable is red. Please match the cables and jacks according to their colors.
• The sound settings may not be set correctly.
- If your audio source has only one jack or is a (mono) audio source, make sure you have plugged the connection into the Audio In L jack (white) on the TV.
The buttons on the side panel don't work.
- Unplug the TV from the AC power for 10 minutes and then plug it back. Turn the TV on and try again.
The TV turns off unexpectedly.
- The electronic protection circuit may have been activated because of a power surge. Wait 30 seconds and then turn the TV on again. If this happens frequently, the voltage in your house may be abnormal. If the other electronic equipment in your home can't work normally, consult a qualified service personnel.
The Remote control doesn't work.
- Something might be blocking between the remote control and the remote sensor on the front panel of the TV. Make sure there is a clear path.
• The remote may not be aimed directly at the TV. - The batteries in the remote may be weak, dead, or installed incorrectly. Put new batteries in the remote.
SPECIFICATIONS
Product Specifications
| Model: | NVR-7713-24RD2-N |
| Video: | avi , MPEG |
| Music: | mp3 |
| Photo: | jpg , jpeg, bmp, png |
| Screen resolution: | 1366x768 |
| Working voltage: | AC 100-240V ~ 50/60HzDC 12V --- 3A |
| Rated power consumption: | 36W |
| Dimensions: | 552x 371 x 154mm |

The European Directive 2002/96 /EC on Waste Electrical and Electronic Equipment (WEEE) required that old household electrical appliances must not be disposed of in the normal unsorted municipal waste stream. Old appliances must be collected separately in order to optimize the recovery and recycling of the material they contain, and reduce the impact on human health and the environment. The crossed out "wheeled bin" symbol on the product remind you of your obligations that when you dispose of the appliance, it must be separately collected.
Besides that, waste batteries and/or accumulator must be removed prior to delivery of WEEE, thought the separated collection channels provided for this purpose (distributors and/or facilities from Local Authorities) In order to fulfill ruling UNE EN-60335, we indicate that if the flexible wire is damaged, it can only be replaced or repaired by a technical service recognized by NEVIR S.A. as per special tooling is required.
nevir
MANUAL DE USUARIO
NVR-7713-24RD2-N

IMPORTANTE
Por favor lea este manual cuidadosamente antes de instalar el televisor.
Guarde este manual para futuras referencias.
Tabla de contenido
Precaución y Advertencia....1
Precauciones de seguridad.... 2
Preparación para su nuevo televisor....3
Comprobar accesorios....3
Guía instalación de Soporte de TV 3
Especificaciones montaje en pared 4
Explicación Jacks de TV....5
Diagrama conexión de dispositivo externo 6
Teclado lateral y panel frontal 7
Botones de panel lateral....7
Panel frontal 7
Instrucciones de control remoto 8
Inserción de pilas en el mando a distancia....8
Angulo de recepción del control remoto 8
Aprendiendo sobre control remoto 9
Botones control remoto 9
Funciones Básicas....10
Encendido y apagado 10
Seleccionar fuente de entrada.... 10
Ajuste de pantalla OSD....10
Primera configuración....11
Menú Operaciones OSD....12
Menú de canales.... 12
Menú de imagen 15
Menú de sonido 16
Menú de tiempo 17
Menú de bloqueo....18
Menú de configuración.... 19
Sistema de archivos PVR....20
Menú de pantalla (En modo PC)....21
Función de medios....22
Solución de problemas.... 23
Identificación de problemas 23
Especificaciones 24
Precaucion y Advertencia

PRECAUCIÓN
RIESGO DE DESCARGA ELÉCTRICA NO ABRIR

Precaucion: Para reducir el riesgo de descarga electrica, no retire la cubierta ni la parte posterior. No hay partes que el usuario pueda reparar. Remitir el servicio al personal de servicio cualificado.

El simbolo del rayo con la punta de flecha, dentro de un triángulo equilátero, está destinado a alertar al usuario de la presencia de voltaje peligroso no aislado dentro de la caja del producto que puede ser de magnitud suficiente para constituir un riesgo de descarga electrica

El signo de exclamación dentro de un triángulo equilátero está destinado a alertar al usuario de la presencia de importantes instrucciones de operación y mantenimiento en la documentación que acompaña al televisor
ADVERTENCIA: PARA REDUCIR EL RIESGO DE INCENCIO O DESCARGA ELECTRICA, NO EXPONGA ESTE APARATO A LA LLUVIA O HUMEDAD.
PRECAUCION: CAMBIOS O MODIFICACIONES NO APROBADOS EXPRESAMENTE POR LA PARTE RESPONSABLE DE EL CUMPLIMIENTO DE LAS NORMAS DE LA FCC PODRÍA EVITAR LA AUTORIDAD DE LOS USUARIOS PARA OPERAR ESTE EQUIPO.
PRECAUCIONES DE SEGURIDAD
- Lea estas instrucciones.
- Guarde estas instrucciones.
- Observe todas las advertencias.
-
Siga todas las instrucciones.
-
No use este aparato cerca del agua. Por ejemplo, no lo use cerca de una tina de lavandería, en un sótano húmedo, cerca de una piscina o similar.
-
Limpiar solo con un paño seco.
-
No bloquee las aberturas de ventilación. Instalar de acuerdo con las instrucciones del fabricante. Las ranuras y las aberturas en la parte posterior o inferior del armario se proporcionan para la ventilación, para asegurar el funcionamiento fiable del televisor y para protegerlo contra el calentamiento. Estas aberturas no deben ser bloqueadas o cubiertas. Las aberturas nunca deben bloquearse colocando el televisor en una cama, sofá, alfombra u otra superficie similar.
-
No instalar cerca de Fuentes de calor tales como radiadores, registros de calor, estufas u otros aparatos (incluyendo amplificadores) que produzcan calor.
-
No modifique el aparejo de seguridad del enchufe polarizado o de conexión a tierra. Un enchufe polarizado tiene dos hojas, una más ancha que la otra. Un enchufe con conexión a tierra tiene dos hojas y una tercera clavija de toma de tierra. La cuchilla ancha o la tercera clavija se proporciona para su seguridad. Si el enchufe suministrado no encaja en su toma de corriente, consulte con un electricista para reemplazar la toma de corriente obsoleta.
-
Proteja el cable de alimentación de que no se pise o se pellizque especialmente en los enchufes, receptáculos de conveniencia y el punto donde salen del aparato.
-
Utilice únicamente accesorios recomendados por el fabricante.
-
Úselo solo con el carro, Soporte, trípode o soporte de mesa recomendado por el fabricante o vendido junto con el aparato. Cuando se utilice un carro, tenga cuidado al mover la combinación carro/ aparato para evitar posibles desperfectos por vuelco. Una combinación de TV y carro deben moverse con cuidado. Las paradas rápidas, la fuerza excesiva y las superficies irregulares pueden hacer que la combinación de TV y carro vuelque.

-
Desenchufe este aparato durante tormentas eléctricas o cuando no se utilice durante largos periodos de tiempo. Para mayor protección de este receptor de TV durante una tormenta eléctrica o cuando no se utiliza durante largos periodos de tiempo, desconéctelo de la toma de corriente y desconecte la antena o el sistema de cable. Esto evitara dañar el televisor debido a los rayos y a las sobretensiones de la line de alimentación.
-
Remitir todos los servicios al personal de servicio cualificado. Se requiere mantenimiento cuando el aparato ha sido dañado de alguna manera, ya sea el cable de alimentación o el enchufe, si se ha derramado líquido o se han caído objetos en el aparato, si el aparato ha sido expuesto a lluvia o humedad, no funciona normalmente o se ha dejado caer.
-
Este televisor debe funcionar solo con el tipo de alimentación indicado en la etiqueta de características. Si el cliente no está seguro del tipo de fuente de alimentación en su casa, consulte con el distribuidor de electrodomésticos o compañía eléctrica local. Para alimentación de la batería del mando a distancia del televisor, consulte el manual de instrucciones.
-
El televisor no debe estar expuesto a goteos o salpicaduras. No se deben colocar objetos llenos de líquidos, como jarrones, en el televisor.
-
Nunca inserte objetos de ningún tipo en este televisor a través de las aberturas, ya que pueden tocar una tensión peligrosa y otras partes eléctricas que podrían provocar un incendio o una descarga eléctrica. Nunca derrame líquidos de ningún tipo en el televisor.
-
Desconecte el televisor de la toma de corriente antes de limpiarlo. No utilice limpiadores líquidos o aerodinámicos, utilice un paño húmedo para limpiarlo.
-
Este televisor nunca debe colocarse cerca o sobre un radiador o una fuente de calor. Este televisor no debe colocarse en una instalación incorporada, como una estantería o estante, a menos que se proporcione una ventilación adecuada o se hayan cumplido las instrucciones del fabricante.
-
No coloque este televisor sobre un carro, soporte, trípode, soporte o mesa inestable. El televisor puede fallar, causando lesiones graves a alguien y daños graves al aparato.
-
No intente reparar este televisor por sí mismo. Abrirlo o quitar las cubiertas puede exponerlo a peligrosos voltajes u otros peligros. Remitir todos los servicios al personal de servicio cualificado.
-
ADVERTENCIA: Para prevenir lesiones, este aparato debe estar firmemente sujeto al piso/ pared de acuerdo con las instrucciones de instalación.
Preparacion de su nuevo televisor
Comprobar accesorios
Compruebe los accesorios que están embalados con su TV.

natural_image
Solid dark gray rectangle with no visible text, symbols, or features.Televisor LED
natural_image
Black remote control with circular button and two battery icons (no text or symbols)Mando y baterias

natural_image
Pure mechanical linkage diagram without any text, numbers, or symbolsSoporte de TV + 2x tornillos

Manual de usuario
+
garantia

Cargador de coche
GUIA INSTALACION DE SOPORTE
Esta televisión esta empaquetada con los soportes separados del televisor. Para instalar el soporte de mesa, por favor lleve a cabo la instalación según las instrucciones detalladas a continuación.
El panel se puede arañar fácilmente, por lo tanto:
Coloque un paño suave sobre la mesa y coloque el televisor boca abajo sobre el paño. Nota: Desenchufe siempre el cable de CA primero cuando instale o extraiga el soporte.
- Tome la base. Por favor, alinee los orificios de los tornillos de la base y el televisor, y luego inserte los tornillos en los agujeros de la base y apriételos. Nota: Para asegurarse de que el televisor esté estable, bloquee todos los tornillos.
natural_image
Isometric technical diagram of a mechanical component with internal channels and directional arrows, labeled (La ilustración)Por favor tome nota de la dirección de la base:
natural_image
Technical line drawing of a mechanical or electronic component with multiple ports and connectors (no text or symbols)La vista inferior del televisor (el gabinete frontal hacia abajo)
(La ilustracion es de referencia, el modelo actual puede diferir de la imagen)
Montaje en pared (si está disponible)
| Dimesiones de la unidad (unidad:mm) | Tornillos |
| VESA 100x100 | M4x6mm, 4pcs |
NOTA: La longitude del tomillo detallado es solo una recomendacion; La longitude requerida puede variar dependiendo del tipo de soporte en pared usado.

Advertencias:
- No instale el soporte de pared por si mismo. Póngase en contacto con profesionales cualificados para la instalación.
- El televisor no debe montarse en paredes o superficies que tengan un ángulo de más de 10 grados con la dirección vertical. De lo contrario el televisor puede caer.
- Las paredes para el montaje deben tener la fuerza suficiente para mantener todo el peso del televisor. Por ejemplo los muros de hormigón y los ladrillos son óptimos para ello. No coloque la montura en paredes blandas como paredes de carton yeso.
- Si se utilizan piezas de repuesto de diferentes características (como tomillos) durante el montaje, consulte a profesionales cualificados para asegurarse de que estas piezas son seguras y efectivas.
- Antes de fijar la base en la pared, asegúrese de que los orificios de los anclajes se ajusten a las normas de instalación. De lo contrario, pueden surgir algunos problemas potenciales.
- No coloque ninguna fuente de calor debajo de su televisor. De lo contrario, puede causar fuego.
- No coloque el televisor cerca de objetos que goteen. Los transductores y los cables de alta tensión deben mantenerse lejos del aparato. De lo contrario, pueden causar arrastramiento, descarga eléctrica o mala resonancia.
- No coloque el televisor en un lugar donde pueda producirse una colisión o vibración.
- De cara a evitar una caída inesperada del televisor, no coloque nada que haga fuerza en el televisor o en el soporte.
- Asegúrese de desconectar el televisor antes de instalarlo. Mantenga objetos duros o afilados lejos del panel de la pantalla para evitar rasguños.
- Después de instalar, en caso de que haya alguna necesidad de mover la televisión, por favor póngase en contacto con profesionales cualificados.
Explicación de Jacks de TV

1

EARPHONE: Conecte un auricular de 3,5 mm para audio personal.
VGA: Conectar el PC a estos puertos.
SCART: Conectar la toma SCART del DVD o VCR.
PC AUDIO IN: Conectar la salida de audio del PC.
RF: Conecte para recibir la señal de su antena o cable a través de un cable coaxial.
COAX: Salida de la televisión de sonido digital.
HDMI: (High-Definition Multimedia Interface) Proporciona una conexión digital sin comprimir.
USB: Conecte el dispositivo USB, como el disco flash para acceder a la función de medios del televisor.
Cl: Lector de tarjeta Cl.
MINI AV: Conectar la toma de salida de Audio/ Video del DVD o VCR
MINI YPbPr: Conectar la toma de salida YPbPr del DVD o VCR.
DC IN : 12V DC, solo para uso en exteriores. Utilice el adaptador de carga del automóvil para obtener la energía del automóvil.
Diagrama de connexion de dispositivo externo

flowchart
graph TD
    A["DVD"] --> B["Decodificadores"]
    B --> C["Conexión de entrada HDMI"]
    C --> D["MINI AV"]
    D --> E["SCART"]
    C --> F["MINI YPbPr"]
    C --> G["MINI AV"]
    F --> H["Conexión de entrada Mini YPbPr"]
    G --> H


Teclado lateral y panel frontal
Botones del Panel Lateral
Si no puede ubicar su mando a distancia, puede usar los botones laterales del teclado en su televisor para operar muchas funciones de TV.

INPUT: Muestra la lista de selección de fuente.
MENU: Muestra el menú principal del televisor.
CH▲: Escanea a través de la lista de canales. En el sistema de menú de TV, actúa como la flecha hacia arriba en el control remoto y se puede utilizar para seleccionar opciones de menú.
CH▼: Escanea hacia abajo a través de la lista de canales. En el sistema de menú de TV, actúa como la flecha hacia abajo en el control remoto y puede usarse para seleccionar opciones de menú.
VOL+: Aumenta el volumen. En el sistema de menú de TV, actúa como la flecha derecha en el control remoto y puede usarse para seleccionar opciones de menú.
VOL-: Disminuye el volumen. En el sistema de menú de TV, actúa como la flecha izquierda del control remoto y puede usarse para seleccionar opciones de menú.
POWER (⏻): Enciende y apaga el televisor.
Panel Frontal
Indicador de Encendido / Espera: Blanco e indicador apagado. Muestra blanco cuando el televisor está en espera y el indicador apagado cuando está encendido.
Sensor del mando a distancia: sensor IR del mando a distancia, que recibe rayos infrarrojos enviados por el mando a distancia.
natural_image
Line drawing of a flat-screen monitor with two side legs and a blank screen (no text or symbols)Indicador de Encendido / Espera Sensor de Control Remoto
NOTA: Si hay una lámina protectora sobre la pantalla, quitela antes de usar el televisor.
Instrucciones Control Remoto
Insertar pilas en el mando
- Levante la tapa del compartimento de las pilas en la parte posterior del mando a distancia.
- Inserte 2 pilas AAA, asegurándose de que las polaridades (+ y -) estén alineadas correctamente.
- Coloque la tapa de nuevo.
Si el control remoto no funciona, revise estos puntos:
- ¿Son las polaridades (+, -) correctas?
- ¿Están las pilas gastadas?
• ¿Hay un fallo de alimentación de CA? - ¿Esta enchufado el cable de alimentación?
- ¿Hay alguna interferencia o bloqueo cerca del sensor del mando?
PRECAUCION:
• Las baterías usadas se deben reciclar.
- Manténgase fuera del alcance de los niños.
• NO use pilas nuevas junto con viejas.
• Cambie ambas baterías a la vez.
- Cuando no vaya a usar el mando a distancia por un periodo de tiempo largo, extraiga las pilas de la unidad.
Precaución: Todas las baterías (empaquetadas o en uso) no deben ser expuestas a altas temperaturas como el calor del sol o el fuego.
Angulo de Recepción del Control Remoto.
Utilice su control remoto a la distancia y Angulo mostrados debajo.

Aprendiendo sobre el control remoto
Botones control remoto
POWER ( ⏻ ): Enciende, apaga y modo suspensión del televisor.
MUTE (☒): Reduce el volumen del televisor a nivel mínimo. Vuelve a pulsar para restaurar el volumen.
NUMBER BUTTONS: Pulse 0-9 para seleccionar un canal directamente.
“-/--” Para cambiar el dígito de canal
(©): Vuelve al canal anterior.
AUDIO: Cambia el canal del audio en modo DVD o multimedia.
FAV-/FAV+.: Permite subir o bajar de canal segun la secuencia actual de la lista de favoritos.
FAV.: Mostrar la lista de canales favoritos.
CH+ or CH- : Para acceder a los canales siguientes o anteriores.
VOL+ or VOL-: Aumenta o disminuye el volumen del televisor.
P. MODE: Cambia entre el modo de imagen predefinido.
S. MODE: Cambia entre el modo de sonido preestablecido.
INPUT: Accede a los canales de entrada disponibles. Use las flechas para resaltar opciones y pulse ok para seleccionar.
SLEEP: Selecciona el temporizador de apagado, después del cual el televisor se apagará automáticamente.
ASPECT: Cambia entre el modo de tamaño de pantalla preestablecido.
INFO: Presione para mostrar la información actual del programa en la pantalla.
Flechas (◄/►/▲/▼): Utilice las cuatro flechas para resaltar diferentes elementos en el menú de TV o cambiar el valor.
OK: Boton de entrar y confirmar.
MENU: Accede al Menú principal o regresa al nivel superior de un submenú.
EXIT: Sale del menú o función actual.
TEXT: Para entrar en el modo de teletexto.
INDEX: Para mostrar la página del índice.
MIX/T: La imagen de TV y TEXTO se mezclan en fondo transparente. Presione la función cam cambio de hora activa en el modo de TV para una visualización retardada.
REVEAL: Modo de teletexto: Para revelar u ocultar las palabras ocultas.
HOLD: Modo de teletexto-Ocultar la página actual que se muestra.
SUBPAGE: Acceso de página con subcodigo.
SIZE: Cambie el tamaño de la pantalla en modo teletexto.
CANCEL: Para cancelar la visualización.
SUB-T: Para mostrar la información de subtítulos.
TV/RADIO: Cambiar entre TV y Radio.
REC: Botón de grabación de video personal. Un dispositivo de memoria USB debe estar conectado al puerto USB para la grabación.
EPG: Muestra la Guía Electrónica de Programas.
RED/GREEN/YELLOW/BLUE: Utilice funciones complementarias en el menú OSD.
▶II Reproducir o pausar archivos multimedia.
■ Dejar de reproducir archivos multimedia.
◀◀ ▶▶ Revisión rápida y avance rápido.
◀◀ ▶▶▶ Seleccionar el anterior o el siguiente archivo multimedia.
NOTA:
- Todas las imágenes de este manual son ejemplos, solo para su referencia, el producto actual puede diferir de las imágenes.
♦ Los botones no mencionados aquí no se usan
Funciones Básicas
Encendido y Apagado
Conecte el cable de CA para alimentar el televisor. En este momento, el televisor pasará al modo de espera y el indicador de encendido se volverá blanco. Use el botón de encendido en el panel lateral de la TV o en el control remoto para encender el televisor. Después de apagar el televisor durante 5 segundos, puede volver a encender.
Seleccionar fuente de entrada
Presione el botón INPUT en el control remoto para mostrar la lista de selección de fuente. Use las flechas ▲ / ▼ para resaltar la fuente que necesita y presione OK para confirmar.

Ajustar pantalla OSD.
El menú OSD (On Screen Display) le permite acceder a las funciones de TV.
Para usar el sistema de menú OSD, presione el botón MENU en el control remoto, luego use la flecha para resaltar una opción de CHANNEL, IMAGEN, SONIDO, HORA, BLOQUEO, CONFIGURACIÓN y presione el botón OK / ▼.
Presione la flecha ▲ / ▼ para moverse a una opción diferente dentro de cada menú. Si es necesario, presione la flecha OK / ▶ para mostrar las opciones de la opción que has resaltado. Si está disponible, use el texto en la parte inferior de cada pantalla para obtener ayuda. Para regresar al menú anterior, presione el botón MENÚ.
Para salir del menu OSD.
- Presione el botón EXIT. El menú se borrara de la pantalla.
- Presione el botón MENU repetidamente hasta que los menús desaparezcan.
Funciones Básicas
Primera configuración
Conecte un cable de RF desde la entrada del televisor llamada "TV-In" a su toma de antena para TV.
Idioma
Seleccione el idioma que se utilizará para los menús y el mensaje.
País
Presione el botón ◀ / ▶ para seleccionar el país que desee
Presione el botón OK para sintonizar el menú configuración, use las flechas para seleccionar la melodía.
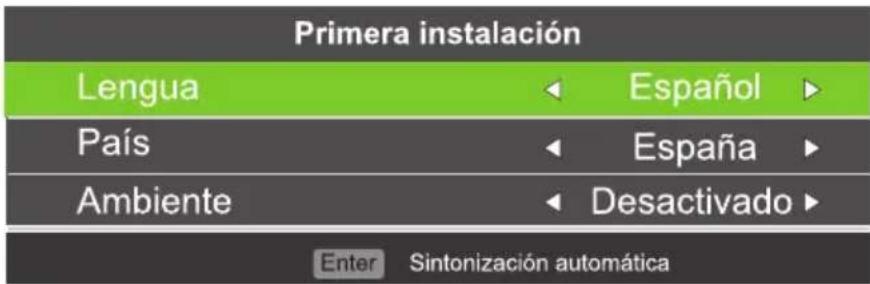
Sintonización automática
Para la primera sintonización automática, presione el botón Menú para omitir la sintonización digital. Para la segunda sintonización analógica, presione el botón Menú para omitir la sintonización analógica.

Menú Operaciones OSD
Menú de Canal
El menú CANAL se utiliza para buscar y editar canales, solo está disponible en la entrada de TV.
Presione MENU en el control remoto. Seleccione CANAL desde el menú principal. Presione el botón OK para pasar al menú CANAL.

Sintonización Automática
Utilice el botón arriba y abajo para seleccionar la Sintonización automática, luego presione el botón ENTER para entrar en el submenú
| Config. De Sintonización | |
| País | España |
| Tiop de Sinto... | TDT + ATV |
| Tipo digital | TDT |
| Tipo de búsqu... | Lleno |
| Identificador ... | Automática |
| Frecuencia | Automática |
| Velocidad de ... | Automática |
| ENTER Iniciar | MENU Atrás |
Menú Operaciones OSD

- Ajuste de canales: Buscar canales automáticamente. Puede dejar de buscar con el botón MENU.

- Ajuste manual ATV: Busca el canal manualmente. Puede personalizar el sistema de color/ sonido y frecuencia del canal.

- Ajuste manual de DTV: Busca el canal manualmente. Use las flechas para seleccionar Sintonización manual de DTV, luego presione OK para entrar al submenú.
Menú Operaciones OSD
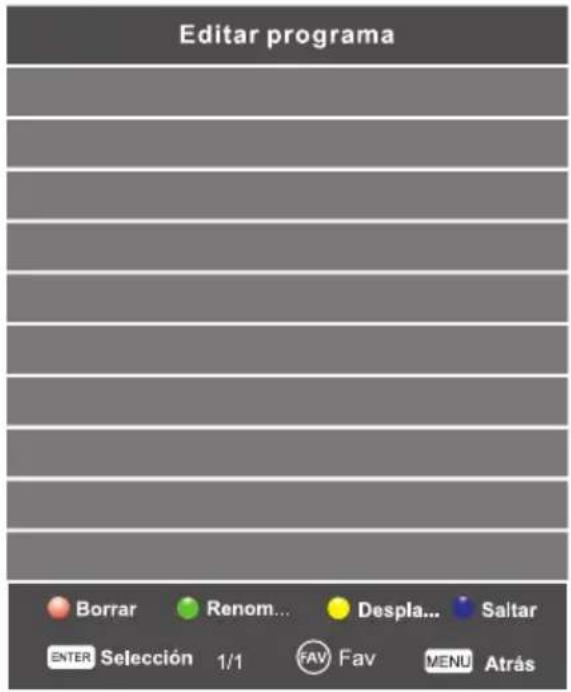
- Editar programa: mediante los botones de color puede editar el programa, las funciones incluyen eliminar, renombrar, omitir canal, etc. También puede agregar o borrar el canal a la lista de canales favoritos del botón FAV en el control remoto.
- Lista de horarios
Muestra la lista de horarios. Está disponible en la fuente de DTV
- Información de señal.
Presione el botón ▲ /▼ para seleccionar la información de señal, después presione el botón OK para ver la información detallada de la señal. Solo disponible cuando haya señal en DTV.
- Informacion de Cl.
Presione el botón ▲/▼ para seleccionar el CI y después presione el botón OK para mostrar la información de la ranura de CI
- Número de canal lógico
Active o desactive la opción Número de canal lógico.
Menú Operaciones OSD
Menu IMAGEN
El menú de imagen se usa para ajustar el efecto de la imagen.
Presione MENU en el control remoto. Seleccione IMAGEN en el menú principal. Presione el botón OK para pasar al menú de imagen.

- Modo de imagen: Selecciona el modo de imagen preestablecido. También puede cambiar el modo mediante el botón P.MODE en el control remoto.
- Solo puede personalizar el contraste, el color, el brillo y el matiz en el modo Personal.
- Contraste: Ajusta la diferencia entre las áreas claras y oscuras de la imagen. Para obtener un mejor valor de imagen, el contraste debe ajustarse al valor adecuado.
- Brillo: Ajusta el brillo de la imagen y, por lo general, se ajusta junto con el contraste.
- Color: Ajusta la saturación del color según su gusto.
- Tono: Ajusta el tinte de la pantalla del televisor.
- Nitidez: Ajusta la nitidez de la imagen. Esta función no está disponible en el modo PC.
- Temp de color: presione el botón OK para acceder al submenú de temperatura de color.
La temperatura del color ajusta la temperatura de la imagen, para seleccionar la opción: Frío, Normal, Cálido. - Reducción de ruido: Para filtrar y reducir el ruido de la imagen y mejorar la calidad de la imagen.
- Modo HDMI: Seleccione el modo HDMI en Automático, Video y PC.
Menú Operaciones OSD
Menú de Sonido
El menú de la imagen se utiliza para ajustar el efecto de sonido del televisor.
Presione MENU en el control remoto. Seleccione SONIDO en el menú principal. Presione el botón OK para pasar al menú de sonido.

- Modo de Sonido: Seleccione el modo de sonido preestablecido. También puede cambiar el modo a través del botón S.MODE en el control remoto. Puede elegir entre cinco tipos de modo de voz, Estándar, Música, Película, Deporte y Personal. Los graves y agudos solo pueden ser ajustados cuando el modo de Sonido está configurado en Personal.
• Agudos: Ajuste la parte más alta del sonido.
• Grave: Ajuste la parte más baja del sonido.
• Balance: Ajusta la cantidad de audio (volumen) que se envía a los altavoces izquierdo y derecho. - Nivel de volumen automático: Esta función puede configurarse como Activada o Desactivada. El nivel de volumen automático puede configurar el volumen automáticamente.
- Modo SPDIF: Seleccione el área de tres modos disponibles incluido Automático, PCM y Apagado.
- AD Switch: Acceda al submenu AD Switch, después seleccione esta opción para ajustar el volumen AD.
NOTA:
Balance: Este elemento puede ajustar la salida del altavoz, le permite escuchar mejor en su posición. Nivel de volumen automático: Este elemento se usa para reducir automáticamente la diferencia entre el canal y el volumen del programa. Esta función también reducirá la fluctuación del sonido.
Menú Operaciones OSD
Menú de HORA
El menú de tiempo se usa para ajustar la hora del televisor.
Presione MENU en el control remoto. Seleccione HORA en el menú principal. Presione el botón OK para pasar al menú de hora.

- Reloj: Ajusta el reloj del televisor.
- Zona horaria: Muestra la zona horaria de cada país.
- Temporizador de reposo: Configure el temporizador de reposo automático, el televisor pasara automáticamente al modo de espera una vez pase el tiempo configurado.
- Espera automática: Activa/ desactiva la suspensión automática, incluyendo apagado, 3 horas, 4 horas y 5 horas.
- Temporizador OSD: Establezca el tiempo de visualización del menú OSD.
- Horas de verano: Establezca la opción de horario de verano en Auto, activar y desactivar.
Menú Operaciones OSD
Menú Bloqueo
El menú de tiempo se usa para ajustar el efecto de bloqueo del televisor.
Presione MENÚ en el control remoto. Seleccione Bloqueo desde el menú principal. Presione el botón OK para proceder a bloquear el menú

- Bloqueo del sistema: Presione el botón OK para entrar, introduzca la contraseña. La contraseña por defecto es 0000
- Configurar la contraseña: Para configurar su propia contraseña, primero introduzca la antigua y después introduzca la nueva dos veces.
- Control paterno: Para entrar al menú BLOQUEO de CANALES, seleccione el programa que quiera, después pulse el botón verde para bloquear o desbloquear los canales.
- Órientación de los padres: Puede configurar la función de control parental para adaptar la visualización de los niños. Elija la categoría en el submenú.
- Bloqueo de teclas: Puede configurar el bloqueo o desbloqueo de las teclas.
- MODO HOTEL

- Presione el botón ▲ /▼ en el control remoto para seleccionar el modo hotel en el menu bloqueo.
- Presione el botón ENTER en el control remoto para entrar en el submenú.
- Después de terminar el ajuste, presione el botón MENU para guardar y volver al menú anterior.
Menú Operaciones OSD
MENU DE CONFIGURACIÓN
El menú de configuración se usa para las opciones adiciones del TELEVISOR.
Presione MENU en el control remoto. Seleccione CONFIGURACION en el menú principal. Presione el botan OK para acceder al menú configuración.
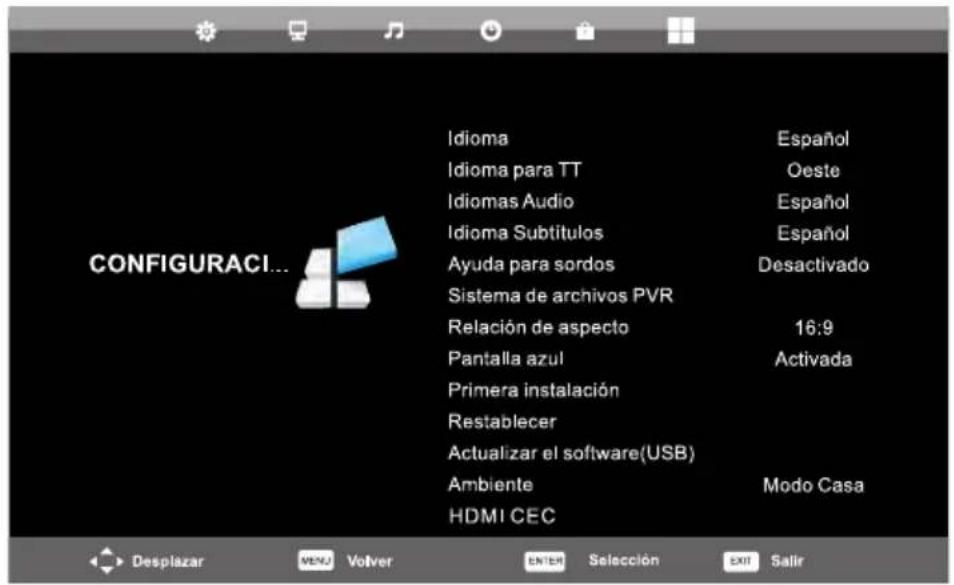
Idioma: Seleccione el idioma OSD que prefiera.
Lenguaje TT / Idioma de audio / Idioma de subtítulos: Seleccione el idioma de teletexto deseado / el idioma principal idioma de audio / el idioma principal de subtítulos.
Discapacidad auditiva: Esta función es para personas con discapacidad auditiva. Cuando este encendido, podrá ver los subtítulos en los programas.
Sistema de archivos PVR: Acceda al submenu para hacer ajustes PVR
Relación de aspecto: Para seleccionar entre los modos disponibles: Automático, 4: 3, 16: 9, Zoom1 y Zoom2.
Pantalla Azul: Para activar / desactivar la pantalla azul. Si la pantalla azul está encendida, el televisor mostrará un fondo azul cuando no hay entrada de señal
Primera instalación: Para establecer opciones relevantes incluido el lenguaje OSD, el país y la afinación.
Reiniciar: Presione el botón OK para ingresar un diálogo, seleccione Sí para restaurar el valor predeterminado de fábrica.
Actualización de software (USB): Actualice el firmware de este modelo. (Por favor, póngase en contacto con el distribuidor)
Ambiente: para configurar el modo de ambiente, incluido el modo de casa y desactivado.
HDMI CEC: Utilizado para el ajuste del efecto CEC.
Menú Operaciones OSD
SISTEMA DE ARCHIVOS PVR
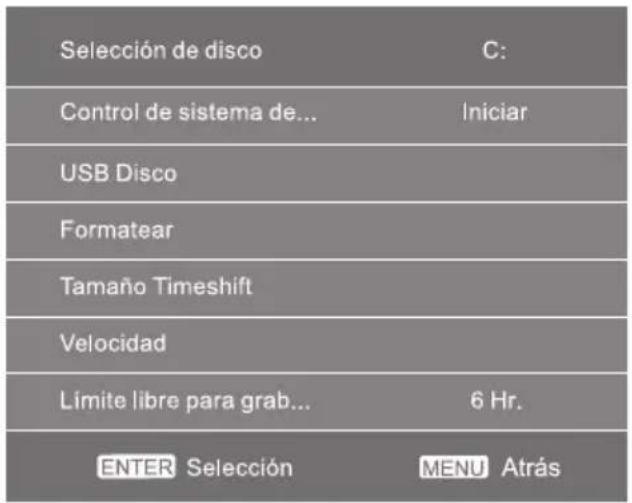
Para verificar y formatear su disco USB para que sea compatible con el sistema de archivos PVR de este modelo. Seleccione "Comprobar" sistema de archivos PVR" para revisar Su disco USB. Seleccione "Formatear" para formatear su disco USB para que sea compatible con este modelo. Seleccione "Límite de grabación gratuita" para establecer el límite de registro para su disco USB.
NOTA IMPORTANTE:
Para cualquier tipo de grabación con esta televisión, debe haber conectado un dispositivo USB en el puerto USB correspondiente en la parte posterior del TV.
- Inserte los dispositivos externos de almacenamiento de alta velocidad, el dispositivo debe formatearse antes.
- Seleccione el programa de DTV y el canal que desea grabar.
- Presione el botón [REC] para acceder al modo PVR y comenzar a grabar. La barra de control PVR en la pantalla se muestra a continuación. Puede seleccionar la configuración apropiada requerida. Puede cambiar el modo del menú de Grabación con el botón OK.
- Si desea detener la grabación, presione el botón [■] y la grabación se detendrá.
Grabación y reproducción instantáneas en un solo toque.
En el modo DTV y con un dispositivo USB conectado correctamente, presione el botón REC en el control remoto para activar la función PVR para la grabación instantánea del canal que está viendo. Presione el botón [■] para detener la grabación, Seleccione la lista de programación en el menú de canales y presione OK para ingresar a la lista de programación, luego use el botón izquierdo o derecho para seleccionar la lista de grabaciones.

Mostrar la lista grabada
Botón Rojo: Elimine el programa que seleccione. Botón OK: Reproduzca el programa que seleccione.
Menú Operaciones OSD
MENU PANTALLA (EN MODO PC)
Presione el boton MENU en el control remote para desplegar el menu principal, use las flechas ◄/▶ para seleccionar el menu de la pantalla.

Auto Ajuste
Presione OK para empezar ajustando automáticamente.
H-Offset
Para ajustar la posición horizontal de la imagen.
V-Offset.
Para ajusta las posición vertical de la imagen
Tamaño
Para ajustar las líneas horizontales de la imagen en pantalla.
FASE
Para ajustar la fase de la imagen.
Restablecer posición
Para restablecer la posición de la imagen
Menú Funciones OSD
Función de medios
NOTA: Antes del menú FUNCION DE MEDIOS, inserte un dispositivo USB o tarjeta de memoria Presione los botones ▲/▼ para seleccionar MEDIOS en el menu de principal y después presione OK para acceder. Podra buscar archivos multimedia seleccionando FOTO, MUSICA, PELICULA O TEXTO. Después presione el boton “▶” para comenzar la reproducción.
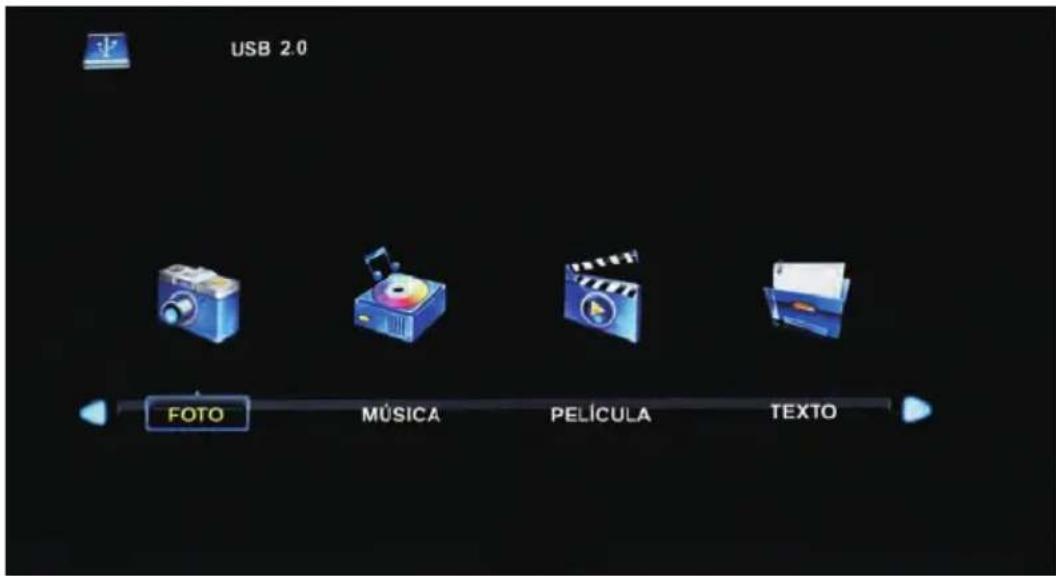
- Presione los botones ◄/▶ para seleccionar la opción que desee ajustar en el menú de medios, después presione OK para acceder.
- Presione los botones ◀/▶ para ajustar o presione los botones ▲/▼ para seleccionar.
- Después de terminar con los ajustes, presione el botón MENU para guardar y volver atrás al anterior menú y presione el botón EXIT para salir completamente del menú.
Solucion de problemas
Identificar problemas
Si tiene algún problema usando el producto, por favor consulte la lista a continuación. Si la lista no resuelve su problema, llame a nuestro Servicio de Atención al Cliente inmediatamente
Problemas del Televisor.
El televisor no se enciende.
- Asegúrese de que el cable AC este enchufado.
- Verifique la toma de corriente de la pared, asegúrese de que la salida AC funciona de manera normal y estable.
- Seleccione la función de Bloqueo en las opciones del menú y presione OK para desmarcar el estado del bloqueo.
No hay imagen ni sonido pero el televisor esta encendido y hay un cartel de "SIN SEÑAL" en la pantalla.
- ¿Está tratando de usar una fiente de entrada sin ningún dispositivo conectado a ella? Para usar otro dispositivo de video/ Audio, asegúrese de que el dispositivo externo funciona normalmente, luego presione FUENTE y elija la fuente de entrada de la derecha.
- La opción de tipo de señal puede estar configurada incorrectamente.
- El canal puedes estar en blanco. Intente buscar el canal de nuevo o probar con otro canal.
El sonido es correcto pero la imagen pobre.
- Si solo puede obtener imagines en blanco y negro desde un dispositivo externo que haya conectado a su televisor, tal vez se deba a que los cables de video no estan bien conectados. Compruebe el estado de la conexión.
- Para la entrada de AV, el cable de video Amarillo se conecta a la toma de entrada de video amarilla en el costado de su televisor. Para la entrada de componentes, los tres cables de video Y, Pb Pr (rojo, azul y verde) deben conectarse a las tomas de entrada correspondientes en el lateral de su televisor.
- Compruebe la conexión de la antena. Asegúrese de que todos los cables están conectados firmemente a la toma de entrada de la televisión en el lateral.
- Intente ajustar los colores.
No hay sonido pero la imagen es correcta.
- El sonido puede estar silenciado. Intente presionar el botón MUTE para restaurar el sonido.
- Para usar AV o un componente, recuerde conectar correctamente la salida de audio izquierda y derecha del dispositivo. El cable del canal Izquierdo es blanco y el cable del canal derecho es rojo. Por favor, haga coincidir los cables y las tomas de acuerdo a sus colores.
- La configuración del sonido puede no estar ajustada correctamente.
- Si su fuente de audio tiene solo un conector o es una fuente de audio MONO, asegúrese de haber conectado el conector en la entrada de AUDIO (blanco) en su televisor.
Los botones en el panel lateral no funcionan.
- Desenchufe el televisor de la toma de corriente durante 10 minutos y luego vuelva a enchufarlo. Encienda el televisor y vuelva a intentarlo.
El televisor se apaga repentinamente.
- El circuito de protección electronica puede haberse activado debido a una sobretension. Espera 30 segundos y luego encienda el televisor nuevamente. Si esto sucede con frecuencia, el voltaje en su casa puede ser anormal. Si el resto de dispositivos electrónicos en su hogar no funcionan correctamente, consulte un técnico cualificado.
El control remoto no funciona.
- Algo podría estar bloqueando la señal entre el control remoto y el sensor remoto en el panel frontal de la TV. Asegúrate de que no hay ningún objeto en medio
- El control remoto puede no estar apuntando directamente a la televisión
- Las baterías del control remoto puedes estar flojas, gastadas o instaladas incorrectamente. Coloque pilas nuevas en el control remoto.
Especificaciones
Especificaciones del producto
| Modelo: | NVR-7713-24RD2-N |
| Video: | avi, MPEG |
| Musica: | mp3 |
| Foto: | jpg , jpeg, bmp, png |
| Resolucion de pantalla: | 1366x768 |
| Voltaje: | AC 100-240V ~ 50/60HzDC 12V --- 3A |
| Consumo de potencia nominal: | 36W |
| Dimensiones: | 552 x 371 x 154mm |
"ELIMINACIÓN DE RESIDUOS DE EQUIPOS ELÉCTRICOS Y ELECTRÓNICOS POR PARTE DE USUARIOS PARTICULARES EN LA UNIÓN EUROPEA"
Según la directiva de Residuos de Aparatos Eléctricos y Electrónicos (RAEE), los residuos AEE han de recogerse y tratarse por separado. Si en un futuro necesita desprenderse de este producto NO lo ponga en los residuos domésticos, envíelo a los puntos de recogidas de residuos existentes en su área. De igual manera debe extraer los residuos de pilas y/o acumuladores antes de la entrega del RAEE a través de los canales de recogida separada habilitados al efecto (distribuidores y/o instalaciones de las Entidades Locales)
DECLARACIÓN DE CONFORMIDAD
NEVIR, S.A. declara bajo su responsabilidad que el aparato indicado cumple los requisitos de las siguientes directivas:
DIRECTIVA EMC
EN 55032:2015
EN 55035:2017
EN61000-3-2:2014
EN 61000-3-3:2013
DIRECTIVA RED
2014/53/EU
ETSI EN 303 340 V1.1.2:2016
DIRECTIVA ROHS
2011/65/EU,(EU) 2015/863
LOW VOLTAGE DIRECTIVA EEC
Product Name: 24" LED TV
Model/Type No.: D236H19-T2/T/C,
NVR-7713-24RD2-N,
XXXXXXXXXXXX32XXXXXXXXXXXX
(Where "X" can be any alphanumeric of a-z, A-Z or 0-9 or blank &"-".)
Standard:EN 60065:2014
Descripción del aparato: TV 24" DLED HD READY
Modelo NEVIR NVR-7713-24RD2-N
Importador: NEVIR, S.A.
Dirección del importador: NEVIR, S.A.
C/ Francisco Rabal, 3
Polig. Ind. La Garena
28806 - Alcala
de Henares Madrid


- nevir
- USER MANUAL
- NVR-7713-24RD2-N
- IMPORTANTE
- Table of Contents
- Caution and Warning
- CAUTION
- Safety Precautions
- Preparation for Your New TV
- Check Accessories
- Stand Installation Guide
- Wall Mounting(if available)
- Warnings:
- TV Jacks Explanation
- Side Keypad and Front Panel
- Keypad Buttons
- Front Panel
- Remote Control Instructions
- Inserting Batteries in the Remote
- If the remote control does not work, check these points:
- CAUTION:
- Remote Control Reception Angle
- Learning about Remote Control
- Remote Control Buttons
- NOTE:
- Basic Operations
- Turning On and Off
- Select input source
- Adjust the OSD Screen
- First Time Settings
- OSD Menu Operations
- CHANNEL menu
- PICTURE menu
- SOUND menu
- TIME menu
- LOCK MENU
- SETUP MENU
- PVR File System
- IMPORTANT NOTE:
- Instant one-touch recording and playback
- SCREEN MENU(IN PC MODE)
- Media Operation
- Troubleshooting
- Identifying Problems
- TV Problems
- No picture or sound but the TV is on and there is a "No Signal" sign on screen.
- The sound is fine, but the picture is poor.
- There is no sound, but the picture is fine.
- The buttons on the side panel don't work.
- The TV turns off unexpectedly.
- The Remote control doesn't work.
- SPECIFICATIONS
- MANUAL DE USUARIO
- Tabla de contenido
- Precaucion y Advertencia
- PRECAUCIÓN
- PRECAUCIONES DE SEGURIDAD
- Preparacion de su nuevo televisor
- Comprobar accesorios
- GUIA INSTALACION DE SOPORTE
- Montaje en pared (si está disponible)
- Advertencias:
- Explicación de Jacks de TV
- Teclado lateral y panel frontal
- Botones del Panel Lateral
- Panel Frontal
- Instrucciones Control Remoto
- Insertar pilas en el mando
- Si el control remoto no funciona, revise estos puntos:
- PRECAUCION:
- Angulo de Recepción del Control Remoto.
- Aprendiendo sobre el control remoto
- Botones control remoto
- NOTA:
- Funciones Básicas
- Encendido y Apagado
- Seleccionar fuente de entrada
- Ajustar pantalla OSD.
- Primera configuración
- Menú Operaciones OSD
- Menú de Canal
- Sintonización Automática
- Menu IMAGEN
- Menú de Sonido
- Menú de HORA
- Menú Bloqueo
- MENU DE CONFIGURACIÓN
- SISTEMA DE ARCHIVOS PVR
- NOTA IMPORTANTE:
- Grabación y reproducción instantáneas en un solo toque.
- Mostrar la lista grabada
- MENU PANTALLA (EN MODO PC)
- Auto Ajuste
- H-Offset
- V-Offset.
- Tamaño
- FASE
- Restablecer posición
- Menú Funciones OSD
- Función de medios
- Solucion de problemas
- Identificar problemas
- Problemas del Televisor.
- Especificaciones
- "ELIMINACIÓN DE RESIDUOS DE EQUIPOS ELÉCTRICOS Y ELECTRÓNICOS POR PARTE DE USUARIOS PARTICULARES EN LA UNIÓN EUROPEA"
- DECLARACIÓN DE CONFORMIDAD
- DIRECTIVA EMC
- LOW VOLTAGE DIRECTIVA EEC
Marque : NEVIR
Modèle : NVR-7713-24RD2-N
Catégorie : Téléviseur