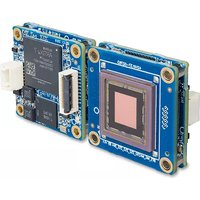
Blackfly S - Caméra FLIR - Notice d'utilisation et mode d'emploi gratuit
Retrouvez gratuitement la notice de l'appareil Blackfly S FLIR au format PDF.


| Type de produit | Caméra industrielle compacte |
| Marque | FLIR (Teledyne) |
| Modèle | Blackfly S |
| Capteur | Sony CMOS (selon variante, ex. IMX264, 5 MP) |
| Résolution maximale | Jusqu'à 24,5 MP selon modèle |
| Interface de données | USB 3.0 ou GigE selon version |
| Alimentation | Via bus USB (USB 3.0 : 4,5 W max) ou PoE (GigE) |
| Consommation électrique | Environ 2,5 W (USB 3.0) |
| Dimensions (L x l x H) | 29 mm x 29 mm x 30 mm |
| Poids | Environ 36 g (sans objectif) |
| Température de fonctionnement | 0 °C à 50 °C |
| Monture d'objectif | C-Mount |
| Fonctions principales | Capture d'images fixes et vidéo, déclenchement matériel/logiciel, déclenchement par actionneur, acquisition à haut débit, horodatage, sortie flash, régions d'intérêt (ROI), binning, décimation |
| Entretien et nettoyage | Nettoyer le boîtier avec un chiffon doux sec ; utiliser un souffleur pour la fenêtre du capteur ; éviter les solvants agressifs |
| Sécurité | Ne pas exposer à l'humidité, aux chocs ou aux températures extrêmes ; utiliser une alimentation conforme ; débrancher avant tout entretien |
| Pièces détachées et réparabilité | Accessoires : câbles USB3/GigE, adaptateurs, plaques de fixation ; réparation par service agréé uniquement ; pas de pièces détachées grand public |
| Compatibilité logicielle | FLIR Spinnaker SDK, MATLAB, LabVIEW, OpenCV, HALCON, etc. |
| Certifications | CE, FCC, RoHS |
FOIRE AUX QUESTIONS - Blackfly S FLIR
Questions des utilisateurs sur Blackfly S FLIR
0 question sur cet appareil. Repondez a celles que vous connaissez ou posez la votre.
Poser une nouvelle question sur cet appareil
Téléchargez la notice de votre Caméra au format PDF gratuitement ! Retrouvez votre notice Blackfly S - FLIR et reprennez votre appareil électronique en main. Sur cette page sont publiés tous les documents nécessaires à l'utilisation de votre appareil Blackfly S de la marque FLIR.
MODE D'EMPLOI Blackfly S FLIR
BLACKFLY®S
Board-level GigE Vision
Will your system support the camera?
Recommended System Configuration:
■ OS—Windows or Linux (32- or 64-bit)
■ CPU— Intel i5 or greater
■ RAM—4 GB
■ Ports—GigE network adapter
■ Software—Microsoft Visual Studio 2010, Visual Studio 2013, or Visual 2015 (to run and compile example code)
Do you have a downloads account?
A downloads account is required to download software and firmware.
- Go to www.flir.com/account.
- Enter your email address and click Continue.
- Complete the Create an account form and click Continue.
- You will receive an email with a link to activate your account.
- Once activated, you can login using the credentials you've created.
The Blackfly S Board-level resources page has many resources to help you your camera effectively, including:
■ Spinnaker ® SDK software, including drivers (login required)
■ Firmware updates and release notes (login required)
■ Dimensional drawings and CAD models
■ Documentation
Do you have all the parts you need?
To install your camera you need the following components:
- Ethernet cable
■ Powered Ethernet switch or Ethernet power injector (if using PoE)
■ TF38 to FPC RJ45 PoE panel mount adapter
■ Heatsink (recommended)
■ FPC cable
■ GPIO cable
■ Lens mount and lens - Tripod adapter (optional)
■ Interface card
Teledyne FLIR sells a number of the additional parts required for installa purchase, visit the Accessories page.
Camera Care
To clean the imaging surface of your camera, follow the steps outlined in Cleaning the imaging surface of your camera.
Extended exposure to bright sunlight, rain, dusty environments, etc. may cause problems with the electronics and optics of the system.
Avoid excessive shaking, dropping, or mishandling of the device.
Warning! Avoid electrostatic charging.
Installing Your Interface Card and Software
- Install your Interface Card
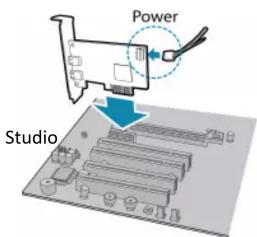
Ensure the card is installed per the manufacturer's instructions.
Connect the internal IDE or SATA power connector on the card to the computer supply.
Alternatively, use your PC's built-in host controller, if equipped.
Open the Windows Device Manager. Ensure the card is properly install cards appear under Network Adapters. An exclamation point (!) next t indicates the driver has not yet been installed.
- Install the Spinnaker® Software
Note: For existing users who already have Spinnaker installed, we ensuring you have the latest version for optimal performance of your code not need to install Spinnaker, use SpinView to install an for your card.
a. Go to the Spinnaker SDK page.
b. Click the Download button. You are prompted to login, if not alr
c. Select your operating system. Depending on your selection there may versions to select.
d. After download is complete, open the file to start the Spinnaker
e. Follow the steps in each setup dialog.
- Enable jumbo frames on the Ethernet card
a. In Start->All Programs-> Spinnaker SDK->SpinView, right click on the Adapter and select Adapter Configuration, then select IP Configuration
b. Click Open Network Connections.
c. Click Change Settings.
d. Click on the Advanced tab and from the Settings list select Jumb
e. Set the Value to 9014 Bytes and click OK.
See How to Optimize GigE Network Adapter Settings for more information configuring for best performance.
Using the Spinnaker SDK
You can monitor or control features of the camera through Spinnaker provided in the Spinnaker SDK, or through the SpinView camera evaluation application. A Programmer's Guide and API Reference is included in the
Installing Your Blackfly S Board-level

natural_image
Illustration of various electronic components including a blue connector, orange cable, black connector, red module, and black housing (no text or symbols)1. Prepare the lens mount.
The board-level models can use C-mounts, CS-mounts, or S-mounts. For C- and CS-mounts, install the retainer, flip over and place IR filter install the gasket.
2. Remove sticker and install lens mount.
The sensor is covered with a protective sticker. Remove the sticker. If residue is present, clean the sensor surface with a non-abrasive cotton and isopropyl alcohol cleaning solution. Immediately install the image board over the prepared lens mount.
3. Install a heat sink.
A heatsink (ACC-01-7000) is recommended but depends on your design usage.
- Connect the FPC cable to the panel mount adapter then connect adapter to the interface card.
A TF38 to FPC RJ45 PoE panel mount adapter allows a GigE cable to a PC.
5. Attach a Lens
6. Plug in the GPIO connector if required
GPIO can be used for power, trigger, serial input output, and strobe.
7. Confirm Successful Installation
When the camera is first connected, the operating system automatically installs the camera driver. Camera drivers are available with the Spinnaker SDK installation.
Run the SpinView application: Start->All Programs->Spinnaker->SpinView
The SpinView application can be used to test the camera's image acquisition capabilities.
Changes to your camera's installation configuration can be made using SpinView application.
Status Indicator LED
LED GigE
| No Light | No poweror LED is in inactive stateor LED is in error status state with no error |
| Blinking Green (1 blink) | Link-Local Address (LLA) |
| Blinking Green (2 blinks) | DHCP IP Address |
| Blinking Green (3 blinks) | Persistent IP Address |
| Solid Green | Acquisition Started |
| Rapid Flashing Green | Firmware update in progress |
| Flashing Green and Red | General Error |
Camera Interface
Ethernet Connector
The camera is equipped with a GigE TF38 connector that is used for transmission, camera control, and power.
General Purpose I/O Connector
The camera is equipped with a 6-pin GPIO connector on the back
Blackfly S Board-level Models

ardColor Pin Line Function Description
| Orange | 1 | 0 | GPIO0 | Non-isolated Input/Output |
| Black | 2 | 1 | GPIO1 | Non-isolated Input/Output |
| White and Green | 3 | 2 | GPIO2 | Non-isolated Input/Output |
| 4 | N/A | VExt | Camera Input Power | |
| Brown the Brown | 5 | N/A | GND | Camera Power Ground |
| Red | 6 | N/A | Vout | Camera Power Output |
For More Information connection
Teledyne FLIR endeavors to provide the highest level of technical sup possible to you.
Support resources can be accessed through the Blackfly S Board-level resources page.
| Your camera's settings and capabilities—Technical Reference or Camera Reference | |||||
| Spinnaker® | SDK—API | Reference / Programmer's Guide | |||
| Selecting a lens for your camera | |||||
| Setting Up Multiple GigE Cameras | |||||
| Using third-party applications from our software partners | |||||
Contacting Teledyne FLIR
hFor general questions and sales inquiries contact us at mv-sales@flir.co
For technical support contact our support team.
Visit our website at: www.flir.com/iis

- BLACKFLY®S
- Board-level GigE Vision
- Will your system support the camera?
- Do you have a downloads account?
- Do you have all the parts you need?
- Camera Care
- Installing Your Interface Card and Software
- Using the Spinnaker SDK
- Prepare the lens mount.
- Remove sticker and install lens mount.
- Install a heat sink.
- Attach a Lens
- Plug in the GPIO connector if required
- Confirm Successful Installation
- Camera Interface
- Ethernet Connector
- General Purpose I/O Connector
- For More Information connection
- Contacting Teledyne FLIR
Marque : FLIR
Modèle : Blackfly S
Catégorie : Caméra