
R2323DX9 - Montre Lorus - Notice d'utilisation et mode d'emploi gratuit
Retrouvez gratuitement la notice de l'appareil R2323DX9 Lorus au format PDF.


| Type de produit | Montre bracelet |
| Marque | Lorus |
| Modèle | R2323DX9 |
| Mouvement | Quartz analogique |
| Diamètre du boîtier | 40 mm |
| Épaisseur du boîtier | 10 mm |
| Largeur du bracelet | 20 mm |
| Poids | 80 g |
| Alimentation | Pile bouton SR626SW (1.5 V) |
| Fonctions principales | Heure, minutes, secondes, date, affichage analogique |
| Étanchéité | 50 mètres (5 ATM) |
| Verre | Verre minéral traité |
| Matériau du boîtier | Acier inoxydable |
| Matériau du bracelet | Bracelet en acier inoxydable |
| Fermeture | Boucle déployante avec poussoirs |
| Entretien et nettoyage | Nettoyer avec un chiffon doux et sec ; éviter les produits chimiques |
| Sécurité | Ne pas immerger dans l'eau chaude ; éviter les chocs violents |
| Pièces détachées et réparabilité | Pile, bracelet et joints disponibles chez un horloger |
| Informations générales | Garantie 2 ans ; service après-vente Lorus |
FOIRE AUX QUESTIONS - R2323DX9 Lorus
Questions des utilisateurs sur R2323DX9 Lorus
0 question sur cet appareil. Repondez a celles que vous connaissez ou posez la votre.
Poser une nouvelle question sur cet appareil
Téléchargez la notice de votre Montre au format PDF gratuitement ! Retrouvez votre notice R2323DX9 - Lorus et reprennez votre appareil électronique en main. Sur cette page sont publiés tous les documents nécessaires à l'utilisation de votre appareil R2323DX9 de la marque Lorus.
MODE D'EMPLOI R2323DX9 Lorus
- Multi-function digital watch with 12 or 24 animation dots.
■ CHARACTERISTICS
- Analogue & digital time displays: Hour, Minute, Second, Month, Date and day of the week.
- Automatic calendar: The calendar automatically adjusts the dates and months from the year of 2000 to 2049.
- Daily alarm and hourly chime: The alarm can be set to sound at the designated time on a 24-hour basis and the chime can be set to sound every hour on the hour with a single beep.
- Second time zone: Time in a different time zone can be displayed.
- Countdown timer: The countdown timer can be set up to 23 hours 59 minutes and 59 seconds.
- St o pwa tch: The stopwatch can measure up to 23 hours 59 minutes and 59 seconds in 1/100-second increments. Split time measurement is available.
- Selection of 12 or 24-hour format: The time display format in either 12-hour indication or 24-hour indication can be selected.
- Animation dots are displayed: Animation dots are displayed in both 12 and 24-hour format and can be selected in either fast flashing or slow flashing.
- EL backlight: The built-in electro-luminescent (EL) backlight illuminates the display for easy viewing in darkness.
■ LCD DISPLAY AND BUTTONS
FUNCTION

* Animation dots are displayed in both 12 and 24-hour format.

Selection of 12-hour/24-hour format
- The time display format in either 12-hour indication or in 24-hour indication can be selected by pressing \$2 button. Under the 12-hour indication format, no mark appears on the display. Under the 24-hour indication format, “-” mark appears under the date indicator.
- The calendar automatically adjusts the dates and months from the year of 2000 up to 2049.
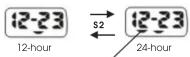
24-hour format indication
■HOW TO CHANGE THE DISPLAY MODE
* Press S3 button to show the NORMAL TIME mode
* If the NORMAL TIME mode is shown already on the display, skip the above operation.
* Press S3 button to change the display mode in the following order.

flowchart
graph TD
    A["NORMAL TIME"] -->|S3| B["AL" means "Daily Alarm"]
    B -->|S3| C["DT" means "Dual Time"]
    C -->|S3| A

■ SETTING THE TIME (ANALOGU) HOW TO SET ALARM TIME
- Pull the crown out one step, the second hand will stop.
- From NORMAL TIME mode, press S3 button once into ALARM mode.
- Set the correct time by turning the crown.
- Push the crown back to the original position. The watch will start running again.
* The analogue indication and digital display of the time setting can be adjusted separately. - From NORMAL TIME mode, press S3 button once into ALARM mode.
- Press S4 button to begin setting procedure.
the hours align stains flushing. - Press S1 button to set HOURS setting.
- Press S3 button to move on to MINUTES setting.
* Selection of the digits to be adjusted is made in the following order by pressing S3 button and then pressing S1 button.
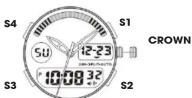
- Press S3 button after completing the setting.

■ HOW TO SET NORMAL TIME CALENDAR
- Press S3 button to show the NORMAL TIME mode.
- Press S4 button to begin setting procedure. The seconds digit starts flashing.
- Press S1 button to set SECONDS setting
-
Press S3 button to move on to HOURS setting. * Selection of the digits to be adjusted is made in the following order by pressing S3 button and then pressing S1 button. S3 S4
-
Press S3 button after completing the setting


* Day of week will change automatically based on date changing.

NORMAL TIME
SECONDS SETTING BY PRESSING S1
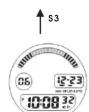

HOURS SETTING BY PRESSING S1
12/24-HOUR FORMAT


MINUTES SETTING BY PRESSING S1
DATE SETTING BY PRESSING S1
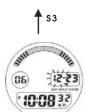
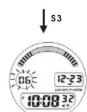
MONTH SETTING BY PRESSING S1
YEAR SETTING BY PRESSING S1
Engagement/Disengagement of ALARM & CHIME
* With each press of S2 button, the ALARM and CHIME can be engaged or disengaged in the following order. The ALARM signal and/or CHIME signal appear or disappear on the display accordingly.
* The ALARM can be set only in one time zone
* If month and date are set, it will alarm once.

flowchart
graph TD
    A["ALARM MODE"] -->|S2| B["ALARM ON"]
    B -->|S2| C["CHIME ON"]
    D["NORMAL TIME"] -->|S3| E["ALARM/CHIME ON"]
    E -->|S2| F["ALARM ON"]
    F -->|S2| G["ALARM MODE"]
    G -->|PRESS S3 1 TIME| H["“means Daily Alarm”"]

[Non-Text]
[Non-Text]
[Non-Text]
[Non-Text]
[Non-Text]
[Non-Text]
[Non-Text]
[Non-Text]
[Non-Text]
[Non-Text]
[Non-Text]
[Non-Text]
[Non-Text]
[Non-Text]
[Non-Text]
[Non-Text]
[Non-Text]
[Non-Text]
[Non-Text]
[Non-Text]
[Non-Text]
[Non-Text]
■ HOW TO SET COUNT DOWN TIMER
Countdown Timer Setting

- From NORMAL TIME mode, press S3 button 3 times into TIMER mode.
- Press S4 button to begin setting procedure
The HOOKS digit stains flushing. - Press S3 button to move on to MINUTES setting.
* Selection of the digits to be adjusted is made
In the following order by pressing S3 button and then pressing S1 button. - Press S3 button after completing the setting


NORMAL TIME


HOUR SETTING BY


SECOND SETTING BY PRESSING S1
MINUTE SETTING BY DRESSING S1
FREGING OF
Countdown Timer Operation

TIME COUNTDOWN SIGNAL
- Press S1 button while in the TIMER mode to start the COUNTDOWN TIMER.
- The countdown signal ":" appears and starts flashing.
- Press S1 button again to stop the COUNTDOWN TIMER
- While in the COUNTDOWN TIMER MODE, press S2 button to reset the countd own time to its starting value and to start to countdown automatically or while in countd own time mode press S2 button and then press S1 button to reset the countdown time.
- Press S3 button return to NORMAL TIME display.

TIMER

RELOAD
TIMED AND
SET
START ↓ \$1

COUNTING


STOP
■HOW TO SET SECOND TIME ZON
- From NORMAL TIME mode, Press S3 button 2 times into DUAL TIME mode.
- Press S4 button to begin setting procedure
- Press S1 button to set HOUR
- Press S3 button to move on to MINUTE setting. * Selection of the digits to be adjusted is made in the following order by pressing S3 button and then pressing S1 button.
- Press S3 button after completing the setting.

PRESS S3
2 TIMES
→


MINUTE SETTING BY PRESSING S1
HOUR SETTING BY PRESSING S1
■ HOW TO USE STOPWATCH
* From NORMAL TIME mode, Press S3 button 4 times into STOPWATCH mode.

Standard Measurement
- Press S1 button alternately to start and stop the STOPWATCH
- Press S2 button to reset the STOPWATCH to "0:00; 00."


NORMAL TIME


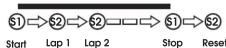
Lap Time Measurement
- Press S1 to start counting first lap time.
- Press S2 button, the STOPWATCH keeps counting first lap time and showing it on the display
- Press S1 button to stop counting first lap time.
- Press S2 button to release first lap time.
- Press S1 button to start counting second lap time. The STOPWATCH shows second lap time
* This operation can be repeated and the split
time can be read. - Press S2 to finish counting the lap time measurement
- Press S2 again to reset the STOPWATCH to "0:00;



NORMAL TIME
STOPWATCH


* Press S3 button return to NORMAL TIME display.
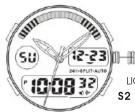
■HOW TO USE EL BACKLIGHT
* Press S2 button in any mode to turn the illuminating light on.
Note:
- The backlight of the watch employs an electro-luminescent (EL) light, which tends to lose illuminating power after very long use.
- The illumination provided by backlight may be hard to see when viewed under direct sunlight
* When the illuminating light becomes dim, replace the batteries with new ones.
■ CARE OF YOUR LORUS WATCH
This watch contains precise electronic components. Never attempt to open the case or remove the back cover.
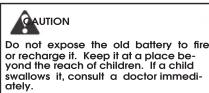
- BATTERY
- WATER RESISTANT
| Indication on the day/case back | Condition of use | Accidental contact with water such as splashes and rain | Swimming and taking a shower | Skin diving | Suba diving |
| No Indi c alion | NO | NO | NO | NO | |
| WATER RE - SISTANT | YES | NO | NO | NO | |
| WATER RE - SISTANT (50M/10 BAR) | YES | YES | NO | NO | |
| WATER RE - SISTANT (100M/10 BAR) or above | YES | YES | YES | NO |
* If your watch is 200 M/20 BAR, 100 M/10 BAR or 50 M/5 BAR water resistant, it is so indicated on the dial/case back.
- Do not operate the buttons when the watch is wet.
- If the watch is exposed to salt water, rinse it in fresh water and then wipe it thoroughly dry.
- Should you find any water or condensation inside the watch, immediately have it checked. Water can corrode electric parts inside the case.
Caution:
Leather straps are not water resistant except so indicated, even if the watch head is water resistant.
• ALLERGIC REACTION
Because the case and band touch the skin directly, it is important to clean them regularly. If not, shirt sleeves may be stained and those with delicate skin may develop a rash. Please wear the watch with some play to avoid any possible allergic reaction. If you develop a rash on your wrist, stop wearing and consult a physician.
• MAGNETISM
Your watch will be adversely affected by strong magnetism. Keep it away from close contact with magnetic objects.
• SHOCKS AND VIBRATIONS
Your watch may be worn for normal sports activities, but be careful not to drop it or hit it on hard surfaces.
• TEMPERATURE
Your watch is preadjusted so that constant accuracy may be insured at normal temperature.
- CLEANING
Use only a soft cloth and clean water for cleaning your watch. Never use chemicals, as the water-proof gasket will corrode.


Marque : Lorus
Modèle : R2323DX9
Catégorie : Montre