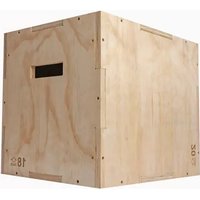
Wooden Plyo Box - Équipement de fitness VirtuFit - Notice d'utilisation et mode d'emploi gratuit
Retrouvez gratuitement la notice de l'appareil Wooden Plyo Box VirtuFit au format PDF.


| Type de produit | Boîte de pliométrie en bois |
| Marque | VirtuFit |
| Modèle | Wooden Plyo Box |
| Matériau principal | Contreplaqué de bouleau |
| Hauteur | 50 cm |
| Largeur | 50 cm |
| Profondeur | 50 cm |
| Poids | Environ 10 kg |
| Charge maximale recommandée | 150 kg |
| Surface antidérapante | Dessus en caoutchouc texturé |
| Utilisation | Sauts, step-ups, dips, exercices plyométriques |
| Entretien et nettoyage | Essuyer avec un chiffon humide et un détergent doux |
| Stockage | Dans un endroit sec, à l'abri de l'humidité |
| Précautions de sécurité | Utiliser sur une surface plane et stable ; vérifier l'absence de fissures avant chaque usage |
| Pièces détachées | Aucune pièce remplaçable |
| Réparabilité | Non réparable par l'utilisateur ; en cas de dommage, remplacer l'unité |
FOIRE AUX QUESTIONS - Wooden Plyo Box VirtuFit
Questions des utilisateurs sur Wooden Plyo Box VirtuFit
0 question sur cet appareil. Repondez a celles que vous connaissez ou posez la votre.
Poser une nouvelle question sur cet appareil
Téléchargez la notice de votre Équipement de fitness au format PDF gratuitement ! Retrouvez votre notice Wooden Plyo Box - VirtuFit et reprennez votre appareil électronique en main. Sur cette page sont publiés tous les documents nécessaires à l'utilisation de votre appareil Wooden Plyo Box de la marque VirtuFit.
MODE D'EMPLOI Wooden Plyo Box VirtuFit
virtufit
Wooden Plyo Box
User manual

ATTENTION
WARNING:
Before beginning any exercise program consult your physician. This is especially important for people who are over 35 years old or who have pre-existing health problems. Read these instructions carefully before using the VirtuFit Wood Plyo Box. You receive important information about the use and safety of your VirtuFit Wood Plyo Box. VirtuFit takes no responsibility for any injuries or property damage caused by the use of this tness equipment.
TOOLKIT
When you open the carton, and you will find the below parts in the carton:


LONG SUPPORTED BOARD (1X) SHORT SUPPORTED BOARD (1X) MAIN SUPPORTED BOARD (1X)
ASSEMBLY INSTRUCTIONS
STEP 1
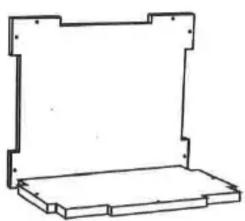
Start by indentifying the bottom and placing the finished side down. Connect one of the sides to the base and install the one screw on the side that will connect the two pieces. Provided you don't start moving the base, this should remind secure.
STEP 2

Install the second side by fitting in to the slot on the base and the adjacent side. Install 2 screws, one screw attaching to the piece at the floor and the other screw at the center connecting the two vertical side pieces. You will install the remaining screws when all sides are assembled.
STEP 3

Repeat step 2 for the third side.
STEP 4

Install the fourth side with 3 screws. The center screw on each side and the screw at the center connecting this side to the bottom panel.
STEP 5

Install short supported board, long supported board, and main supported board together as illustrated to make the inner construction stable.
STEP 6
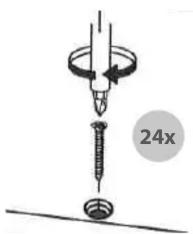
Fix all the screws with an electric screwdriver.
STEP 7

- Place the top on the structure and install all screws on the top.
- Rotate the VirtuFit Wood Plyo Box and install all remaining screws so that the sit ush with the surface of the VirtuFit Wood Plyo Box.


Marque : VirtuFit
Modèle : Wooden Plyo Box
Catégorie : Équipement de fitness