
MS 6080 - équipements de mesure KATHREIN - Notice d'utilisation et mode d'emploi gratuit
Retrouvez gratuitement la notice de l'appareil MS 6080 KATHREIN au format PDF.


| Type de produit | Analyseur de spectre portable pour mesures de champ |
| Marque | Kathrein |
| Modèle | MS 6080 |
| Catégorie | Équipements de mesure |
| Dimensions (L x l x h) | 250 x 160 x 60 mm |
| Poids | 1,5 kg |
| Alimentation | Batterie lithium-ion rechargeable 7,4 V / 4400 mAh |
| Autonomie | Environ 4 heures en utilisation continue |
| Écran | LCD couleur 5,7 pouces (résolution 640x480) |
| Plage de fréquence | 5 MHz à 6 GHz |
| Fonctions principales | Mesure de puissance, champ électrique, C/N, MER, analyse de spectre, localisation de fuites |
| Interfaces | USB 2.0, LAN, entrée RF (N 50 ohms), sortie audio |
| Entretien et nettoyage | Nettoyer avec un chiffon doux et sec. Ne pas utiliser de produits abrasifs. |
| Sécurité | Utiliser uniquement le chargeur fourni. Ne pas ouvrir l'appareil. Protéger de l'humidité. |
| Pièces détachées et réparabilité | Contacter le service après-vente Kathrein pour toute réparation. Piles de rechange disponibles. |
| Température de fonctionnement | 0 °C à +40 °C |
| Humidité de fonctionnement | 20% à 80% sans condensation |
| Garantie | 2 ans |
| Accessoires inclus | Adaptateur secteur, câble USB, sonde de mesure, mallette de transport |
FOIRE AUX QUESTIONS - MS 6080 KATHREIN
Questions des utilisateurs sur MS 6080 KATHREIN
0 question sur cet appareil. Repondez a celles que vous connaissez ou posez la votre.
Poser une nouvelle question sur cet appareil
Téléchargez la notice de votre équipements de mesure au format PDF gratuitement ! Retrouvez votre notice MS 6080 - KATHREIN et reprennez votre appareil électronique en main. Sur cette page sont publiés tous les documents nécessaires à l'utilisation de votre appareil MS 6080 de la marque KATHREIN.
MODE D'EMPLOI MS 6080 KATHREIN
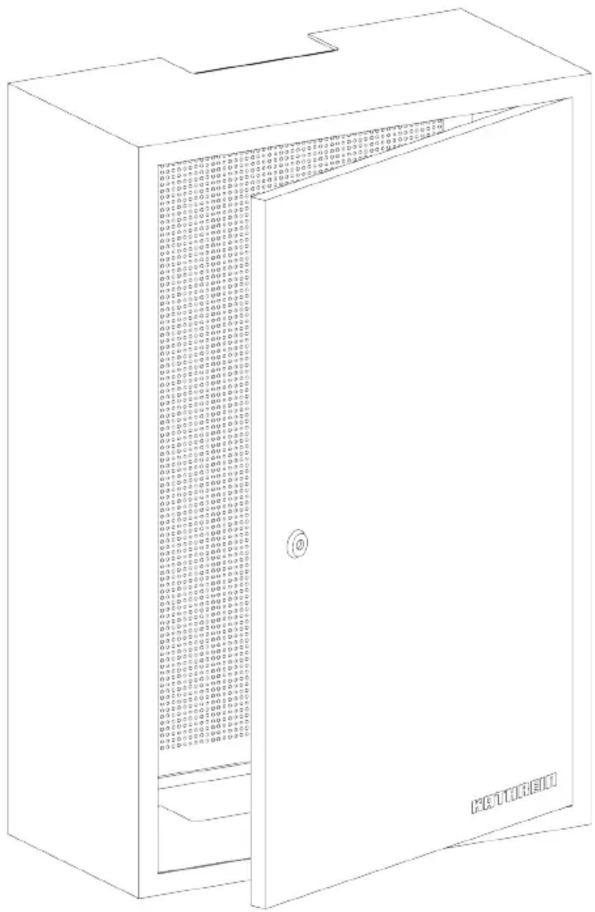
Mounting cabinet
Variants
MS 4060 400 x 600 x 200 mm
MS 6080 600 x 800 x 200 mm
MS 6060 600 x 600 x 200 mm
Description
▶ On-wall mounting cabinet for protected installation of active and passive components
▶ For indoor installation
For the most up-to-date version of this document, go to www.kathrein-ds.com
Scope of supply
■ Mounting cabinet (1 door)
■ Perforated metal sheet
■ Warning label
■ Earthing cable 2x (A)
- Nut M6 2x (B)
■ Washer 6.4 mm 7x (C)
■ Serrated lock washer 6.4 mm 4x (D)
■ Sheet metal screw 4x (E)
■ Mounting set small 1x (F)
■ Instructions for use
Mounting notes

The mounting cabinet may only be mounted in dry indoor areas. Do not mount it on or against easily combustible material.
The mounting cabinet must be provided with an equipotential bonding cable (Cu, at least 4 mm 2 ).
Wall mounting


▶ Use four suitable dowels and corresponding screws or screw-dowel systems. Choose the correct thread diameter, head diameter and screw length for the respective mounting hole of the cabinet and the cabinet weight including components.
Take into account that different wall types (e.g. masonry, concrete, ...) require different mounting material.
The mounting material is not included.
Installing the earthing cable

All housing parts are to be connected using the washers and serrated lock washers in such a way that current-carrying capacity and permanent contact are ensured.
Connecting the earthing cable to the door:
The earthing cable (A) must be connected as shown in Fig. 1. Put a serrated lock washer (D), then the ring eye of the earthing cable (A), a washer (C) and another serrated lock washer (D) onto the threaded bolt of the cabinet door. Then screw a nut (B) onto the threaded bolt and tighten it with a tool.
Connecting the earthing cable to the housing frame:
The earthing cables (A) must be connected as shown in Fig. 2. Put a serrated lock washer (D), then the ring eye of the earthing cable (A), a washer (C), the ring eye of the earthing cable (A), another washer (C) and another serrated lock washer (D) onto the threaded bolt of the housing frame. Then screw a nut (B) onto the threaded bolt and tighten it with a tool. Use the sheet-metal screws (E) and the washers (C) to mount the housing frame onto the rear wall (perforated metal sheet).

Figure 1

Figure 2
Connecting the earthing cable to the mounting plate (perforated metal sheet):
The earthing cable (A) must be connected as shown in Fig. 3. Use the mounting set (F) to connect the earthing cable. First put the serrated lock washer (M4), then the washer (M4) and then the small ring eye of the earthing cable (A) onto the sheet-metal screw. Then screw the screw into the mounting plate (perforated metal sheet).
Connecting the on-site PE conductor:
For integration into the protective equipotential bonding on site, connect the PE conductor (H07V-U 4 mm 2 Cu, solid) to the mounting plate (perforated metal sheet) via the flat terminal using a U-clamp. Must be connected as shown in Fig. 4.

Figure 3
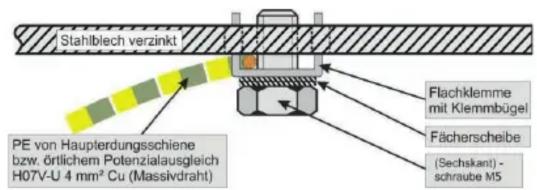
Figure 4

The conductivity of the produced contacts must be tested and measured for all cabinet and mounting components.

Attach the enclosed warning label to the outside of the cabinet door if required.

- MOUNTING CABINET
- VARIANTS
- DESCRIPTION
- SCOPE OF SUPPLY
- MOUNTING NOTES
- WALL MOUNTING
- INSTALLING THE EARTHING CABLE
- CONNECTING THE EARTHING CABLE TO THE DOOR
- CONNECTING THE EARTHING CABLE TO THE HOUSING FRAME
- CONNECTING THE EARTHING CABLE TO THE MOUNTING PLATE (PERFORATED METAL SHEET)
- CONNECTING THE ON-SITE PE CONDUCTOR
Marque : KATHREIN
Modèle : MS 6080
Catégorie : équipements de mesure