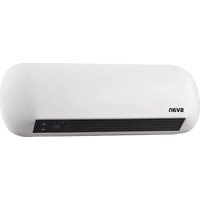
SCES2000D - Chauffage SVAN - Notice d'utilisation et mode d'emploi gratuit
Retrouvez gratuitement la notice de l'appareil SCES2000D SVAN au format PDF.


| Type de produit | Chauffage électrique d'appoint |
| Marque | SVAN |
| Modèle | SCES2000D |
| Puissance | 2000 W |
| Tension d'alimentation | 220-240 V ~ 50 Hz |
| Type de chauffage | Convection forcée (ventilateur) |
| Thermostat | Réglable avec arrêt automatique |
| Niveaux de puissance | 2 niveaux : 1000 W / 2000 W |
| Dimensions (L x P x H) | 25 x 20 x 15 cm |
| Poids | 1.5 kg |
| Matériau | Plastique ABS résistant à la chaleur |
| Longueur du cordon d'alimentation | 1.5 m |
| Fonctions | Thermostat réglable, arrêt automatique, protection anti-basculement, minuterie 12h |
| Entretien et nettoyage | Débrancher et nettoyer avec un chiffon doux sec ; ne pas immerger |
| Sécurité | Protection surchauffe, arrêt automatique en cas de basculement |
| Pièces détachées et réparabilité | Contacter le service après-vente SVAN pour les pièces |
| Informations générales | Notice téléchargeable gratuitement sur notice-facile.com |
FOIRE AUX QUESTIONS - SCES2000D SVAN
Questions des utilisateurs sur SCES2000D SVAN
0 question sur cet appareil. Repondez a celles que vous connaissez ou posez la votre.
Poser une nouvelle question sur cet appareil
Téléchargez la notice de votre Chauffage au format PDF gratuitement ! Retrouvez votre notice SCES2000D - SVAN et reprennez votre appareil électronique en main. Sur cette page sont publiés tous les documents nécessaires à l'utilisation de votre appareil SCES2000D de la marque SVAN.
MODE D'EMPLOI SCES2000D SVAN
svan
MANUAL DE USUARIO
CALEFACTOR DE PARED
ELÉCTRICO

natural_image
White air conditioner unit with digital display showing 19:26 (no text or symbols on body)SCES2000D
Lea atentamente este manual y guárdelo para futuras consultas.
Este aparato está destinado únicamente al uso doméstico.

- Indicador encendido
- Potencia 1000W
- Potencia 2000W
- Temporizador 24h
- Ventana abierta
- Temporizador semanal
- Función ON
- Función OFF
- Botón de encendido
- Botón de 24H temporizador
Mando a distancia
ES
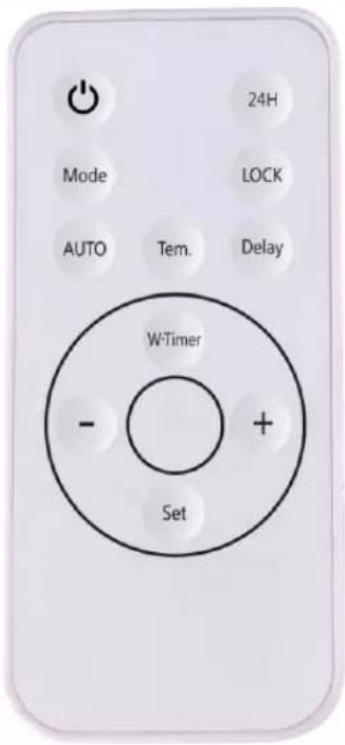
- ON/OFF: Botón de Encendido / Apagado.
- 24H: Temporizador 24H.
- MODE: Frío / Templado / Caliente.
- LOCK: Bloqueo para niños.
- AUTO: Función venta-na abierta.
- TEMP: Temperatura real en la pantalla.
- DELAY: Establecer la temperatura para la función semanal
- W. Timer: Función semanal.
- +: Incrementar.
- -: Disminuir.
- SET: Fijar la hora.

ES
PRECAUCIONES SEGURIDAD
- El calentador se debe col-gar en la pared, la salida de aire tiene que ir hacia abajo, y deber estar colocado sobre una superficie plana.
- No se debe colgar sin sujeción.
- No utilizar el calentador en un lugar donde haya gas combustible o explosivo. No cubrir la salida de aire.
- Si el cable de alimentación está dañado, debe ser re-emplazado por el fabricante, un agente de servicio o una persona cualificada para evitar un peligro.
- El calentador no debe estar ubicado inmediatamente debajo de una toma eléctrica. El zócalo eléctrico debe estar equipado con cable de tierra, su capacidad debe ser 250V\~10A o superior a 250V\~10A. El enchufe y el enchufe de alimentación deben estar en buenas condiciones de conexión.
- Si nadie está usando el aparato o lo está reparando, por favor desenchufarlo.
- No tocar el calentador con las manos mojadas u otro conductor.
-
Si el motor no está funcionando correctamente, por favor, desenchufarlo inmediatamente.
-
Durante el uso del calentador, por favor, no abrir la puerta o ventana de forma continua, de lo contrario influirá en el efecto de calefacción.
-
Si se desea apagar el calentador, presionar el interruptor de encendido/apagado a apagado, a continuación, el calentador mantendrá el ventilador de trabajo de 30 segundos hasta que sople el aire frío, entonces el calentador dejará de funcionar, y se puede retirar el enchufe.
-
No utilizar este calentador en el baño.
-
El temporizador ajusta el tiempo de trabajo del calentador.
-
El mando a distancia utiliza 2 pilas CR2025 3V.
-
La batería debe retirarse del aparato antes de tirarlo y de forma segura.
-
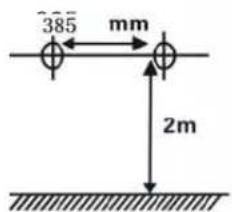
El calentador debe estar instalado a una distancia mínima de 2m sobre el suelo.
-
Si el calentador necesita reparación, por favor contactar con una persona cualificada o al servicio técnico autorizado de la compañía.
-
No usar este aparato de calefacción en el entorno inmediato de una bañera, ducha o piscina.
-
Los niños menores de 3 años deben mantenerse fuera del alcance del aparato a menos que sean continua-mente supervisados.
-
Los niños menores de 3 años y menores de 8 años deben sólo encender / apagar el aparato siempre que éste haya sido colocado o instalado en su posición de funcionamiento normal y prevista y que sean supervisados o hayan recibido instrucciones relativas al uso del aparato de una forma segura y entiendan los riesgos que el aparato tiene. Los niños desde 3 años y menores de 8 no deben enchufar, regular y limpiar el aparato o realizar operaciones de mantenimiento.
-
No debe colocarse inmediatamente debajo de una base de toma de corriente.
PRECAUCIÓN: Algunas partes de este producto pueden ponerse muy calientes y causar quemaduras. Debe ponerse atención particular cuando los niños y las personas vulnerables estén presentes.

Para evitar sobrecalentamientos, no cubrir el aparato de calefacción.
¡PRECAUCIÓN!
ES
Este aparato puede ser utilizado por niños de 8 años y mayores y las personas con capacidades físicas, sensoriales o mentales reducidas o falta de experiencia y conocimiento si han sido supervisados o instruidos acerca del uso del aparato de una manera segura y comprenden los peligros involucrados. Los niños no deben jugar con el aparato. La limpieza y mantenimiento no serán realizadas por los niños sin supervisión.

ELIMINACIÓN CO- RRECTA DEL PRODUC- TO. Esta marca indica que este producto no debe eliminarse junto con otros residuos do- mésticos en toda la UE.
Para evitar los posibles daños al medio ambiente o a la salud humana que representa la eliminación incontrolada de residuos, reciclar correctamente para promover la reutilización sostenible de recursos materiales. Para devolver su dispositivo usado, utilice los sistemas de devolución y recogida o póngase en contacto con el establecimiento donde se adquirió el producto. Ellos pueden recoger este producto para el reciclaje seguro ambiental.
ES
INTRODUCCIÓN
Gracias por la compra nuestro producto de calidad. Utilizar cuidadosamente y de acuerdo con las instrucciones que figuran a continuación. Por favor leer y guardar estas instrucciones para futura referencia.
INSTALACIÓN
Hacer dos agujeros en la pared, preferiblemente 2 metros por encima del suelo y a una distancia de más de 25mm desde la esquina; asegurarse de hacer el diámetro igual que la tubería de expansión.
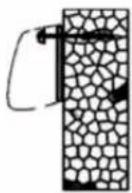
Fijar dos tornillos en el tubo de expansión, mantener las puntas de los tornillos hacia afuera 10mm, y colgar la máquina después de que los tornillos estén lo suficientemente fijos.

ANTES DE UTILIZAR
- Antes de insertar el enchufe en una toma de corriente, asegurarse de que el suministro eléctrico en su área coincida con el de la etiqueta de clasificación de la unidad.
- Retirar con cuidado el producto de la bolsa de plástico y el cartón.
- Colocar el aparato sobre una superficie firme y nivelada, estableciendo la posición del botón maestro “-”. Enchufar el cable en una toma de corriente AC220-240V\~, con un “BEE” sonará cuando esté “Encendido”.
FUNCIONAMIENTO
- Al presionar el botón ON / OFF; comenzará a expulsar aire frío y la luz “♡” se encenderá en la pantalla.
- Al presionar el botón "MODE" del mando a distancia. Saldrá aire caliente y las luces de " ") se encenderán. Al presionar el botón "MODE" por segunda vez, saldrá aire caliente y las luces de " ") se encenderán al mismo tiempo.
- Presionar el botón "MODE" por tercera vez, saldrá aire frío y la luz se encenderá "Fan/M".
CONFIG. TEMPORIZ. 24H.
- Encender el aparato (en uno de los siguientes modos fan, warm, hot).
- Presionar el botón "24h" para configurar el temporizador hasta 24 horas, mantener presionado el botón "24h" para aumentar las horas de 00: 00--24: 00 (01: 00 = 1 hora, ... 24: = 24: 00 horas, etc) y la luz "D" se encenderá.
Advertencia: si se configura "00", significa que no se activará ningún temporizador y que la luz "D" se apagará.
TERMOSTATO
- Encender el aparato (en uno de los siguientes modos fan, warm, hot). Esta función sólo se puede activar con el mando a distancia.
- Ajustar la temperatura usando las teclas “+/-”. Las temperatura disponible oscila entre 10°C y 49°C. En este punto se encenderá la luz “☐”.
- Cuando la temperatura desciende 2°C desde la temperatura establecida, el aparato comenzará a calentarse nuevamente con "I / W" (2000W).
- Cuando la temperatura es más alta que 1C° o la misma con la que se configuró, emitirá aire frío.
FUNCIÓN. TEMPORIZ. SEMANAL
Instalado el aparato, conectarlo al enchufe. Encender el aparato (en uno de los siguientes modos: ventilador, cálido, caliente). Esta función sólo se puede activar con el mando. Antes de encenderlo se ha de configurar la hora.
SEMANA Presionar el botón "SET", "1" parpadeará levemente, presionar los botones "+/-" para establecer la semana de 1 a 7 (1 = lunes ... 7 = domingo etc.).
HORA Presionar el botón "SET" nuevamente, la pantalla LED parpadea en el frente "00", presionar los botones "+/-" para configurar las horas desde 01--00 (01 = 1 en punto, 02 = 2 en punto ... 00 = 24 o 'reloj etc.)
MINUTO Presionar el botón "SET" una vez más, la pantalla LED detrás del centelleo "00", presione los botones "+/-" para establecer los minutos de 00 a 59 (01 = 1 minuto, 02 = 2 minutos etc.)
NOTA: Presione el botón "SET", la pantalla muestra que el número par-padeará 5 segundos, se debe operar en ese tiempo, de lo contrario el aparato volverá al modo de espera.
CONFIGURAR TEMPORIZADOR SEMANAL
SEMANA Presionar el botón "W-TIMER" por primera vez, "1" se encenderá, significa "lunes".
HORA Presionar la tecla "W-TI-MER" 2 veces y actuando las teclas "+/-" será posible configurar la hora desde 01--00 (01 = 1 en punto, 02 = 2 en punto ... 00 = 24 en punto etc.)
MINUTO Presionar la tecla "W-TIMER" 3 veces y actuando las teclas "+/-" será posible establecer los minutos de 00 a 59 (01 = 1 minu-to, 02 = 2 minutos ect.). Con la luz "ON" encendida, se ha configurado el tiempo de encendido.
HORA Presionar la tecla "W-TI-MER" 4 veces y actuando las teclas "+/-" será posible configurar la hora desde 01--00 (01 = 1 en punto, 02 = 2 en punto ... 00 = 24 en punto etc.)
MINUTO Presionar la tecla "W-TIMER" 5 veces y actuando las teclas "+/-" será posible establecer los minutos de 00 a 59 (01 = 1 minuto, 02 = 2 minutos ect.).
Con la luz "OFF" encendida, se ha- configurado el tiempo de apagado.
EN ESTE MOMENTO EL DÍA ES EL LUNES
Al presionar el botón "W-TIMER" una vez más, se enciende la luz en "2" que significa "martes"
Atención: los tiempos seguirán siendo los establecidos anteriormente.
Al presionar la tecla "DELAY" puede configurar el día elegido, y luego usar las teclas "+/-" para configurar la temperatura.
Se pueden configurar diferentes horarios de apertura, cierre y temperatura en toda la semana.
ES
FUNCIÓN VENTANAS ABIERTAS
- Encender el aparato (en uno de los siguientes modos fan, warm, hot).
- Presionar el botón "AUTO" y la luz "☐" se encenderá. El aparato funcionará como modelo inteligente de ahorro de energía (En esta función el aparato verifica y registra la temperatrura ambiente inmediatamente. Dejará de funcionar cuando el aparato verifique que en el entorno la temperatura desciende ≥3°C.
- Para volver a ponerlo en marcha el usuario tendrá que reiniciar el aparato presionando el botón ON/OFF.
- Presionar el botón "AUTO" de nuevo y la luz "☐" se apagará. De este modo la función queda deshabilitada.
ADVERTENCIA: Cuando se pulsa el botón "DELAY", el número parpadea 5 segundos, este tiempo debería ser suficiente para hacer funcionar las selecciones, de lo contrario el producto volverá al modo "stand-by", y se tendrá que pulsar el botón "LOCK" para reactivar el aparato y reiniciarlo.
(Esta configuración se cancelará si hay un corte de energía).
FUNCIÓN SEGURIDAD NIÑOS
Esta función se puede activar sólo con el mando a distancia.
Cuando el aparato esté conectado al enchufe presionar el botón "LOCK", se apagarán todas las luces, con la excepción de la luz "Power". De esta forma, tanto el mando a distancia como el panel de control no estarán operativos.
Presionar el botón "LOCK" nueva- mente y todo volverá a estar activo.
CONTROL SEGURIDAD
Para evitar daños y peligros por sobrecalentamiento, el calefactor está equipado con una protección contra sobrecalentamiento que apaga el aparato en caso de que se alcancen altas temperaturas.
LIMPIEZA Y MANTENIMIENTO
Si no usa el calentador durante mucho tiempo, guardar en un lugar ventilado y seco. Espere a que la máquina esté fría y saque el enchufe, luego límpiela con un paño húmedo. Nunca lave directamente con agua; No deje caer el agua en la máquina. Nunca lo limpie con ácidos, diluyentes químicos, gasolina, benceno, etc. Antes de volver a usarlo, compruébelo y asegúrese de que la salida de ventilación no tenga ningún tipo de artículos.
| Este producto es apto únicamente para espacios bien asilados o para uso ocasional. | ||||||
| Ref: SCES2000D | ||||||
| Partida | Símbolo | Valor | Unid. | Partida | Unid. | |
| Potencia calorífica | Tipo de aportación de calor, unicamente para los aparatos de calefacción local eléctricos de acumulación (seleccionar uno) | |||||
| Potencia calorífica nominal | Pnom | 2.0 | Kw | Control manual de la carga de calor, con termostato integrado | NA | |
| Potencia calorífica mín. (indicativa) | Pmin | 1.0 | Kw | Control manual de la carga de calor con respuesta a la temperatura interior o exterior | NA | |
| Potencia calorífica máx. (continuada) | Pmax,c | 1.914 | Kw | Control electrónico de la carga de calor con respuesta a la temperatura interior o exterior | NA | |
| Consumo auxiliar de electricidad | Potencia calorífica asistida por ventiladores | NA | ||||
| A potencia calorífica nominal | elmax | 0 | Kw | Tipo de control de potencia calorífica/de temperatura interior (seleccionar uno) | ||
| A potencia calorífica mínima | elmin | 0 | Kw | Potencia calorífica de un solo nivel, sin control de temperatura interior | No | |
| En modo espera | eISB | 0 | Kw | Dos o más niveles manuales, sin control de temperatura interior | No | |
| Con control de temperatura interior mediante termos-tato mecánico | No | |||||
| Control electrónico de temperatura interior | No | |||||
| Control electrónico de temperatura interior y tempori-zador diario | No | |||||
| Control electrónico de temperatura interior y tempori-zador semanal | Si | |||||
| Otras opciones de control (pueden seleccionarse varias) | ||||||
| Control de temperatura interior con detección de presencia | No | |||||
| Control de temperatura interior con detección de ventanas abiertas | Si | |||||
| Con opción de control a distancia | No | |||||
| Con control de puesta en marcha adaptable | No | |||||
| Con limitación de tiempo de funcionamiento | No | |||||
| Con sensor de lámpara negra | No | |||||
| Información de contacto | SVAN TRADING S.L.Av. Altos Hornos S/N. Pto. Sagunto (46520). Valencia, España. | |||||
svan
USER MANUAL
ELECTRIC WALL HEATER

natural_image
Front view of a white air conditioner unit with digital display and control panel (no visible text or symbols)SCES2000D
Read this manual carefully and keep it for future reference.
This appliance is intended for domestic use only

- Power indicator
- Watts: 1000W
- Watts: 2000W
- Timer 24h
- Window open
- Weekly timer
- Function open
- Function close
- Power button
- 24H timer button
Remote crontol
EN
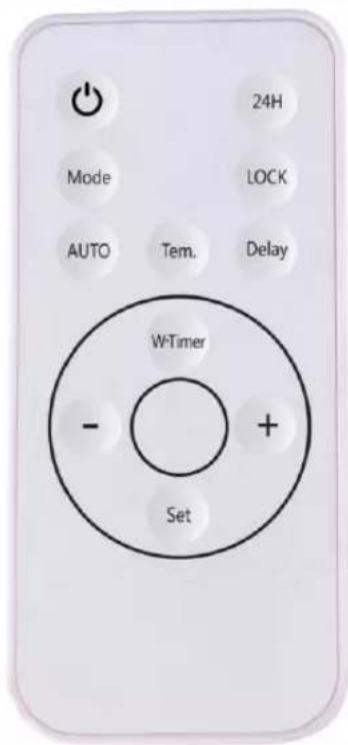
- ON/OFF: Main power button.
- 24H: Setting timer from 1-24 hours.
- MODE: COLD, WARM, HOT 3 setting for selection.
- LOCK: Child-Lock function for heater.
- AUTO: Window Open Function
- TEMP: Display real time
- DELAY: Set temperature for weekly function.
- W. Timer: Set the timer of one week.
- +: Increase.
- -: Decrease.
- SET: Set real time.

EN
PRECAUCIONES SEGURIDAD
-
The heater should be hung on the wall and make the wind outlet down or be placed on flat appliance. You must not place it precipitantly or tipsily.
-
Please do not use the heater in the place where full of combustible or explosive gas. Don't cover the wind outlet.
-
If the supply cord is damaged, it must be replaced by the manufacturer or its service agent or a similarly qualified person in order to avoid a hazard.
-
The heater must not be located immediately below an electrical socket. The electrical socket must be equipped with earth wire, its capacity should be 250V\~10A or exceed 250V\~10A. The socket and the power plug should be in good connecting condition.
-
El calentador no debe estar ubicado inmediatamente debajo de una toma eléctrica. El zócalo eléctrico debe estar equipado con cable de tierra, su capacidad debe ser 250V\~ 10A o superior a 250V\~ 10A. El enchufe y el enchufe de alimentación deben estar en buenas condiciones de conexión.
-
If nobody is in using or you are repairing the heater, please pull off the plug.
-
If motor is not working properly, please stop it immediately.
-
During using the heater, please do not open the door or window continually otherwise it will influence the heating effect.
-
If want to shut off the heater, press the on/off switch to off, then the heater will keep the fan working 30 seconds until it blowing out cool wind, then the heater will stop working, and you may pull off the plug.
-
Do not use the heating appliance in the immediate vicinity of a bath, shower or pool.
-
Timer sets the heater working time.
-
Remote control, please use 2 batteries.
-
The battery must be removed from the appliance before it is scrapped.
-
The battery is to be disposed of safely.
-
The heater must be installed at least 2 m above the floor.
-
If the heater needs repair, please ask for special person or our company authorized maintenance department.
-
It should not be placed immediately under a power outlet base.
-
Children under 3 years of age should be out of reach unless they are continuously supervised.
-
Children under 3 years of age and under 8 years old should be monitored / turned off as long as it has been installed or installed in its normal operating position and has been supervised or received instructions on how to use the device safely and understand the risks that the device has.
Children from 3 years of age and children under 8 should not be plugged in, regulate and clean the appliance or maintenance operations.
- CAUTION: Some parts of this product may get very hot and cause burns. Special attention must be paid when children and vulnerable people are present.

To avoid overheating, do not cover the heating appliance.
CAUTION!
This appliance can be used by children aged from 8 years and above and persons with reduced physical, sensory or mental capabilities or lack of experience and knowledge if they have been given supervision or instruction concerning use of the appliance in a safe way and understand the hazards involved. Children shall not play with the appliance. Cleaning and user maintenance shall not be made by children without supervision.
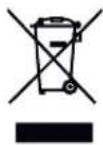
CORRECT DISPOSAL OF THIS PRODUCT. This marking indicates that this product should not be disposed with other household wastes throughout the EU.
To prevent possible harm to the environment or human health from uncontrolled waste disposal, recycle it responsibly to promote the sustainable reuse of material resources. To return your used device, please use the return and collection systems or contact the retailer where the product was purchased. They can take this product for environmental safe recycling.
EN
INTRODUCTION
Thank you for the purchase of our quality product. Used carefully and in accordance with the instructions set out below.
Please read and keep these instructions for future reference.
INSTALLING THE DEVICE
To avoid all dangers, follow the safety instructions.
- The installation must be done by the service agent or similarly qualified persons in order to avoid a hazard.
- Important! Make sure that there are no electric cables or other installations (for example water pipes) near the drill holes. Make sure that the appliance is securely and vertically fitted to the wall.
Get two holes on the wall 2 m above the floor and near the corner more 25 mm, be sure to make the diameter just as same as the expanding pipe. Fix two screws on the expanding pipe, keep the tips of the screws out for 10mm, and hang up the machine after the screws are fixed enough.

OPERATION INSTRUCTIONS
- Before inserting the plug into an electrical outlet, make sure that the electrical supply in your area matches that on the rating label on the unit.
- Carefully remove the heater from the plastic bag and the carton.
- Place the heater on a firm level surface, setting the master button “-” position.
Plug the cord set into a AC220-240V\~ electrical outlet, with "BEE" sounds the "Power" light is on.
GENERAL USING OPERATION
- Turn the heater ON by pressing remote control the ON/OFF button, the unit will blow the cold air and "⏻" light is on.
- Pressing the "MODE" button on remote control, the unit will blow the warm air and both "") lights are on. Pressing the "MODE" button second times on remote control, the unit will blow the hot air and both ") lights are on.
- Pressing the "MODE" button Three times on remote control,- the unit will blow the cold air and "Fan/M" light is on.
24H TIMER FUNCTION
- Open the appliance as working conditions, (fan, warm, hot are all ok). This function through by Remote control "24h" button.
- Press "24h" button, set the timer up to 24 hours, keep press "24h" button to increase the hours from 00:00--24:00(01:00=1hour,...24:=24:00 hours ect.) and the "D" light is on.
PS:set as "00" means no set timer, the "D" light is off.
THERMOSTAT INSTRUCTIONS
- Open the appliance as working conditions,(fan,warm,hot are all ok). This function only through by Remote control.
- To adjust temperature, press the “-+” to set the desired temperature and the temperature set from 10^ C to 49^ C.
- When the air temperature drops 2 degree below the set temperature, the heater will start heating with "I/W"(2000W).
- When the air temperature high 1 degree or ≤ the set temperature, the heater will blow the cold air.
WEEK TIMER FUNCTION
- Open the appliance as working conditions, (fan, warm, hot are all ok). This function only through by Remote control.
- Before turn on the heater, set the time as real time.
WEEK Press "Set" button, "1" light twinkle, press "●●+” two buttons set the week from 1--7 (1=Monday...7=Sunday ect.).
HOUR Press "Set" button again, LED display front "00" twinkle, press "●+” two buttons set the Hours from 01--00(01=1 o'clock,02=2 o'clock...00=24 o'clock ect.)
MINUTE Press "Set" button once more, LED display behind "00" twinkle, press "☐☐" two buttons set the minutes from 00--59(01=1 Minute, 02=2 Minute ect.)
NOTE: Press "Set" button, screen shows number will twinkle 5 seconds, you should operate in time, otherwise appliance will get back to standby.
(Appliance will keep the right time until power off).
WEEKLY TIMER SETTING
EN
WEEK Press "W-TIMER" button 1st time,"1" lights on,means "Monday".
HOUR Press "W-TIMER" button 2nd times, LED display front "00" twinkle, press "☐☐" two buttons set the Hours from 01--00(01=1 o'clock,02=2 o'clock...00=24 o'clock ect.)
MINUTE Press "W-TIMER" button 3rd times, LED display behind "00" twinkle "●●+ " two buttons set the Hours from 00--59(01=1 Minute,02=2 Minute ect.). With the "ON" light on, it means open time.
HOUR Press "W-TIMER" button 4th times, LED display front "00" twinkle, press "☐☐" two buttons set the Hours from 01--00(01=1 o'clock,02=2 o'clock...00=24 o'clock ect.)
MINUTE Press "W-TIMER" button 5th times, LED display behind "00" twinkle "☐☐" two buttons set the Hours from 00--59(01=1 Minute,02=2 Minute ect.)
With the "OFF" light on, it means close time.
THE ABOVE ARE FINISED SET MONDAY TIMER.
-
Press "W-TIMER" button once more, "2" lights on, means "Tuesday". PIs noted that the operate with open time HOUR/MINUTE and close time HOUR/MINUTE are all same as before Monday.
-
From Monday-Sunday are all set finished, press "DELAY" button on remote control 7th times to set from Monday to Sunday's temperature and press "☐☐" two buttons, select the temperature which you need, the temperature range from 10°C to 49°C.
You can set different open time, closed time and temperature within whole week.
EN
WINDOW OPEN FUNCTION
- Open the appliance as working conditions,(fan,warm,hot are all ok). This function only through by Remote control.
- Press “AUTO” button, the “☐” light is on. The appliance is working as smart saving energy models. (In this function, the appliance is check and record environment temperature in immediately. It will stop working, when the appliance check the environment are drop ≥3°C. The user should restart the appliance with “ON/OFF” button).
- Press "AUTO" button again, the "☐" light is off. Window Open Function is closed.
CHILD-LOCK FUNCTION
- This function only through by Remote control. When appliance are plug in, this function can be used in any models.
- Press "LOCK" button one time, all lights and LED display are closed, only "Power" light on. In this condition, both control panel and remote control are fault use.
- Press "LOCK" button again, all lights are on and both panel and remote control are use to succeed.
OVERHEAT PROTECTION
This heater is protected with an overheat protection that switches off the appliance automatically in case of overheating. For example: due to the total or partial obstruction of the vents. In this case, unplug the appliance, wait about 30 seconds for it to cool and remove the object which is obstructing the vents. Then switch it back on as described above. The appliance should now operate normally. If the problem persist, please contact Customer Service for assistance.
CLEANING & MAINTENANCE
Before undertaking any cleaning or maintenance on the appliance, disconnect it from the power supply.
For cleaning it is recommended to use a soft moist rag and neutral detergent. Do not use an abrasive cloth or devices which could affect the appearance of the appliance. Check that the hot air outlet and the ventilation inlet are free of dust and dirt.
During cleaning, be careful not to touch the heating elements. To open the filter on the back for cleaning, press the top of plastic net at back. In case of breakdown and/or poor functioning of the appliance, disconnect the appliance from the power supply and contact an authorised repairer.
| This product is only suitable for well insulated spaces or ocasioanl use. | ||||||
| Ref: SCES2000D | ||||||
| Item | Symbol | Value | Unit | Item | Unit | |
| Heat output | Type of heat input, for electric storage local space heaters only (select one) | |||||
| Nominal heat output | Pnom | 2.0 | Kw | Manual heat charge control, with integrated thermos-tat | NA | |
| Minimum heat output (indicative) | Pmin | 1.0 | Kw | Manual heat charge control with room and/or outdoor temperature feedback | NA | |
| Maximum continuous heat output | Pmax,c | 1.914 | Kw | Electronic heat charge control with room and/or outdoor temperature feedback | NA | |
| Auxiliary electricity consumption | Fan assisted heat output | NA | ||||
| At nominal heat output | elmax | 0 | Kw | Type of heat output/room temperature control (select one) | ||
| At minimum heat output | elmin | 0 | Kw | Single stage heat output and no room temperature control | No | |
| In standby mode | eISB | 0 | Kw | Two or more manual stages, no room temperature control | No | |
| With mechanic thermostat room temperature control | No | |||||
| With electronic room temperature control | No | |||||
| Electronic room temperature control plus day timer | No | |||||
| Electronic room temperature control plus week timer | Yes | |||||
| Other control options (multiple selections possible) | ||||||
| Room temperature control, with presence detection | No | |||||
| Room temperature control, with open window detection | Yes | |||||
| With distance control option | No | |||||
| With adaptive start control | No | |||||
| With working time limitation | No | |||||
| With black bulb sensor | No | |||||
| Contact details | SVAN TRADING S.L.Av. Altos Hornos S/N. Pto. Sagunto (46520). Valencia, España. | |||||
SVAN TRADING S.L.
Imported by B73737553
Av. Altos Hornos S/N. Pto. Sagunto (46520). Valencia, España.
info@svanelectro.com
060600024


- svan
- MANUAL DE USUARIO
- CALEFACTOR DE PARED
- ELÉCTRICO
- Mando a distancia
- ES
- PRECAUCIONES SEGURIDAD
- ¡PRECAUCIÓN!
- INTRODUCCIÓN
- INSTALACIÓN
- ANTES DE UTILIZAR
- FUNCIONAMIENTO
- CONFIG. TEMPORIZ. 24H.
- TERMOSTATO
- FUNCIÓN. TEMPORIZ. SEMANAL
- CONFIGURAR TEMPORIZADOR SEMANAL
- EN ESTE MOMENTO EL DÍA ES EL LUNES
- FUNCIÓN VENTANAS ABIERTAS
- FUNCIÓN SEGURIDAD NIÑOS
- CONTROL SEGURIDAD
- LIMPIEZA Y MANTENIMIENTO
- USER MANUAL
- ELECTRIC WALL HEATER
- SCES2000D
- Remote crontol
- EN
- CAUTION!
- INTRODUCTION
- INSTALLING THE DEVICE
- OPERATION INSTRUCTIONS
- GENERAL USING OPERATION
- 24H TIMER FUNCTION
- THERMOSTAT INSTRUCTIONS
- WEEK TIMER FUNCTION
- WEEKLY TIMER SETTING
- THE ABOVE ARE FINISED SET MONDAY TIMER.
- WINDOW OPEN FUNCTION
- CHILD-LOCK FUNCTION
- OVERHEAT PROTECTION
- CLEANING & MAINTENANCE
Marque : SVAN
Modèle : SCES2000D
Catégorie : Chauffage