
SPA2600 - Système home cinéma PHILIPS - Notice d'utilisation et mode d'emploi gratuit
Retrouvez gratuitement la notice de l'appareil SPA2600 PHILIPS au format PDF.


| Type de produit | Système home cinéma |
| Marque | Philips |
| Modèle | SPA2600 |
| Dimensions (L x l x H) | 400 x 300 x 200 mm (estimation) |
| Poids | 5 kg (estimation) |
| Alimentation | Secteur 220-240 V, 50/60 Hz |
| Consommation électrique | 50 W (estimation) |
| Puissance de sortie | 200 W RMS (estimation) |
| Caisson de basses | Intégré |
| Fonctions principales | Lecteur CD/DVD, radio FM, entrée USB, entrées audio auxiliaires (RCA, 3,5 mm) |
| Formats audio pris en charge | MP3, WMA, CD audio |
| Connectivité | Sorties haut-parleurs, sortie caisson, antenne FM |
| Accessoires inclus | Télécommande, câbles audio, guide de démarrage rapide |
| Entretien et nettoyage | Nettoyer avec un chiffon doux et sec. Ne pas utiliser de solvants. |
| Sécurité | Ne pas exposer à l'humidité, ne pas ouvrir le boîtier, débrancher avant nettoyage. |
| Pièces détachées et réparabilité | Contacter un centre de service agréé Philips pour toute réparation. |
| Garantie | Garantie légale de conformité de 2 ans (estimation) |
| Environnement d'utilisation | Intérieur, température ambiante |
FOIRE AUX QUESTIONS - SPA2600 PHILIPS
Questions des utilisateurs sur SPA2600 PHILIPS
0 question sur cet appareil. Repondez a celles que vous connaissez ou posez la votre.
Poser une nouvelle question sur cet appareil
Téléchargez la notice de votre Système home cinéma au format PDF gratuitement ! Retrouvez votre notice SPA2600 - PHILIPS et reprennez votre appareil électronique en main. Sur cette page sont publiés tous les documents nécessaires à l'utilisation de votre appareil SPA2600 de la marque PHILIPS.
MODE D'EMPLOI SPA2600 PHILIPS
SPA2600_QSG_Single_EN.qxd 13-12-2005 13:45 Pagina 1
Important notes
For United Kingdom only
Mains plug
This apparatus is fitted with an approved 13 Amp plug.
To change a fuse in this type of plug proceed as follows
1 Remove fuse cover and fuse.
2 Fix new fuse, which should be a BS1362 5 Amp.A.S.T.A. or BSI approved type
3 Rent the fuse cover.
If the fitted plug is not suitable for your socket outlets, it should be cut off and an appropriate plug fitted in its place. If the mains plug contains a fuse, this should have a value of 5 Amp. If a plug without a fuse is used, the fuse at the distribution board should not be greater than 5 Amp.
(1) 2017年1月1日
The severed plug must be disposed of to avoid a possible shock hazard should it
be inserted into a 13 Amp socket elsewhere.
How to connect a plug
The wires in the mains lead are coloured with the following code:
blue = neutral (N), brown = live (L). As these colours may not correspond with
the colour markings identifying the terminals in your plug, proceed as follows:
- Connect the blue wire to the terminal marked N or coloured black.
- Connect the brown wire to the terminal marked L or coloured red.
- Do not connect either wire to the earth terminal in the plug, marked B
or coloured green (or green and yellow).
Before replacing the plug cover, make certain that the cord grip is clamped over the sheath
of the lead, not simply over the two wires.
-
Copyright
Recording and playback of material may require consent. See Copyright Act 1956 and
The Performer's Protection Acts 1958 to 1972.
Disposal
Your product is designed and manufactured with high quality materials and components, which can be recycled and reused. Please inform yourself about the local separate collection system for electrical and electronic products, including those marked by the crossed-out wheeily bin symbol. Please act according to your local rules and do not dispose of your old products with your normal household waste


Need help?
Online help: www.philips.com/support
Helpline
United Kingdom 0906 1010 016 (£ 0.15)
Specifications are subject to change without notice.
Trademarks are property of Koninklijke Philips Electronics N.V. or their respective owners.
2005 © Koninklijke Philips Electronics N.V. All rights reserved.
www.phjtpc.com
312 247 501 069

Multimedia Speaker
SPA2600
Welcome
Quick start guide

Connect

Enjoy
natural_image
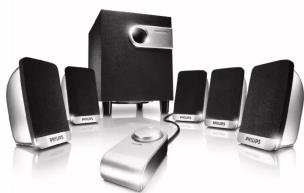
Product photo of a modern audio amplifier with multiple speakers and a central speaker (no visible text or labels)PHILIPS
What's in the box?

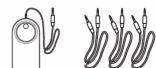
Wired remote control

Quick Start guide

Warranty
What else you'll need

SPA2600_QSG_Single_EN.qxd 13-12-2005 13:45 Pagina 2

Connect
flowchart
graph TD
    PC["PC"] -->|1| WRC["WRC"]
    WRC -->|2| SW["SW"]
    SW -->|3| RRL["RRL"]
    RRL -->|4| AC["AC"]
    AC -->|5| FL["FL"]
    FL -->|6| FR["FR"]
    FR -->|7| SW
    SW -->|8| RRL
    RRL -->|9| AC
    AC -->|10| SW
    SW -->|11| RRL
    RRL -->|12| AC
    AC -->|13| SW
    SW -->|14| RRL
    RRL -->|15| AC
    AC -->|16| SW
    SW -->|17| RRL
    RRL -->|18| AC
    AC -->|19| SW
    SW -->|20| RRL
    RRL -->|21| AC
    AC -->|22| SW
    SW -->|23| RRL
    RRL -->|24| AC
    AC -->|25| SW
    SW -->|26| RRL
    RRL -->|27| AC
    AC -->|28| SW
    SW -->|29| RRL
    RRL -->|30| AC
-
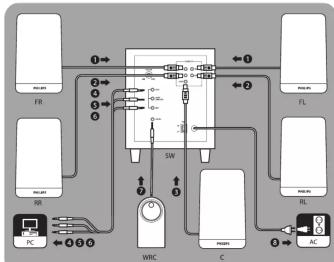
Connect the front satellites (red and green plugs) to the FRONT R and FRONT L parts of the vehicle.
-
Connect the surround satellites (yellow and blue plume) to the REAR B and REAR I
-
Connect the surround satellites (yellow and blue plugs) to the REAR R and REAR L ports of the subwoofer.
-
Connect the center satellite (white plug) to the CENTER port of the subwoofer.
-
Connect the green part of the audio cable from the FRONT port of the subwoofer
to the corresponding port of your audio source (for example, your computer).
- Connect the blue part of the audio cable from the REAR port of the subwoofer to
the corresponding port of your audio source.
- Connect the orange part of the audio cable from the CENTER/SUBWOOFER port
of the subwoofer to the corresponding port of your audio source.
- Connect the black plug of the wired remote control to the CONTROL port of the
subwoofer.
- Connect the mains cable to a power supply.

Enjoy

I. Push the POWER button on the rear of the subwoofer to turn on the multimedia.
speakers.
The green light on the subwoofer comes on.
- Make sure that your audio source is correctly configured.
Use a soundcard or other sound device with 5.1 capabilities for optimal functioning.
- Adjust the bass level with the SUBWOOFER VOLUME control on the rear of the
subwoofo
- Adjust the volume level with VOLUME control on the wired remote control.
You can now enjoy the sound of your multimedia speakers.
Important Safety Instructions
For US/Canada only
This product was designed and manufactured to meet strict quality and safety
standards.There are, however, some installation and operation precautions which you
should be particularly aware of.
Read these instructions. All the safety
Read these instructions • All the safety
and operating instructions should
before the appliance is operated.
2 Keep these instructions - The safety
and operating instructions should be
retained for future reference.
3 Heed all warnings - All warnings on
the appliance and in the operating
the appliance and in the operating instructions should be adhered to
- Follow all instructions. All cases
4 Follow all instructions - All operating and
use instructions should be followed.
Do not use this apparatus near water
for example, near a bathtub, washbowl,
kitchen sink, laundry tub, in a wet basement
or near a swimming pool, etc.
6 Clean only with a damp cloth.
The appliance should be cleaned only
as recommended by the manufacturers
7 Install in accordance with the
1) install in accordance with the manufacturer instructions. Do not
Manufacturers Instructions. Do not
block any of the ventilation openings.
For example, the appliance should not be
situated on a bed, sofa, rug, or sit
surface or placed in a built-in installation,
such as a bookcase or cabinet that may
impede the flow of air through the
ventilation openings.
8 Do not install near any heat sources
- Do not install near any heat sources such as radiators, heat registers, stoves.
such as Holdators, Heat Regulators, Stores,
or other apps
produce heat.
9 Do not defeat the safety purpose
of the polarized or grounding-type plug.
A polarized plug has two blades with one
The socket-outlet shall be installed near the equipment and shall be easily accessible.
wider than the other. Match wide blade of
plug to wide slot, fully insert.A grounding
type plug has two blades and a third
grounding props The wide blade or the
grounding profit. The wide base of the third people are provided for your safety.
third proing are provided for your safety.
When the provided plug does not fit into
your outlet, consult an electrician for
replacement of the obsolete outlet.
Protect the power cord from bein
walked on or pinched particularly at plugs,
convenience receptacles, and the point
where they exit from the apparatus.
Only use attachments/accessories
specified by the manufacturers
Lip only with a car stand
Only only with a cafe, stand, tripod,
bracket, or table specified by the
manufacturer, or sold with the apparatus.
When a cart is used, use caution when
moving the cart/apparatus combination
to avoid injury from tip-over.
Unplug this apparatus during lightning
storms or when unused for long periods
of time.
Refer all services to qualified service
Refer all servicing to qualified service
personnel. Servicing is required when the
apparatus has been damaged in any way,
such as power-supply cord or plug is
damaged, liquid has been spilled or objects
have fallen into the apparatus, the apparatus
has been exposed to rain or moisture, does
not operate normally, or has been dropped.
Warning! To reduce the risk of fire or
electric shock, do not expose this appliance.
-
- DE VICTORIA

Marque : PHILIPS
Modèle : SPA2600
Catégorie : Système home cinéma